

This little tree is a single lacy ornament built from three stacked triangular tiers. Each tier fans out into open spokes and finishes with a row of scalloped shells, so the silhouette reads as a classic layered Christmas tree. A small loop at the peak lets it hang from a branch, a gift tag, or a window hook.
The colors shade from light to dark as you move down the tree: cream at the top, light sage green in the middle, and forest green at the base. Each tier is slightly smaller than the one below it, which gives the tree its tapered shape. The style is delicate thread lace, similar to vintage doily work, but sized as a quick ornament.
The pattern uses US crochet terms. The finished ornament measures about 3 in (7.6 cm) tall including the hanging loop, and 2.5 in (6.4 cm) wide at the base.
Construction is simple. You work the tree body top-down in rows as one continuous piece, changing color at the start of each tier. Then you return to each tier and add the scalloped shell edge in that tier’s color. A short hanging loop at the peak finishes the ornament.
Finished Size and Construction
- Finished size: 3 in (7.6 cm) tall including loop × 2.5 in (6.4 cm) wide at base
- Skill level: Intermediate (thread crochet, working into small spaces)
- Terminology: US crochet terms
- Yarn weight: Lace (0), size 10 cotton crochet thread
- Hook: 1.5 mm steel hook (US steel size 8)
- Number of pieces: 1
- Layout: Single piece, three stacked tiers (cream top, sage middle, forest bottom)
- Piece size: Tree body 2.5 in (6.4 cm) tall plus a 0.5 in (1.3 cm) hanging loop
- Size before border: 2.25 in (5.7 cm) tall × 2.25 in (5.7 cm) wide
- Border depth: 0.25 in (0.6 cm) of shells below the base, with corner picots extending 0.125 in (0.3 cm) beyond each tier
Materials
Thread advice: Use a mercerized cotton thread in size 10. Mercerized cotton holds crisp stitch definition, blocks flat, and takes starch well. Avoid fuzzy or acrylic threads, because the open spokes will blur and the scallops won’t hold their shape.
Colors:
- Cream / off-white (Color A): 3 g, about 17 m. This covers the top tier, its shells, and the hanging loop.
- Light sage green (Color B): 3 g, about 17 m. This covers the middle tier and its shells.
- Forest green (Color C): 4 g, about 22 m. This covers the bottom tier and its shells.
These quantities include a margin of roughly 25% for tails, a test swatch, and small differences in tension.
Tools:
- 1.5 mm steel crochet hook
- Fine tapestry needle
- Small sharp scissors
- Rustproof pins
- Blocking mat or foam board
- Spray starch or diluted fabric stiffener (optional)
- Ruler marked in inches and cm
Abbreviations (US Terms)
- ch – chain
- sl st – slip stitch
- sc – single crochet
- dc – double crochet
- sk – skip
- sp(s) – space(s)
- st(s) – stitch(es)
- tch – turning chain
- RS / WS – right side / wrong side
- rep – repeat
Special stitches:
- Shell: (sc, 5 dc, sc) all in the same ch-3 loop.
- Picot: Ch 3, sl st in the 3rd ch from the hook.
- Corner picot: Ch 4, sl st in the 3rd ch from the hook, ch 1. This is a picot with one extra chain on each side, so it stands out as a point at the tier corner.
Gauge and Checkpoints
Gauge matters less here than in a garment, but it sets the final size. Work Tier 1 (Rows 1–3) first as your test piece, then measure it before continuing.
Base gauge: 14 dc = 1 in (2.5 cm) in size 10 thread with a 1.5 mm hook. In the shell edge, one shell spans about 0.25 in (0.6 cm).
Checkpoints (measure flat, lightly pressed with your fingers):
- Tier 1, after Row 1: Flat edge of the half-circle is 0.5 in (1.3 cm) across.
- Tier 1, after Row 3: 1 in (2.5 cm) wide × 0.75 in (1.9 cm) tall.
- Tier 2, after Row 3: 1.5 in (3.8 cm) wide. The body is 1.5 in (3.8 cm) tall from the peak.
- Tier 3, after Row 3: 2.25 in (5.7 cm) wide. The body is 2.25 in (5.7 cm) tall from the peak.
- After the border: Base is 2.5 in (6.4 cm) wide and the body is 2.5 in (6.4 cm) tall.
- After the hanging loop: 3 in (7.6 cm) overall.
If your test tier is too big: Switch to a 1.25 mm hook, or tighten your chains. Loose chains in the ch-3 loops are the most common cause.
If your test tier is too small: Switch to a 1.75 mm hook. Do not add stitches, because the counts are tied to the shell math below.
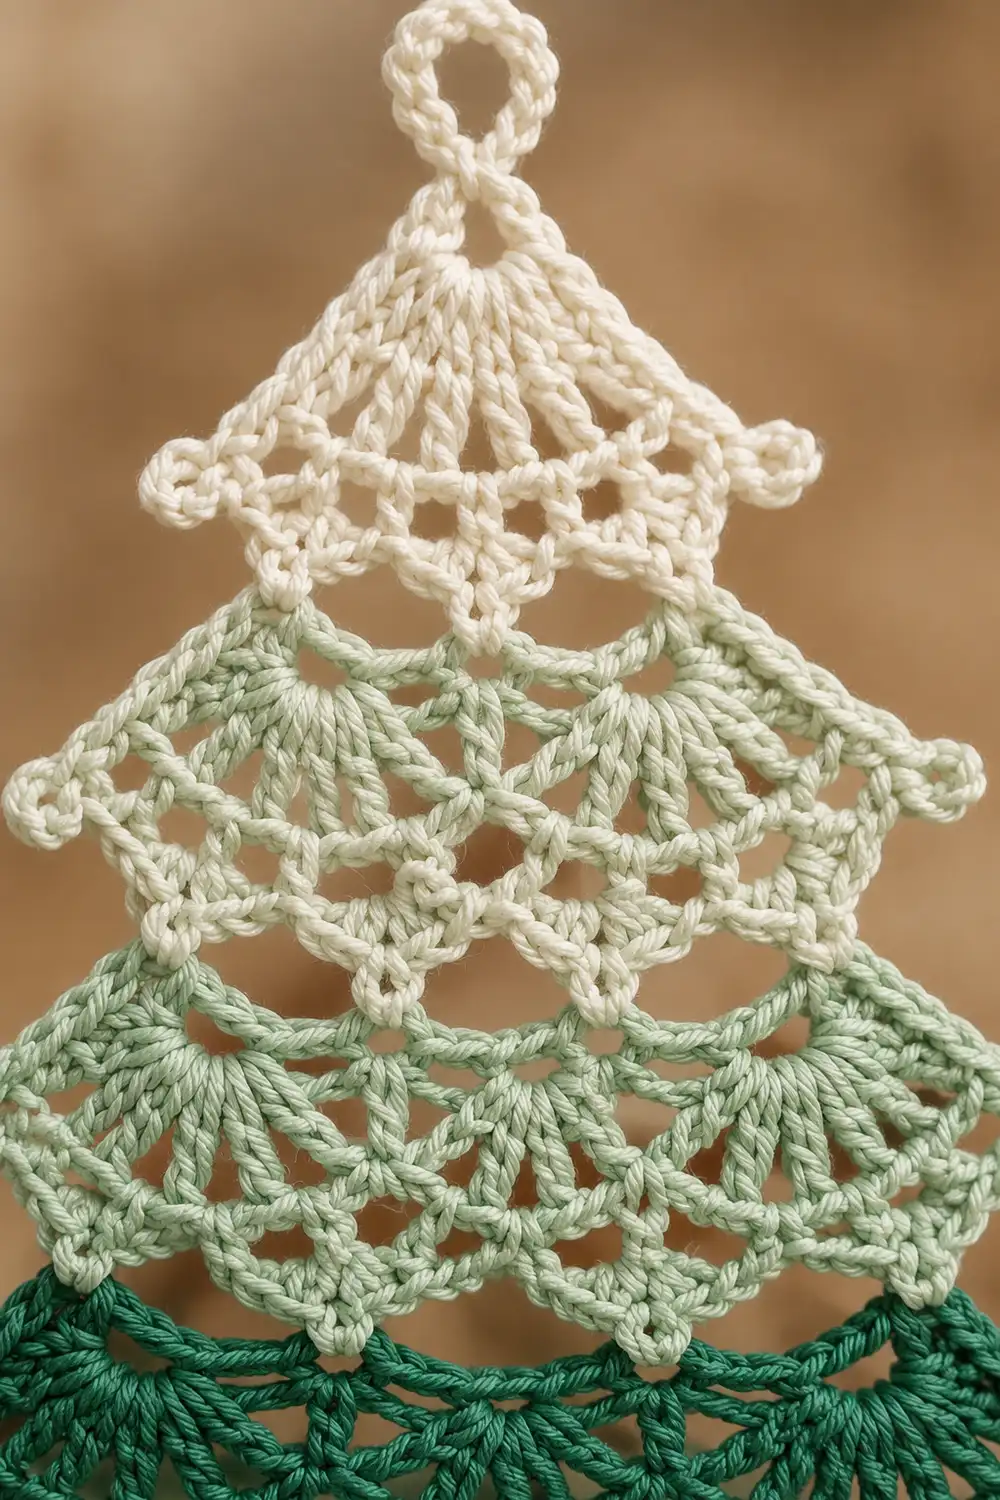
Tree Body
The body is worked top-down in flat rows. Each tier has three rows:
- Row 1 is the spoke row.
- Row 2 is the spaced row.
- Row 3 is the loop row.
At the end of each tier, you change color on the last sc and turn.
Tier 1 (Cream)
With Color A, ch 4. Sl st in the first ch to form a ring. This ring becomes the peak of the tree.
Row 1 (RS): Ch 3 (counts as dc), 8 dc in ring. Turn. (9 dc)
Row 2 (WS): Ch 4 (counts as dc + ch 1). Sk first dc, then (dc in next dc, ch 1) 7 times. Dc in top of tch. Turn. (9 dc, 8 ch-1 sps)
Row 3 (RS): Ch 1, sc in first dc. Then (ch 3, sk next dc, sc in next dc) 4 times, placing the last sc in the 3rd ch of the tch. (5 sc, 4 ch-3 loops)
On the final sc, change to Color B: insert the hook, yarn over with A, and pull up a loop, then finish the sc with B. Cut A, leaving a 6 in (15.2 cm) tail. Turn.
Checkpoint: 1 in (2.5 cm) wide × 0.75 in (1.9 cm) tall.
Tier 2 (Sage)
Row 1 (WS): Ch 3 (counts as dc), dc in first sc. Work 3 dc in each of the next 3 sc, then 2 dc in the last sc. Turn. (2 + 9 + 2 = 13 dc)
Row 2 (RS): Ch 4 (counts as dc + ch 1). Sk first dc, then (dc in next dc, ch 1) 11 times. Dc in top of tch. Turn. (13 dc, 12 ch-1 sps)
Row 3 (WS): Ch 1, sc in first dc. Then (ch 3, sk next dc, sc in next dc) 6 times, placing the last sc in the 3rd ch of the tch. (7 sc, 6 ch-3 loops)
Change to Color C on the final sc. Cut B, leaving a 6 in (15.2 cm) tail. Turn.
Checkpoint: 1.5 in (3.8 cm) wide. The body measures 1.5 in (3.8 cm) from the peak.
Tier 3 (Forest)
Row 1 (RS): Ch 3 (counts as dc), dc in first sc. Work 3 dc in each of the next 5 sc, then 2 dc in the last sc. Turn. (2 + 15 + 2 = 19 dc)
Row 2 (WS): Ch 4 (counts as dc + ch 1). Sk first dc, then (dc in next dc, ch 1) 17 times. Dc in top of tch. Turn. (19 dc, 18 ch-1 sps)
Row 3 (RS): Ch 1, sc in first dc. Then (ch 3, sk next dc, sc in next dc) 9 times, placing the last sc in the 3rd ch of the tch. (10 sc, 9 ch-3 loops)
Fasten off.
Checkpoint: 2.25 in (5.7 cm) wide × 2.25 in (5.7 cm) tall.
How the Tiers Grow
Each loop row ends with one more sc than it has loops. The next spoke row places 2 dc in each end sc and 3 dc in each middle sc. Then each loop row uses every other dc, so the loop count is (dc − 1) ÷ 2.
| Tier | Spoke row (dc) | Loops in Row 3 | Sc in Row 3 |
|---|---|---|---|
| 1 | 9 | (9 − 1) ÷ 2 = 4 | 5 |
| 2 | 2 + (3 × 3) + 2 = 13 | (13 − 1) ÷ 2 = 6 | 7 |
| 3 | 2 + (5 × 3) + 2 = 19 | (19 − 1) ÷ 2 = 9 | 10 |
This produces 4, 6, and 9 loops. Each tier is wider than the one above, which creates the tapered tree shape.
Border: Scalloped Shell Edge and Hanging Loop
The border adds a scalloped shell edge to the bottom of each tier, plus a corner picot at each end. It is worked into the ch-3 loops of each tier’s Row 3, always with the RS facing.
On Tiers 1 and 2, the Row 3 sc are already holding the next tier. Only the loops are used here. As you work, the shells fold down over the top of the tier below. This overlap creates the stepped, layered look.
Border gauge: One shell = about 0.25 in (0.6 cm) wide, or 4 shells per inch (2.5 cm). Each corner picot extends 0.125 in (0.3 cm) beyond the tier edge. Each tier therefore gains 0.25 in (0.6 cm) of total width from its two picots.
Tier 1 Edge (Cream)
With the RS facing, join Color A with a sl st in the first ch-3 loop of Tier 1, Row 3.
Work 1 corner picot. Then work 1 shell in the same loop. Work 1 shell in each of the next 3 loops. Ch 4, sl st in the 3rd ch from the hook, ch 1, then sl st in the last loop. Fasten off.
Count: 4 shells (8 sc + 20 dc = 28 sts) + 2 corner picots.
Width: (4 × 0.25 in) + 0.25 in = 1.25 in (3.2 cm).
Tier 2 Edge (Sage)
Using Color B, work as for Tier 1 across the 6 loops of Tier 2, Row 3.
Count: 6 shells (12 sc + 30 dc = 42 sts) + 2 corner picots.
Width: (6 × 0.25 in) + 0.25 in = 1.75 in (4.4 cm).
Tier 3 Edge (Forest)
Using Color C, work as for Tier 1 across the 9 loops of Tier 3, Row 3.
Count: 9 shells (18 sc + 45 dc = 63 sts) + 2 corner picots.
Width: (9 × 0.25 in) + 0.25 in = 2.5 in (6.4 cm).
These shells hang free and form the base scallops. They add 0.25 in (0.6 cm) of depth, so the body is now 2.5 in (6.4 cm) tall.
Hanging Loop (Cream)
Join Color A with a sl st into the starting ring at the peak. Ch 15, then sl st in the same ring.
Work 20 sc over the ch-15 loop. Sl st in the ring and fasten off.
The loop stands 0.5 in (1.3 cm) tall, which brings the ornament to 3 in (7.6 cm) overall.
Why the Math Works
There is exactly one shell for every ch-3 loop. Each loop sits on 2 dc of the spaced row below it, and those dc are spaced to about 0.25 in (0.6 cm). That matches the width of one 7-stitch shell.
Because of this, the shells lie flat without ruffling or pulling. The width of each tier is simply (loops × 0.25 in) + 0.25 in for the two picots. With 4, 6, and 9 loops, the tiers are 1.25, 1.75, and 2.5 in (3.2, 4.4, and 6.4 cm) wide.
Final Blocking
- Weave in all ends within their own color sections. Run each tail through the dc posts, not across open spaces, and trim close.
- Soak the ornament in cool water for 5 minutes. Press out the water gently in a towel. Do not wring it.
- Lay it RS up on the blocking mat. Pin the peak and the center of the base so the body measures 2.5 in (6.4 cm) tall.
- Pin the two Tier 3 corner picots 2.5 in (6.4 cm) apart. Then pin the Tier 2 picots 1.75 in (4.4 cm) apart and the Tier 1 picots 1.25 in (3.2 cm) apart. Center each tier on the tree.
- Smooth the Tier 1 and Tier 2 shells downward so they overlap the tier below.
- Pin the center dc of each base shell to round out the scallops. Open the spoke spaces with a pin tip.
- Mist with spray starch if you want a stiff ornament. Shape the hanging loop upright.
- Let it dry completely, about 6–8 hours. Check that the total height is 3 in (7.6 cm) before unpinning.
Final Quality-Control Checklist
- [ ] Stitch counts: 9, 13, and 19 dc in the spoke rows. 4, 6, and 9 loops in the loop rows.
- [ ] Shells: 4, 6, and 9 shells, with one in every loop and none skipped or doubled.
- [ ] Corner picots: Two on every tier, all standing out as clean points.
- [ ] Tier widths: 1.25 in (3.2 cm), 1.75 in (4.4 cm), and 2.5 in (6.4 cm).
- [ ] Total height: 3 in (7.6 cm) including the loop.
- [ ] Color changes: Clean, with no stray color showing at the tier edges.
- [ ] Ends: Woven in securely and invisible from the RS.
- [ ] Hanging loop: Centered at the peak and firmly anchored.
- [ ] Shape: The tree hangs straight without twisting.
Troubleshooting
The tier cups or curls upward.
The spaced row is too tight. Loosen the ch-1 spaces, or go up 0.25 mm for Row 2 only.
The shells ruffle.
Your ch-3 loops are too short for 7 stitches. Make the loop chains slightly looser. Do not reduce the dc count, because 5 dc keeps the scallop shape.
The shells flare out or gap.
The loops are too long. Tighten the chains, or work the shells more firmly.
A tier is lopsided.
Recount the spoke row. A missing end dc (the tch) is the usual cause.
The tiers don’t step out.
Check that the corner picots were worked. Also check that the shells were folded down over the next tier during blocking.
The hanging loop leans.
Rejoin the loop exactly at the center of the ring.
The ornament is too floppy.
Re-block it with fabric stiffener instead of starch.
Care
Hand wash in cool water with mild soap, then reshape and pin flat to dry. Store the ornament flat or hanging, away from heavy items, so the scallops keep their shape.
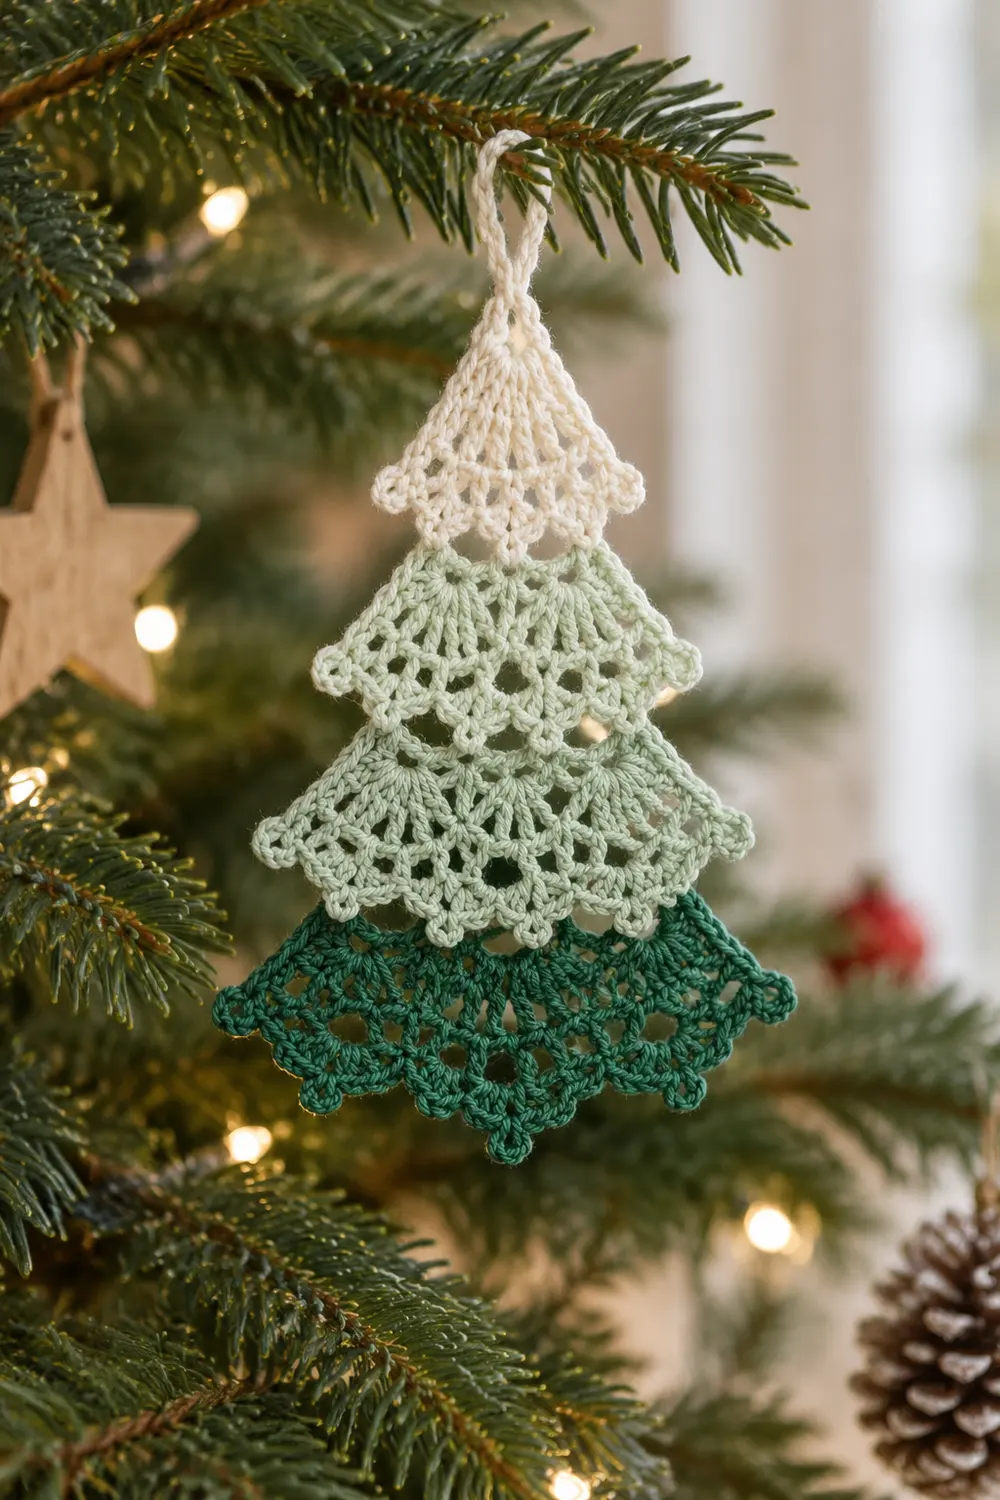
Final Notes
Here is the full measurement chain:
- Tier 1 is 1 in (2.5 cm) wide before its edge.
- Tier 2 reaches 1.5 in (3.8 cm), and Tier 3 reaches 2.25 in (5.7 cm).
- The shell border adds picot points and 0.25 in (0.6 cm) of depth, bringing the tiers to 1.25, 1.75, and 2.5 in (3.2, 4.4, and 6.4 cm) wide.
- The body is 2.5 in (6.4 cm) tall, and the hanging loop brings it to 3 in (7.6 cm).
If your first tier matches its checkpoint, every tier after it will follow. The stitch counts grow from 9 to 13 to 19 dc, and the loops from 4 to 6 to 9.
Optional: For a fuller tree, you could repeat the formula to add a fourth tier. This is not part of the pattern above.
Happy crocheting!