

The Frosted Clover Table Runner is a lacy, all-white runner built from small diamond motifs. Each diamond has an open center ring, a solid square body, and three looped lobes at every point. Together the lobes give the motif its four-lobed, cloverleaf silhouette. Picots finish every lobe, and diamond-shaped windows open up between the motifs once they are joined.
The motifs sit on point in three columns and touch tip to tip. A two-round border follows the zigzag outer edge. Three tassels hang from the bottom points. The look is crisp and wintry, and it works well on a holiday table or year-round on a narrow sideboard.
This pattern uses US crochet terms. The finished runner measures about 14.1 in (35.8 cm) wide and 41.1 in (104.4 cm) long, plus 3 in (7.6 cm) tassels.
Construction is simple. You make one test motif, then join the rest as you go on the last round. A two-round border is worked around the outside, and the tassels are added last.
Finished Size and Construction
- Finished size: about 14.1 in (35.8 cm) x 41.1 in (104.4 cm), excluding tassels
- Tassels: 3, each 3 in (7.6 cm) long below the head
- Skill level: Intermediate
- Terminology: US
- Yarn weight: Sport (#2) mercerized cotton
- Hook: 3.0 mm
- Number of pieces: 27 motifs
- Layout: 3 columns x 9 rows, motifs set on point and joined tip to tip
- Motif size: 4.5 in (11.4 cm) point to point; straight sides 2.5 in (6.4 cm)
- Size before border: 13.5 in (34.3 cm) x 40.5 in (102.9 cm)
- Border depth: about 0.3 in (0.8 cm)
Materials
Choose a smooth, mercerized sport-weight cotton. It shows stitch definition, holds picots crisply, and blocks well. Avoid fuzzy or very soft cotton, because the lobes will lose their shape.
- White sport cotton: 150 g (about 465 m / 508 yd)
Tools:
– 3.0 mm crochet hook
– Tapestry needle
– Scissors
– Rust-proof pins and a blocking mat
– Spray bottle
– Stiff card, 3.5 in (8.9 cm) wide, for the tassels
– Measuring tape
The quantity includes a margin of about 15% for your gauge swatch, yarn tails, and small differences in tension.
Abbreviations (US Terms)
- ch – chain
- sl st – slip stitch
- sc – single crochet
- dc – double crochet
- MR – magic ring
- sp – space
- sk – skip
- st(s) – stitch(es)
- rep – repeat
Special stitches:
– Picot: ch 3, sl st into the first ch.
– Joining picot: ch 1, sl st into the center-lobe picot of the neighboring motif, ch 1, sl st into the first ch.
– 3-dc group: 3 dc worked into the same space.
Gauge and Checkpoints
Gauge: 6 sc = 1 in (2.5 cm) along a straight motif side.
Make one complete motif before you start the runner. Block it lightly and measure it. Use these checkpoints while you work:
- After Rnd 1: about 1.25 in (3.2 cm) across
- After Rnd 2: about 2 in (5.1 cm) across
- After Rnd 3: straight side about 2.25 in (5.7 cm)
- After Rnd 5: straight side 2.5 in (6.4 cm); 4.5 in (11.4 cm) point to point
If your motif is larger than 4.75 in (12.1 cm) point to point, go down to a 2.75 mm hook.
If it is smaller than 4.25 in (10.8 cm), go up to a 3.25 mm hook.
A difference of just 0.25 in (0.6 cm) per motif grows to 2.25 in (5.7 cm) over the nine rows of the runner, so fix your gauge now.
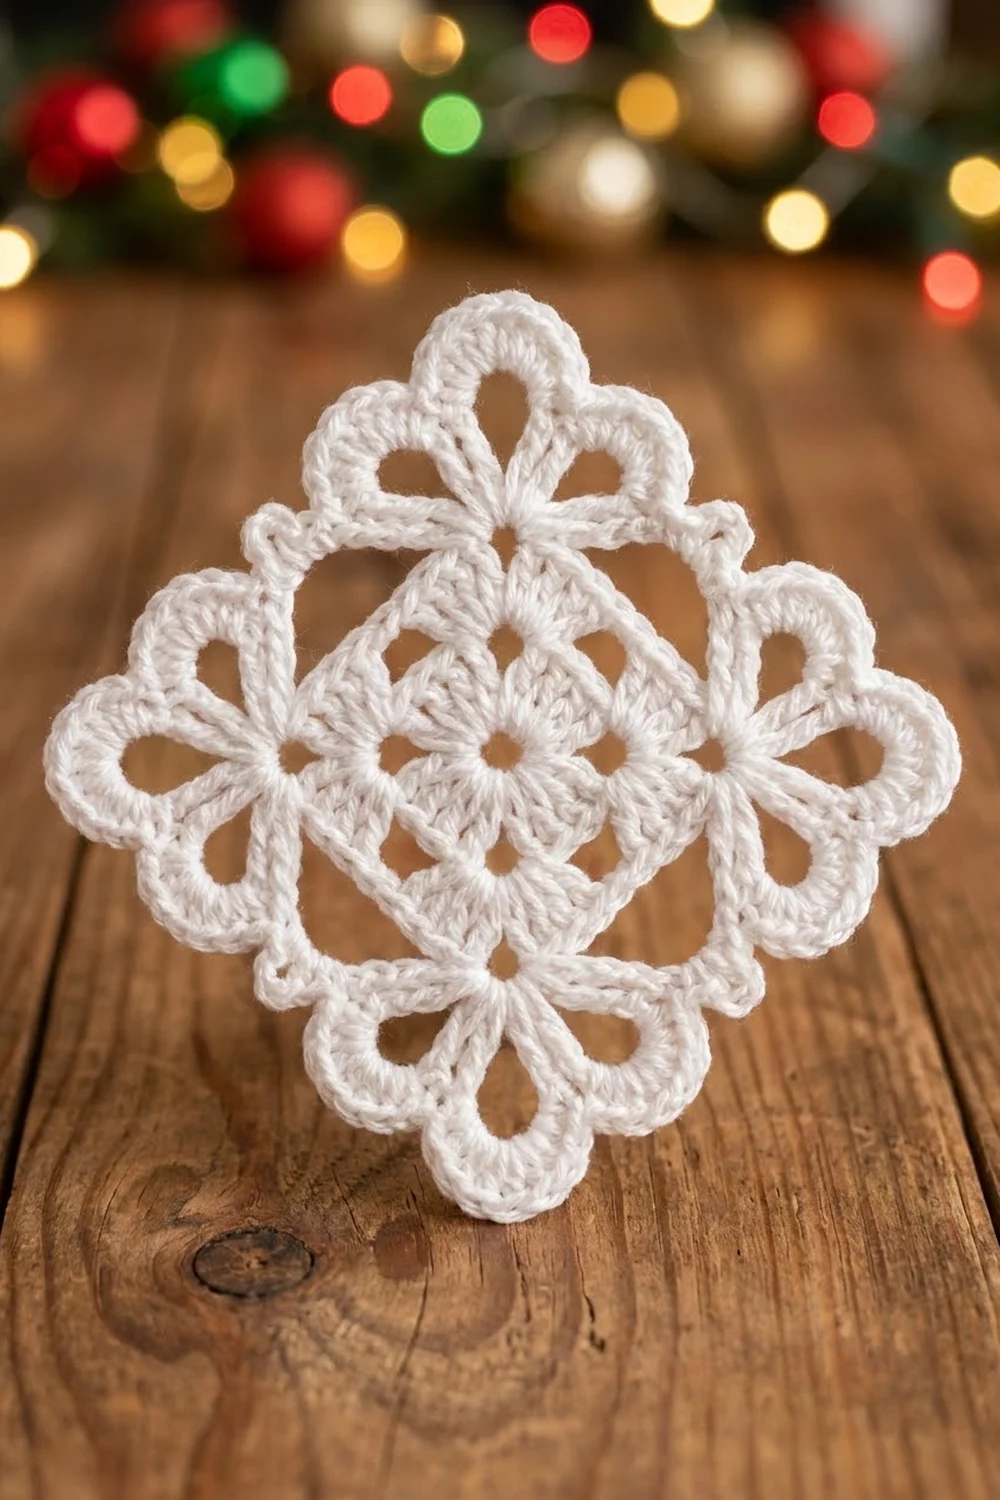
Motif Pattern
Work every round with the right side facing you. Do not turn.
Rnd 1: Make an MR. Ch 3 (counts as dc), work 15 dc into the ring. Join with a sl st to the top of the beginning ch-3. Pull the ring closed. (16 dc)
Rnd 2: Ch 5 (counts as dc + ch 2). [Dc in next st, ch 2] 15 times. Join with a sl st to the 3rd ch of the beginning ch-5. (16 dc, 16 ch-2 sps)
Rnd 3 (squaring round): Sl st into the first ch-2 sp. Ch 3 (counts as dc), work 2 dc in the same sp. [Ch 1, 3-dc group in next sp] 3 times, then ch 9 for the corner loop.
*3-dc group in next sp, [ch 1, 3-dc group in next sp] 3 times, ch 9. Rep from * 2 more times. Join to the top of the beginning ch-3.
(16 groups = 48 dc, 12 ch-1 sps, 4 ch-9 corner loops; each side has 4 groups and 3 ch-1 sps)
Rnd 4 (lobe round): Ch 1. Sc in the same st as the join.
Side: Work sc in each dc and each ch-1 sp across the side, ending in the last dc before the ch-9 loop. This gives 15 sc (12 dc + 3 sps).
Corner: Into the ch-9 loop work (2 sc, ch 5, 2 sc, ch 7, 2 sc, ch 5, 2 sc).
Rep the side and corner around, counting the starting sc as the first sc of side 1. Join to the first sc.
(60 side sc + 32 corner sc = 92 sc; 12 lobes: 8 ch-5 and 4 ch-7)
Rnd 5 (picot round): Ch 1. Sc in each of the first 15 sc.
Corner:
1. Sk 2 sc, then work (3 sc, picot, 3 sc) in the ch-5 lobe.
2. Sk 2 sc, then work (4 sc, picot, 4 sc) in the ch-7 lobe.
3. Sk 2 sc, then work (3 sc, picot, 3 sc) in the next ch-5 lobe.
4. Sk 2 sc.
*Sc in each of the next 15 sc, then work the corner. Rep from * around. Join to the first sc and fasten off.
(60 side sc + 80 corner sc = 140 sc, 12 picots)
Skipping the 2-sc anchors pulls the three lobes together into a tight cloverleaf.
Definition used throughout: the motif has 15 sc per side. This count covers only the straight edge between corners. It does not include any corner-lobe stitches. The corners are handled separately in the joining and border instructions.
Make All Pieces
- White: 27 motifs in total. The first is complete, and the other 26 are joined on Rnd 5.
Each motif has four points: top, right, bottom, and left. Motifs in the same row touch at their left and right points. Motifs in the same column touch at their top and bottom points.
Layout (top to bottom):
ROW 1: WHITE WHITE WHITE
ROW 2: WHITE WHITE WHITE
ROW 3: WHITE WHITE WHITE
ROW 4: WHITE WHITE WHITE
ROW 5: WHITE WHITE WHITE
ROW 6: WHITE WHITE WHITE
ROW 7: WHITE WHITE WHITE
ROW 8: WHITE WHITE WHITE
ROW 9: WHITE WHITE WHITE
TASSELS:  T     T     T   (bottom points of Row 9)
Joining
Method: Join as you go on Rnd 5, using the center-lobe picots only.
Order: Work row by row, left to right.
– Each new motif joins to its left neighbor at its own left point.
– From Row 2 onward, each new motif also joins to the motif above it at its own top point.
Stitch-to-stitch logic: Work Rnd 5 as written. When you reach the center (ch-7) lobe of a point that will touch a finished motif, replace the picot with a joining picot. The full sequence for that lobe is (4 sc, joining picot, 4 sc).
Each join links exactly one picot to one picot. The side lobes stay free. This is what creates the diamond-shaped windows between motifs.
Tension: Keep the ch 1 on each side of the joining sl st snug but not tight. If the joins pull, the points will pucker. If they are loose, the runner will sag between motifs.
Size checkpoints:
– After 2 motifs in a row: 9 in (22.9 cm)
– After Row 1: 13.5 in (34.3 cm) wide
– After Row 4: 18 in (45.7 cm) long
– All 9 rows joined: 13.5 in (34.3 cm) x 40.5 in (102.9 cm)
Border
Border gauge: 6 sc per in, the same as the motifs. The border uses 1 sc for every motif side stitch, so it adds no extra stitches along the edges and the runner lies flat.
The outer edge is a zigzag made of exposed straight sides, free points, and valleys. Each valley is where two edge motifs meet at a joined picot.
- Exposed sides: Each corner motif has 3 exposed sides. Every other edge motif has 2. In total: 6 on the top + 6 on the bottom + 18 on each long side, minus 4 sides counted twice at the corners = 44 sides.
- Free points: 3 on the top + 3 on the bottom + 9 on the left + 9 on the right = 24.
- Valleys: 2 on the top + 2 on the bottom + 8 on the left + 8 on the right = 20.
Each long edge has 17 exposed sides: 9 lower sides plus 8 upper sides, because the top-row motif’s upper side belongs to the top edge. That gives 17 x 15 = 255 sc. The total across all sides is 44 x 15 = 660 sc.
Rnd 1: Join yarn in the first sc of any exposed side.
- Sides: Sc in each of the 15 sc.
- Free point: Ch 1, sc in the first side-lobe picot, ch 3, sc in the center picot, ch 3, sc in the last side-lobe picot, ch 1.
- Valley: Ch 1, sc in the outer side-lobe picot of the first motif, ch 2, sc through both joined center picots, ch 2, sc in the outer side-lobe picot of the next motif, ch 1.
Join to the first sc.
Count: 660 sc on the sides + 72 sc at the points (24 x 3) + 60 sc at the valleys (20 x 3) = 792 sc, plus 312 ch (192 at the points + 120 at the valleys). That is 1,104 sts in total.
Rnd 2: Ch 1.
- Sides: Sc in each sc. (15 per side)
- Point: Work 1 sc in each ch-1 sp, 1 sc in each sc, and 3 sc in each ch-3 sp, but work 3 sc in the center sc. (13 sc per point: 11 worked one per existing st + 2 added at the tip)
- Valley: Work 1 sc in each ch-1 sp, 1 sc in each outer sc, and 2 sc in each ch-2 sp. Sk the center sc. (8 sc per valley: 9 existing sts – 1 skipped)
Join and fasten off.
Count: 660 + (24 x 13) + (20 x 8) = 660 + 312 + 160 = 1,132 sc. As a check: 1,104 + 48 added at the points – 20 skipped at the valleys = 1,132.
Why the math works: Each straight side keeps exactly 15 sts. Each point gains 2 sts to turn its outer angle, and each valley loses 1 st to tighten its inner angle. The result is a flat edge with crisp tips.
Tassels (make 3):
1. Wrap yarn 30 times around the 3.5 in (8.9 cm) card.
2. Thread a 12 in (30.5 cm) strand under the wraps at the top and tie it tightly.
3. Cut the wraps at the bottom.
4. Bind the tassel 0.5 in (1.3 cm) below the top to form the head.
5. Trim the skirt to 3 in (7.6 cm).
Use the tie strands to sew one tassel to the center tip sc of each bottom point in Row 9.
Final Blocking
- Weave in all ends along the sc rows, not through the lobes.
- Soak the runner in cool water for 15 minutes. Gently press out the water. Do not wring it.
- Lay it on the mat and pin the four corner motifs to the finished size of 14.1 in (35.8 cm) x 41.1 in (104.4 cm).
- Pin every free point and every valley. Check that each motif is 4.5 in (11.4 cm) point to point.
- Pin out each side lobe so the cloverleaf opens evenly.
- Leave the tassels unpinned. Comb them straight.
- Let the runner dry completely before you unpin it.
Final Quality-Control Checklist
- All 27 motifs measure 4.5 in (11.4 cm) point to point.
- Every motif side has 15 sc.
- Each joined point uses one picot-to-picot join.
- Border Rnd 2 totals 1,132 sc.
- The runner measures 14.1 in (35.8 cm) x 41.1 in (104.4 cm).
- The 3 tassels hang evenly and measure 3 in (7.6 cm).
- All ends are secure and invisible.
Troubleshooting
Motif cups: Rnd 1 or 2 is too tight. Loosen the dc or go up one hook size for those rounds only.
Lobes flop open: Make sure you skipped the 2-sc anchors on Rnd 5.
Runner skews to one side: You may have joined a motif at the wrong point. Recheck the layout before you start the border.
Border ruffles at the points: Work only 3 sc into the center sc, not more.
Valleys pucker: Loosen the ch-2 spaces on border Rnd 1.
Tassels uneven: Trim them after blocking, not before.
Care
Hand wash in cool water with mild soap and lay flat to dry. Re-pin the points if needed. Press lightly through a cloth on a cotton setting if you want an extra crisp finish.
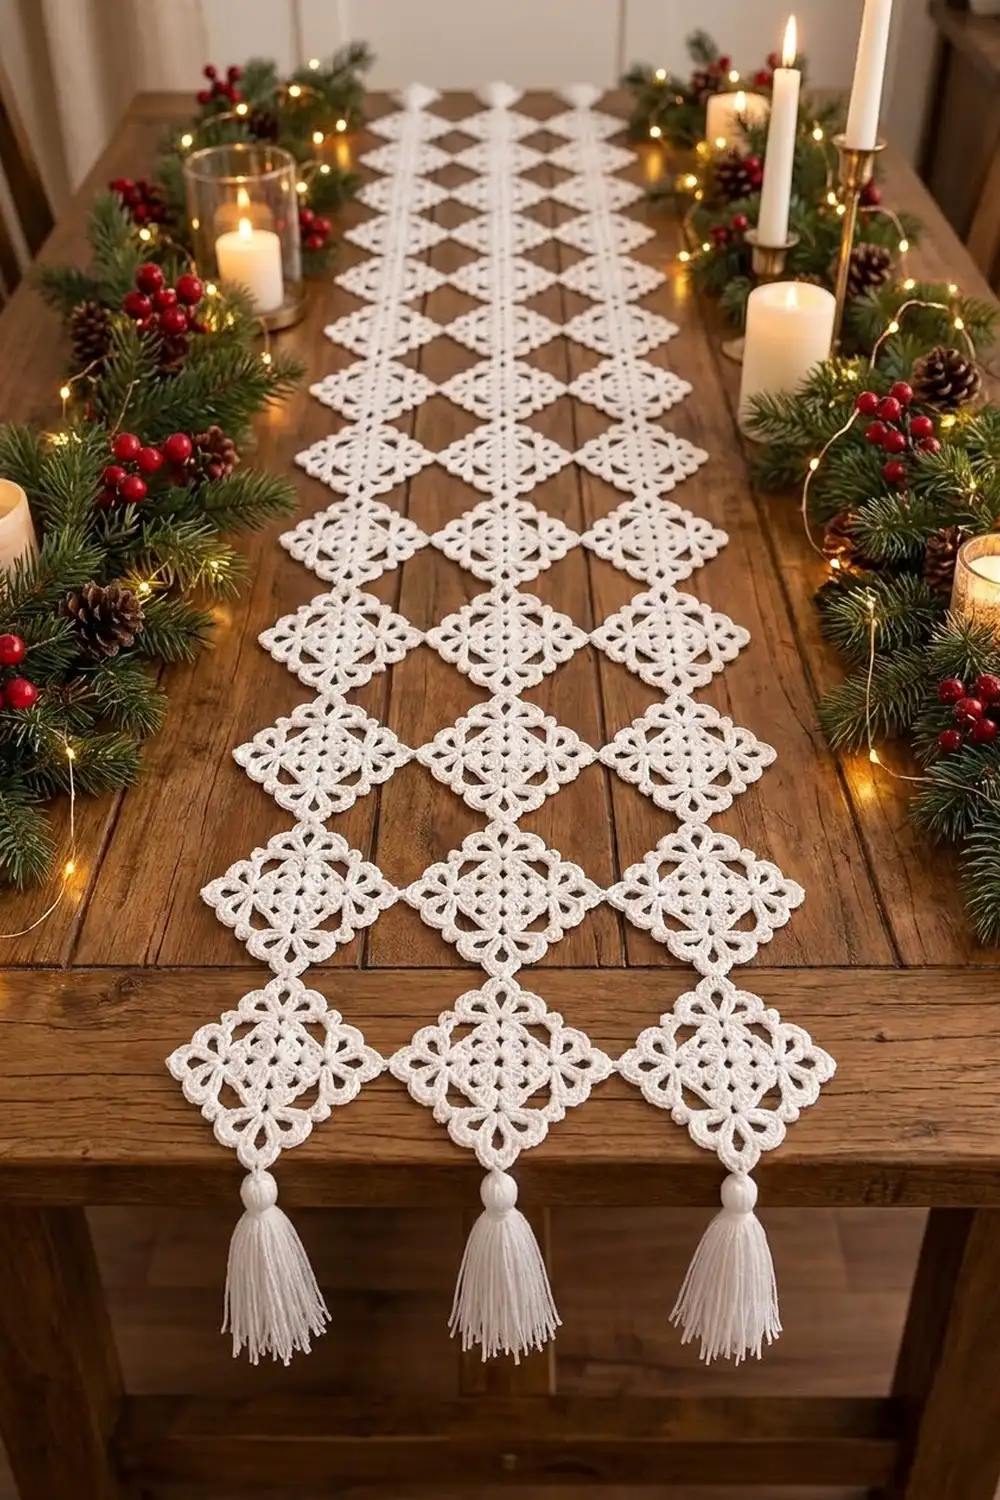
Final Notes
Everything in this runner follows one measurement chain:
– 6 sc per in gives a 2.5 in (6.4 cm) motif side.
– That side gives a 4.5 in (11.4 cm) diamond.
– Three diamonds make 13.5 in (34.3 cm) across, and nine make 40.5 in (102.9 cm) down.
– The 0.3 in (0.8 cm) border brings the runner to 14.1 in (35.8 cm) x 41.1 in (104.4 cm).
Check your test motif, and the rest falls into place.
Optional: for a longer table, add rows of three motifs. Each row adds 4.5 in (11.4 cm) and 2 valleys per long side to the border count.
Happy crocheting!