

This café curtain hangs like a row of soft green ribbons. Wide lace strips, each with a ribbed S-curve down the center, alternate with slim cords strung with tiny flowers. A lace header with inverted triangles joins everything at the top, and every strand ends in a full tassel.
The sample uses a single color, a cool mint green in smooth mercerized cotton. Light shining through the openwork makes a layered, botanical pattern, and the curtain gives privacy without blocking the view.
All instructions use US crochet terms. The finished curtain is 27 in (68.6 cm) wide and 22 in (55.9 cm) long, from the top edge to the bottom of the strips. The tassels hang another 3.5 in (8.9 cm), so the total drop is 25.5 in (64.8 cm).
You make 7 serpentine strips and 6 flower strands as separate pieces. One sc row worked across all the top edges joins them, and then you work the lace header upward from that row. The tassels go on last.
Finished Size and Construction
- Finished size: 27 in x 22 in (68.6 cm x 55.9 cm), plus 3.5 in (8.9 cm) tassels
- Skill level: Intermediate (short rows, join-as-you-go)
- Terminology: US
- Yarn weight: Sport (#2) cotton
- Hook: 3.25 mm (US D/3)
- Number of pieces: 13 (7 serpentine strips, 6 flower strands)
- Layout: one row across, alternating strip and strand, with strips at both ends
- Piece size: strips are 3 in x 20 in (7.6 cm x 50.8 cm); strands are 20 in (50.8 cm) long with a 1 in (2.5 cm) top tab
- Size before border: 27 in x 20 in (68.6 cm x 50.8 cm)
- Border depth: 2 in (5.1 cm) lace header, along the top edge only
Materials
Use a smooth, firm sport-weight cotton with about 150 m per 50 g. Mercerized cotton gives crisp stitches and holds its shape while it hangs.
- Mint green: 250 g, about 750 m
These quantities include a margin of roughly 20%. They cover all 13 pieces, the header, and 13 tassels.
Tools: 3.25 mm (US D/3) hook, tapestry needle, stitch markers, a stiff card 3.75 in (9.5 cm) wide, blocking mats and rust-proof pins, 10 clip curtain rings, and a curtain rod.
Abbreviations (US Terms)
- ch chain
- sl st slip stitch
- sc single crochet
- hdc half double crochet
- dc double crochet
- BLO back loop only
- sp space
- st(s) stitch(es)
- RS / WS right side / wrong side
Picot: Ch 3, sl st in 3rd ch from hook.
Band row types:
– Full Row (FR): Ch 3 (counts as dc), turn, dc BLO in each st across, dc in top of turning ch = 9 dc.
– Short Row (SR): Ch 3 (counts as dc), turn, dc BLO in next 4 sts = 5 dc. Leave the remaining 4 sts unworked.
– Return Row (RR): Ch 3 (counts as dc), turn, dc BLO in next 3 sts, dc in top of turning ch = 5 dc.
Gauge and Checkpoints
Gauge: 24 dc and 12 rows = 4 in (10.2 cm). 24 sc = 4 in (10.2 cm). Chains and sl-st cords work up at about 6 sts per inch.
Make one complete strip before you start the rest, and check it at each stage:
- Band width: 9 dc = 1.5 in (3.8 cm).
- Band length: about 18 in (45.7 cm) from end to end, measured straight through the middle of the curves.
- One flower: 1.5 in (3.8 cm) across.
- Frame Rnd 3: the top edge is 18 sc = 3 in (7.6 cm), and each long side is 121 sc = 20 in (50.8 cm).
If your strip is too big, go down 0.25 mm in hook size. If it is too small, go up 0.25 mm. The header math depends on each strip’s 3 in (7.6 cm) top edge, so check that measurement most carefully.
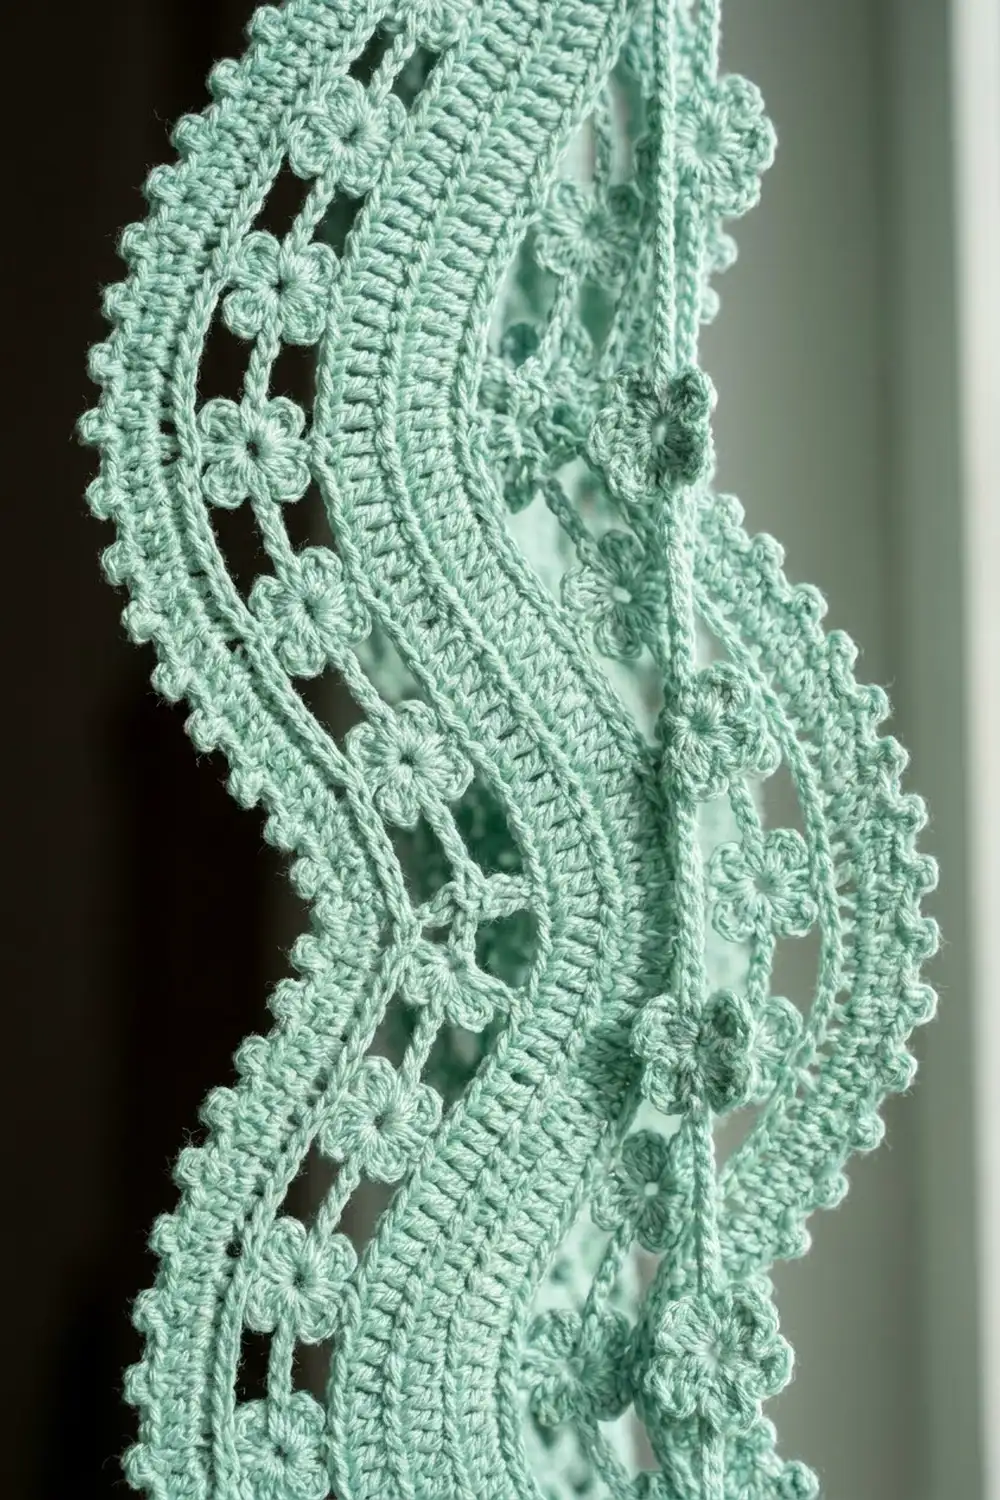
Serpentine Strip (make 7)
The Band
You work the band sideways in ribbed rows. Short rows add length to one edge only, which makes the band curve. Switching which edge gets the short rows reverses the curve.
Ch 11.
Row 1: Dc in 4th ch from hook and in each ch across = 9 dc (the skipped ch count as 1 dc). Call the edge where this row ends Edge A and the other edge Edge B.
Curve A: [FR, FR, SR, RR], repeated as stated. Each repeat starts and ends at Edge A, so the extra rows build up along Edge A.
Curve B: The same sequence, but each repeat starts at Edge B.
Transition (T): 1 FR. This row moves you to the opposite edge.
Work in this order:
- Rows 2–9: Curve A twice (half curve)
- Row 10: T
- Rows 11–26: Curve B 4 times
- Row 27: T
- Rows 28–43: Curve A 4 times
- Row 44: T
- Rows 45–60: Curve B 4 times
- Row 61: T
- Rows 62–77: Curve A 4 times
- Row 78: T
- Rows 79–86: Curve B twice (half curve)
That is 86 rows, with 66 row-ends along each edge. The two half curves cancel out the angle the full curves create, so both ends of the band point straight down.
The Frame
Rnd 1: Ch 1. Work 2 sc in each row-end along both long edges (132 sc per side) and 1 sc in each st across both ends (9 sc per end). Join with a sl st = 282 sc. Fasten off.
Every curve leaves a concave bay on its inner side. Edge B has bays at Curves 1, 3, and 5, and Edge A has bays at Curves 2, 4, and 6, for 6 bays in all. The outermost point of each curve is a peak.
Flowers (make 6, one per bay):
Rnd 1: Ch 4, sl st in first ch to form a ring. Ch 1, 12 sc in ring, sl st to first sc = 12 sc.
Rnd 2: *Ch 3, skip 1 sc, sl st in next sc; repeat from * 5 more times = 6 ch-3 loops.
Rnd 3: Work (sc, hdc, dc, hdc, sc) in each loop, then sl st to first sc = 6 petals, 30 sts. In petals 1 and 2, replace the dc with a spoke: dc, ch 5, sl st in frame Rnd 1, ch 5, sl st in top of same dc. Attach petal 1’s spoke 3 sts above the deepest point of the bay and petal 2’s spoke 3 sts below it. Petal 4 now points outward. Fasten off.
Rnd 2 (chain line): Join with a sc in the first top-end st of Rnd 1. Sc in next 8 sts (9 sc total), then ch 4.
- Down the first side: Sc in Rnd 1 just below the corner (this is the anchor). Then work the following 3 times: [ch 18, sc in dc of petal 4 of the next flower, ch 18, sc in Rnd 1 at the next peak]. The third peak sc lands near the bottom corner.
- Bottom: Ch 4, sc in each of the 9 bottom-end sts, ch 4.
- Up the second side: Work an anchor sc just above the corner, then work the 3-part sequence as before. Ch 4 and sl st to first sc.
Rnd 3: Ch 1, then work:
- Top: 4 sc in the ch-4 sp, sc in each of the 9 sc (working 2 sc in the 5th sc), 4 sc in the next ch-4 sp. That is 4 + (9 + 1) + 4 = 18 sc, including both corner sts.
- Side: 1 sc in the anchor, then 3 times: [19 sc in the ch-18 sp, sc in the sc, 19 sc in the ch-18 sp, sc in the sc]. That is 1 + 3 x 40 = 121 sc.
- Bottom: 18 sc, worked the same way as the top.
- Second side: 121 sc, worked the same way as the first side.
Join with a sl st = 278 sc. The extra sc in each ch-18 sp pulls the chain line straight.
Rnd 4 (picot edge): Join at a top corner and work down the first side: sc in first sc, *picot, sc in next 3 sc; repeat from * 39 more times = 121 sc and 40 picots. Sc in each of the 18 bottom sc. Work the second side to match, then fasten off. Leave the 18 top sc unworked for joining.
Flower Strand (make 6)
Tab: Ch 7, sc in 2nd ch from hook and in each ch across = 6 sc. Rotate the work and sl st in the free loops of the first 3 foundation ch to reach the center of the tab.
Cord: Ch 121, sl st in 2nd ch from hook and in each ch back up = 120 sl sts, about 20 in (50.8 cm). Sl st into the tab and fasten off.
Flowers: Make 7 flowers, working Rnds 1–3 without spokes. Sew them flat to the cord:
- Center the first flower at st 9 from the top, 1.5 in (3.8 cm) down.
- Space the rest 17 sts apart, about 2.8 in (7.1 cm).
- The last flower is centered at st 111, which leaves 9 sts below it.
Make All Pieces
- 7 serpentine strips (6 flowers each = 42 flowers)
- 6 flower strands (7 flowers each = 42 flowers)
Layout (S = strip, F = flower strand), with widths in inches:
S  F  S  F  S  F  S  F  S  F  S  F  S
3  1  3  1  3  1  3  1  3  1  3  1  3
Total width: 7 x 3 in + 6 x 1 in = 27 in (68.6 cm).
Joining
The pieces are joined only along the top edge, so their lower edges hang free. Lay them out RS up in layout order with the top edges level. Join yarn at the top corner of the first strip.
Header Row 1 (joining row, RS): Ch 1, sc in each of the 18 top sc of the strip, then continue straight into the 6 tab sc of the next strand. Carry on the same way across every piece, without adding any chains or stitches between pieces. That gives (7 x 18) + (6 x 6) = 126 + 36 = 162 sc.
Each sc goes into exactly one stitch of a piece, so the seams add no stitches. Keep the same tension you used for the pieces: if you work too tightly the strips bunch together, and if you work too loosely they splay apart.
Checkpoint: Row 1 should measure 27 in (68.6 cm) when laid flat without stretching.
Border: Lace Header
Border gauge: 6 sts per inch, so 162 sts / 6 = 27 in (68.6 cm).
Row 2 (WS): Ch 3 (counts as dc), turn, dc in each st = 162 dc.
Row 3: Ch 3, turn, dc in next st. *Ch 3, skip 3, dc in next 2, ch 3, skip 3, dc in next 2; repeat from * 15 more times. This gives 66 dc (33 pairs) and 32 ch-3 sps, and 66 + (32 x 3) = 162. The pairs alternate A, B, A, and so on, with an A pair at each edge (17 A pairs, 16 B pairs). The B pairs grow into the triangles.
Row 4: Ch 3, turn, dc in next dc. *Ch 2, dc in ch-3 sp, dc in next 2 dc, dc in ch-3 sp, ch 2, dc in next 2 dc; repeat from * 15 more times. That is 66 dc worked 1 per st + 32 dc added in sps = 98 dc and 32 ch-2 sps.
Row 5: Ch 3, turn, dc in next dc. *Ch 1, dc in ch-2 sp, dc in next 4 dc, dc in ch-2 sp, ch 1, dc in next 2 dc; repeat from * 15 more times. That is 98 dc worked 1 per st + 32 dc added in sps = 130 dc and 32 ch-1 sps.
Row 6: Ch 3, turn, dc in next dc. *Dc in ch-1 sp, dc in next 6 dc, dc in ch-1 sp, dc in next 2 dc; repeat from * 15 more times. That is 130 dc worked 1 per st + 32 dc added in sps = 162 dc.
Row 7: Ch 1, turn, sc in each st = 162 sc. Fasten off.
Why the math works: The header pattern is a multiple of 10 sts plus 2, and 16 x 10 + 2 = 162. Each repeat in Rows 3–6 always covers exactly 10 sts (3+2+3+2, then 2+4+2+2, then 1+6+1+2, then 8+2). So the header stays 27 in (68.6 cm) wide while the triangles widen from 2 sts to 8 sts. The 2 sc rows and 5 dc rows add up to 2 in (5.1 cm) of depth.
To hang: Clip a ring at each top corner and every 18 sts in between, for 10 rings spaced 3 in (7.6 cm) apart.
Tassels (make 13)
- Wrap the yarn 30 times around the 3.75 in (9.5 cm) card.
- Tie the bundle at the top and cut the loops at the bottom.
- Wrap the neck 0.5 in (1.3 cm) below the tie.
- Trim to 3.5 in (8.9 cm).
Tie one tassel to each strip at the bottom center, between the 9th and 10th sc. Tie one to the bottom end of each cord.
Final Blocking
- Soak in cool water for 10 minutes, then press the water out in a towel.
- Pin the header flat to 27 in x 2 in (68.6 cm x 5.1 cm).
- Pin each strip to 3 in x 20 in (7.6 cm x 50.8 cm), pinning out every picot.
- Ease the curves so each peak touches its chain line and the spokes lie taut.
- Straighten the cords and center the flowers on them.
- Let it dry completely. Steam the tassels and trim them evenly.
Final Quality-Control Checklist
- Header Row 7 has 162 sc and measures 27 in (68.6 cm).
- All 7 strips are 20 in (50.8 cm) long, and their tops are level.
- Each strip has 6 flowers and each strand has 7.
- All 13 tassels are the same length.
- All ends are woven in through solid stitches.
- Every strip follows the same curve sequence.
Troubleshooting
- Gaps at short-row turns: On the next full row, work the dc at the step into the side of the turning chain.
- Band curves too little: Your dc rows are too short. Go up a hook size for the band only.
- Chain lines sag: Work Rnd 3 more firmly, or ch 16 instead of 18 in Rnd 2 and still work 19 sc into each sp.
- Strips flare at the header: Redo Row 1 with firmer tension.
- Flowers tilt: Tack each flower through its center as well as at the cord.
Care
Hand wash cool and lay flat to dry, re-pinning the curves while it is damp. Steam the tassels lightly to refresh them.
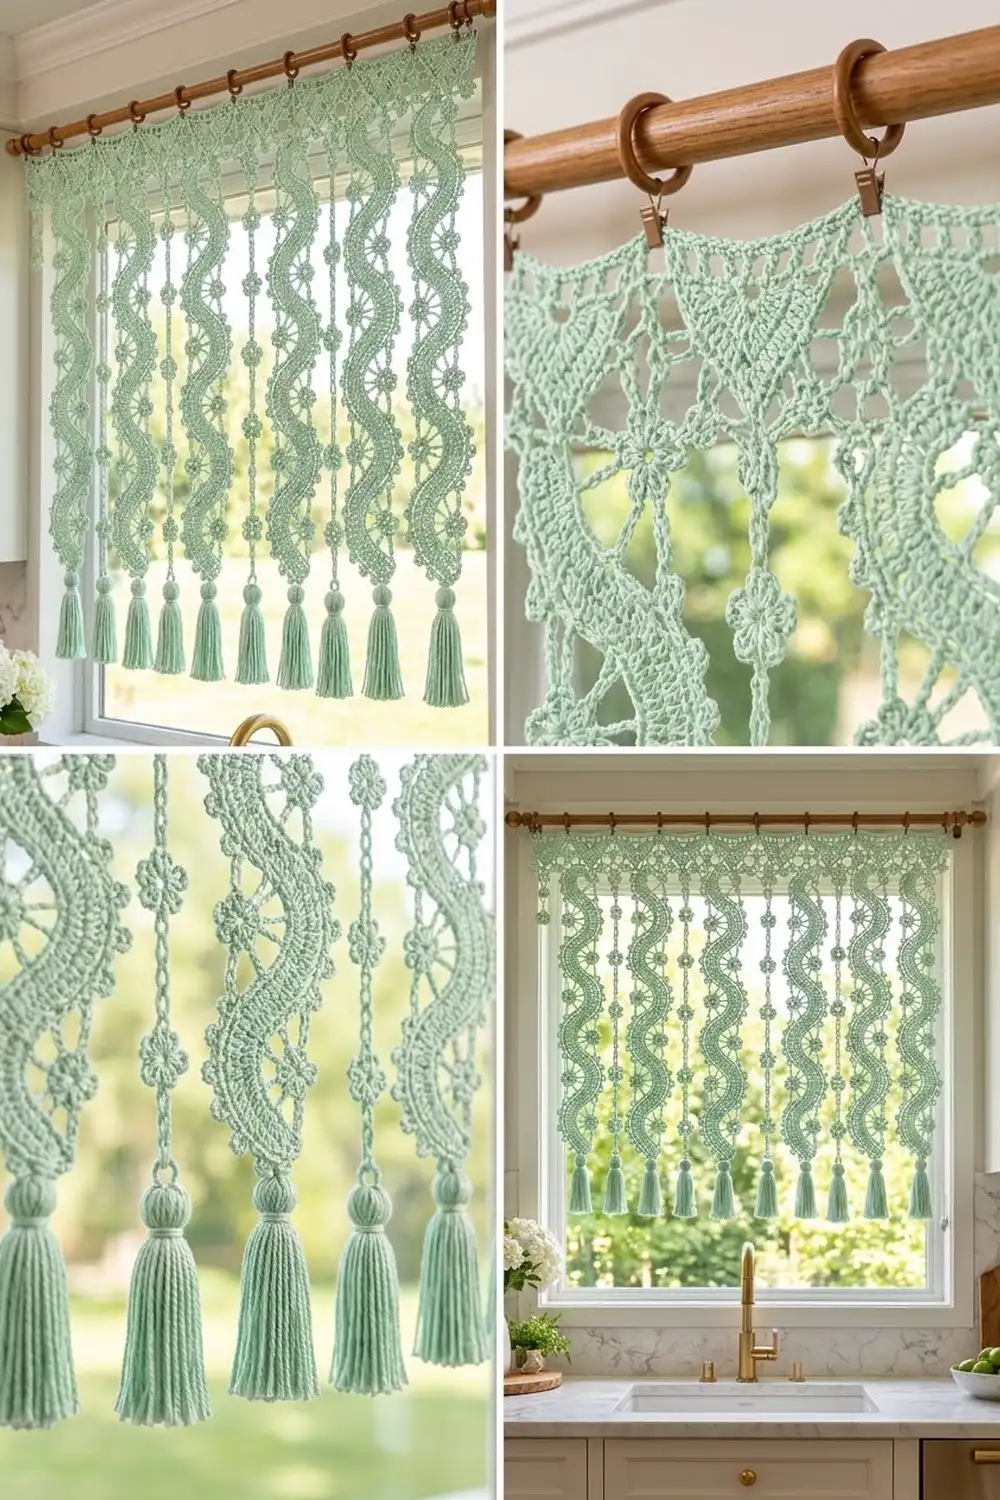
Final Notes
All the measurements build on each other:
- Each 9-dc band is 1.5 in (3.8 cm) wide and is framed out to a 3 in (7.6 cm) strip with an 18-sc top edge.
- Each strand tab is 6 sc, or 1 in (2.5 cm) wide.
- Seven strips and six tabs make 162 sts = 27 in (68.6 cm).
- The 10-plus-2 header repeat keeps that width all the way to the top.
If every top edge measures correctly, the whole curtain will too.
Happy crocheting!