

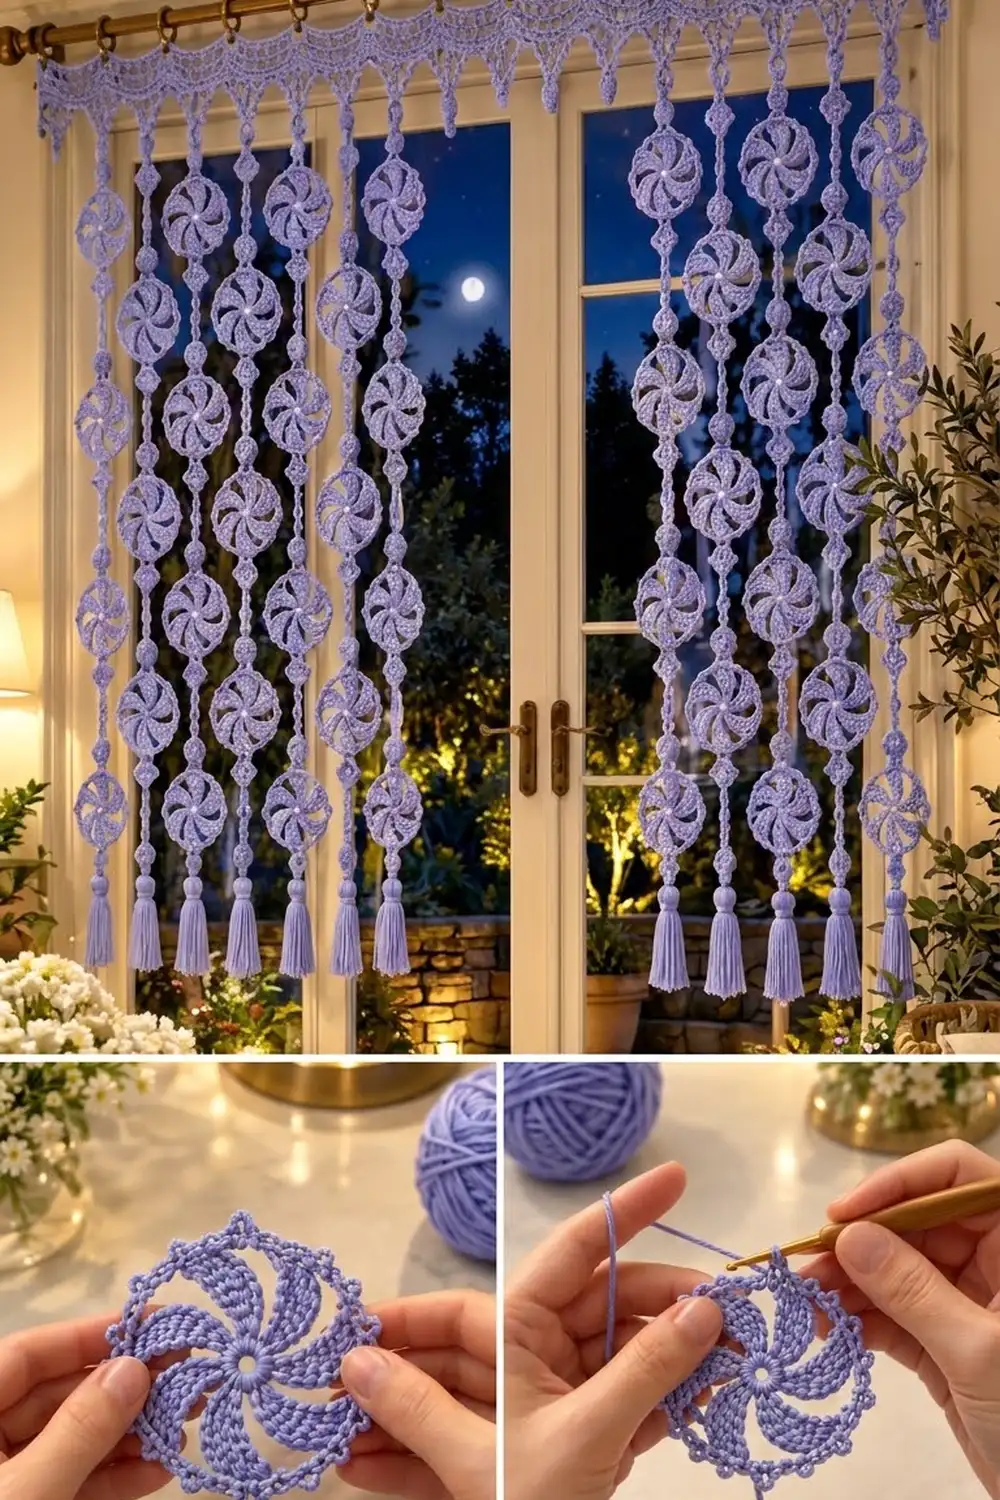
This curtain is made of hanging strands of swirled pinwheel motifs. Each strand alternates large lacy pinwheels with small picot rosettes and ends in a full tassel. A lace header with a pointed lower edge holds everything together and hangs from curtain rings on a rod.
The whole piece is worked in one soft lavender-periwinkle cotton, so all the interest comes from texture. Eight curved blades turn around an open center, a picot ring frames each motif, and small diamond-shaped stems link the rosettes. Light comes through every gap.
All instructions use US crochet terms. The finished curtain is 50 in (127.0 cm) wide. The strands come in two staggered lengths, reaching 51 in (129.5 cm) and 54.5 in (138.4 cm) from the top of the header to the tassel tips.
The construction repeats a few simple steps. You make 60 motifs and 10 tassels, then join them into 10 strands with rosettes worked join-as-you-go. Finally you crochet the header in rows and hang one strand from each header point.
Finished Size and Construction
- Finished size: 50 in (127.0 cm) wide × 51–54.5 in (129.5–138.4 cm) long
- Skill level: Intermediate
- Terminology: US
- Yarn weight: DK / light worsted (weight 3) cotton
- Hook: 4.0 mm (G-6)
- Number of pieces: 60 pinwheel motifs, 60 rosettes, 10 tassels, 1 header
- Layout: 10 strands × 6 motifs, staggered
- Piece size: motif 4.5 in (11.4 cm); rosette 1.25 in (3.2 cm)
- Size before border: each strand 46 in (116.8 cm) including tassel
- Border (header) depth: 3 in (7.6 cm) at the points, 2.25 in (5.7 cm) at the shallowest
Materials
Pick a smooth mercerized or combed cotton in DK weight, about 120 m per 50 g. Cotton holds its shape when hanging and shows the swirl clearly. Don’t use fuzzy or very stretchy yarn, because the strands will grow over time.
- Lavender: 950 g / 2,280 m (nineteen 50 g balls of 120 m)
This amount includes a margin of about 14%. The estimated use is 1,992 m: 28 m per motif, 2 m per rosette, 96 m for the header, 6 m for the hanging chains and 9 m per tassel. Buy everything from one dye lot.
Tools:
- 4.0 mm (G-6) crochet hook
- Tapestry needle and scissors
- Stitch markers
- Rigid card 4.5 in (11.4 cm) tall, for the tassels
- 11 curtain rings, 1 in (2.5 cm)
- Blocking mats, rustproof pins, spray bottle
- Tape measure
Abbreviations (US Terms)
- ch – chain
- sl st – slip stitch
- sc – single crochet
- hdc – half double crochet
- dc – double crochet
- tr – treble crochet
- sp – space
- st(s) – stitch(es)
- MR – magic ring
- RS – right side
Special stitch – picot: Ch 3, sl st in the 3rd ch from hook.
Gauge and Checkpoints
Make and block one complete motif first. It confirms your gauge and shows how much yarn one motif uses.
- Motif gauge: a blocked motif measures 4.5 in (11.4 cm) from picot tip to picot tip.
- Header gauge: 16 sc = 4 in (10.2 cm).
- Chain gauge: 6 ch = 1 in (2.5 cm).
Motif checkpoints (measured lightly flattened):
- After Rnd 1: 1 in (2.5 cm)
- After Rnd 3: 2 in (5.1 cm)
- After Rnd 6: 3.5 in (8.9 cm)
- After Rnd 7: 4.25 in (10.8 cm)
- After Rnd 8: 4.5 in (11.4 cm)
If the motif is too big, go down to a 3.5 mm hook. If it is too small, go up to a 4.5 mm hook. Never change the stitch counts, because the strand spacing depends on motifs that measure 4.5 in (11.4 cm).
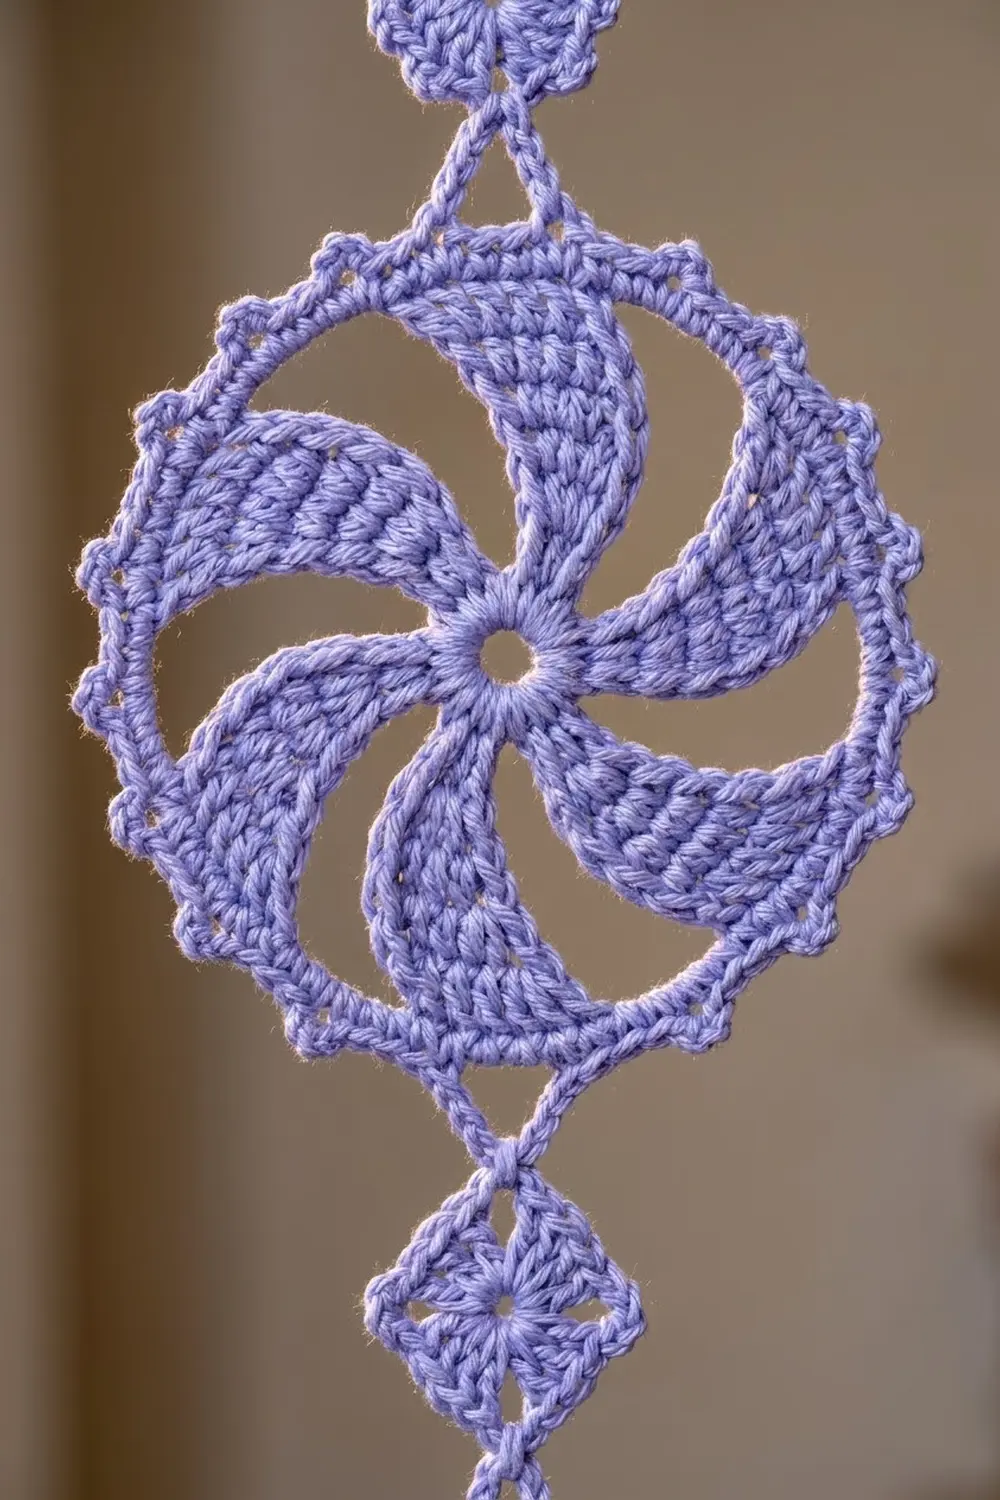
Pinwheel Motif (Make 60)
In each round, every blade moves forward by one chain space. That shift is what makes the blades curve.
Rnd 1: MR, ch 3 (counts as dc), 15 dc in ring, join with sl st in top of ch-3. Pull the ring closed but leave a small open center. (16 dc)
Rnd 2: Ch 3 (counts as dc), dc in next st, ch 2, dc in next 2 sts, ch 2; repeat from * 6 more times, join. (16 dc, 8 ch-2 sps: 8 blades of 2 dc)*
Rnd 3: Sl st in next dc, ch 3 (counts as dc), 2 dc in next ch-2 sp, ch 2, skip next dc, dc in next dc, 2 dc in next ch-2 sp, ch 2; repeat from * 6 more times, join. (24 dc: 8 blades of 3 dc)*
Rnd 4: Sl st in next dc, ch 3, dc in next dc, 2 dc in next ch-2 sp, ch 2, skip next dc, dc in next 2 dc, 2 dc in next ch-2 sp, ch 2; repeat from * 6 more times, join. (32 dc: 8 blades of 4 dc)*
Rnd 5: Sl st in next dc, ch 3, dc in next 2 dc, 2 dc in next ch-2 sp, ch 2, skip next dc, dc in next 3 dc, 2 dc in next ch-2 sp, ch 2; repeat from * 6 more times, join. (40 dc: 8 blades of 5 dc)*
Rnd 6: Sl st in next dc, ch 3, dc in next 3 dc, 2 dc in next ch-2 sp, ch 2, skip next dc, dc in next 4 dc, 2 dc in next ch-2 sp, ch 2; repeat from * 6 more times, join. (48 dc: 8 blades of 6 dc, 8 ch-2 sps)*
Rnd 7 (outer frame): Sl st in next 5 dc so you reach the last dc of the blade, which is its tip. If you prefer, fasten off and join new yarn at any blade tip instead. Ch 1, sc in same st, ch 8, sc in tip of next blade, ch 8; repeat from * 6 more times, join to first sc. Leave the Rnd 6 ch-2 sps unworked. They become the open crescents behind the blades. (8 sc, 8 ch-8 sps)*
Rnd 8 (picot ring): Ch 1, sc in first sc, (3 sc, picot, 2 sc, picot, 3 sc) in next ch-8 sp, sc in next sc; repeat from * around, leaving out the final sc, join. Fasten off. (72 sc, 16 picots)*
Each repeat has 1 + 8 = 9 sc, and 9 × 8 = 72. Weave in the ends and block the motif to 4.5 in (11.4 cm).
Marking: Put a marker in any picot to make it the top picot. The 9th picot counting from it is the bottom picot, with 7 picots on each side between them. Mark the bottom picot too.
Tassels (Make 10)
- Wrap yarn 40 times around the 4.5 in (11.4 cm) card.
- Thread a 10 in (25.4 cm) tie under the wraps at the top and knot it. Knot its ends into a 0.5 in (1.3 cm) hanging loop.
- Slide the wraps off the card. Wrap a separate strand tightly 0.75 in (1.9 cm) below the top to form a round head, knot it, and bury the ends.
- Cut the bottom loops and trim the tassel to 4 in (10.2 cm).
Make All Pieces
Every piece uses the Lavender yarn:
- Motifs: 60 (28 m each)
- Tassels: 10 (9 m each)
- Rosettes: 60, worked during joining (2 m each)
- Header: 1 (96 m)
Layout grid (M = motif, r = rosette, | = hanging chain, T = tassel):
Strand:  1  2  3  4  5  6  7  8  9  10
Header:  V  V  V  V  V  V  V  V  V  V
         |  M  |  M  |  M  |  M  |  M
         M  r  M  r  M  r  M  r  M  r
         r  M  r  M  r  M  r  M  r  M
         ...alternate until each strand has 6 M + 6 r...
         T  T  T  T  T  T  T  T  T  T
The odd strands hang 3.5 in (8.9 cm) lower than the even strands. Each strand runs M r M r M r M r M r M r T.
Joining (Building the Strands)
Rosettes link the motifs and are worked join-as-you-go. Two opposite loops on each rosette become stems. The upper stem joins the bottom picot of the motif above, and the lower stem joins the top picot of the motif below. Each stem (ch 5, sl st, ch 5) pulls into a small diamond.
Lay 6 motifs in a column with their top picots pointing up.
Rosette Rnd 1: MR, ch 1, 12 sc in ring, join. (12 sc)
Rosette Rnd 2: Ch 1, sc in first sc. Then:
- Loop 1 (upper stem): ch 5, sl st in bottom picot of motif above, ch 5, skip next sc, sc in next sc.
- Loops 2–3: *ch 3, skip next sc, sc in next sc; repeat from * once.
- Loop 4 (lower stem): ch 5, sl st in top picot of motif below, ch 5, skip next sc, sc in next sc.
- Loop 5: ch 3, skip next sc, sc in next sc.
- Loop 6: ch 3, skip last sc, join to first sc. Fasten off.
(6 sc, 4 ch-3 loops, 2 stem loops)
Stitch logic: The sc sit in sts 1, 3, 5, 7, 9 and 11. Loop 1 spans sts 1–3 and Loop 4 spans sts 7–9, so the two stems are exactly opposite each other and the strand hangs straight.
Order: Use 5 rosettes to join motifs 1–2, 2–3, 3–4, 4–5 and 5–6. On the 6th rosette, work Loop 1 into the bottom picot of motif 6, and sl st Loop 4 through the tassel’s hanging loop.
Tension: Chain the stems at your chain gauge, 6 ch = 1 in (2.5 cm). Stems that are too tight pucker the picots. Stems that are too loose let the strand stretch.
Size checkpoint: One unit is a 4.5 in (11.4 cm) motif plus a 2.5 in (6.4 cm) rosette with its stems, for 7 in (17.8 cm). After 3 units the strand should measure 21 in (53.3 cm). A finished strand is 42 in (106.7 cm) from the top picot to the tassel loop, or 46 in (116.8 cm) with the tassel.
Border (Lace Header)
The header is the curtain’s border. It is worked in rows from the top edge down, and its lower edge ends in ten points.
Border gauge: 16 sc = 4 in (10.2 cm). Each strand gets a 20-st repeat, which measures 5 in (12.7 cm).
Foundation: Ch 201.
Row 1 (RS, top edge): Sc in 2nd ch from hook and in each ch across, turn. (200 sc)
Row 2: Ch 1, sc in each st across, turn. (200 sc)
Row 3 (mesh): Ch 4 (counts as dc + ch 1), skip next st, dc in next st, ch 1, skip next st, dc in next st; repeat from * to last st, dc in last st, turn. (101 dc + 99 ch-1 sps = 200 sts)*
Row 4: Ch 1, sc in each dc and each ch-1 sp across, working the last sc in the 3rd ch of the turning ch, turn. (101 + 99 = 200 sc)
Row 5: Repeat Row 3. (200 sts)
Row 6: Repeat Row 4. (200 sc)
Row 7 (points): Ch 1, sc in next 2 sts, hdc in next 2 sts, dc in next 3 sts, tr in next 3 sts, ch 6, tr in next 3 sts, dc in next 3 sts, hdc in next 2 sts, sc in next 2 sts; repeat from * 9 more times. Fasten off. (200 sts worked 1 per existing st + 0 added sts, plus 10 ch-6 hanging loops)*
The tall tr groups form the points, and the sc where the repeats meet form the valleys.
Why the math works: The header starts at 10 strands × 20 sts = 200 sts, and every row keeps that count. At 16 sc per 4 in, 200 sts measures 50 in (127.0 cm). Each ch-6 loop sits at the center of its repeat, so the strands hang 5 in (12.7 cm) apart. With 4.5 in (11.4 cm) motifs, that leaves 0.5 in (1.3 cm) of clearance between neighbors, and the staggered heights add more.
Hang the strands: Join yarn with sl st in a ch-6 loop.
- Even strands (2, 4, 6, 8, 10): ch 12, which is 2 in (5.1 cm).
- Odd strands (1, 3, 5, 7, 9): ch 33, which is 5.5 in (14.0 cm).
Sl st in the top picot of motif 1, then sl st back along the back bump of each ch. Sl st in the ch-6 loop and fasten off. The doubled chain won’t stretch. The 3.5 in (8.9 cm) difference is half of one 7 in (17.8 cm) unit, so neighboring motifs sit at alternating heights.
Rings: Sew the 11 rings to the foundation edge: one at st 1, then one at every 20th st (20, 40 … 200).
Final Blocking
- Pin the header flat to 50 in (127.0 cm), opening up the mesh and pinning out each point.
- Spray it until damp and let it dry completely.
- Hang the curtain on its rod.
- Mist each strand lightly. Flatten the motifs and ease the blades into their curves.
- Hold a steamer above the tassels to straighten them, then trim them even.
- Let everything dry while hanging. The tassels act as weights.
Final Quality-Control Checklist
- Each motif has 8 blades, 72 sc and 16 picots, and measures 4.5 in (11.4 cm).
- Each rosette has its stems on opposite loops (1 and 4).
- Each strand has 6 motifs, 6 rosettes and 1 tassel, and measures 46 in (116.8 cm).
- Each header row has 200 sts, there are 10 points, and the header is 50 in (127.0 cm) wide.
- Hanging chains are 2 in (5.1 cm) on even strands and 5.5 in (14.0 cm) on odd strands.
- All ends are woven in securely.
Troubleshooting
- Blades look straight: You worked into the first dc of a blade. Always skip it.
- Motif cups: The Rnd 8 sc are too tight. Work them looser, or use a larger hook for Rnds 7–8.
- Motif ruffles: The ch-8 loops are too loose. Chain more firmly.
- Strand twists: A stem went into the wrong picot. Recount so the bottom picot is the 9th from the top.
- Header curves: The mesh rows don’t match your sc gauge. Check them again against 16 sc = 4 in (10.2 cm).
- Strands lengthen: Make sure every hanging chain is doubled, and use cotton.
Care
Hand wash in cool water and roll the curtain in a towel to remove the water. Dry it flat or hanging, and never wring it or use a dryer.
Final Notes
Here is the full measurement chain. A 4.5 in (11.4 cm) motif plus a 2.5 in (6.4 cm) rosette unit makes 7 in (17.8 cm). Six units make a 42 in (106.7 cm) strand, and the tassel brings it to 46 in (116.8 cm). Ten strands spaced 5 in (12.7 cm) apart fill the 50 in (127.0 cm) header. A 2 in (5.1 cm) or 5.5 in (14.0 cm) hanging chain plus the 3 in (7.6 cm) header gives final lengths of 51 in (129.5 cm) and 54.5 in (138.4 cm). If your first motif matches its numbers, the whole curtain will too.
Happy crocheting!