

The Nautilus Cascade Curtain is a full-length hanging made of round spiral medallions. Each medallion has a solid center that swirls out from the middle like a seashell, and an outer ring of open chain loops. Small stuffed crochet balls link the medallions into vertical strands, and a lacy header band carries the whole curtain on a wooden rod.
The sample uses one color, a dusty teal cotton. Light comes through the chain loops and the spaces between the strands, so it works well in a window or doorway. Because it uses a single color, there are no color changes or ends from color work.
This pattern uses US crochet terms. The finished curtain is 45.5 in (115.6 cm) wide and 75 in (190.5 cm) long. Length is measured from the base of the rod loops to the bottom of the lowest ball.
You make 56 medallions and join them as you go into a grid 7 wide and 8 deep. Then you make 63 balls and use them to connect the motifs up and down, and you finish by working the header and its rod loops.
Finished Size and Construction
- Finished size: 45.5 in (115.6 cm) wide x 75 in (190.5 cm) long
- Skill level: Intermediate
- Terminology: US crochet terms
- Yarn weight: Worsted weight (#4) mercerized cotton
- Hook: 4.5 mm (US 7)
- Number of pieces: 56 medallions, 63 balls, 1 header band
- Layout: 7 columns x 8 rows
- Medallion size: 6.5 in (16.5 cm) across
- Size before border (header): 45.5 in (115.6 cm) x 71.75 in (182.2 cm)
- Border (header) depth: 3.25 in (8.3 cm), not counting the rod loops
Materials
Use a smooth, firm, mercerized cotton. It shows the spiral line clearly and does not stretch much under the curtain’s weight. Avoid acrylic, which tends to stretch and sag over a long hanging.
Yarn
– Dusty teal, worsted weight cotton: 900 g, about 1,530 m (for example, 18 balls of 50 g / 85 m each)
Tools
– 4.5 mm (US 7) crochet hook
– Tapestry needle
– About 100 g of polyester fiberfill for the balls
– 4 stitch markers
– Wooden dowel, 1 in (2.5 cm) thick and 50 in (127.0 cm) long
– Scissors, measuring tape, blocking mats, rustproof pins, spray bottle
These quantities include a margin of about 15% for the gauge swatch and for small differences in tension.
Abbreviations (US Terms)
- ch – chain
- sl st – slip stitch
- sc – single crochet
- hdc – half double crochet
- dc – double crochet
- fsc – foundation single crochet
- BLO – back loop only
- MR – magic ring
- sk – skip
- sp – space
- st(s) – stitch(es)
Special technique – nautilus taper: The medallion center is worked as one continuous spiral. It starts with short stitches and builds up to dc. At the end, it steps back down through hdc and sc to a sl st, so there is no visible step. Working in BLO leaves the front loops on the surface, and they form the spiral line.
Gauge and Checkpoints
Make one medallion before you start the rest. Every other measurement in this pattern depends on this one piece.
- After Rnd 5: 4.5 in (11.4 cm) across
- After Rnd 6: 5 in (12.7 cm) across
- After Rnd 7: 6.5 in (16.5 cm) across, measured from loop tip to loop tip
- Ball: 1.25 in (3.2 cm) across
- Header gauge: 16 sc = 4 in (10.2 cm), which is 4 sc per 1 in (2.5 cm)
If your medallion is more than 0.25 in (0.6 cm) too big, go down half a hook size. If it is too small, go up half a size. Check the gauge again after any hook change. If the center cups, your dc are too short, so go up a hook size. If the center ruffles, go down a size.
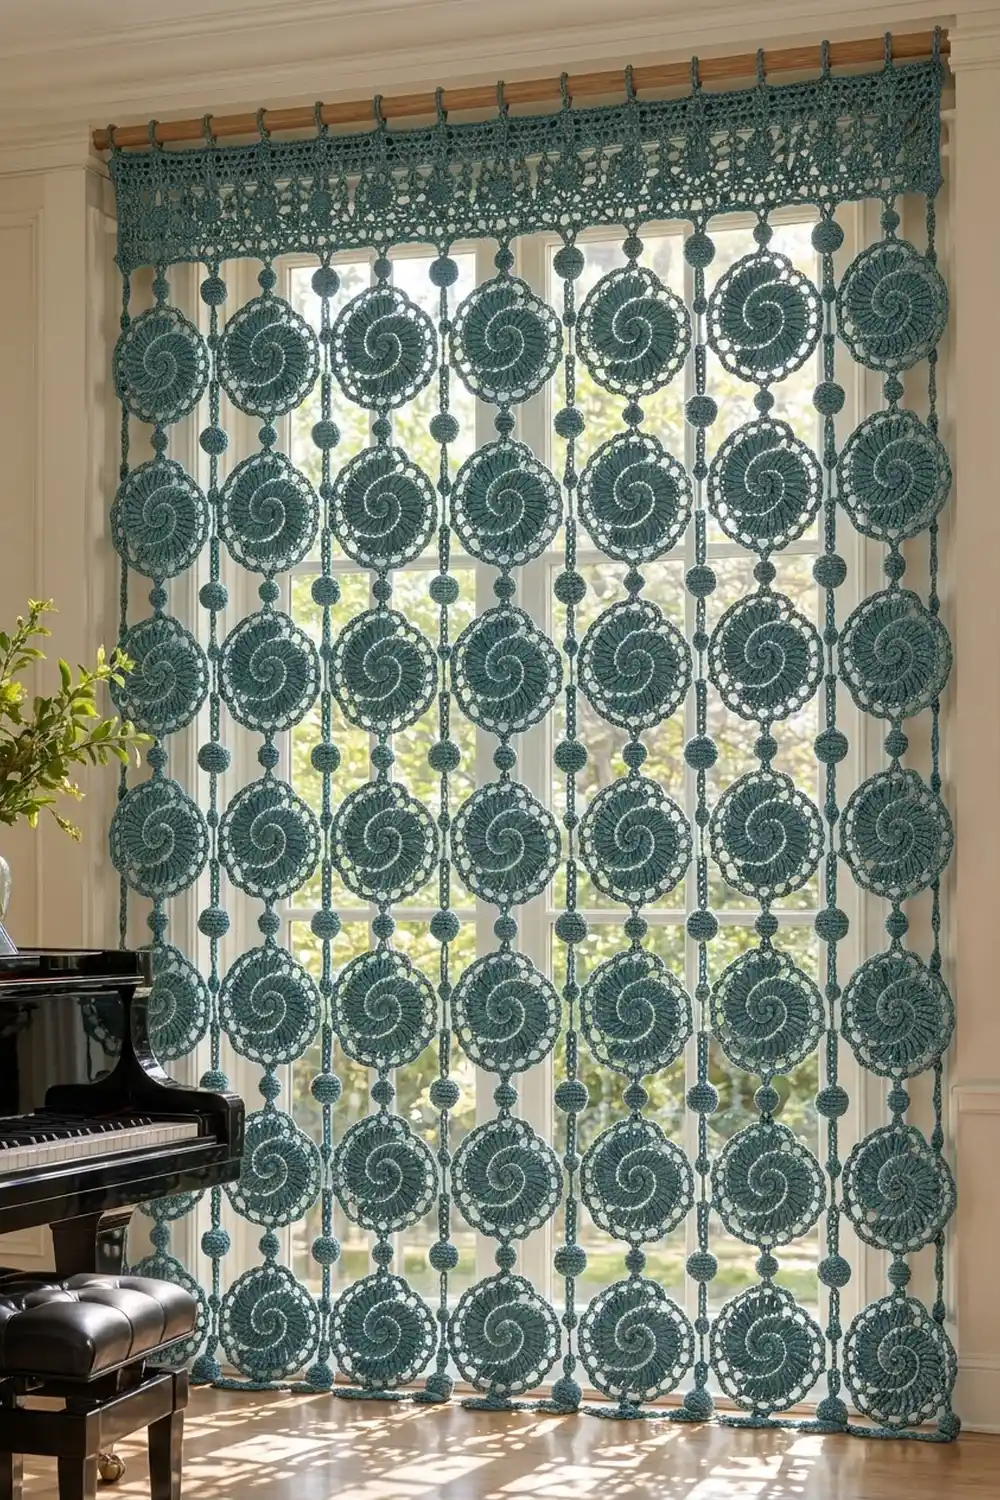
Medallion (Make 56)
Rnd 1: In the MR, work 2 sc, 2 hdc, and 8 dc. Do not join; the rest of the center is worked in a continuous spiral. Place a marker in the first st. (12 sts)
Rnd 2 (BLO for Rnds 2–5): Work 2 dc in each st around. (24 sts)
Rnd 3: Dc in next st, 2 dc in next st, repeat 12 times. (36 sts)
Rnd 4: Dc in next 2 sts, 2 dc in next st, repeat 12 times. (48 sts)
Rnd 5: Dc in next 3 sts, 2 dc in next st, repeat 11 times. For the 12th repeat, work the nautilus taper: hdc in each of the next 2 sts, sc in next st, 2 sc in last st. Sl st into the next st. The sl st is not counted. (60 sts)
Pull the starting tail snug. The front loops now show as one spiral line winding from the center to the edge.
Rnd 6 (outline round, both loops): Ch 1, sc in each st around, then sl st to the first sc. (60 sc = 60 worked 1-per-existing-st + 0 extra)
Checkpoint: 5 in (12.7 cm) across, lying flat.
Rnd 7 (loop round): Ch 1, sc in the first st, ch 5, sk 2, sc in next st. Repeat until the last repeat, which ends with ch 5, sk 2, sl st to the first sc. (20 ch-5 loops and 20 sc)
The math: 60 sts ÷ 3 sts per repeat = 20 loops, with no stitches left over.
Loop map: Hold the medallion right side facing you. Loop 1, the first loop of Rnd 7, is the top. Loop 11 is the bottom. Loop 6 is the left side and loop 16 is the right side. Put a marker in each of these four loops so you can find them for joining.
Ball (Make 63)
Leave a 12 in (30.5 cm) starting tail. This tail comes out of the top of the ball.
Rnd 1: 6 sc in the MR. (6)
Rnd 2: 2 sc in each st. (12)
Rnd 3: Sc in next st, 2 sc in next st 6 times. (18)
Rnds 4–6: Sc in each st. (18)
Rnd 7: Sc in next st, sc2tog 6 times. (12)
Stuff the ball firmly.
Rnd 8: Sc2tog 6 times. (6) Fasten off and leave a 12 in (30.5 cm) ending tail. Run the tail through the front loops of the last 6 sts and pull them closed. This tail comes out of the bottom of the ball.
Checkpoint: 1.25 in (3.2 cm) across.
Make All Pieces
- Medallions: 56 in dusty teal, 7 per row for 8 rows
- Balls: 63 in dusty teal: 7 top connectors, 49 between-motif connectors (7 per column), and 7 bottom tails
- Header: 1 in dusty teal
Layout grid (M = medallion, o = ball):
HEADER BAND (182 sts)
 o   o   o   o   o   o   o
 M - M - M - M - M - M - M   Row 1
 o   o   o   o   o   o   o
 M - M - M - M - M - M - M   Row 2
 ...  (6 more rows of the same)
 M - M - M - M - M - M - M   Row 8
 o   o   o   o   o   o   o
Each “-” is a side join between neighbors (loop 16 to loop 6). Each “o” is a ball connector.
Joining
Side joins (join as you go): Complete the first medallion in a row as written. For each next medallion, work Rnd 7 as written until you reach loop 6. Work that loop as: ch 2, sl st into loop 16 of the medallion on the left, ch 2, sk 2, sc in next st. Then finish the round as written.
This replaces each ch 5 with ch 2 + sl st + ch 2, which is still 5 chain lengths. The loop keeps its size, and the joined loop tips sit side by side. Medallions in a row are therefore spaced exactly 6.5 in (16.5 cm) apart, and the joins add no width.
Ball connectors: Each ball sits between loop 11 of the medallion above and loop 1 of the medallion below.
- Use the hook to work the starting tail into ch 2, then sl st into loop 11 of the upper medallion.
- Use the ending tail the same way: ch 2, then sl st into loop 1 of the lower medallion.
- Run each tail back through its chain and into the core of the ball, then weave it in.
For the bottom row, add a ball to loop 11 of each medallion using only the starting tail. Leave the bottom ball hanging free.
Tension: Keep the connector chains the same length as your normal chains. If you pull them tight, the columns will be shorter than planned and the rows won’t line up.
Vertical spacing: Each motif-to-motif step is 6.5 in (16.5 cm) + 0.5 in (1.3 cm) + 1.25 in (3.2 cm) + 0.5 in (1.3 cm) = 8.75 in (22.2 cm).
Size checkpoint: The grid should measure 45.5 in (115.6 cm) wide. From the top of the top row to the bottom of the bottom-row balls, it should measure 69.5 in (176.5 cm). That is 52 in (132.1 cm) of medallions + 15.75 in (40.0 cm) of connectors + 1.75 in (4.4 cm) of bottom tail. Adding the 2.25 in (5.7 cm) top connectors brings the total to 71.75 in (182.2 cm), the size before the header.
Border: Header Band and Rod Loops
The curtain’s only border is the header across the top. The left, right, and bottom edges are left as the medallion loops.
Border gauge: 4 sc per 1 in (2.5 cm).
Per-piece count: Each medallion column is 6.5 in (16.5 cm) wide, so it gets 26 header sts (6.5 x 4). With 7 columns, the header needs 7 x 26 = 182 sts. No extra stitches are added between columns, because the side joins add no width.
Row 1: Fsc 182 and turn. (182 sts) Checkpoint: 45.5 in (115.6 cm) long.
Row 2 (mesh): Ch 3 (counts as dc), dc in next st, ch 2, sk 2, dc in next 2 sts. Repeat 45 times and turn. (182 sts = 2 + 45 x 4: 92 dc and 45 ch-2 sps)
Row 3: Ch 1, sc in each dc, and work 2 sc in each ch-2 sp. Turn. (182 sc = 92 + 90)
Rows 4–9: Repeat Rows 2 and 3 three more times, lining up each new dc over the dc of the previous mesh row. (182 sts each row) This gives 5 sc rows and 4 mesh rows.
Checkpoint: the header measures 3.25 in (8.3 cm) deep.
Row 10 (rod loops): Ch 1, sc in first 2 sts, ch 14, sk 2, sc in next 2 sts. Repeat 45 times. Fasten off. (45 loops; stitch base 2 + 45 x 4 = 182) Each loop is about 3.5 in (8.9 cm) long, which is enough to go around the 1 in (2.5 cm) dowel.
Attaching the columns: On the foundation edge of Row 1, count off seven sections of 26 sts. Use the starting tail of each top-connector ball to ch 2 and sl st into st 13 of its section, which is st 13, 39, 65, 91, 117, 143, or 169. Use the ending tail to ch 2 and sl st into loop 1 of the top medallion in that column. Each column then hangs centered under its 26-st section, because 7 sections x 26 sts = 182 sts.
Final Blocking
- Lay the curtain flat on mats in sections. It is long, so block the top half first and then the bottom half.
- Mist it with water until it is evenly damp.
- Pin the header straight at 45.5 in (115.6 cm) wide.
- Pin each medallion round at 6.5 in (16.5 cm), putting a pin through each loop tip.
- Check that the columns are straight and the rows of medallions are level.
- Let it dry completely, then thread the dowel through the rod loops.
Final Quality-Control Checklist
- Every medallion measures 6.5 in (16.5 cm) and has exactly 20 loops.
- The spiral line on every medallion turns the same way.
- All side joins are between loop 16 and loop 6.
- All 63 balls are firm and 1.25 in (3.2 cm) across.
- Every connector uses ch 2 on each side.
- The header has 182 sts in every row and 45 rod loops.
- The columns attach at sts 13, 39, 65, 91, 117, 143, and 169.
- All tails are woven into the ball cores or into solid stitches.
Troubleshooting
- Spiral line looks broken: You may have worked some stitches through both loops. Rnds 2–5 must all be in BLO.
- Step shows at the end of Rnd 5: Work the full taper (hdc, hdc, sc, 2 sc), then the sl st.
- Center cups: Go up a hook size, or loosen your dc.
- Loops flip over: Block with firm pins and let the curtain dry flat.
- Columns hang at different lengths: Some connector chains are tighter than others. Redo them at your normal tension.
- Header ruffles or pulls in: Count again for 182 sts, then check your sc gauge.
Care
Hand wash in cool water with mild soap, press the water out in a towel, and dry the curtain flat. Never hang it to dry while it is wet, because the weight will stretch the strands.
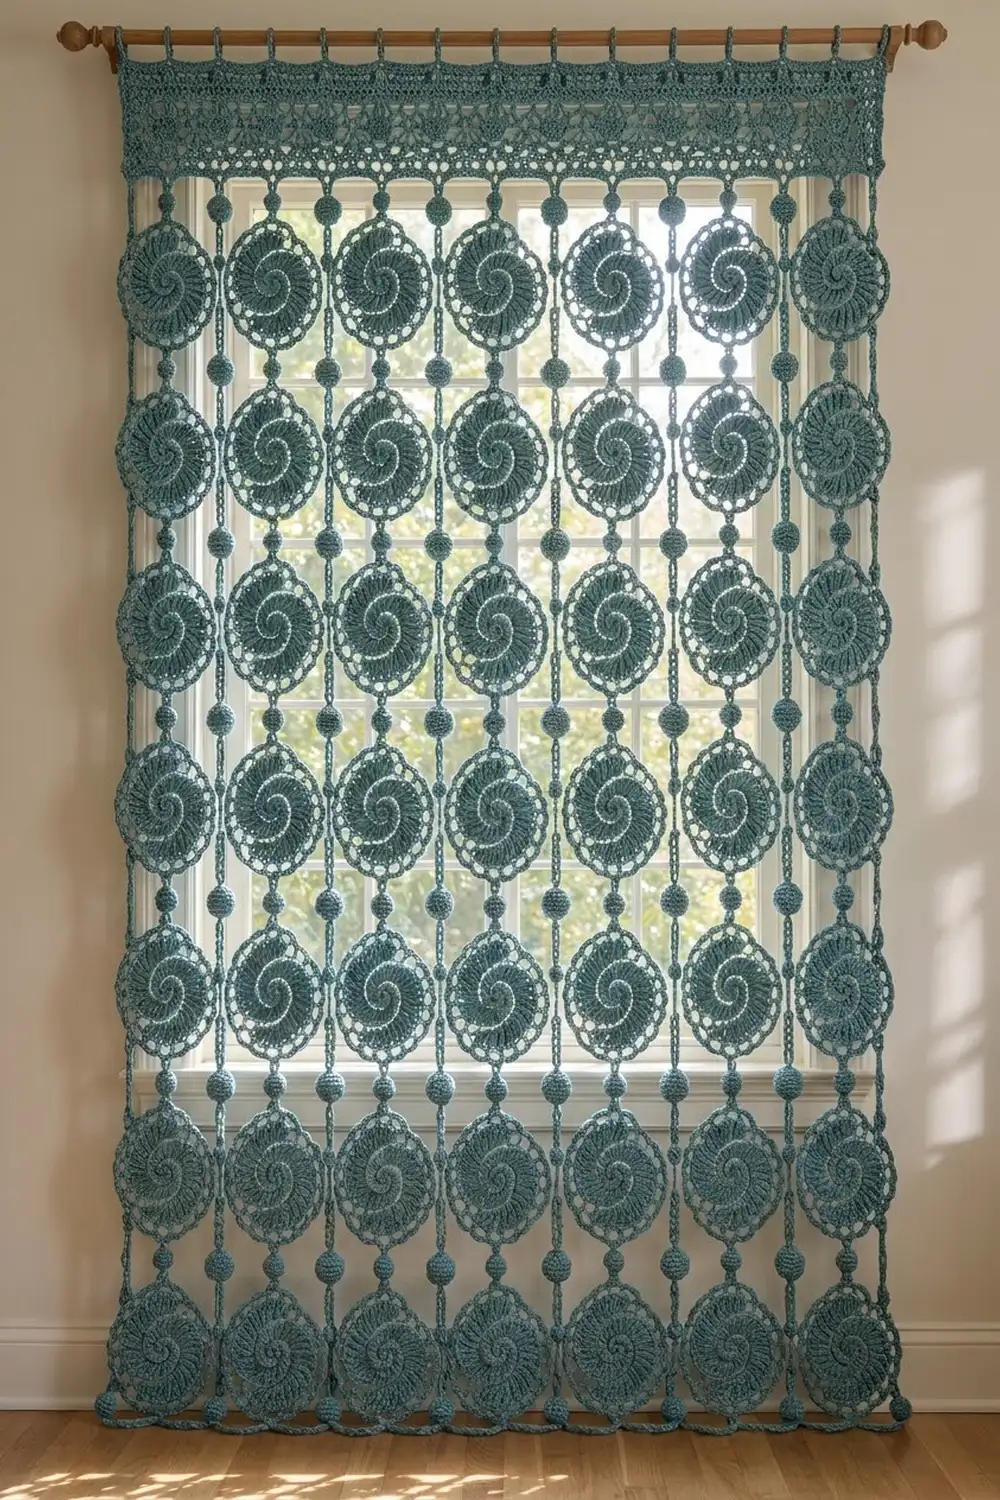
Final Notes
The measurements build on each other:
- One medallion is 6.5 in (16.5 cm) across.
- Seven medallions joined side by side make 45.5 in (115.6 cm).
- That width matches the header: 7 columns x 26 sts at 4 sts per 1 in (2.5 cm) = 182 sts.
- Vertically, each step of medallion plus connector is 8.75 in (22.2 cm), which builds a 71.75 in (182.2 cm) body.
- The 3.25 in (8.3 cm) header brings the total to 75 in (190.5 cm).
If your first medallion matches its checkpoints, the rest of the curtain will come out to these sizes.
Happy crocheting!