

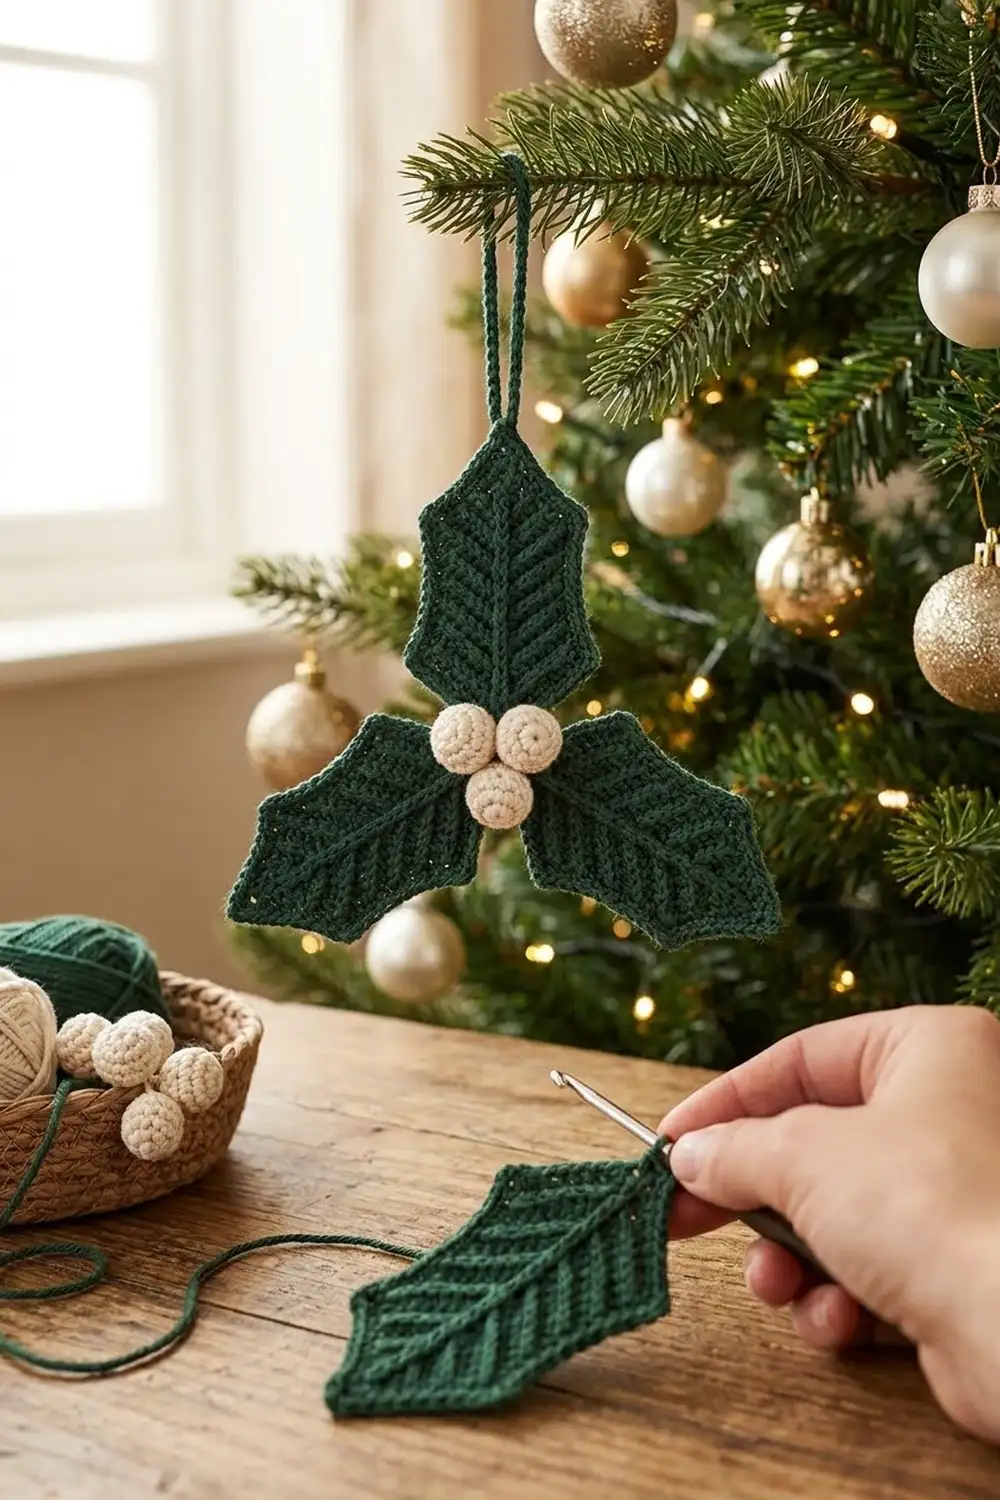
This holly ornament has three pointed leaves in deep forest green and a tight cluster of three cream berries at the center. Every leaf has a raised center vein and slanted side veins, so it looks closer to a real holly sprig than a flat cutout. A slim green cord loop at the top lets it hang from a tree branch, a garland, or a gift.
The palette is just dark green and cream. Small pieces worked tightly give it a neat, textured look that fits a classic or rustic Christmas setting.
This pattern uses US crochet terms. The assembled ornament measures about 5 in (12.7 cm) wide and 4.5 in (11.4 cm) tall without the loop, or 6.5 in (16.5 cm) tall with the loop.
Each leaf is worked in the round on both sides of a foundation chain. Round 2 uses taller stitches to widen the leaf, and Round 3 is a pointed edging that creates the holly lobes. The veins are surface slip stitches added afterwards. Then you sew the three leaves together at their bases, stitch the stuffed berries over the joint, and attach the loop.
Finished Size and Construction
- Finished size: 5 in (12.7 cm) wide x 4.5 in (11.4 cm) tall, plus a 2 in (5.1 cm) loop
- Skill level: Advanced beginner
- Terminology: US crochet terms
- Yarn weight: DK (light worsted, #3)
- Hook: 3.5 mm (E/4) for leaves and loop; 3.0 mm (C/2 or D/3) for berries
- Number of pieces: 7 (3 leaves, 3 berries, 1 hanging loop)
- Layout: One leaf pointing up and two leaves angled down to the left and right, joined at the bases, with the berries on top of the joint
- Leaf size (finished): 2.75 in (7.0 cm) long x 2 in (5.1 cm) wide, measured point to point
- Leaf size before border: 2.5 in (6.4 cm) long x 1.5 in (3.8 cm) wide
- Border depth: About 0.25 in (0.6 cm), including the points
Materials
Use a smooth DK yarn with good stitch definition. Mercerized cotton or a cotton blend shows the surface-slip-stitch veins best. Fuzzy or brushed yarn hides the veins and blurs the points.
- Dark green (forest/holly green): 15 g, about 34 m
- Cream (off-white): 5 g, about 11 m, which covers the berries and their stuffing
Both amounts include a margin of about 30% for swatching and tails.
Tools:
- 3.5 mm (E/4) crochet hook
- 3.0 mm (C/2 or D/3) crochet hook
- Tapestry needle
- Scissors
- Stitch marker
- Rust-proof pins and a blocking mat or folded towel
- Ruler or tape measure
Abbreviations (US Terms)
- ch – chain
- sl st – slip stitch
- sc – single crochet
- hdc – half double crochet
- dc – double crochet
- sc2tog – single crochet 2 together
- st(s) – stitch(es)
- sp – space
- rnd – round
- RS – right side
Special stitches:
- Point (pt): Ch 3, sl st in 2nd ch from hook, sc in next ch. This makes a small, firm spike that forms one holly point.
- Surface slip stitch: Hold the yarn behind the work. Insert the hook from front to back, pull up a loop, then insert the hook in the next gap along your line, pull up a loop, and draw it through the loop on the hook.
Gauge and Checkpoints
Gauge: 20 sc and 22 rows = 4 in (10.2 cm) with a 3.5 mm hook, which is 5 sc per 1 in (2.5 cm).
Make one complete leaf before you start the others, and measure it at each stage:
- After Rnd 1: 2.25 in (5.7 cm) long x 0.6 in (1.5 cm) wide
- After Rnd 2: 2.5 in (6.4 cm) long x 1.5 in (3.8 cm) wide
- After Rnd 3: 2.75 in (7.0 cm) long x 2 in (5.1 cm) wide, point to point
- Berry: 0.6 in (1.5 cm) across
If the leaf is more than 0.25 in (0.6 cm) too big, go down half a hook size. If it is more than 0.25 in (0.6 cm) too small, go up half a size. If the leaf ripples, your tension is too loose. If it cups, your tension is too tight. Fix your gauge before you make leaves 2 and 3, because all three need to match for the layout to look balanced.
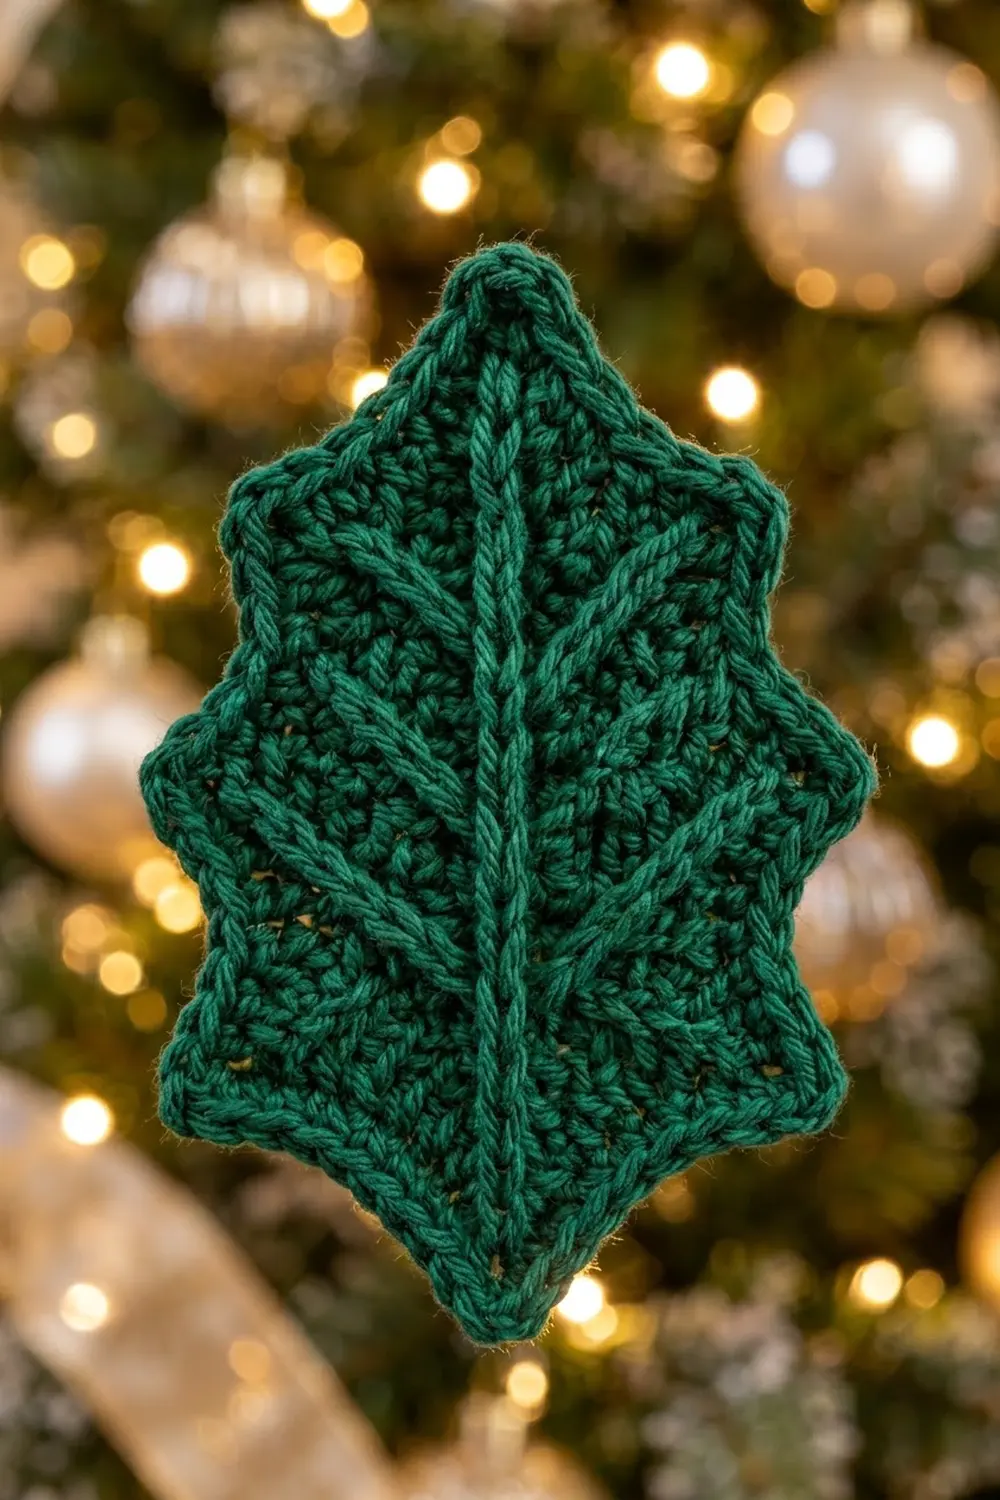
Leaf (Make 3)
Use the 3.5 mm hook and dark green yarn.
Ch 10.
Rnd 1 (RS): Sc in 2nd ch from hook and in each of next 7 ch (8 sc). 3 sc in last ch for the tip. Turn to work along the bottom loops of the chain. Sc in each of next 7 ch, then 2 sc in the last ch, which is the one that already holds the first sc. Join with sl st to first sc. (20 sts)
Stitch map for Rnd 1: st 1 = base, sts 2–8 = side A, sts 9–11 = tip, sts 12–18 = side B, sts 19–20 = base. Mark st 1.
Rnd 2 (growth round): Ch 1. Sc in st 1.
Side A: Sc in next st, hdc in next st, 2 dc in next st, dc in next st, 2 dc in next st, hdc in next st, sc in next st (9 sts).
Tip: Sc in next st, (sc, ch 2, sc) in next st, sc in next st (4 sc and 1 ch-2 sp).
Side B: Sc in next st, hdc in next st, 2 dc in next st, dc in next st, 2 dc in next st, hdc in next st, sc in next st (9 sts).
Base: Sc in next st, 2 sc in last st. Join with sl st to first sc. (26 sts and 1 ch-2 sp)
Breakdown: base 4 sts (1 at the start and 3 at the end), side A 9, tip 4 plus the ch-2 sp, side B 9. 4 + 9 + 4 + 9 = 26. The side shaping reads the same in both directions, so side B automatically mirrors side A.
Do not fasten off. Go straight into the edging (Rnd 3) in the Border section below. Then come back and add the veins.
Leaf Veins
Work these after Rnd 3, with the RS facing you. Cut 36 in (91.4 cm) of dark green. Carry it along the back between veins, and catch it under a few stitches on the back as you go.
Center vein: Start at the base, in the center of the foundation chain. Work 9 surface sl sts along the chain line up to the bottom of the tip. This makes the raised spine.
Side veins (3 per side): Each side vein starts at the center vein and slants up and out toward the edge.
- Vein 1: Starts 0.5 in (1.3 cm) above the base. Work 4 surface sl sts toward the lower point.
- Vein 2: Starts 1 in (2.5 cm) above the base. Work 3 surface sl sts toward the upper point.
- Vein 3: Starts 1.5 in (3.8 cm) above the base. Work 2 surface sl sts toward the edge just below the tip.
Repeat on the other side so the veins form matching chevrons. Each leaf has 9 + (2 x 9) = 27 surface sl sts in total. Weave in the ends on the back.
Berry (Make 3)
Use the 3.0 mm hook and cream yarn. The smaller hook makes a firm fabric that keeps the stuffing hidden.
Rnd 1: 6 sc in a magic ring. (6 sts)
Rnd 2: 2 sc in each st around. (12 sts)
Rnd 3: Sc in each st around. (12 sts)
Stuff firmly with cream yarn scraps.
Rnd 4: Sc2tog 6 times. (6 sts)
Fasten off and leave an 8 in (20.3 cm) tail. Thread the tail through the front loops of the last 6 sts, pull it closed, and keep the tail for sewing.
Hanging Loop
Use the 3.5 mm hook and dark green yarn. Leave a 6 in (15.2 cm) starting tail.
Ch 24. Sl st in the back bump of the 2nd ch from hook and in each remaining ch. (23 sl sts)
Fasten off and leave a 6 in (15.2 cm) tail. The cord should measure about 4 in (10.2 cm). Folded in half, it makes a 2 in (5.1 cm) loop.
Make All Pieces
- Dark green: 3 leaves and 1 hanging loop
- Cream: 3 berries
Layout (front view):
              [ loop ]
                 ||
             [ Leaf 1 ]
              tip up
          [Berry 1][Berry 2]
              [Berry 3]
   [ Leaf 2 ]          [ Leaf 3 ]
  tip down-left      tip down-right
Leaf 1 points straight up. Leaves 2 and 3 point down and outward at about 60 degrees from vertical, so the three leaves are spaced roughly evenly around the center.
Joining
Method: Whipstitch through the base stitches, using the 8 in (20.3 cm) tails from leaves 2 and 3.
- Lay the leaves RS up in the layout shown above. Overlap the base of leaf 1 by about 0.25 in (0.6 cm) on top of the bases of leaves 2 and 3.
- Stitch-to-stitch: Each leaf has 4 base sts from Rnd 3. Using the tail from leaf 2, whipstitch its 4 base sts to the lower-left 2 base sts of leaf 1 and the left 2 base sts of leaf 3. Use one pass per stitch: 4 sts on leaf 2 meet 2 + 2 sts on the other two leaves.
- Using the tail from leaf 3, whipstitch its remaining 2 base sts to the right 2 base sts of leaf 1. All 4 base sts of every leaf are now secured, and the joint forms a small triangle about 0.5 in (1.3 cm) across.
- Tension: Pull each stitch just snug. If you pull too hard, the leaves cup upward. If you sew too loosely, the leaves will droop when the ornament hangs.
- Sew the berries over the triangle with their cream tails: two side by side at the top and one centered below. Take 3 or 4 stitches through each berry and the leaves underneath, then sew the berries to each other where they touch.
- Fold the loop in half. Sew both ends to the back of leaf 1, 0.25 in (0.6 cm) below the tip point, so the cord looks like it grows out of the tip.
Size checkpoint: The assembled piece should measure 5 in (12.7 cm) wide x 4.5 in (11.4 cm) tall without the loop.
Border: Pointed Holly Edging (Rnd 3)
Work this round on each leaf right after Rnd 2, before the veins and before joining.
Border gauge: Same as the leaf, 5 sts per 1 in (2.5 cm). Work firmly so the points stand out on their own.
Rnd 2 positions on side A, from base to tip, are a1–a9 (sc, hdc, dc, dc, dc, dc, dc, hdc, sc). On side B, from tip to base, they are c1–c9 in the same order.
Rnd 3: Ch 1. Sc in first st (base).
Side A: Sc in a1, sc in a2, sc in a3, (sc, pt, sc) in a4, sl st in a5, sc in a6, (sc, pt, sc) in a7, sc in a8, sl st in a9. (11 sts and 2 pts)
Tip: Sc in next 2 sc, (sc, pt, sc) in ch-2 sp, sc in next 2 sc. (6 sts and 1 pt)
Side B: Sl st in c1, sc in c2, (sc, pt, sc) in c3, sc in c4, sl st in c5, (sc, pt, sc) in c6, sc in c7, sc in c8, sc in c9. (11 sts and 2 pts)
Base: Sc in each of the last 3 sts. (4 base sts in total)
Join with sl st to first sc. (32 sts and 5 points)
Fasten off. On leaf 1, weave in the tail. On leaves 2 and 3, leave an 8 in (20.3 cm) tail for joining.
Why the math works: This is a conversion round. 26 sts + 1 ch-2 sp are worked one stitch into each existing stitch. Each of the 4 side points adds 1 extra sc, and the ch-2 sp takes 2 sc. That gives 26 + 4 + 2 = 32. The extra stitches flare out at the points. The sl sts at a5, a9, c1, and c5 sit lower than sc and pull the edge in, which creates the curved dips between the lobes. Every lobe gets the same counts, so the leaf stays symmetrical.
Final Blocking
- Weave in all ends before you block, except the joining tails.
- Mist each leaf lightly with water until it is damp but not wet.
- Pin the leaf flat, RS up, to 2.75 in (7.0 cm) x 2 in (5.1 cm). Put one pin in every point to keep it sharp.
- Press the center vein gently with a finger to raise it.
- Let it dry completely, which takes about 2 hours.
- After joining, mist the joint lightly and pin the whole ornament to 5 in (12.7 cm) x 4.5 in (11.4 cm). Keep the berries unpinned so they stay round.
Final Quality-Control Checklist
- All three leaves measure 2.75 in (7.0 cm) x 2 in (5.1 cm), within 0.125 in (0.3 cm).
- Each leaf has 5 sharp points: the tip and 2 on each side.
- The dips between the points curve inward.
- Each leaf has a center vein and 3 side veins per side, angled in the same direction.
- The berries are firm and round, with no stuffing showing.
- The base joint is hidden under the berries.
- The loop is centered over the tip of leaf 1, and the ornament hangs straight.
- All ends are woven in on the back.
Troubleshooting
- The leaf twists into a spiral: Rnd 1 has an extra or missing stitch. Recount to 20.
- The points are soft or rounded: Pull each point snug, or use a smaller hook for Rnd 3 only.
- There are no dips between the points: Check that you worked sl sts, not sc, at a5, a9, c1, and c5.
- The veins pucker the leaf: Loosen your surface sl sts, or go up one hook size for the veins.
- Stuffing shows through the berries: Use the 3.0 mm hook and stuff with matching cream yarn.
- The ornament tilts when hanging: Re-sew the loop so it sits exactly over the tip.
Care
Hand wash in cool water with mild soap, then press out the water in a towel. Lay the ornament flat to dry, and reshape the points while it is damp.
Final Notes
Here is how the measurements build on each other. A 10-chain foundation becomes a 2.25 in (5.7 cm) leaf after Rnd 1. Rnd 2 widens it to 2.5 in x 1.5 in (6.4 cm x 3.8 cm). The pointed Rnd 3 brings it to 2.75 in x 2 in (7.0 cm x 5.1 cm). Three matching leaves joined at their bases make an ornament 5 in (12.7 cm) wide and 4.5 in (11.4 cm) tall, and the 2 in (5.1 cm) loop brings the total height to 6.5 in (16.5 cm). If every checkpoint matches, the finished ornament will too.
Happy crocheting!