

This curtain is made of maple leaves. Each leaf has a cream center, a light pink round, a deep rose round, and a forest green serrated edge. Green chain cords link the leaves into three vertical columns, and the open spaces between the cords let light through.
The palette is soft and slightly vintage, like autumn leaves just turning. The dark green edge outlines every lobe, so each leaf stays crisp against a bright window.
All instructions use US crochet terms. One finished panel measures 22.5″ (57.2 cm) wide and 80.5″ (204.5 cm) long, measured from the top of the tabs to the lowest stem. Make two panels for a pair like the one shown.
You work each leaf in five rounds from a magic ring and add a short stem at the end. You join the leaves as you go, using slip-stitch cords in place of the tip picots. A top header with hanging tabs finishes the panel.
Finished Size and Construction
- Finished panel size: 22.5″ x 80.5″ (57.2 cm x 204.5 cm), including tabs
- Skill level: Intermediate
- Terminology: US
- Yarn weight: DK (#3) cotton
- Hook: 4.0 mm (G-6); 5.0 mm (H-8) for the header foundation chain only
- Number of pieces: 30 leaves per panel (60 for the pair), plus 1 header per panel
- Layout: 3 columns x 10 rows per panel
- Leaf size:
- 5.5″ (14.0 cm) wide from tip to tip
- 5.25″ (13.3 cm) tall without the stem
- 5.75″ (14.6 cm) tall with the stem
- Size before border: 20.5″ x 77.5″ (52.1 cm x 196.9 cm), including the top cords
- Border depth: the header is 1″ (2.5 cm) deep, and the tabs hang 2″ (5.1 cm) above it
Materials
Use a smooth, mercerized or combed DK cotton. Cotton keeps the picots crisp and hangs without stretching. Avoid fuzzy or stretchy yarns, because the cords will lengthen over time.
Amounts for the pair of panels (one panel uses about half):
- Cream (Color A): 100 g / 230 m
- Light pink (Color B): 100 g / 230 m
- Deep rose (Color C): 175 g / 403 m
- Forest green (Color D): 225 g / 518 m
These quantities include a margin of about 15%. The meters assume a DK cotton with 50 g / 115 m per ball.
Tools:
- 4.0 mm (G-6) hook
- 5.0 mm (H-8) hook
- Tapestry needle
- Stitch markers
- Measuring tape
- Blocking mats and rustproof pins
- Spray bottle
Abbreviations (US Terms)
- ch – chain
- sl st – slip stitch
- sc – single crochet
- hdc – half double crochet
- dc – double crochet
- tr – treble crochet
- sp – space
- st(s) – stitch(es)
- RS – right side
Special stitches:
- Picot: ch 3, sl st in 3rd ch from hook.
- Standing sc: start with a slip knot on the hook, insert the hook into the st, and complete an sc.
- Cord (N): ch N, sl st in the target picot or loop, then sl st in the back bump of each of the N ch to return to your starting point. This makes a firm, rope-like cord.
Gauge and Checkpoints
- Leaf gauge: one leaf measures 5.5″ (14.0 cm) across the upper side tips after Round 5.
- Cord gauge: 5 reinforced cord ch = 1″ (2.5 cm).
- Header gauge: 16 hdc = 4″ (10.2 cm).
Make one complete test leaf first, and measure it after each round:
- After Round 1: 1.25″ (3.2 cm) across
- After Round 2: 2.25″ (5.7 cm) across
- After Round 3: 3.5″ (8.9 cm) from tip to tip
- After Round 4: 4.75″ (12.1 cm) from tip to tip
- After Round 5: 5.5″ (14.0 cm) wide and 5.25″ (13.3 cm) tall
If your leaf is too big, go down a hook size. If it is too small, go up a hook size. Leaf size sets the column spacing, so match it before you continue.
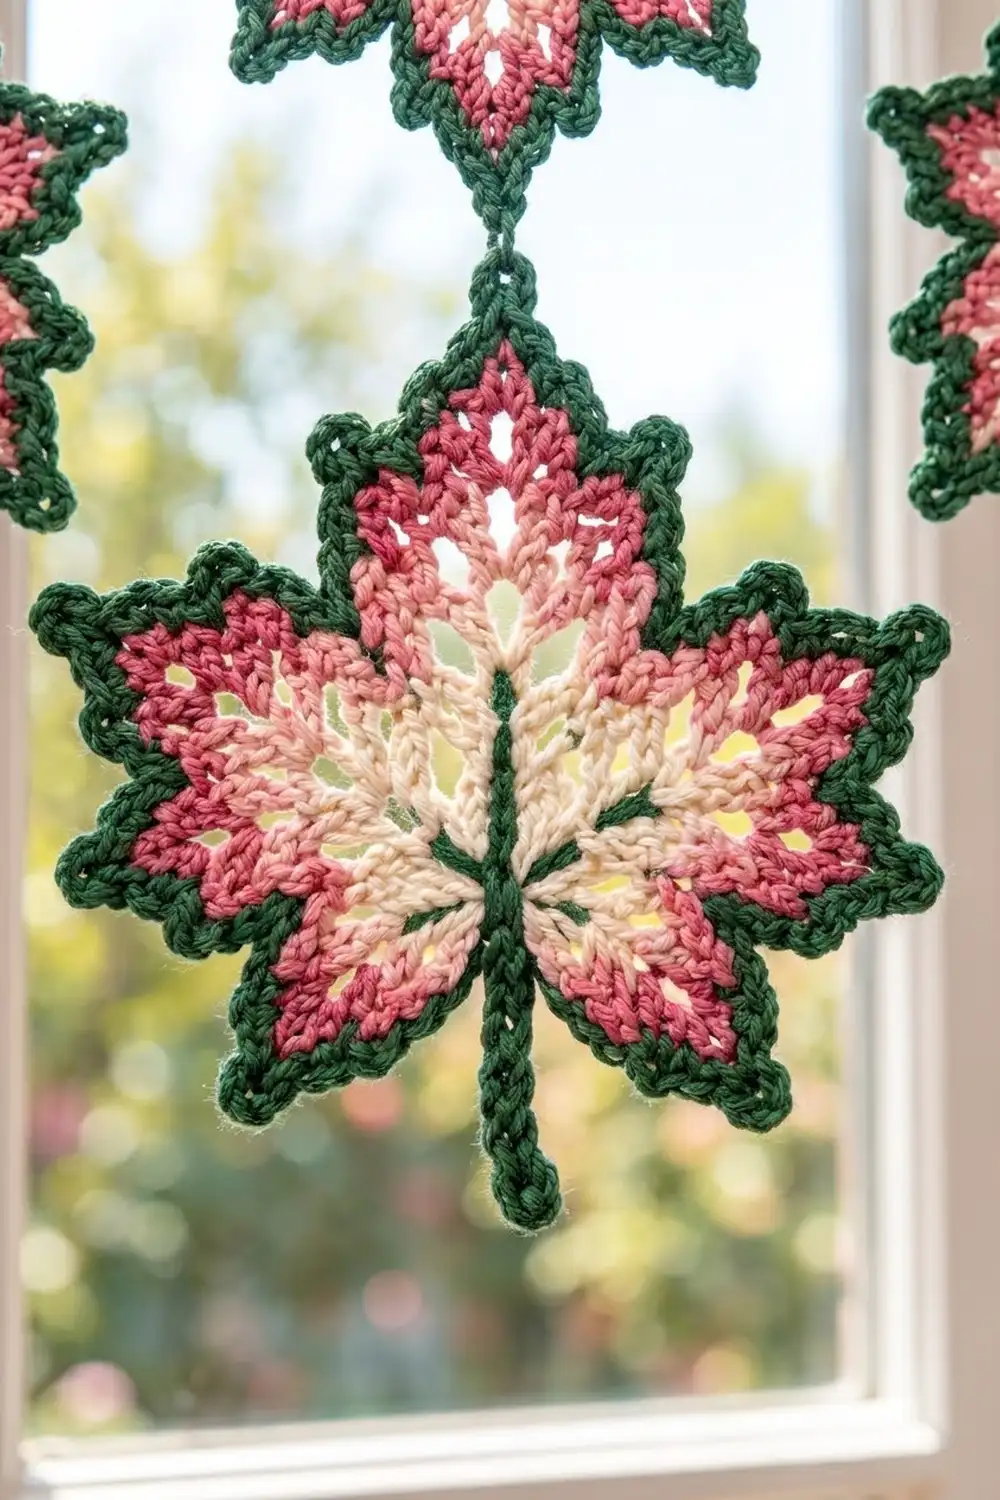
Leaf Pattern
Each of the five lobes is built on 6 sts of Round 2. Keep the RS facing throughout.
Round 1 (Color A): Make a magic ring. Ch 3 (counts as dc), then work 14 dc in the ring. Join with sl st to the top of the beg ch-3. (15 dc)
Round 2 (Color A): Ch 3 (counts as dc), dc in the same st, then work 2 dc in each st around. Join and fasten off. (30 dc)
Round 3 (Color B): Join with a standing sc in any st.
*Hdc in next st, 2 dc in next st, (tr, ch 3, tr) in next st, 2 dc in next st, hdc in next st**, sc in next st. Repeat from * 3 more times, then from * to ** once.
Join with sl st to the first sc and fasten off. (45 sts: 9 per lobe, plus 5 ch-3 sps)
The sc is the valley between two lobes, and the ch-3 sp marks the tip of each lobe.
Round 4 (Color C): Join with a standing sc in any valley sc.
*Hdc in next hdc, dc in next dc, 2 dc in next dc, tr in next tr, (tr, ch 3, tr) in ch-3 sp, tr in next tr, 2 dc in next dc, dc in next dc, hdc in next hdc**, sc in next valley sc. Repeat from * 3 more times, then from * to ** once.
Join and fasten off. (65 sts: 13 per lobe, plus 5 ch-3 sps)
Each lobe now has one valley sc, 6 sts on each side, and a tip sp.
Round 5 (Color D), the serrated edge: Mark any valley as the stem valley. The lobe directly opposite it is the top lobe. The two lobes beside the stem valley are the lower lobes, and the remaining two are the upper side lobes.
Join Color D with a sl st in the stem-valley sc.
*Sc in next 3 sts, picot, sc in next 3 sts, (2 sc, picot, 2 sc) in ch-3 sp, sc in next 3 sts, picot, sc in next 3 sts**, sl st in next valley sc. Repeat from * 3 more times, then from * to ** once.
Join with sl st to the first sl st. (85 sts: 80 sc + 5 sl st, plus 15 picots)
The sl st valleys stay deep, and the side picots make the serrated maple edge. On panel leaves, some tip picots are replaced with cords. See the Joining section.
Stem (Color D): Do not fasten off.
- Ch 9, then sl st in the 4th ch from the hook to make an end loop.
- Sl st in each of the next 5 ch.
- Sl st in the stem-valley sl st, then fasten off.
The stem hangs about 1.4″ (3.6 cm) below the valley and about 0.5″ (1.3 cm) below the lower tips.
Center accent: With Color D, work one French knot in the center of the ring.
Make All Pieces
For each panel, make 30 leaves (60 for the pair). Every leaf uses all four colors:
- Rounds 1–2: Color A
- Round 3: Color B
- Round 4: Color C
- Round 5 and stem: Color D
Work Rounds 1–4 on all of the leaves first. Then work Round 5 in layout order so you can join as you go.
        [ HEADER WITH 7 TABS ]
   |          |          |
  A1 ------- B1 ------- C1
   |          |          |
  A2 ------- B2 ------- C2
   ...        ...        ...
  A10 ------ B10 ------ C10
In the grid, the vertical lines are top cords and the horizontal lines are pairs of side cords. Work the leaves in this order: A1, B1, C1, A2, B2, C2, and so on.
Joining
Method: join as you go with reinforced cords. At a tip that needs a join, work: 2 sc in ch-3 sp, Cord (N) to the target, 2 sc in the same sp. The cord replaces the tip picot, so the leaf still has 85 sts.
Which tips join:
- Top tip, Row 1:
- 2 sc in sp.
- Ch 12, then sl st in the 3rd ch from the hook to make an end loop.
- Sl st in each of the next 9 ch, then 2 sc in the same sp.
This cord is about 2″ (5.1 cm) long, and the header attaches to its end loop.
– Top tip, Rows 2–10: Cord (10) to the stem end loop of the leaf above. 10 ch = 2″ (5.1 cm).
– Upper side tip next to an existing leaf on the left: Cord (10) to that leaf’s upper side tip picot.
– Lower side tip next to an existing leaf on the left: Cord (20) to that leaf’s lower side tip picot. 20 ch = 4″ (10.2 cm).
– All other tips: work the picot as written.
Stitch-to-stitch logic: each cord joins two tips at the same height.
- Upper side tips are 5.5″ (14.0 cm) apart on one leaf. Add a 2″ (5.1 cm) cord and the columns sit 7.5″ (19.1 cm) apart, center to center.
- Lower side tips are about 3.5″ (8.9 cm) apart on one leaf. That leaves a gap of about 4″ (10.2 cm) between neighboring lower tips, which the 20-ch cord fills.
Tension: make the chains at the same tension as your sc. Work the return sl sts snugly but without puckering. Untwist each cord before you work its first return sl st.
Size checkpoint: after Row 2, lay the work flat and check two measurements:
- Width: outer tip to outer tip should be 20.5″ (52.1 cm), which is 5.5″ + 7.5″ + 7.5″ (14.0 cm + 19.1 cm + 19.1 cm).
- Row pitch: the top tip of A1 to the top tip of A2 should be 7.75″ (19.7 cm). That is a 5.75″ (14.6 cm) leaf plus a 2″ (5.1 cm) cord.
Border (Header)
The top header is the only border. The green Round 5 edges of the leaves finish the sides and bottom.
Border gauge: 16 hdc = 4″ (10.2 cm), which is 4 sts per 1″ (2.5 cm). Each column gets 30 sts, which equals 7.5″ (19.1 cm), the same as the column spacing. Three columns x 30 sts = 90 sts.
Row 1 (Color D, 5.0 mm hook):
- Ch 15, then sl st in the end loop of A1’s top cord.
- Ch 30, then sl st in the end loop of B1’s top cord.
- Ch 30, then sl st in the end loop of C1’s top cord.
- Ch 15.
(90 ch: 15 + 30 + 30 + 15; the joins are not counted) Check that each group of 30 ch measures 7.5″ (19.1 cm).
Row 2 (4.0 mm hook): Ch 2 (does not count as a st), turn. Hdc in each ch across, skipping the sl st joins. (90 hdc)
Row 3: Ch 1, turn. Sc in each st across. (90 sc)
Row 4 (tabs): Ch 1, turn. Sc in first 2 sts, *ch 20, sc in next st, sc in next 13 sts*. Repeat from * to * 5 more times. Ch 20, sc in next st, sc in last 3 sts. Fasten off. (90 sc + 7 ch-20 loops)
Check: 2 + (1 + 13) x 6 + 1 + 3 = 90.
Why the math works:
- Each column’s 30 sts are centered on its top cord, with 15 sts on each side, so the leaves hang straight.
- At 4 sts per inch, 90 sts make 22.5″ (57.2 cm).
- The header extends 1″ (2.5 cm) beyond the outer tips on each side: 20.5″ + 1″ + 1″ = 22.5″ (52.1 cm + 2.5 cm + 2.5 cm = 57.2 cm).
- The tabs are 14 sts, or 3.5″ (8.9 cm), apart.
- Each tab loop is 4″ (10.2 cm) around, which fits a rod up to 1.1″ (2.8 cm) thick.
Final Blocking
- Weave in ends along the green edging, not through the cords.
- Lay three rows at a time on mats with the RS up, and mist them until damp.
- Pin each leaf at its five tips and its stem loop, at 5.5″ (14.0 cm) wide.
- Pin the cords straight. Columns should be 7.5″ (19.1 cm) apart, and row pitch should be 7.75″ (19.7 cm).
- Pin the header at 22.5″ (57.2 cm).
- Let each section dry, then move on to the next one.
- Hang the panel for a day to settle it.
Final Quality-Control Checklist
- Every leaf has 85 sts in Round 5 and five clear tips.
- All stems point down and all top lobes point up.
- No cord is twisted.
- The columns hang straight and parallel.
- The header has 90 sts and 7 evenly spaced tabs.
- All ends are hidden.
- The panel measures 22.5″ x 80.5″ (57.2 cm x 204.5 cm).
Troubleshooting
- Leaf cups: Rounds 3–4 are too tight. Go up half a hook size.
- Leaf ruffles: the trebles are loose. Snug each wrap.
- Uneven lobes: recount. Round 3 needs 9 sts per lobe, and Round 4 needs 13.
- Cords stretch: the return sl sts are too loose. Rework them more snugly.
- Columns drift: each upper cord must be exactly 10 ch.
- Header ripples: the foundation chain is too loose. Rework it with the 4.0 mm hook.
- Header pulls inward: the chain is too tight. Use a 5.5 mm (I-9) hook for Row 1.
Care
Hand wash in cool water with mild detergent. Roll the panel in towels, then rehang it while it is slightly damp so the cords dry straight.
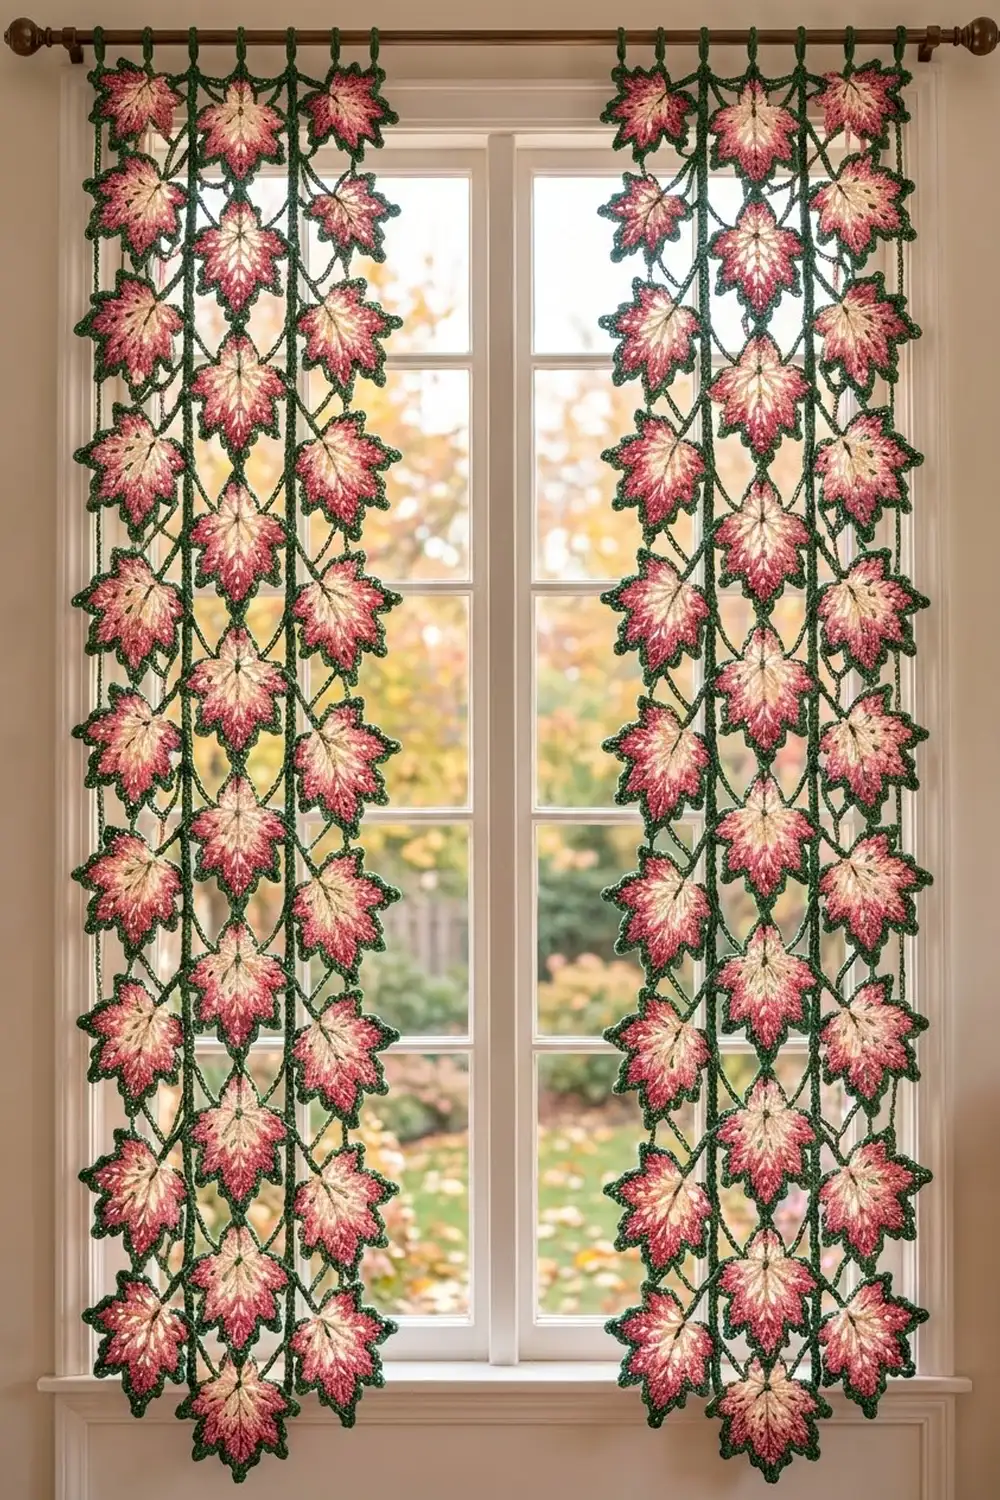
Final Notes
Here is how the measurements build on each other:
- Width: a 5.5″ (14.0 cm) leaf plus a 2″ (5.1 cm) cord sets the columns 7.5″ (19.1 cm) apart. Three columns span 20.5″ (52.1 cm), and the 90-st header is 22.5″ (57.2 cm).
- Length: a 5.75″ (14.6 cm) leaf plus a 2″ (5.1 cm) cord gives a 7.75″ (19.7 cm) row pitch. Ten rows plus the top cords, header, and tabs total 80.5″ (204.5 cm).
Each row you add or remove changes the length by 7.75″ (19.7 cm).
Happy crocheting!