

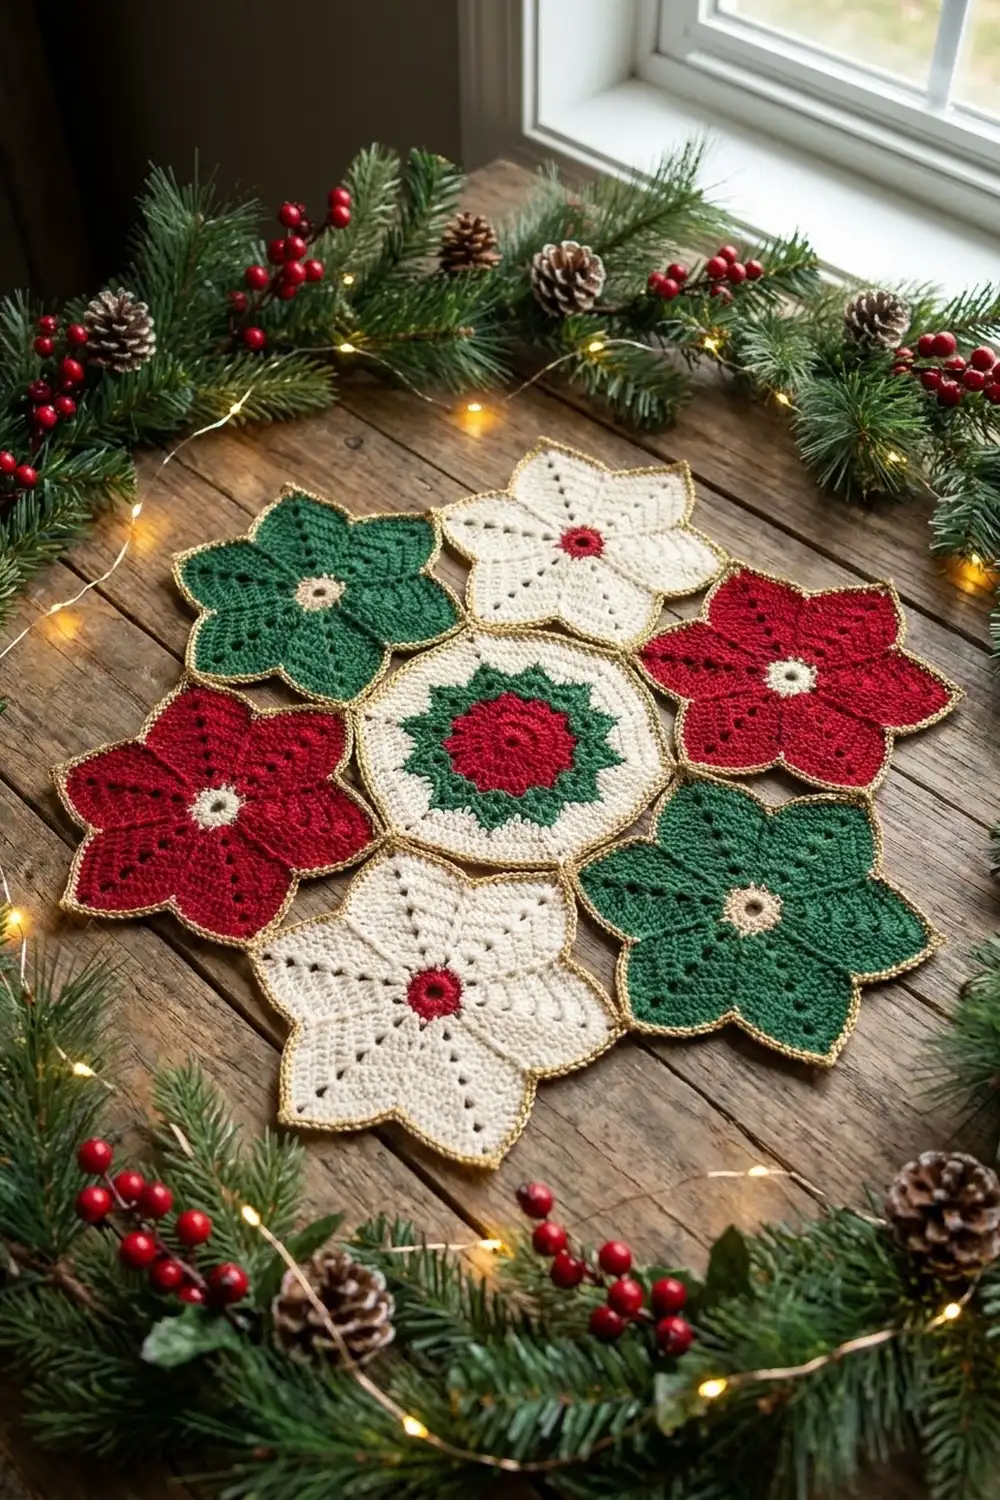
The Golden Star Flower Rosette is a seven-piece holiday centerpiece. It has six pointed, five-petal flowers joined around a round star medallion. Every motif has a fine gold outline, so the finished piece looks like stained glass on a wooden table or under a candle.
The colors are classic Christmas: two deep red flowers, two forest green flowers, two cream flowers, and a center medallion with a red middle, a green twelve-point star, and a cream outer ring. Small eyelets in each petal and around each flower center keep the texture light and lacy.
This pattern uses US crochet terms. The finished rosette measures about 14 in (35.6 cm) across the two widest outer petal tips. Each flower measures 2.5 in (6.4 cm) from center to tip, and the center medallion is 5 in (12.7 cm) in diameter.
Construction is simple. You crochet the center medallion first, including its gold round. Then you crochet the flowers one at a time and join each one while you work its gold round, so nothing needs to be sewn later.
Finished Size and Construction
- Finished size: about 14 in (35.6 cm) across
- Skill level: Intermediate (easy repeats, but you need careful counting and join-as-you-go)
- Terminology: US crochet terms
- Yarn weight: DK (light worsted, #3)
- Hook: 4.0 mm (G-6)
- Number of pieces: 7 (1 round center medallion and 6 flowers)
- Layout: hexagonal rosette, 6 flowers around 1 center
- Flower size: 2.5 in (6.4 cm) center to tip, with border
- Medallion size: 5 in (12.7 cm) diameter, with border
- Size before border: flower 2.25 in (5.7 cm) center to tip; medallion 4.5 in (11.4 cm) diameter
- Border depth: 0.25 in (0.6 cm), one round of gold sc
Materials
Choose a smooth DK yarn with good stitch definition. Mercerized cotton or a cotton blend gives the crispest petal points. Acrylic works too, but it needs steam blocking to stay flat. For the gold, use a DK-weight metallic yarn, or hold a fine metallic thread together with a matching gold yarn.
- Red: 20 g (46 m)
- Green: 20 g (46 m)
- Cream: 25 g (58 m)
- Gold metallic: 15 g (45 m)
These amounts include a margin of about 20% for gauge checks and weaving in.
Tools:
- 4.0 mm (G-6) crochet hook
- Tapestry needle
- 6 stitch markers
- Scissors
- Measuring tape or ruler
- Blocking mat, rust-proof pins, and a spray bottle or steamer
Abbreviations (US Terms)
- ch: chain
- sl st: slip stitch
- sc: single crochet
- hdc: half double crochet
- dc: double crochet
- tr: treble crochet
- sp: space
- st(s): stitch(es)
- MR: magic ring
Special stitch: standing sc. With a slip knot on the hook, insert the hook into the stitch, yarn over, pull up a loop, yarn over, and pull through both loops. This joins a new color without a chain.
Special stitch: tip join. Sc in the tip space and ch 1. Remove the hook and insert it from front to back through the target loop on the finished motif. Pick up the dropped loop and pull it through, ch 1, then sc in the same tip space. The ch 1, join, ch 1 takes the place of the ch 2 on an unjoined tip, so the stitch count stays the same.
Gauge and Checkpoints
You measure gauge on the motifs themselves. Make one flower and the medallion through their last colored round before you buy all your yarn.
- Flower after Round 1: 1.25 in (3.2 cm) diameter
- Flower after Round 3: 1.5 in (3.8 cm) center to tip
- Flower after Round 4: 2.25 in (5.7 cm) center to tip
- Medallion after Round 2: 2.25 in (5.7 cm) diameter
- Medallion after Round 4: 3.5 in (8.9 cm) diameter
- Medallion after Round 5: 4.5 in (11.4 cm) diameter
If your motifs are too big, switch to a 3.75 mm hook. If they are too small, switch to a 4.5 mm hook. Change the hook, not the stitch counts. The joins only line up if every flower is the same size, so keep your tension even from the first flower to the last.
Center Medallion
Make 1. Start with red.
Round 1 (red): MR, ch 3 (counts as first dc), 11 dc in ring. Sl st to top of ch-3. (12 dc)
Round 2 (red): Ch 3 (counts as dc), dc in same st, 2 dc in each st around. Sl st to top of ch-3. (24 dc) Fasten off.
Checkpoint: 2.25 in (5.7 cm) diameter.
Round 3 (green): Standing sc in any dc, (dc, ch 1, dc) in next st. *Sc in next st, (dc, ch 1, dc) in next st; repeat from * 10 more times. Sl st to first sc. (12 sc, 24 dc, 12 ch-1 sps = 12 star points) Fasten off.
Each (dc, ch 1, dc) makes one point of the green star, and each sc makes a valley between two points.
Round 4 (cream): Standing sc in any ch-1 sp, dc in next dc, tr in next sc, dc in next dc. *Sc in next ch-1 sp, dc in next dc, tr in next sc, dc in next dc; repeat from * 10 more times. Sl st to first sc. (12 sc, 24 dc, 12 tr = 48 sts)
The tr fills each valley and the sc caps each green point, so the edge becomes a circle again.
Round 5 (cream): Ch 3 (counts as dc), dc in next 2 sts, 2 dc in next st. *Dc in next 3 sts, 2 dc in next st; repeat from * 10 more times. Sl st to top of ch-3. (60 dc) Fasten off.
Checkpoint: 4.5 in (11.4 cm) diameter. Lay it flat. It should not cup or ruffle.
The gold round for the medallion is in the Border section. Work it before you start the flowers.
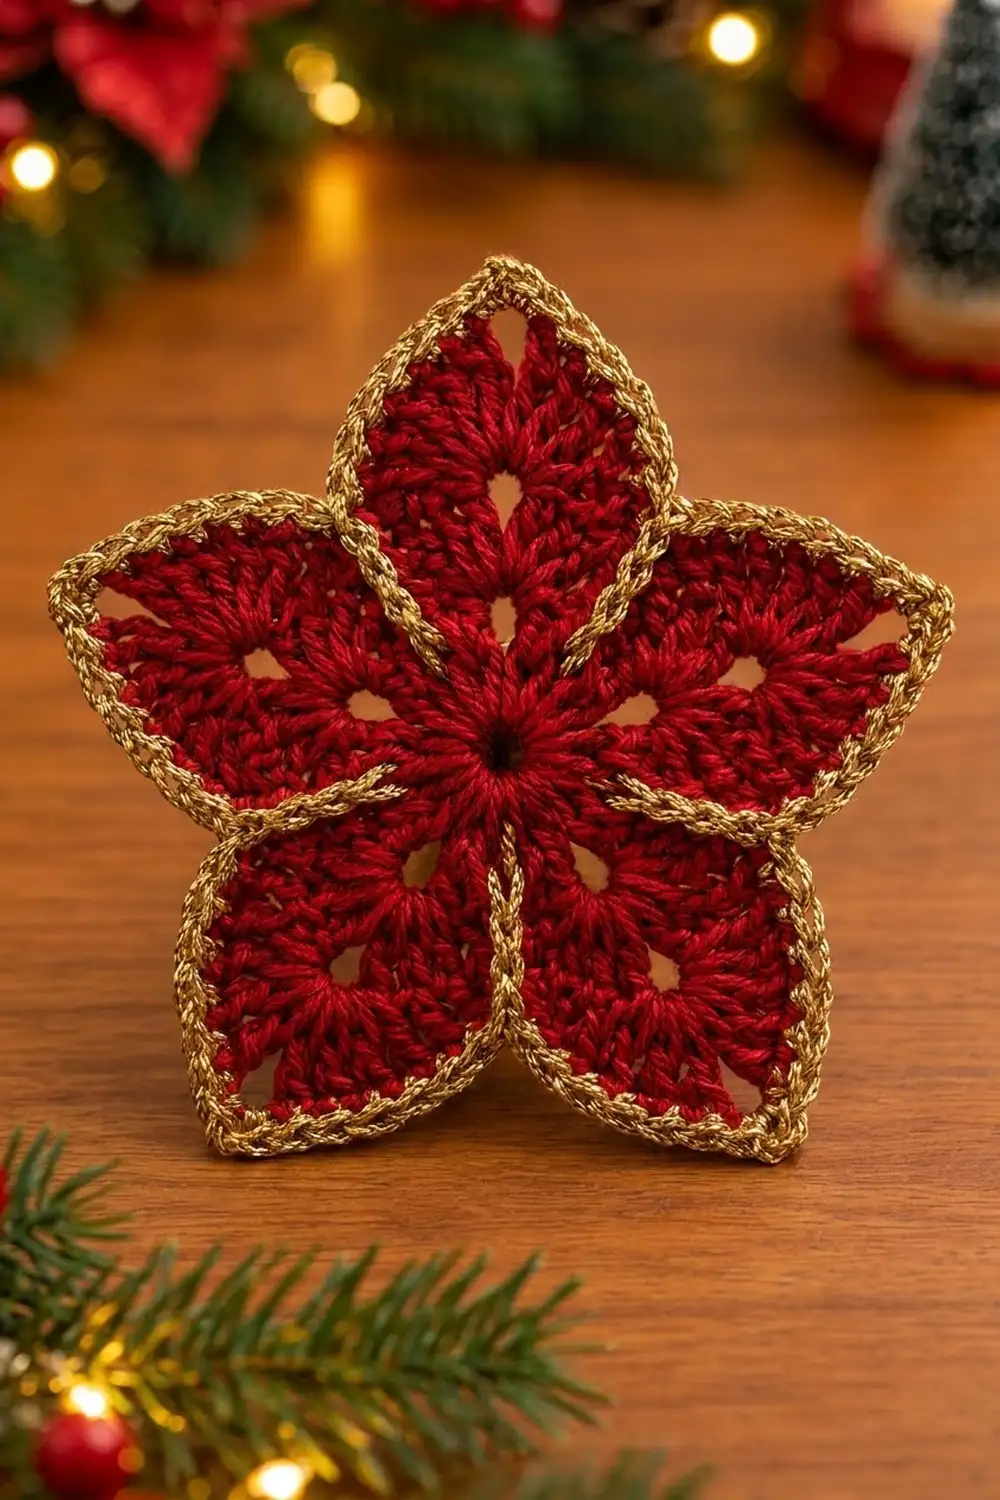
Flower Motif
Make 6: 2 red, 2 green and 2 cream. Work Rounds 1–4 in one color.
Round 1: MR, ch 3 (counts as first dc), 14 dc in ring. Sl st to top of ch-3. (15 dc)
Checkpoint: 1.25 in (3.2 cm) diameter.
Round 2: Ch 3 (counts as dc), dc in same st, ch 2, skip next st, 2 dc in next st, ch 1. *2 dc in next st, ch 2, skip next st, 2 dc in next st, ch 1; repeat from * 3 more times. Sl st to top of ch-3. (20 dc, 5 ch-2 sps, 5 ch-1 sps)
Each petal now has 4 dc around a ch-2 eyelet. The ch-1 sps are the small holes between petals around the flower center.
Round 3: Ch 3 (counts as dc), dc in next dc, (2 dc, ch 2, 2 dc) in ch-2 sp, dc in next 2 dc, sc in ch-1 sp. *Dc in next 2 dc, (2 dc, ch 2, 2 dc) in ch-2 sp, dc in next 2 dc, sc in ch-1 sp; repeat from * 3 more times. Sl st to top of ch-3. (40 dc, 5 sc, 5 ch-2 sps)
Each petal now has 8 dc, with a second eyelet above the first. The sc pulls the petals apart and forms the valleys.
Checkpoint: 1.5 in (3.8 cm) center to tip.
Round 4: Ch 2 (counts as hdc), dc in next 2 dc, 2 dc in next dc, (tr, ch 3, tr) in ch-2 sp, 2 dc in next dc, dc in next 2 dc, hdc in next dc, sl st in next sc. *Hdc in next dc, dc in next 2 dc, 2 dc in next dc, (tr, ch 3, tr) in ch-2 sp, 2 dc in next dc, dc in next 2 dc, hdc in next dc, sl st in next sc; repeat from * 3 more times. Fasten off.
Each petal has 6 sts on each side (hdc, dc, dc, 2 dc, tr), 1 ch-3 tip space, and 1 valley sl st.
Total: 10 hdc, 40 dc and 10 tr = 60 sts, plus 5 ch-3 tip sps and 5 valley sl sts.
The stitches get taller from hdc up to tr, which gives each petal its pointed leaf shape.
Checkpoint: 2.25 in (5.7 cm) center to tip.
Make All Pieces
- Center medallion: 1 (red Rounds 1–2, green Round 3, cream Rounds 4–5)
- Red flowers: 2
- Green flowers: 2
- Cream flowers: 2
- Gold: border round on all 7 pieces
Layout grid, with the rosette lying flat:
        [G1]    [C2]
    [R6]   [CENTER]   [R3]
        [C5]    [G4]
G = green, C = cream, R = red. The numbers show the joining order, going clockwise from the top left. The colors repeat green, cream, red around the ring, so no two flowers of the same color touch.
Joining
You join the pieces during each flower’s gold Border round, using the tip join above. Read this section before you start the flower border.
Join plan:
- Each flower joins 1 petal tip to the center medallion.
- Each flower joins the 2 tips on either side of that one to its neighbors. Flower 1 waits for Flowers 2 and 6 to join to it.
- The other 2 tips on each flower stay free and form the outer edge.
Stitch-to-stitch logic: The medallion’s gold round has 6 ch-2 join loops, one every 10 sc, so they sit exactly 60° apart. Each flower joins one tip to one of those loops. A flower-to-flower join goes into the ch-2 tip space of the neighbor’s matching tip. That makes 12 joins in total: 6 to the center and 6 between flowers.
Order:
- Flower 1 (G1): join 1 tip to the medallion.
- Flowers 2–5: join 1 tip to the medallion and 1 tip to the previous flower.
- Flower 6 (R6): join 1 tip to the medallion, 1 tip to Flower 5 and 1 tip to Flower 1.
Tension: Keep the ch 1 on each side of a join relaxed. If you pull it tight, the tips pucker and the rosette domes. Before each join, lay the pieces flat and check that the petal is not twisted.
Size checkpoint: After Flower 3, measure from the medallion center to the far free tip of Flower 2. It should be 7 in (17.8 cm), which is half of the 14 in (35.6 cm) total.
Border
The border is one round of gold sc around each piece. Border gauge is 20 sc = 4 in (10.2 cm) along a straight edge, and the round is 0.25 in (0.6 cm) deep.
Medallion Border
Round 6 (gold): Standing sc in any dc, sc in next 9 sts, ch 2, place marker in ch-2 sp. *Sc in next 10 sts, ch 2, place marker in ch-2 sp; repeat from * 4 more times. Sl st to first sc. Fasten off.
Count: 60 sc (1 in each existing st) + 6 ch-2 join loops (added). That gives 10 sc for each sixth of the circle.
Flower Border
Round 5 (gold): Treat each petal as one side. Standing sc in the first hdc of a free petal, sc in next 5 sts, (sc, ch 2, sc) in ch-3 tip sp, sc in next 6 sts, sl st in valley sl st. *Sc in next 6 sts, (sc, ch 2, sc) in ch-3 tip sp, sc in next 6 sts, sl st in valley sl st; repeat from * 3 more times. Sl st to first sc. Fasten off.
At a tip that joins another piece, replace (sc, ch 2, sc) with the tip join.
Per petal: 6 + 2 + 6 = 14 sc, 1 ch-2 tip (or join), and 1 valley sl st.
Total: 60 sc (1 in each existing st) + 10 sc (2 added at each tip) = 70 sc, plus 5 tips and 5 valley sl sts.
Why the math works:
- One sc in each stitch keeps the gold edge the same length as the colored edge, so it lies flat.
- The 2 extra sc at each tip turn the point sharply without stretching it.
- The sl st in each valley keeps the inner angle tight instead of filling it in.
- On the medallion, 60 divides evenly by 6, so the 6 join loops line up with the 6 flowers.
Final Blocking
- Weave in all ends on the wrong side, through stitches of the same color. Weave gold ends into gold.
- Spray the rosette until it is lightly damp. Do not soak the metallic yarn.
- Lay it face down on the blocking mat.
- Pin the medallion into a 5 in (12.7 cm) circle.
- Pin each free petal tip outward until the rosette measures 14 in (35.6 cm) across.
- Push each valley gently inward with a pin to sharpen the petal points.
- For acrylic, hold the steam above the piece. Do not press it with the iron.
- Let it dry completely, for at least 12 hours, before you remove the pins.
Final Quality-Control Checklist
- 7 pieces: 1 medallion and 6 flowers, 2 of each color
- Medallion gold round: 60 sc and 6 ch-2 loops
- Each flower’s gold round: 70 sc, 5 tips and 5 valley sl sts
- 12 joins in total, with no twisted petals
- Colors run green, cream, red, green, cream, red going clockwise
- The rosette measures 14 in (35.6 cm) across and lies flat
- No loose ends show on the front
Troubleshooting
Petals curl forward: Your Round 4 tension is too tight. Use a hook 0.25 mm larger for that round only.
Medallion ruffles: Check that Round 5 has exactly 60 dc. If the count is right, use a smaller hook for Round 5.
Medallion cups: Round 4 is probably short of 48 sts. Make sure there is a tr in every valley.
Gold edge waves: There are extra sc. Recount for 14 sc per petal.
Flowers don’t reach each other: One flower is smaller than the others. Block it again, or remake it with a slightly larger hook.
Joins show gaps: Tighten the sc that comes right after the join, not the chains.
Care
Hand wash in cool water with mild soap, roll the piece in a towel to press out the water, and dry it flat with the petals reshaped. Do not tumble dry, because heat can dull the metallic gold.
Final Notes
The measurements build in a short chain. A flower measuring 2.25 in (5.7 cm) center to tip becomes 2.5 in (6.4 cm) with its gold border. A medallion measuring 4.5 in (11.4 cm) becomes 5 in (12.7 cm). Six flowers joined around the medallion make a 14 in (35.6 cm) rosette. If every motif matches its checkpoint, the joins will line up.
Happy crocheting!