

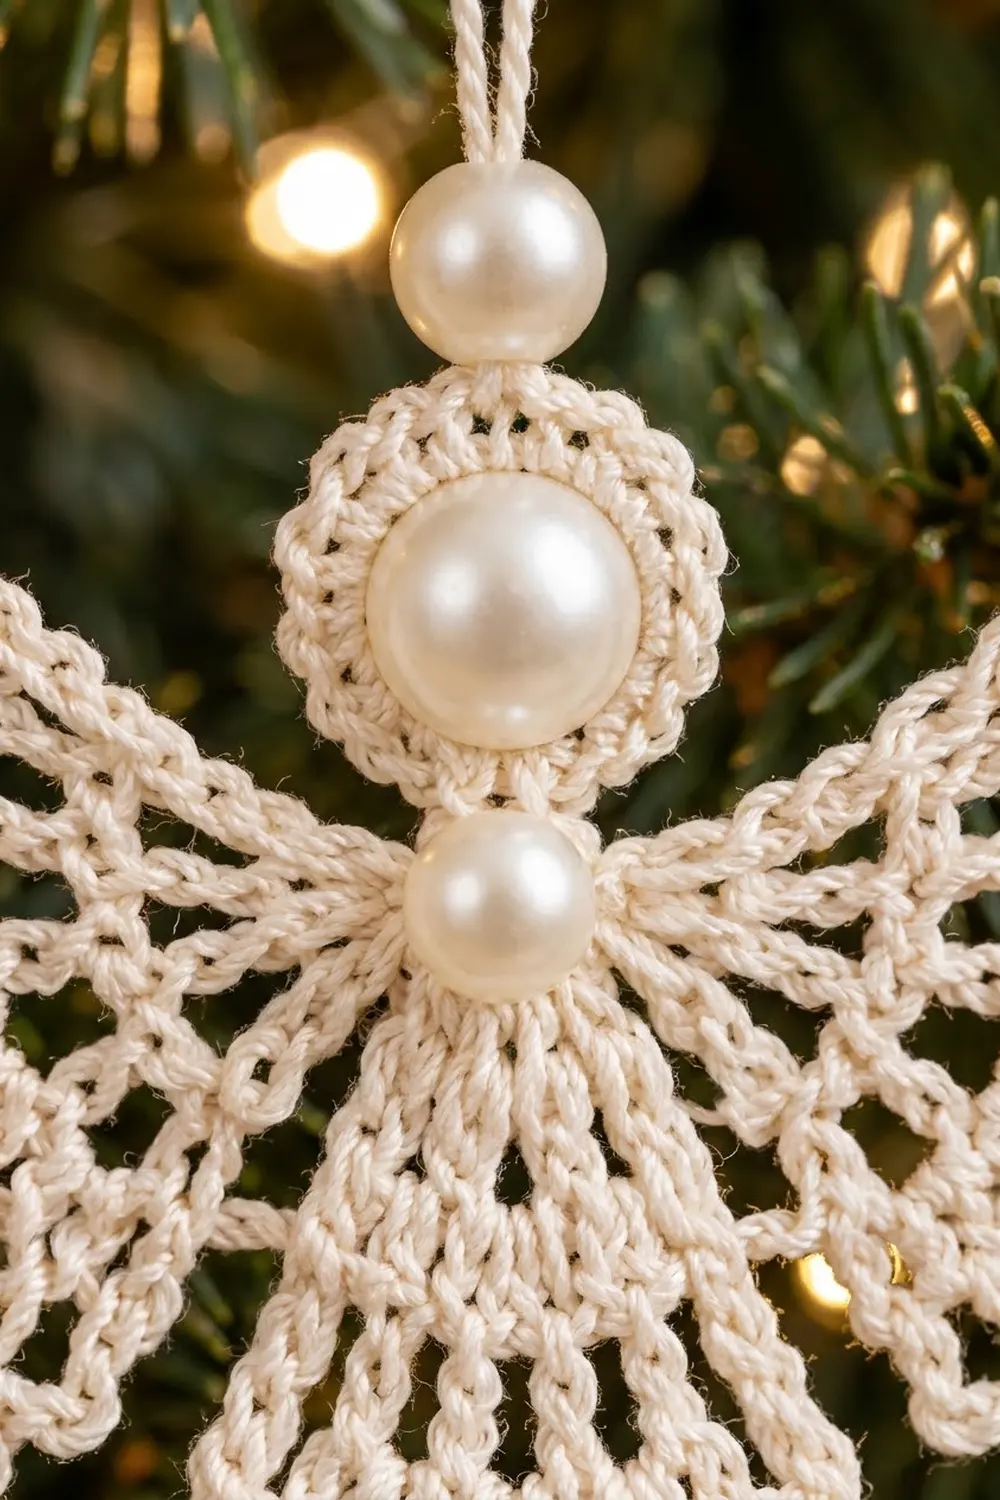
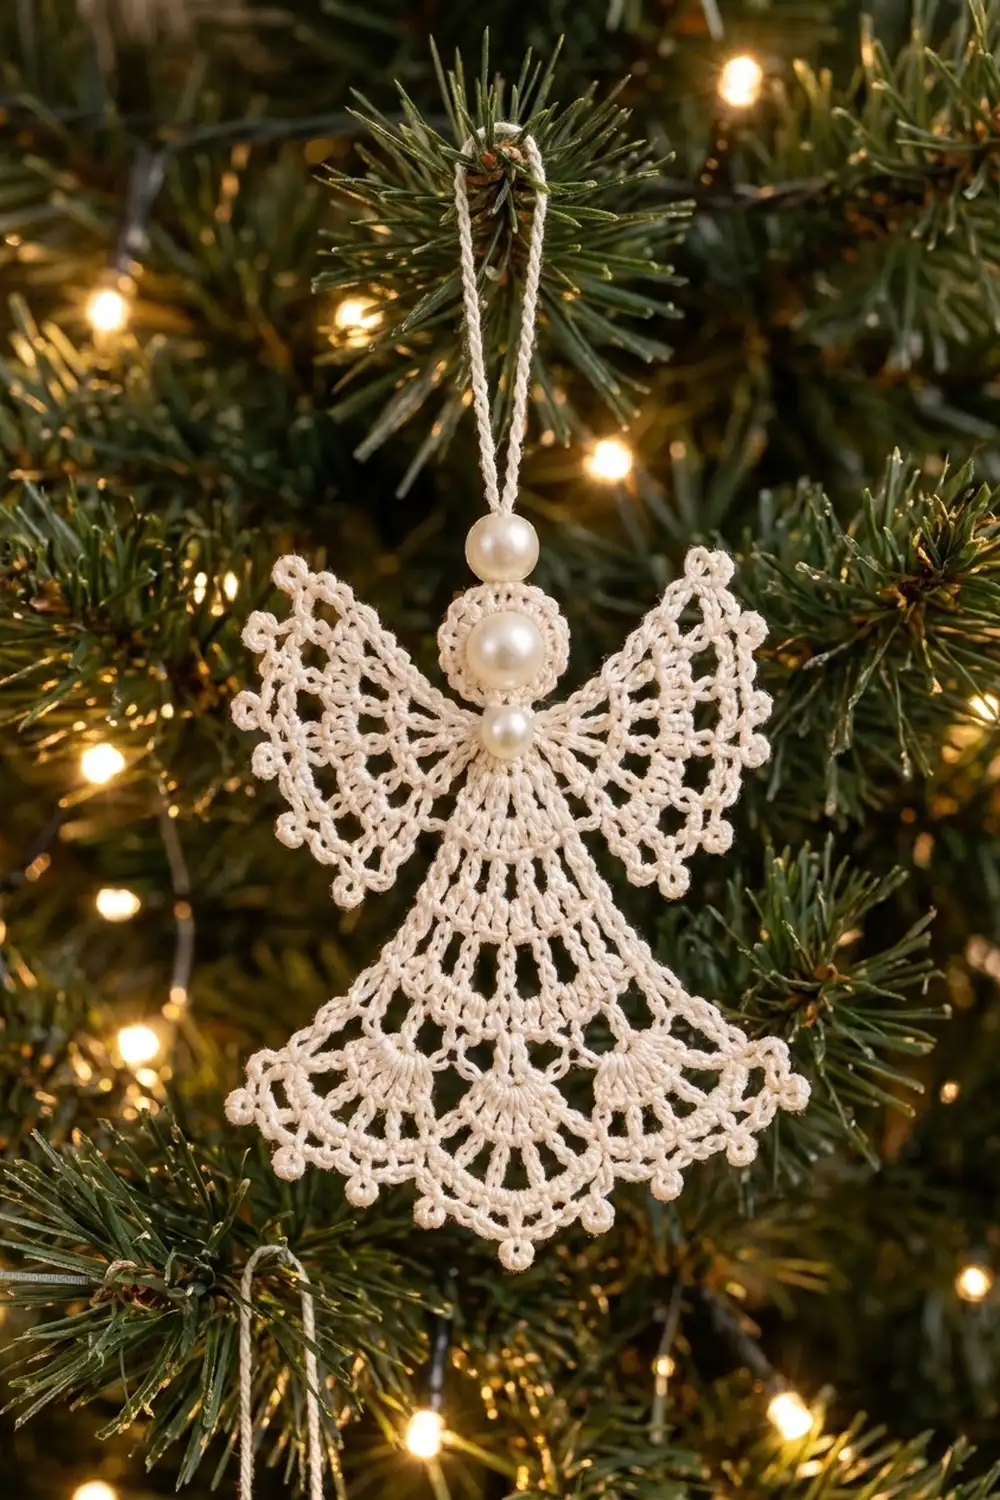
The Pearl Grace Angel is a small lace ornament in ivory crochet thread. It has a round head with a pearl in the middle, wide fan-shaped wings and a bell skirt that ends in a scalloped hem trimmed with picots. It looks delicate on a tree, and it is quick to make once you are comfortable with thread.
The design uses one color only, a soft ivory or cream. Three pearl beads finish it: one at the face, one at the neck and one on the hanging loop. The style is classic heirloom lace, and it also works well in white or ecru.
This pattern uses US crochet terms. The finished angel measures 3.5 in (8.9 cm) across the hem, 4 in (10.2 cm) across the wings and 3 in (7.6 cm) tall from the top of the head to the hem picots. The hanging loop adds about 1.75 in (4.4 cm).
You make the angel in one piece, from the top down. Start with the head in rounds, then work the yoke and skirt in rows straight off the bottom of the head. The wings go into the side edges of the yoke. A picot border goes around the hem and the wing edges last. Nothing is sewn together except the pearls.
Finished Size and Construction
- Finished size: 3.5 in (8.9 cm) hem width, 4 in (10.2 cm) wingspan, 3 in (7.6 cm) tall
- Skill level: Intermediate (fine thread, simple stitches)
- Terminology: US crochet terms
- Yarn weight: Lace (0), size 10 crochet cotton thread
- Hook: 1.5 mm steel hook
- Number of pieces: 1
- Layout: single piece, no assembly or joining
- Piece size: same as finished size
- Size before border: 3 in (7.6 cm) hem width, 3.5 in (8.9 cm) wingspan, 2.75 in (7.0 cm) tall
- Border depth: 0.25 in (0.6 cm) on the hem and wing edges
Materials
Choose a mercerized size 10 cotton thread. Mercerized cotton has a slight sheen that matches the pearls. It holds starch well and shows each stitch clearly. Avoid fuzzy or acrylic threads, which blur the lace and don’t block crisply.
- Ivory (only color): 10 g, about 28 m (31 yd)
Quantities include a comfortable margin. One angel uses roughly 6 g, so the extra covers a gauge test and some ripping back.
Tools and notions:
- 1.5 mm steel crochet hook
- 1 white or ivory pearl bead, 8 mm (face)
- 2 white or ivory pearl beads, 5 mm (neck and hanging loop)
- Fine beading or sewing needle and ivory sewing thread
- Small tapestry needle for weaving in ends
- 3 locking stitch markers
- Small scissors
- Fabric stiffener or heavy spray starch
- Foam blocking board, plastic wrap and rustproof pins
Abbreviations (US Terms)
- ch – chain
- sl st – slip stitch
- sc – single crochet
- dc – double crochet
- tr – treble crochet
- sp(s) – space(s)
- st(s) – stitch(es)
- RS / WS – right side / wrong side
Special stitch – picot: ch 3, sl st in the 3rd ch from hook (the first ch made).
Gauge and Checkpoints
Gauge: 14 dc = 1 in (2.5 cm) and 5 rows of dc = 1 in (2.5 cm) with size 10 thread and a 1.5 mm hook. Head Rounds 1–2 = 0.75 in (1.9 cm) across.
Gauge matters in this lace because stitch count alone shapes the skirt. Make the head first and measure it. If the head is right, the rest of the angel will usually come out right too.
Checkpoints (measured flat, unstretched):
- After head Round 2: 0.75 in (1.9 cm) across
- After yoke Row 3: 1.1 in (2.8 cm) wide; 1.35 in (3.4 cm) from top of head
- After skirt Row 6: 3 in (7.6 cm) wide; 2 in (5.1 cm) from top of head
- After skirt Row 8: 3 in (7.6 cm) wide; 2.75 in (7.0 cm) from top of head
- After wings: 3.5 in (8.9 cm) wingspan, each wing 1.2 in (3.0 cm) out from the yoke edge
- After border: 3.5 in (8.9 cm) hem, 4 in (10.2 cm) wingspan, 3 in (7.6 cm) tall
If your head is too big (over 0.75 in / 1.9 cm), try a 1.25 mm hook. If it is too small, try a 1.75 mm hook. A difference of 0.1 in (0.3 cm) at the head grows to about 0.5 in (1.3 cm) at the hem, so adjust early.
Head
Ch 6, sl st to the first ch to form a ring.
Round 1: Ch 3 (counts as dc), 15 dc in ring, sl st to top of ch-3. (16 dc)
Round 2: Ch 1, sc in same st, ch 2, sc in next dc, ch 2; repeat from * 14 more times, sl st to first sc. (16 sc, 16 ch-2 sps)
Sl st into the next ch-2 sp. This sp is now the bottom of the head. The sp directly opposite (the 9th sp counting this one as the 1st) is the top of the head, where the hanging loop goes later. Mark it with a stitch marker.
Check: the head lies flat and measures 0.75 in (1.9 cm). Do not fasten off.
Yoke
Work the yoke in rows from the bottom ch-2 sp of the head. Row 1 is the RS.
Row 1 (RS): Ch 3 (counts as dc), 4 dc in same ch-2 sp. Turn. (5 dc)
Row 2 (WS): Ch 3 (counts as dc), dc in first st, 2 dc in each of next 4 sts (the last one is the top of the turning ch). Turn. (10 dc)
Row 3 (RS): Ch 3 (counts as dc), dc in first st, dc in next st, 2 dc in next st; repeat from * 3 more times, dc in last st. Turn. (15 dc)
Row 3 count: 2 + (4 x 3) + 1 = 15 dc, using all 10 stitches of Row 2. The yoke is now a small solid fan 1.1 in (2.8 cm) wide.
Skirt
Row 4 (WS, treble rays): Ch 5 (counts as tr + ch 1), tr in next dc, ch 1; repeat from * 12 more times, tr in last dc. Turn. (15 tr, 14 ch-1 sps)
Row 5 (RS, lattice): Ch 1, sc in first tr, ch 3, sc in next tr; repeat from * 13 more times, working the last sc in the 4th ch of the turning ch-5. Turn. (15 sc, 14 ch-3 loops)
Row 6 (WS, solid band): Ch 3 (counts as dc), 2 dc in next ch-3 loop, dc in next sc; repeat from * 13 more times. Turn. (43 dc)
Row 6 count: 1 turning ch + (14 x 3) = 43 dc. Checkpoint: 3 in (7.6 cm) wide and 2 in (5.1 cm) from the top of the head.
Row 7 (RS, arches): Ch 1, sc in first dc, ch 7, skip next 5 dc, sc in next dc; repeat from * 6 more times, working the last sc in the top of the turning ch-3. Turn. (8 sc, 7 ch-7 arches)
Row 7 check: 1 + (7 x 6) = 43 stitches used, so every arch spans exactly 5 skipped dc.
Row 8 (WS, fans): Ch 1, sc in first sc, 9 dc in next ch-7 arch, sc in next sc; repeat from * 6 more times. (7 fans of 9 dc + 8 sc = 71 sts)
Do not fasten off. Place the live loop on a locking stitch marker; you return to it for the hem border. Checkpoint: the skirt is 3 in (7.6 cm) wide at the hem and the angel is 2.75 in (7.0 cm) tall.
Wings (make 2)
Work each wing into one side edge of the yoke, across the ends of Rows 1–3. Turn the angel so that side edge is on top. The wing grows outward and upward toward the head.
Wing Row 1: Join thread with a sl st in the end of yoke Row 3. Ch 4 (counts as tr), tr in same row end, 2 tr in end of Row 2, 2 tr in end of Row 1. Turn. (6 tr)
Wing Row 2: Ch 4 (counts as dc + ch 1), dc in first st, ch 1, (dc, ch 1, dc) in next st; repeat from * 4 more times, working the last group in the top of the turning ch. Turn. (12 dc, 11 ch-1 sps)
Wing Row 3: Ch 3 (counts as dc), dc in next ch-1 sp, dc in next dc; repeat from * 10 more times, working the last dc in the 3rd ch of the turning ch-4. Turn. (23 dc)
Row 3 count: 1 + (11 x 2) = 23 dc, one per existing dc plus one per ch-1 sp.
Wing Row 4 (mesh): Ch 1, sc in first dc, ch 4, skip next dc, sc in next dc; repeat from * 10 more times, working the last sc in the top of the turning ch-3. (12 sc, 11 ch-4 loops)
Place the live loop on a stitch marker. Work the second wing the same way on the other side edge. Because you turn the angel over to reach that edge, the second wing comes out as a mirror image of the first.
Checkpoint: each wing reaches 1.2 in (3.0 cm) out from the yoke, its outer edge is about 1.6 in (4.1 cm) long, and the wingspan is 3.5 in (8.9 cm). The wing tips should sit about level with the head.
Hanging Loop
Join thread in the marked top ch-2 sp of the head. Ch 50, sl st in the same sp. Fasten off. The loop hangs about 1.75 in (4.4 cm) above the head.
Border
Border gauge: one picot plus the sc around it adds 0.25 in (0.6 cm) to an edge. That is 0.25 in (0.6 cm) at the hem and at each wing tip. It turns the 3 in (7.6 cm) hem into 3.5 in (8.9 cm) and the 3.5 in (8.9 cm) wingspan into 4 in (10.2 cm).
Hem Border (Row 9, RS)
Put the live loop from Row 8 back on your hook and turn so the RS faces you.
Ch 1, sc in first sc, [ch 3, skip next dc, sc in next dc, picot] 4 times, ch 3, skip last dc of fan, sc in next sc; repeat from * 6 more times. Fasten off.
Per fan: 5 ch-3 sps and 4 sc with picots. Full row: 36 sc, 35 ch-3 sps, 28 picots.
Why it works: each fan has 9 dc, an odd number. The picots land on dc 2, 4, 6 and 8, so they sit evenly on both sides of the center dc (dc 5). The skips use dc 1, 3, 5, 7 and 9, so the bracket covers exactly 9 stitches per fan before the sc in the sc between fans. The 8 sc from Row 8 stay as anchor points, so every scallop starts and ends in the same place.
Wing Border (each wing)
Put the live loop from Wing Row 4 back on your hook and turn.
Ch 1, (2 sc, picot, 2 sc) in next ch-4 loop; repeat from * 10 more times, sl st in last sc of Wing Row 4. Fasten off. (44 sc, 11 picots per wing)
Why it works: Wing Row 4 has 11 loops, so each loop gets one centered picot, 11 per wing. Four sc per ch-4 loop fill the loop without stretching it or making it ruffle.
Total border picots: 28 on the hem + 11 + 11 on the wings = 50.
Final Blocking
- Weave in all ends along solid stitches (head, yoke or Row 6) so they disappear.
- Mix fabric stiffener according to the label, or use heavy spray starch.
- Soak the angel completely, then press out the excess between two towels. Do not wring.
- Cover the foam board with plastic wrap. Lay the angel RS up.
- Pin the head round first, then pin the yoke straight down from it.
- Pin the hem out to 3.5 in (8.9 cm), with a pin in every picot and one at the sc between each fan.
- Pin the wings out and up to a 4 in (10.2 cm) wingspan, with a pin in each wing picot.
- Check that the total height is 3 in (7.6 cm) and that the two wings mirror each other.
- Let it dry completely, usually 12–24 hours.
- Unpin. Sew the 8 mm pearl to the center of the head on the RS. Sew one 5 mm pearl at the neck over yoke Row 1 and the other at the base of the hanging loop, just above the head.
Final Quality-Control Checklist
- Head: 16 dc and 16 ch-2 sps, flat, 0.75 in (1.9 cm)
- Yoke Row 3: 15 dc, 1.1 in (2.8 cm) wide
- Skirt Row 4: 15 tr; Row 5: 14 loops; Row 6: 43 dc
- Row 7: 7 arches; Row 8: 7 fans of 9 dc
- Wings: 6 tr, 12 dc, 23 dc and 11 loops each, mirrored
- Border: 28 hem picots, 11 picots on each wing
- Size: 3.5 in (8.9 cm) hem, 4 in (10.2 cm) wingspan, 3 in (7.6 cm) tall
- Pearls stitched on firmly, with no sewing thread showing on the RS
- Hanging loop centered over the head, angel hangs straight
Troubleshooting
Head ruffles or cups. Ruffling means your tension is too loose or the ring is too big; try a smaller hook or ch 5 for the ring. Cupping means the 16 dc are crowded; loosen up slightly.
Skirt curls inward. Your Row 4 tr or Row 7 chains are too tight. Chain loosely, or use a hook 0.25 mm larger for those rows only.
Hem ripples. The fans are too full. Pull each dc snug and check that you have exactly 9 dc per arch.
Wings droop. Use a firmer stiffener and pin the wing tips higher. Make sure all 6 tr in Wing Row 1 go into the row ends, not through a single strand.
Wings don’t match. Recount Wing Row 2 (12 dc) on both sides. One missing (dc, ch 1, dc) group shifts the whole fan.
Picots twist or lean. Work the sl st through the front loop and back bump of the first ch, and keep the tension the same on every picot chain.
Care
Hand wash gently in cool water if needed, then re-starch and block to the original measurements. Store flat in a box between layers of tissue paper so the wings keep their shape.
Final Notes
The measurements build in a simple chain. A 0.75 in (1.9 cm) head leads to a 1.1 in (2.8 cm) yoke, a 3 in (7.6 cm) skirt by Row 6 and a body 2.75 in (7.0 cm) tall after Row 8. The wings bring the span to 3.5 in (8.9 cm). The picot border finishes the angel at 3.5 in (8.9 cm) across the hem, 4 in (10.2 cm) across the wings and 3 in (7.6 cm) tall. If the head is right, the rest follows.
Make one for the top branch, then a whole choir for the tree or for gift tags.
Happy crocheting!