

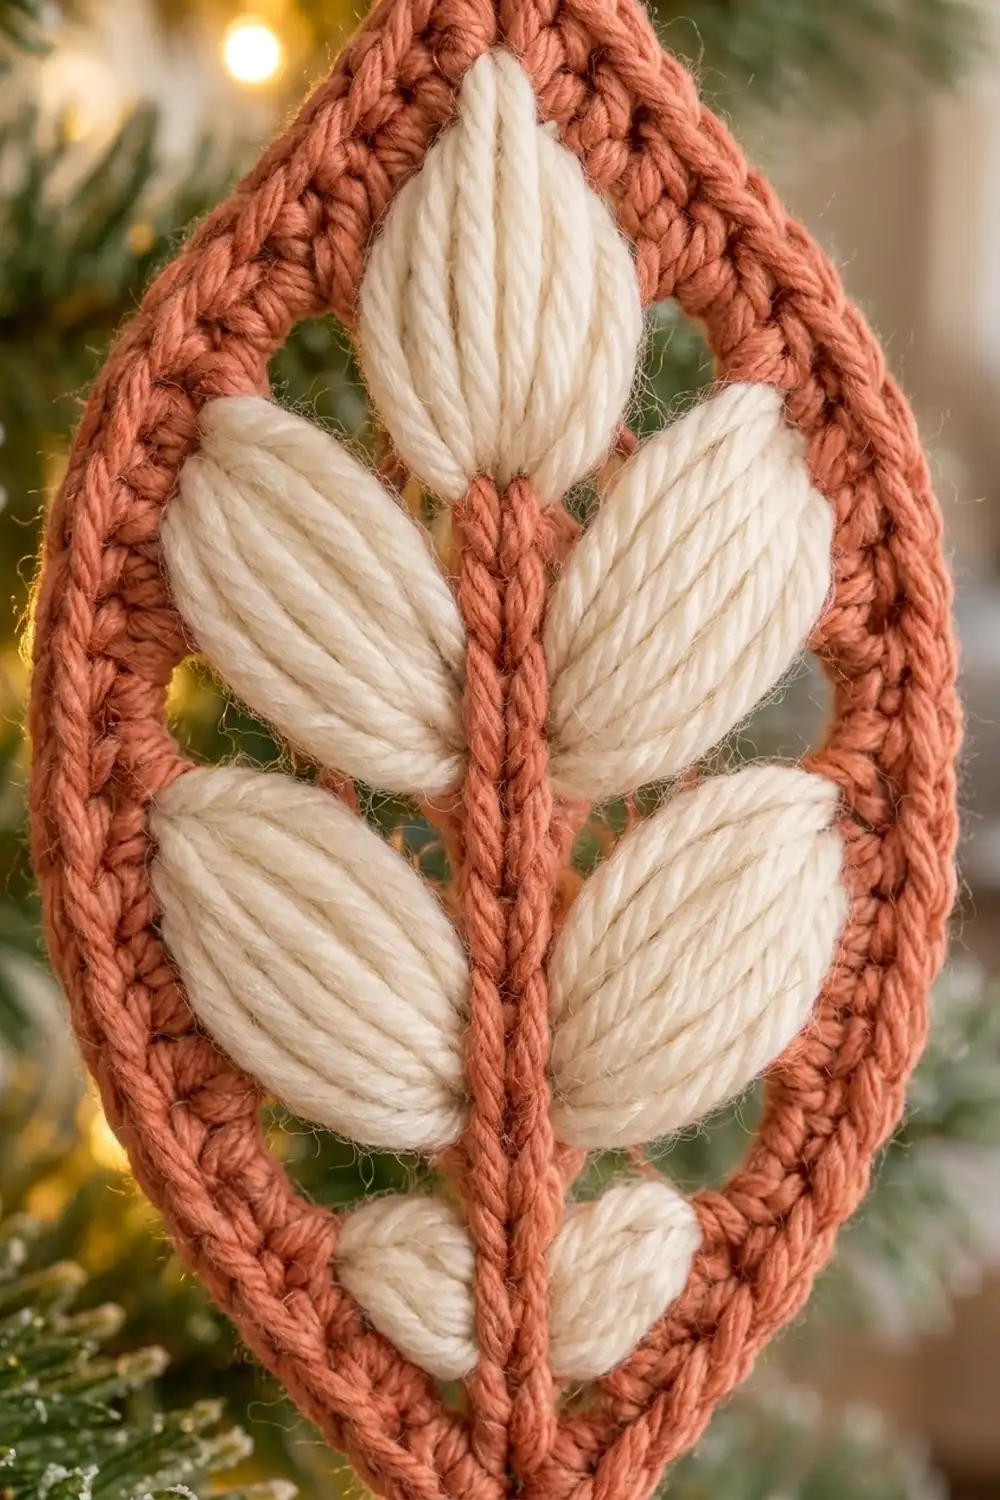
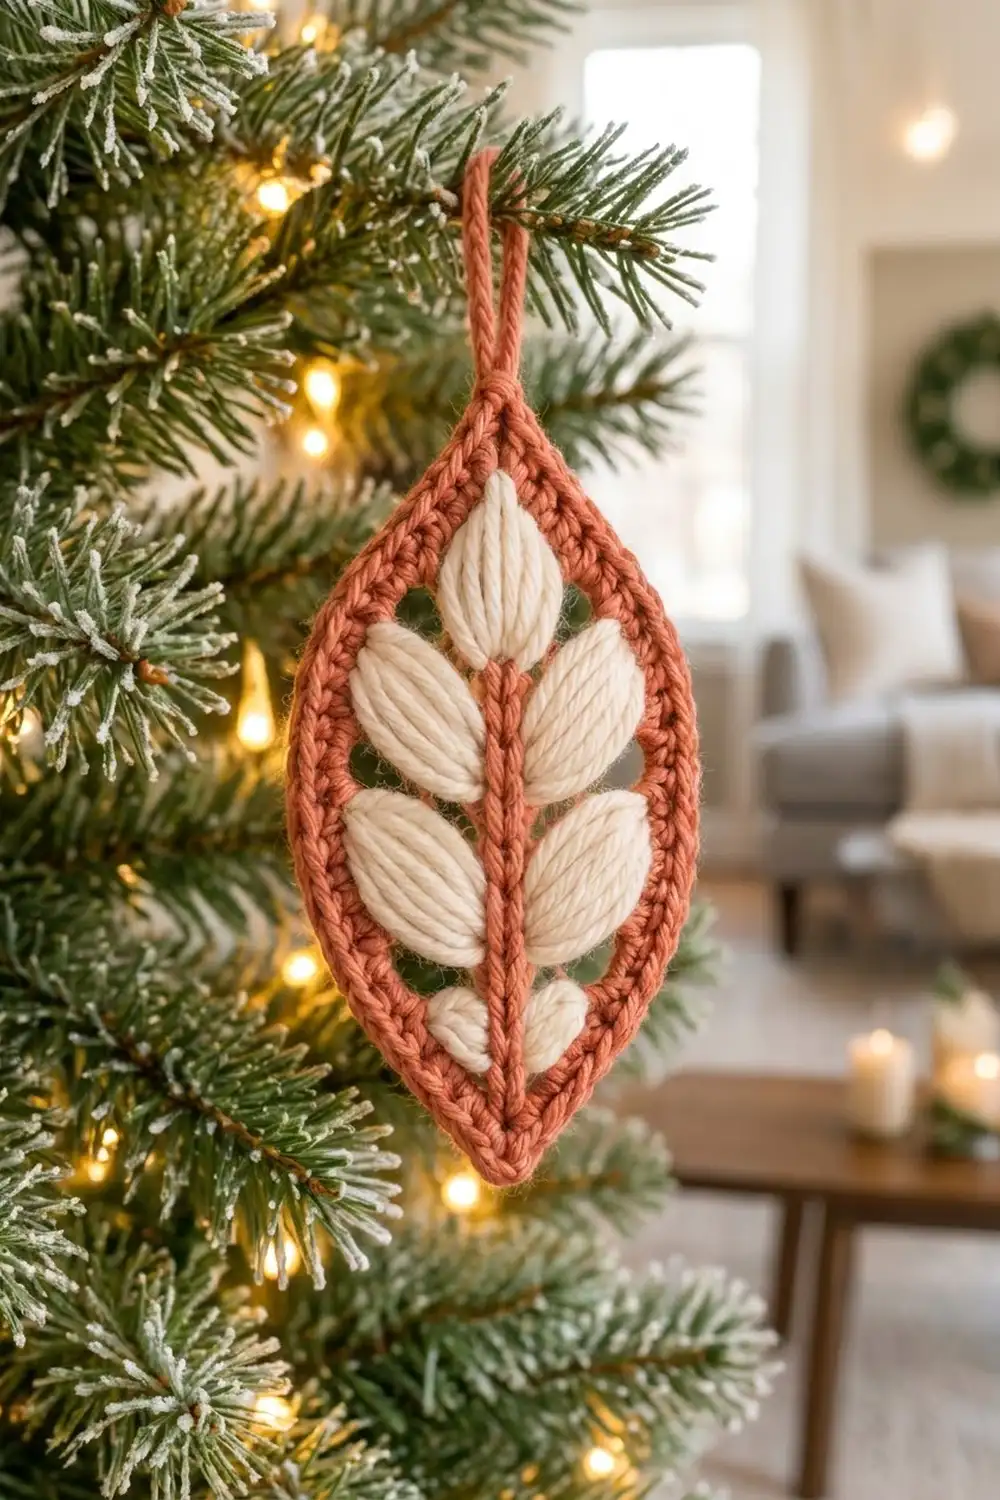
The Hearth Sprig Leaf Ornament is a small leaf shape with pointed ends, made as one single piece. A warm terracotta frame outlines an open center. A raised terracotta stem runs from tip to tip, and seven plump cream leaflets branch off the stem like a sprig of winter greenery.
The palette uses just two colors: terracotta and cream. The cream leaflets are made with long pulled-up loops gathered into a puff, so they look soft, glossy and almost embroidered against the crisp single crochet frame. The style is cozy and rustic, and it looks especially good on a green tree with warm lights.
This pattern uses US crochet terms. The finished ornament is 4 1/4 in (10.8 cm) tall and 2 1/2 in (6.4 cm) wide. The hanging loop adds about 2 in (5.1 cm) more.
Here is the order of work. First, you chain a ring that becomes the inner edge of the frame and work one round of single crochet around it. Next, you add a stem across the opening with a chain and a row of slip stitches. Then you work the cream leaflets directly into the stem. One last terracotta round finishes the frame, and you chain the hanging loop at the top tip.
Finished Size and Construction
- Finished size: 4 1/4 in (10.8 cm) tall x 2 1/2 in (6.4 cm) wide, plus a 2 in (5.1 cm) hanging loop
- Skill level: Easy-Intermediate
- Terminology: US crochet terms
- Yarn weight: Worsted (#4)
- Hook: 4.0 mm (G-6)
- Number of pieces: 1
- Layout: one standalone motif, worked in the round, no joining
- Opening (inside the frame): 3 1/4 in (8.3 cm) tall x 1 1/2 in (3.8 cm) wide
- Size before border (after Rnd 2): 3 3/4 in (9.5 cm) x 2 in (5.1 cm)
- Border depth: 1/4 in (0.6 cm), one round of single crochet
Materials
Choose a smooth worsted-weight yarn that shows stitches clearly. Cotton or a cotton blend gives the crispest frame and the shiniest leaflets. A soft acrylic also works, but the leaflets will look a little fuzzier.
- Terracotta (Color A): 8 g / about 16 m (17.5 yd), for the frame, stem, border and hanging loop
- Cream (Color B): 5 g / about 10 m (11 yd), for the seven leaflets
Tools:
- 4.0 mm (G-6) crochet hook
- Tapestry needle
- Scissors
- 2 stitch markers
- Ruler or tape measure
- Blocking mat and rust-proof pins
- Optional: light spray starch
All yarn amounts include extra yarn for a gauge swatch, yarn tails and a possible restart.
Abbreviations (US Terms)
- ch: chain
- sc: single crochet
- sl st: slip stitch
- st(s): stitch(es)
- yo: yarn over
- Rnd: round
Special stitch: Long-Loop Leaflet (LLL). Put a slip knot of Color B on your hook. *Yo, insert the hook in the stem st given in the pattern, yo, and pull up a loop to the stated length. Repeat from * 4 more times (5 repeats total, 11 loops on hook). Hold the loops even with your index finger. Yo and pull through all 11 loops, then ch 1 to lock the leaflet tip.
Small Long-Loop Leaflet (small LLL): Work the same as the LLL, but make 4 repeats (9 loops on hook) and pull each loop up to 5/8 in (1.6 cm).
Gauge and Checkpoints
Gauge: 18 sc and 18 rnds = 4 in (10.2 cm). That is 4.5 sc per inch. Each round of sc adds about 1/4 in (0.6 cm) to every edge.
Make one full ornament before you start a batch. Check your work at each stage:
- After Rnd 1: Lay the chain ring out as a leaf shape with pointed ends. It should be about 3 1/4 in (8.3 cm) tall and 1 1/2 in (3.8 cm) wide.
- After Rnd 2: The frame measures 3 3/4 in (9.5 cm) x 2 in (5.1 cm).
- After the stem: The stem crosses the opening without sagging or pulling, about 3 1/4 in (8.3 cm).
- After the leaflets: Large leaflets are about 1 in (2.5 cm) long and 1/2 in (1.3 cm) wide.
- After the border: The ornament measures 4 1/4 in (10.8 cm) x 2 1/2 in (6.4 cm).
If your piece is too big, go down to a 3.75 mm (F-5) hook. If it is too small, go up to a 4.5 mm (7) hook. Keep the leaflet loop lengths the same either way, because you measure them instead of counting them.
Pattern
Frame Base (Color A)
Rnd 1: Ch 36. Make sure the chain isn’t twisted, then sl st into the first ch to form a ring. (36 ch)
Mark ch 1 as the top tip and ch 19 as the bottom tip.
Rnd 2: Ch 1, 3 sc in ch 1 (top tip), sc in next 8 ch, 2 sc in next ch, sc in next 8 ch, 3 sc in next ch (bottom tip, ch 19), sc in next 8 ch, 2 sc in next ch, sc in next 8 ch, sl st to first sc. (42 sc)
Count check: 36 sts worked 1 per ch + 6 extra (2 at each tip, 1 at the middle of each side) = 42 sc.
Each side has 20 sc. A side runs from the sc after one tip center to the sc before the other tip center. Two sides of 20 plus the 2 tip-center sc = 42.
Move the markers into the center sc of each 3-sc tip. Fasten off and weave in the ends.
Stem (Color A)
Lay the frame flat with the top tip pointing up. The foundation chain along the inner edge still has one free strand facing the opening.
Step 1: Join Color A with a sl st into the free strand of the foundation ch at the bottom tip (ch 19).
Step 2: Ch 15. Stretch the chain gently up through the middle of the opening and sl st into the free strand of ch 1 at the top tip. (15 ch)
Step 3: Turn. Working back down toward the bottom tip, sl st into the back bump of each of the 15 ch. Then sl st into the same free strand at the bottom tip. (15 sl st)
This makes the raised, doubled stem line that runs straight down the middle. Fasten off and weave in the ends along the back of the stem.
Number the stem sl sts 1 to 15, starting at the top.
Checkpoint: The stem should be straight and slightly taut. If it sags, pull out the stem and make it again with 14 ch and 14 sl sts. If it pulls the frame inward, use 16.
Leaflets (Color B)
Every leaflet starts at the stem and points upward. Make each leaflet separately, and leave a 6 in (15.2 cm) tail when you fasten off.
Top leaflet: Make an LLL into stem st 1. Pull each loop up to 1 in (2.5 cm) and point the loops straight up toward the top tip. Ch 1 and fasten off.
Pair 1 (large): Make an LLL into the left outer strand of stem st 4. Use 1 in (2.5 cm) loops and angle them up and out at about 45 degrees. Fasten off. Repeat in the right outer strand of stem st 4.
Pair 2 (large): Work the same as Pair 1, into the left and right outer strands of stem st 8.
Pair 3 (small): Make a small LLL into the left outer strand of stem st 12, then another into the right outer strand. Fasten off after each one.
Leave stem sts 13 to 15 bare, so a short piece of stem shows below the last pair.
Total: 7 leaflets (1 top leaflet, 2 large pairs, 1 small pair).
Tension tip: Keep your hook hand still and let the loops grow off your index finger. Don’t pull each loop tight against the stem, or the base of the leaflet will pucker.
Securing the tips: Thread a tail onto the tapestry needle. Take one small stitch from the leaflet tip into the back of the nearest Rnd 2 sc on the inner edge, so the tip just meets the frame. Then run the tail down through the middle of the leaflet strands and weave it into the back of the stem. Repeat for every leaflet.
Checkpoint: The two leaflets in each pair should match each other and lie flat. Each pair should just touch the leaflets above it.
Border (Color A)
The border uses the same gauge as the rest of the piece: 4.5 sc per inch. This round adds 1/4 in (0.6 cm) to every edge.
Rnd 3: Join Color A with a sl st in the first sc of Rnd 2 (the sc just before the marked top-tip center). Ch 1, sc in the same sc, 3 sc in the marked top-tip center, sc in next 10 sc, 2 sc in next sc, sc in next 9 sc, 3 sc in the marked bottom-tip center, sc in next 10 sc, 2 sc in next sc, sc in next 8 sc, sl st to first sc. (48 sc)
Count check: 42 sts worked 1 per existing st + 6 extra (2 at each tip, 1 at the middle of each side) = 48 sc.
Per side: each side starts with 20 sc. It gains 1 sc in the middle of the side and 1 new sc next to each tip center, so each side now has 23 sc. Two sides of 23 plus the 2 tip-center sc = 48.
Why the math works: When you add a band around a rounded shape, the outer edge has to be about 2 x 3.14 x the band depth longer than the inner edge. For a band 1/4 in (0.6 cm) deep, that is about 1 1/2 in (3.8 cm), or roughly 7 sts. Adding 6 sts per round keeps the frame almost flat, and blocking evens out the small difference. Placing most of the extra sts at the tips keeps the points sharp instead of rounding them off.
Hanging loop: Don’t fasten off. Sl st into the next 2 sc to reach the top-tip center. Ch 18, then sl st into the same top-tip center sc. When folded, the loop is about 2 in (5.1 cm) tall. Fasten off and weave the end into the frame.
Final Blocking
- Lightly spray the ornament with water, or wet it and gently squeeze out the extra water in a towel.
- Lay it face up on the blocking mat.
- Pin the top and bottom tips so the piece measures 4 1/4 in (10.8 cm) tall.
- Pin each side at its widest point so the piece measures 2 1/2 in (6.4 cm) wide.
- Straighten the stem so it runs exactly down the center.
- Shape each leaflet with your fingers so it is smooth and evenly rounded, and set the two leaflets in each pair at matching angles.
- For a stiffer ornament, add a light coat of spray starch.
- Let the piece dry completely before you remove the pins.
Final Quality-Control Checklist
- Rnd 2 has 42 sc and Rnd 3 has 48 sc.
- Each side of the border has 23 sc between the tip centers.
- The tips are pointed and line up with the stem.
- The stem has 15 ch and 15 sl sts and lies straight.
- There are 7 leaflets: 1 top leaflet, 2 large pairs and 1 small pair.
- The two leaflets in each pair match.
- The finished size is 4 1/4 in (10.8 cm) x 2 1/2 in (6.4 cm).
- The hanging loop is centered on the top tip and is about 2 in (5.1 cm) long.
- All ends are woven in on the back and don’t show through the opening.
Troubleshooting
The frame ruffles. You’re adding too many sts, or your tension is loose. Check that you have 42 and 48 sts, and try a smaller hook.
The frame cups or curls inward. Your tension is too tight on the outer round. Loosen up on Rnd 3, or go up half a hook size for that round only.
The tips are rounded. Make sure each 3-sc group goes into the exact tip-center sc on every round, and pin the tips firmly when blocking.
The leaflets look uneven. Hold all the loops against your finger at the same height before you close the leaflet. You can also pull the loops up over a pencil to keep them the same length.
The leaflets are too thin. Pull the loops up a little longer, or add one more repeat to the large leaflets (13 loops on hook).
The stem sags. Use 14 ch instead of 15, or pull the stem a little tighter before you sl st into the top tip.
The ornament twists when it hangs. Make sure you worked the hanging loop into the exact top-tip center sc.
Care
Hand wash in cool water with a mild soap, gently press out the water and dry flat. Block and starch again if needed, and store the ornament flat between seasons.
Final Notes
Here are the key measurements in order. A 36-ch ring gives an opening of 3 1/4 in (8.3 cm) by 1 1/2 in (3.8 cm). Rnd 2 brings the frame base to 3 3/4 in (9.5 cm) by 2 in (5.1 cm). A 15-st stem crosses the opening and seven cream leaflets fill it. The 1/4 in (0.6 cm) border brings the ornament to 4 1/4 in (10.8 cm) by 2 1/2 in (6.4 cm), with a 2 in (5.1 cm) loop on top.
If your first ornament matches these numbers, the rest of your batch will match too.
Happy crocheting!