

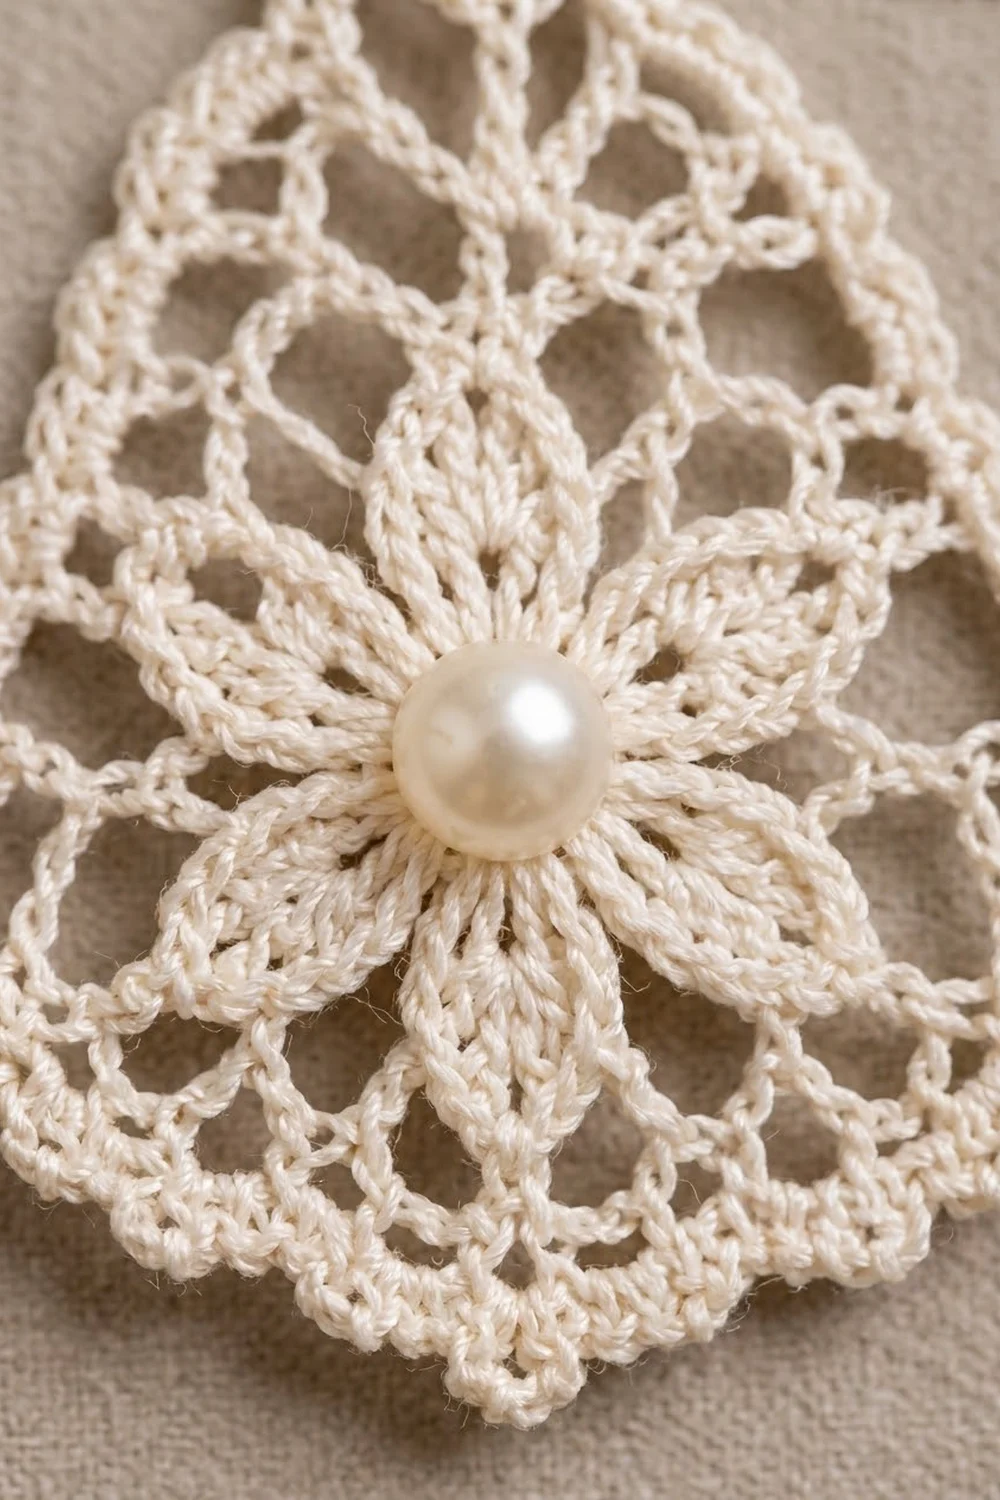
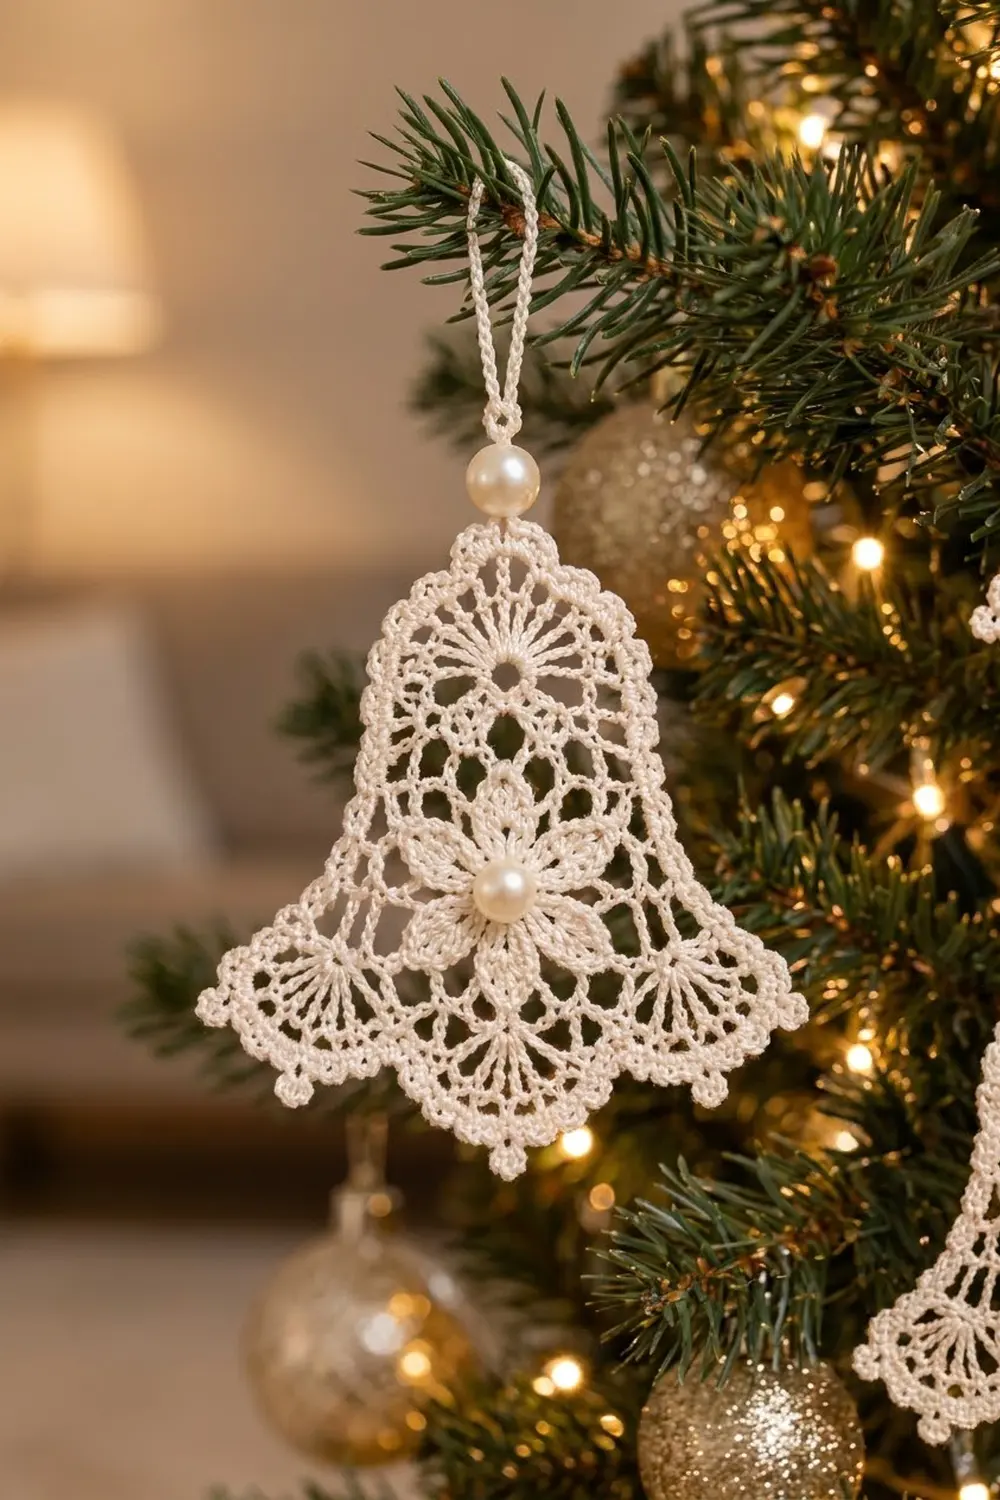
The Pearl Chime Lace Bell is a small, flat thread-lace ornament in soft ivory. A six-petal flower with a pearl center sits in the middle of the bell. Above it is a rounded crown of open mesh and solid shells. Below it, a flared skirt ends in three picot-edged fans. A chain loop with a small pearl at its base lets it hang straight from a branch.
The look is classic heirloom Christmas lace: one color, crisp texture, and a little shine from the pearls. Make a single bell for a gift tag, or make a handful in the same ivory thread for a tree.
This pattern uses US crochet terms. The finished bell measures 3 in (7.6 cm) wide at the hem and 3.5 in (8.9 cm) tall without the hanging loop. The loop adds about 1 in (2.5 cm).
The bell is one single piece. You start with the flower in the round and frame it with a shaping round. Next you work a short crown in rows across the top, then the skirt in rows across the sides and bottom. A picot hem row and one edging round finish it.
Finished Size and Construction
- Finished size: 3 in (7.6 cm) wide x 3.5 in (8.9 cm) tall, plus a 1 in (2.5 cm) loop
- Skill level: Intermediate (thread lace)
- Terminology: US crochet terms
- Yarn weight: Size 10 crochet cotton (Lace / 0)
- Hook: 1.75 mm (US steel 6)
- Number of pieces: 1
- Layout: single flat motif, no joining
- Piece size after Round 5 (flower frame): 2.25 in (5.7 cm) wide
- Size before border: 2.75 in (7.0 cm) wide x 3.25 in (8.3 cm) tall
- Border depth: about 0.25 in (0.6 cm)
Materials
Choose a mercerized size 10 cotton thread. It keeps clear stitch definition, has a soft sheen that matches the pearls, and takes starch well. Avoid fuzzy or very soft threads, because the lace will lose its shape.
- Ivory size 10 cotton thread: 8 g / 40 m (44 yd) per bell
- 1 pearl bead, 8 mm, flat-back or half-drilled, for the flower center
- 1 pearl bead, 6 mm, round, for the base of the hanging loop
- Tools:
- 1.75 mm (US steel 6) crochet hook
- Small tapestry needle
- Beading needle and ivory sewing thread
- Sharp scissors
- Fabric stiffener or heavy spray starch
- Rustproof pins and a foam blocking board
- Ruler or tape measure
The thread quantity includes a margin of about 25% for your gauge check, joins, and weaving in. One bell uses roughly 6 g / 31 m (34 yd).
Abbreviations (US Terms)
- ch – chain
- sl st – slip stitch
- sc – single crochet
- hdc – half double crochet
- dc – double crochet
- tr – treble crochet
- sk – skip
- sp(s) – space(s)
- st(s) – stitch(es)
- RS – right side
Special stitch – picot: ch 3, sl st into the 3rd ch from hook (the first ch made). Picots are not counted in stitch totals.
Petal tip labels: Round 3 makes six petals, each with one tr at its tip. Call the top petal T1, then label the rest T2 to T6 in the order you worked them. T4 points straight down. The ch-8 spaces made in Round 4 are S1 (between T1 and T2) through S6 (between T6 and T1).
Gauge and Checkpoints
Gauge is measured on the flower itself. Make Rounds 1–3 first as your test piece.
- After Round 3: the flower measures 1.5 in (3.8 cm) across, petal tip to petal tip.
- After Round 5: 2.25 in (5.7 cm) wide at the widest point.
- After Row C (skirt): 2.75 in (7.0 cm) wide at the hem, 3.25 in (8.3 cm) tall.
- After border and blocking: 3 in (7.6 cm) wide x 3.5 in (8.9 cm) tall.
If your flower is larger than 1.5 in (3.8 cm), go down to a 1.5 mm (US steel 7) hook. If it is smaller, go up to a 2 mm (US steel 4) hook. A difference of 0.125 in (0.3 cm) on the flower grows to about 0.25 in (0.6 cm) on the finished bell, so check before you continue.
Part 1: Pearl Flower (Rounds 1–3)
Ch 6, sl st in first ch to form a ring.
Round 1 (RS): Ch 3 (counts as dc), 17 dc in ring. Sl st in top of ch-3 to join. (18 dc)
Round 2: Ch 1, sc in same st, ch 5, sk 2 dc, sc in next dc, ch 5, sk 2 dc; repeat from * 4 more times. Sl st in first sc to join. (6 sc, 6 ch-5 sps; 36 sts total)
Round 3 (petals): Sl st in first ch-5 sp. In each ch-5 sp work (sc, hdc, 2 dc, tr, 2 dc, hdc, sc). Sl st in first sc to join. (6 petals of 9 sts; 54 sts total)
Each petal is a pointed oval with the tr at its tip. Measure now: 1.5 in (3.8 cm) across.
Part 2: Flower Frame (Rounds 4–5)
Round 4: Sl st in next hdc, next 2 dc, and the tr at the tip of the first petal. This tip is T1. Ch 1, sc in same tr, ch 8, sc in tr at tip of next petal; repeat from * 4 more times, ch 8. Sl st in first sc to join. (6 sc, 6 ch-8 sps; 54 sts total)
The ch-8 spaces run straight from tip to tip and form a hexagon around the flower.
Round 5 (bell shaping): This round changes stitch height to start the bell outline, with short stitches at the top and tall stitches at the bottom.
Ch 1, sc in sc at T1.
– S1: 9 sc. Sc in T2.
– S2: 9 hdc. Dc in T3.
– S3: 11 dc. Dc in T4.
– S4: 11 dc. Dc in T5.
– S5: 9 hdc. Sc in T6.
– S6: 9 sc.
Sl st in first sc to join. (6 tip sts + 58 sts in spaces = 64 sts)
Fasten off. Checkpoint: 2.25 in (5.7 cm) wide.
Part 3: Crown (Rows 6–8)
The crown is worked in rows over the 19 sts at the top: the 9 sc of S6, the sc at T1, and the 9 sc of S1.
Row 6: With RS facing, join thread in the first sc of S6. Ch 3 (counts as dc), ch 2, sk 2 sts, dc in next st; repeat from * 5 more times. The last dc lands in the last sc of S1. (7 dc, 6 ch-2 sps; 19 sts)
Row 7: Turn. Sl st in first ch-2 sp, ch 3 (counts as dc), 2 dc in same sp, 3 dc in each of the next 5 ch-2 sps. (18 dc)
The dc groups fan out from the mesh like short spokes, which gives the crown its radiating look.
Row 8: Turn. Ch 1, sk first dc, sc in next 2 dc, hdc in next 3 dc, dc in next 6 dc, hdc in next 3 dc, sc in next 2 dc. Leave the last dc unworked. (16 sts)
The taller center stitches round off the top of the bell. Fasten off.
Part 4: Skirt (Rows A–C)
The skirt is worked in rows over the other 45 sts of Round 5: from T2, through S2, T3, S3, T4, S4, T5, S5, to T6.
Row A: With RS facing, join thread in the st at T2. Ch 1, sc in same st, ch 5, sk 3 sts, sc in next st; repeat from * 10 more times. The last sc lands in T6. (12 sc, 11 ch-5 sps; 67 sts)
Check: the 6th ch-5 sp sits directly under T4, at the center bottom of the bell.
Row B (fans): Turn. Ch 1, sc in first ch-5 sp, 9 dc in next sp (Fan 1), sc in next sp, ch 5, sc in next sp, ch 5, sc in next sp, 9 dc in next sp (Fan 2, the center fan), sc in next sp, ch 5, sc in next sp, ch 5, sc in next sp, 9 dc in next sp (Fan 3), sc in last sp. (8 sc + 27 dc + 4 ch-5 sps = 55 sts)
Row C (flare): Turn. Ch 1, sc in first sc.
– Over each fan: ch 2, (dc in next dc, ch 1) 8 times, dc in next dc, ch 2. (21 sts per fan)
– Between fans: sc in next sc, (ch 6, sc in next sc) twice.
End with sc in last sc. (8 sc + 63 fan sts + 4 ch-6 sps = 95 sts)
The ch-1 spaces open each fan wider than the row above it, which gives the bell its flared hem. Checkpoint: 2.75 in (7.0 cm) wide at the hem and 3.25 in (8.3 cm) tall from the top of Row 8 to Row C.
Border: Picot Hem and Edging
The border has two parts: a picot hem row across the skirt, and one sc edging round up the sides and across the crown.
Border gauge: 7 sc fill one ch-6 sp, and 2 sc plus a picot fill one fan ch-1 sp. Worked this way, the edge lies flat without ruffling or cupping.
Row D (picot hem, trim row): Turn. Ch 1, sc in first sc.
– Over each fan: 2 sc in ch-2 sp, sc in next dc, (sc, picot, sc) in next ch-1 sp, sc in next dc; repeat from * 7 more times, 2 sc in ch-2 sp. (29 sc and 8 picots per fan)
– Between fans: sc in next sc, (7 sc in next ch-6 sp, sc in next sc) twice.
End with sc in last sc. Do not fasten off.
Count: 95 sts worked 1-per-existing-stitch + 28 extra sts (8 extra in each of the 3 fans, 1 extra in each of the 4 ch-6 sps) = 123 sc, plus 24 picots.
The math works because each ch-1 sp gets 2 sc instead of 1, adding length exactly where the fan is widest. That extra length lets the scallops curve without pulling the hem in.
Round F (edging): Do not turn. Work along the side edges and the crown with RS facing.
– First skirt side: 1 sc in the end of each row, Row D to Row A. (4 sc)
– First crown side: 2 sc in end of Row 6, 2 sc in end of Row 7, 1 sc in end of Row 8. (5 sc)
– Crown top: sc in each of the first 8 sts of Row 8. Hanging loop: ch 25, sl st in last sc made. Sc in each of the remaining 8 sts. (16 sc)
– Second crown side: 1 sc in end of Row 8, 2 sc in end of Row 7, 2 sc in end of Row 6. (5 sc)
– Second skirt side: 1 sc in the end of each row, Row A to Row D. (4 sc)
Sl st in first sc of Row D. (4 + 5 + 16 + 5 + 4 = 34 sc, plus the ch-25 loop)
Fasten off and weave in all ends along the back of solid stitches.
The 34 edging stitches match the row ends (2 sc per dc row end, 1 sc per sc row end) and the 16 sts of Row 8, so nothing extra is added at the corners. The loop leaves from the exact center, with 8 sts on each side.
Adding the Pearls
Use a beading needle and doubled sewing thread to sew the 8 mm pearl into the center ring of the flower. Pass through the ring 3 times so the pearl sits flat and does not tilt.
Sew the 6 mm pearl at the base of the hanging loop, right on top of the Round F sc where the loop begins. Knot securely on the back.
Final Blocking
- If the bell has been handled a lot, wash it gently in lukewarm water. Squeeze out the water; do not wring.
- Soak it in fabric stiffener, or blot it damp and spray heavily with starch.
- Lay it RS up on a foam board covered with plastic wrap.
- Pin the top of the crown first, then pin the center of the hem so the height measures 3.5 in (8.9 cm).
- Pin the two outer hem corners so the width measures 3 in (7.6 cm).
- Pin the tip of every picot outward to open the scallops. Pin each fan’s center point slightly lower than its sides.
- Pin each petal tip of the flower into a clean point.
- Straighten the hanging loop and pin it into a 1 in (2.5 cm) oval.
- Let it dry completely, at least 12 hours, before removing the pins.
Final Quality-Control Checklist
- [ ] Flower measures 1.5 in (3.8 cm) with 6 equal petals.
- [ ] Round 5 has 64 sts, and the bottom is longer than the top.
- [ ] Crown Row 8 has 16 sts and a rounded top.
- [ ] The center fan is directly below T4 and the flower pearl.
- [ ] Row D has 123 sc and 24 picots.
- [ ] Round F has 34 sc, with the loop at the exact center.
- [ ] Finished bell is 3 in (7.6 cm) wide x 3.5 in (8.9 cm) tall.
- [ ] Both pearls are secure and all ends are woven in.
- [ ] The bell hangs straight, not tilted.
Troubleshooting
Flower cups instead of lying flat: Your Round 1 dc may be too tight. Loosen them, or go up a hook size for Rounds 1–2 only.
Round 4 chains pull the petals inward: Your chains are tight. Make the chains looser, or chain with a hook one size larger, and keep the same stitch counts.
Round 5 ruffles: Go down one hook size for Round 5 only. Keep the counts so Row A still begins on T2 and ends on T6.
Fans are uneven: Check that Row A starts exactly on T2 and ends on T6. Count the 11 ch-5 sps before starting Row B.
Hem rolls toward you: Starch more heavily and pin every picot. Make sure Row D has 2 sc in each ch-1 sp, not 3.
Bell hangs crooked: The loop is off center. Count 8 sts on each side of it and move it if needed.
Pearl tilts or wobbles: Add another pass of sewing thread through the flower ring and around the bead.
Care
Spot clean gently or hand wash in cool water, then reshape and re-starch if needed. Store flat between sheets of tissue paper so the picots and loop stay crisp.
Final Notes
The whole bell depends on a short measurement chain. The flower sets the scale at 1.5 in (3.8 cm). Round 5 shapes it to 2.25 in (5.7 cm) with 64 sts. The crown uses 19 of those sts and the skirt uses the other 45, flaring to 2.75 in (7.0 cm) by 3.25 in (8.3 cm). The picot hem and edging add the last 0.25 in (0.6 cm), and blocking sets the final size at 3 in (7.6 cm) by 3.5 in (8.9 cm).
Check the flower, count Round 5, and the rest of the bell falls into place.
Happy crocheting!