

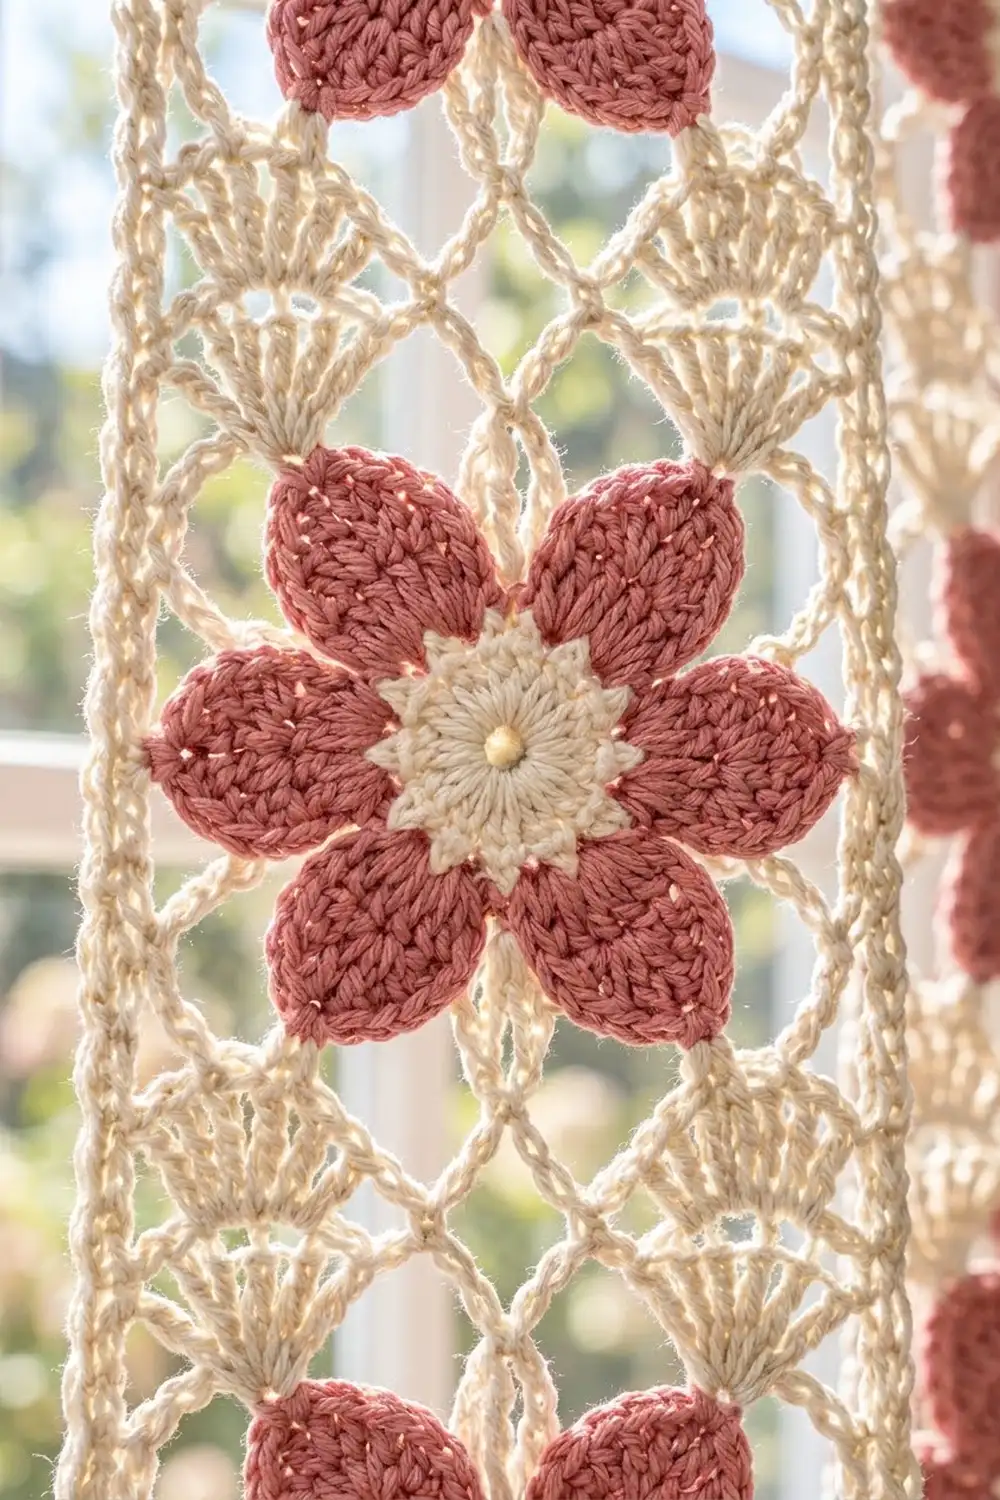
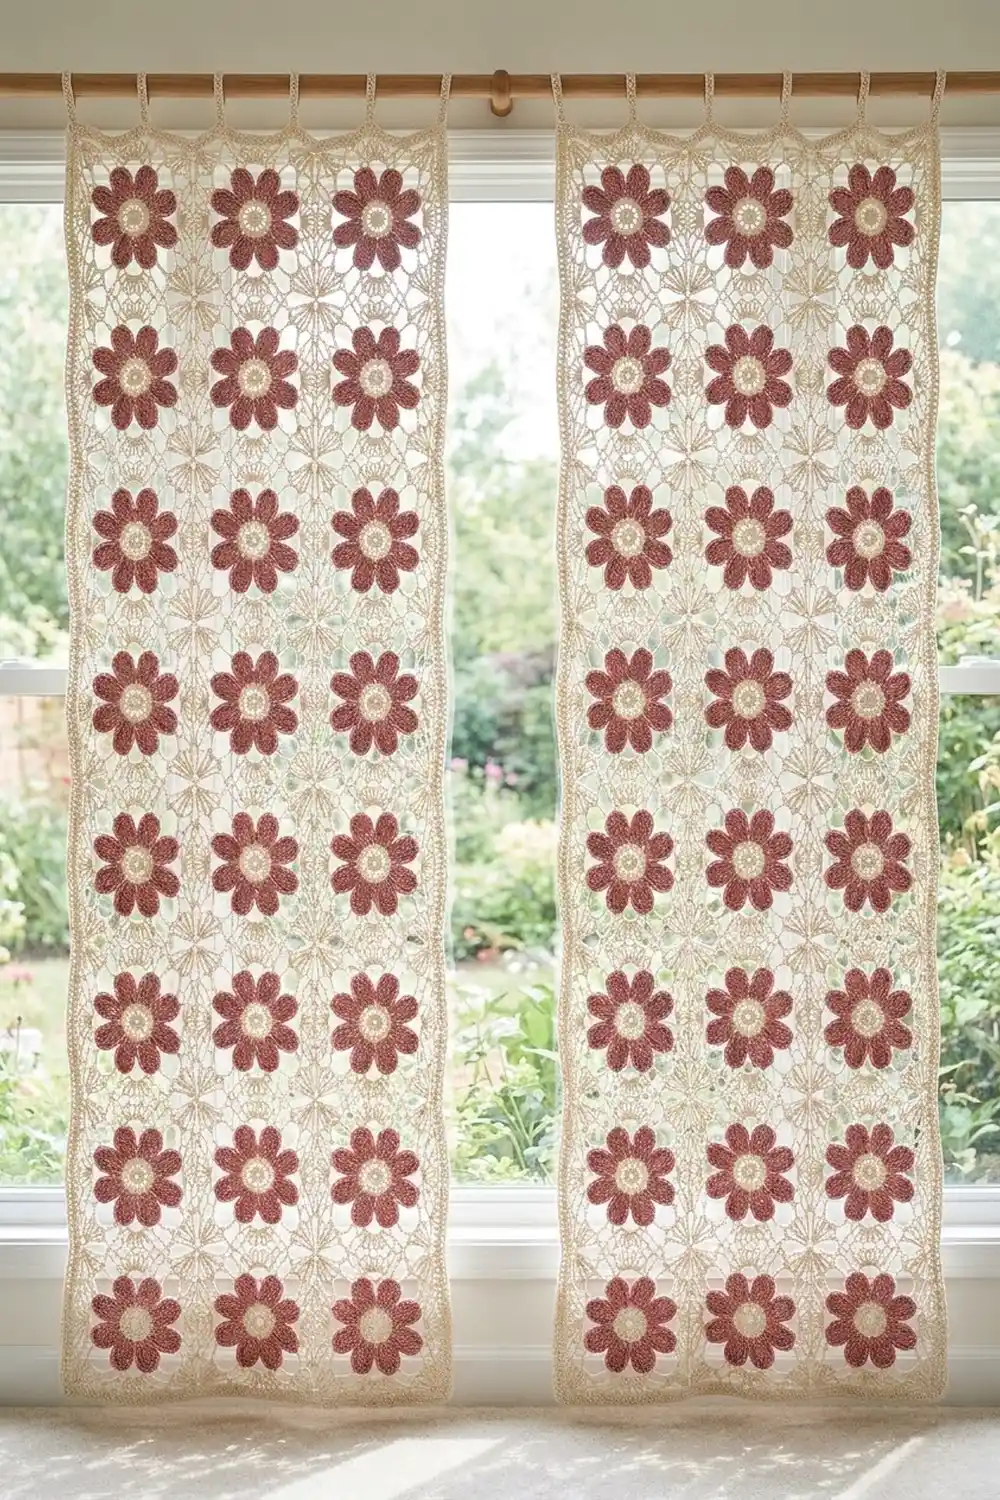
The Rosewindow Lattice Curtain is a pair of airy lace panels made from square flower motifs. Each motif has a dusty rose eight-petal flower with a textured cream center. The flower sits inside an open cream frame of chain loops, with a small fan shell at the middle of each side. Once the motifs are joined, fans from neighboring squares face each other across every seam, and the chain loops form a diamond lattice between the flowers.
Only two colors are used: dusty rose for the petals and natural cream for everything else. Light passes through the open frame, so the flowers seem to float against the window. The look is cottage style without being fussy.
This pattern uses US crochet terms. Each panel is 3 motifs wide and 10 motifs tall. One finished panel measures 21 in (53.3 cm) wide by 66.5 in (168.9 cm) long, plus hanging tabs about 2.5 in (6.4 cm) tall.
You crochet each motif in the round, from the center out, and finish it with a solid single crochet round that has a fixed stitch count. Then you join the motifs stitch to stitch with slip stitches and add a three-round border. The chain hanging tabs are worked into the last round of the border.
Finished Size and Construction
- Finished panel size: 21 in x 66.5 in (53.3 cm x 168.9 cm), plus 2.5 in (6.4 cm) tabs
- Skill level: Intermediate
- Terminology: US crochet terms
- Yarn weight: DK / light (#3) cotton
- Hook: 4.0 mm (G-6)
- Number of pieces: 60 motifs total, 30 per panel, 2 panels
- Layout per panel: 3 motifs wide x 10 motifs tall
- Motif size: 6.5 in (16.5 cm) square, 29 sts per side
- Panel size before border: 19.5 in x 65 in (49.5 cm x 165.1 cm)
- Border depth: 0.75 in (1.9 cm) on each side
Materials
Choose a smooth mercerized or combed cotton in DK weight. Cotton holds the lace shape, blocks crisply, and doesn’t stretch much while the panels hang. Avoid fuzzy or splitty yarns, because they blur the lattice.
- Color A, natural cream: 500 g, about 1,200 m
- Color B, dusty rose: 300 g, about 720 m
These quantities cover both panels and include a margin of about 15% for swatching, joining, and weaving in ends. One motif uses about 4 g of B and 6 g of A. The border and tabs use about 25 g of A per panel.
Tools:
- 4.0 mm (G-6) crochet hook
- Tapestry needle
- Stitch markers (at least 7)
- Scissors
- Measuring tape
- Blocking mats and rust-proof pins
- Spray bottle
Abbreviations (US Terms)
- ch: chain
- sl st: slip stitch
- sc: single crochet
- hdc: half double crochet
- dc: double crochet
- tr: treble crochet
- sp: space
- st(s): stitch(es)
- RS / WS: right side / wrong side
Special stitch, Fan: Work 7 dc in the same stitch. The Fan sits at the middle of each motif side and opens outward toward the edge.
Gauge and Checkpoints
Gauge: 18 sc = 4 in (10.2 cm) along the final round of a motif, measured after light blocking.
Make and block one complete motif before you start the rest. Lace changes size a lot when it’s blocked, so measure only once the test motif is dry.
Checkpoints:
- After Round 2, the cream center measures 1.5 in (3.8 cm) across.
- After Round 4, the flower measures 4.5 in (11.4 cm) from petal tip to petal tip.
- After Round 6, the square measures about 5.5 in (14.0 cm) per side.
- After Round 7, each side measures about 6.25 in (15.9 cm).
- After Round 8 and blocking, each side measures 6.5 in (16.5 cm) and has 29 sts.
If your motif is too big: Go down to a 3.75 mm hook, or work your chains more firmly. Loose chain loops are the most common reason for oversized lace.
If your motif is too small: Go up to a 4.5 mm hook, and make sure your dc and tr reach full height.
Being off by 0.25 in (0.6 cm) per motif adds up to 0.75 in (1.9 cm) across the width and 2.5 in (6.4 cm) down the length. Fix your gauge now, not after 30 motifs.
Motif Pattern
Make 60 motifs. Rounds 1–2 and 5–8 use A, and Rounds 3–4 use B. Work every round with the RS facing you.
Center (Color A)
Round 1: With A, make a magic ring. Ch 2 (does not count as a st), then work 16 dc in the ring. Pull the ring closed and join with a sl st to the first dc. (16 dc)
Round 2: Ch 1. Sc in the next dc, 2 sc in the next dc. Repeat from * 8 times in total. Join with a sl st to the first sc. (24 sc) Fasten off A.
Round 1 forms the raised, ridged inner circle, and Round 2 forms the flat outer ring of the center.
Petals (Color B)
Round 3: Join B in any sc. Ch 1, sc in the same st, ch 3, skip 2 sts. Sc in the next st, ch 3, skip 2 sts. Repeat from * 7 more times. Join with a sl st to the first sc. (8 sc, 8 ch-3 sps)
Round 4: In each ch-3 sp, work (sc, hdc, 2 dc, 3 tr, 2 dc, hdc, sc). Join with a sl st to the first sc. (8 petals of 11 sts each, 88 sts) Fasten off B.
Each petal is a rounded oval whose tip is the middle tr. Because each petal is worked into its own chain space, the petals stay separate and lie flat.
Lace Frame (Color A)
Round 5: Join A in the center tr (the 2nd of 3) of any petal. Ch 1, sc in the same st. Ch 7, sc in the center tr of the next petal. Repeat from * 6 more times. Ch 7 and join with a sl st to the first sc. (8 sc, 8 ch-7 loops)
Round 6 (squaring): Sl st into the first ch-7 loop. Ch 3 (counts as dc), then work (3 dc, ch 3, 4 dc) in the same loop to make a corner. Ch 5, sc in the next loop, ch 5. Work (4 dc, ch 3, 4 dc) in the next loop for a corner, ch 5, sc in the next loop, ch 5. Repeat from * 2 more times. Join with a sl st to the top of the beginning ch-3. (32 dc, 4 sc, 8 ch-5 sps, 4 corner ch-3 sps)
The corners are worked into loops 1, 3, 5, and 7. The sc in loops 2, 4, 6, and 8 mark the middle of each side.
Round 7 (fans and lattice): Sl st in the next 3 dc and into the corner ch-3 sp. Ch 3 (counts as dc), then work (2 dc, ch 3, 3 dc) in the same sp. Ch 5, sc in the next ch-5 sp, Fan in the next sc, sc in the next ch-5 sp, ch 5, (3 dc, ch 3, 3 dc) in the next corner sp. Repeat from * 2 more times. Ch 5, sc in the next ch-5 sp, Fan in the next sc, sc in the next ch-5 sp, ch 5. Join with a sl st to the top of the beginning ch-3. (24 corner dc + 28 Fan dc + 8 sc = 60 sts, plus 8 ch-5 sps and 4 corner ch-3 sps)
The ch-5 arches skip over the Round 6 dc groups, which opens up the diamond lattice. Each Fan rises from the sc at the middle of a side in Round 6.
Round 8 (edge, conversion round): Ch 1. Sc in the same st and in the next 2 dc, 3 sc in the corner sp, sc in the next 3 dc. 5 sc in the next ch-5 sp, sc in the next sc, sc in each of the 7 Fan dc, sc in the next sc, 5 sc in the next ch-5 sp, sc in the next 3 dc, 3 sc in the corner sp, sc in the next 3 dc. Repeat from * 2 more times. Then work 5 sc in the next ch-5 sp, sc in the next sc, sc in each of the 7 Fan dc, sc in the next sc, and 5 sc in the last ch-5 sp. Join with a sl st and fasten off. Weave in all ends.
Count: 60 sts worked 1 per existing st + (8 ch-5 sps x 5 sc = 40) + (4 corner sps x 3 sc = 12) = 112 sc.
Per side: The middle sc of each 3-sc corner group is the corner stitch. Between two corner sts there are 1 + 3 + 5 + 1 + 7 + 1 + 5 + 3 + 1 = 27 sts. Adding the 2 corner sts gives 29 sts per side. To check: 4 x 29 − 4 shared corners = 112.
Make All Pieces
Make 60 identical motifs in total, 30 for each panel.
- Color B: about 4 g per motif, about 240 g in total
- Color A: about 6 g per motif, about 360 g in total, not counting the border and tabs
Each panel is laid out 3 motifs across by 10 down (M = one motif):
Row 1  (top):    [M] [M] [M]
Row 2:           [M] [M] [M]
Row 3:           [M] [M] [M]
Row 4:           [M] [M] [M]
Row 5:           [M] [M] [M]
Row 6:           [M] [M] [M]
Row 7:           [M] [M] [M]
Row 8:           [M] [M] [M]
Row 9:           [M] [M] [M]
Row 10 (bottom): [M] [M] [M]
Block every motif to 6.5 in (16.5 cm) square before joining. Motifs that are all the same size give you straight seams.
Joining
Method: Slip stitch join with A. Hold two motifs with their WS together and work through the back loops only. This leaves a thin chain ridge on the RS that matches the lattice.
Stitch-to-stitch logic: Each edge has 29 sts, counting both corners. Match corner st to corner st, and the middle Fan sc to the middle Fan sc. Work 1 sl st through each matched pair, for 29 sl sts per seam. Don’t skip or add any stitches.
Order:
- Join the motifs into horizontal strips of 3. Each strip has 2 seams.
- Join the 10 strips along their long edges. Each long seam has 3 x 29 = 87 sl sts.
- At every four-way intersection, sl st firmly through the corner sts so that no hole forms.
Tension: Your slip stitches should be as loose as your sc. Tight seams pull the panel in and make the lattice ripple. If your seams pucker, use a hook one size larger just for joining.
Size checkpoint: Two joined strips should measure 13 in (33.0 cm) tall, and four should measure 26 in (66.0 cm). The fully joined panel should measure 19.5 in x 65 in (49.5 cm x 165.1 cm).
Border
Border gauge: 18 sts = 4 in (10.2 cm). This matches the motif edge gauge, so working 1 border st into each edge st keeps the border flat.
Starting counts: The short edges have 3 motifs x 29 sts = 87 sts. The long edges have 10 motifs x 29 sts = 290 sts. At each seam, the corner sts of both motifs count and are worked separately. No stitches are added at seams.
Round 1 (sc): Join A in any st on a long edge. Ch 1, sc in each st around, and work 3 sc in each of the 4 outer corner sts. The middle sc of each group becomes the new corner st. Join with a sl st.
Counts: short sides 87 + 2 = 89; long sides 290 + 2 = 292. Total = (750 sts worked 1 per st) + (4 corners x 2 extra = 8) = 758 sts.
Round 2 (hdc): Ch 1, hdc in each st around, with 3 hdc in each corner st. Join with a sl st.
Counts: short sides 91, long sides 294, total 766.
Round 3 (sc with tabs): Ch 1, sc in each st around, with 3 sc in each corner st. Join with a sl st and fasten off.
Before you start this round, plan the tabs on the top short edge. It will have 93 sts, corners included. Place markers at sts 2, 17, 32, 47, 62, 77, and 92. They are 15 sts apart and centered on st 47. When you reach a marked st, sc in it, ch 24, and sl st back into the same sc to make a tab. Then carry on with the round.
Counts: short sides 93, long sides 296, total 774 sc, plus 7 tabs.
Why the math works: Every motif edge has exactly 29 sts, and the border gauge matches the edge gauge. That means 87 sts measure 19.5 in (49.5 cm) and 290 sts measure 65 in (165.1 cm). The three border rounds add 0.75 in (1.9 cm) to each side, so the panel finishes at 21 in x 66.5 in (53.3 cm x 168.9 cm).
Final Blocking
- Weave in any remaining ends along the seams, where they are hidden.
- Soak the panel in cool water with a little mild wash for 15 minutes. Squeeze out the water gently; don’t wring the panel.
- Roll the panel in a towel to remove more water.
- Pin it flat to 21 in x 66.5 in (53.3 cm x 168.9 cm). Pin the outer edges first, then each seam intersection.
- Open out each petal and Fan with your fingertips.
- Let the panel dry completely before you unpin it.
Final Quality-Control Checklist
- Every motif has 8 petals, 4 Fans, and 112 sc in Round 8.
- Every motif measures 6.5 in (16.5 cm) square.
- Every seam has 29 sl sts, with the corners and Fan centers lined up.
- All intersections are closed and flat.
- The border has 93 sts on each short side and 296 on each long side.
- The 7 tabs are evenly spaced and the same length.
- The two panels match within 0.5 in (1.3 cm).
Troubleshooting
Petals cup or ruffle: The Round 3 chains are too tight. Work ch 4 instead of ch 3, but keep 8 spaces.
The center buckles: Recount. Round 1 should have 16 dc and Round 2 should have 24 sc.
The lattice droops: The chains are too loose. Use a smaller hook for Rounds 5–7 only.
Fans lean to one side: Each Fan must go into the Round 6 sc, not into the chain beside it.
The panel narrows at the seams: The seams are too tight. Rejoin them with a larger hook.
The border waves: Recount the edge. Work exactly 1 st per edge st, with nothing extra at the seams.
Care
Hand wash in cool water, or machine wash on a delicate cycle in a mesh bag. Reshape the panel while damp and lay it flat to dry.
Final Notes
Here is how the measurements build up. Each motif has 112 sc, with 29 sts per side, and measures 6.5 in (16.5 cm) square. Three motifs across give 87 sts and 19.5 in (49.5 cm). Ten motifs down give 290 sts and 65 in (165.1 cm). The three-round border adds 0.75 in (1.9 cm) on every side, so the finished panel measures 21 in x 66.5 in (53.3 cm x 168.9 cm). Make a second panel the same way to complete the pair.
Happy crocheting!