

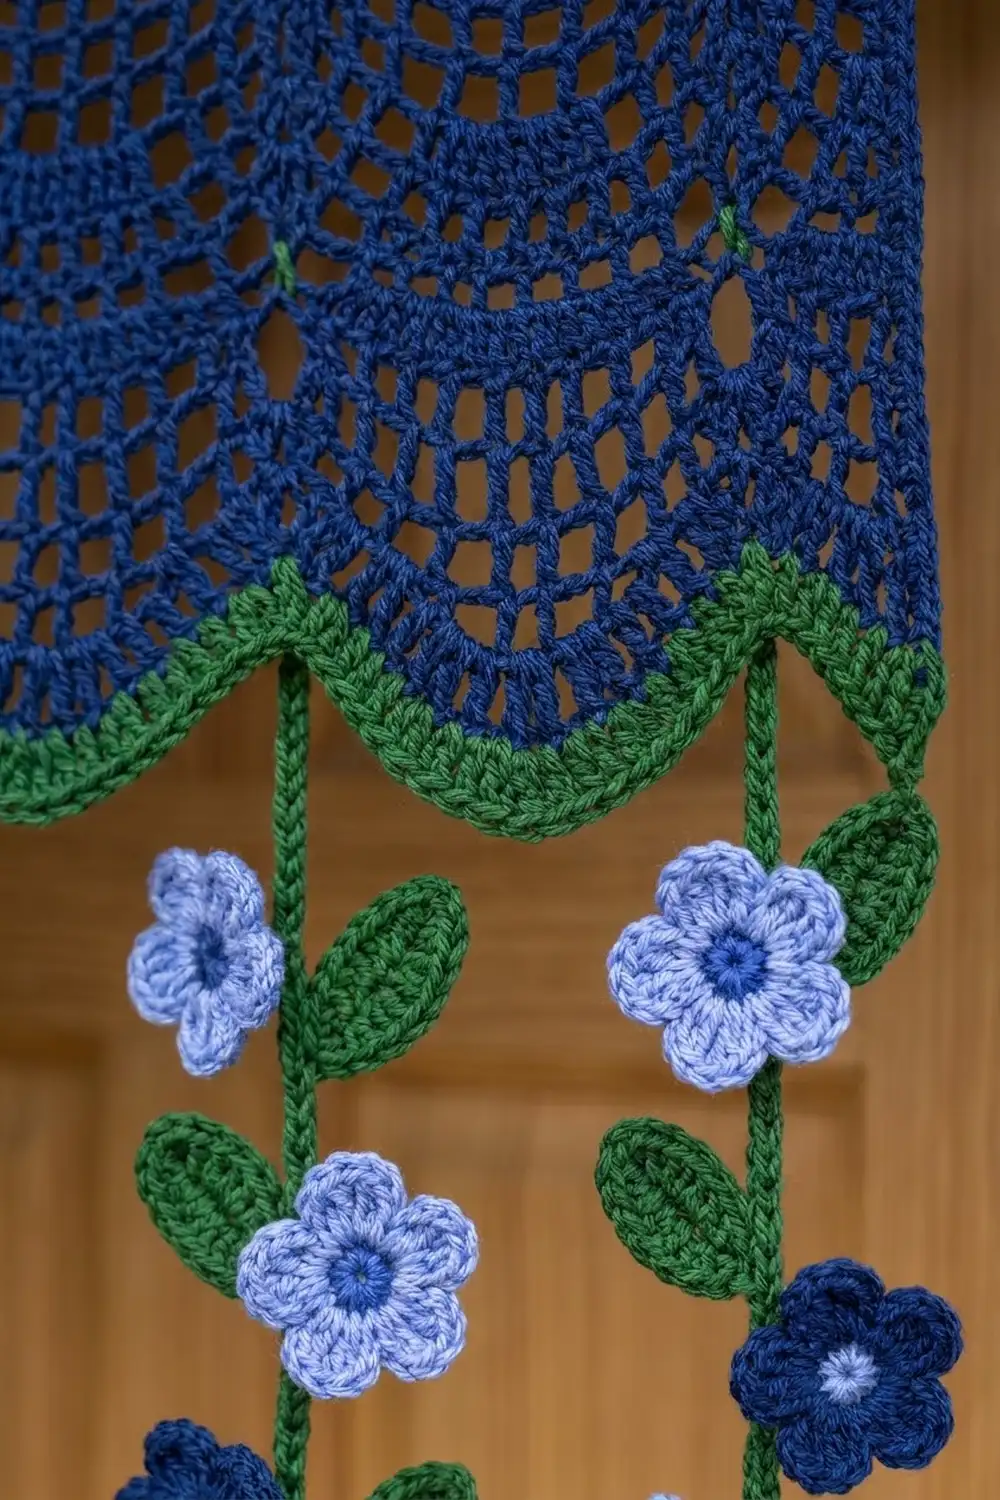
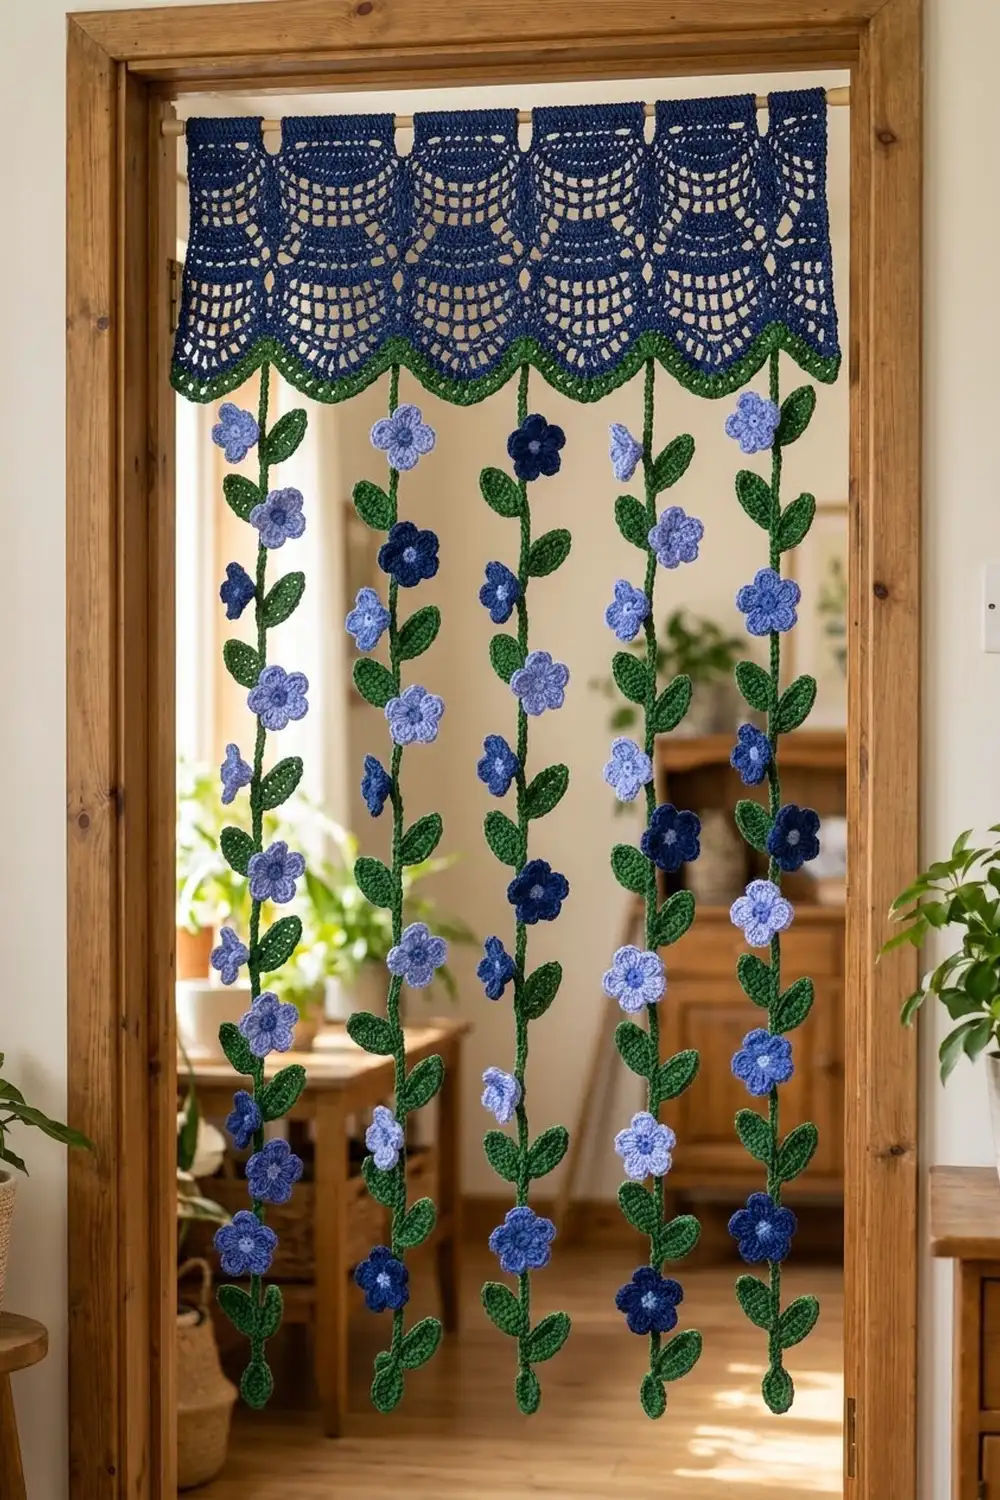
The Bluebell Trellis Door Curtain is a navy lace valance with six flowering vines hanging from it. The top is a band of filet mesh. Below it sit five half-circle fans whose solid rims form a row of scallops, edged in deep green. Six green vines hang from the scallop points, each with leaves and five-petal flowers in navy and soft periwinkle.
The look is cottage-garden. It is pretty in a doorway or across a pantry opening, and you can still walk through the vines. The palette uses three colors: navy, periwinkle, and forest green. The flowers alternate between navy with periwinkle centers and periwinkle with navy centers.
This pattern uses US crochet terms. The finished curtain is 30 in (76.2 cm) wide. The valance is 8 in (20.3 cm) deep at the center of each scallop, and the whole piece is about 62 in (157.5 cm) from the top of the tabs to the tips of the vines.
You will crochet five fans and join them with a mesh band worked across their straight edges. Then you add the hanging tabs and a two-row green border along the scalloped edge. Last, you make the stems, leaves, and flowers and sew them together into six vines.
Finished Size and Construction
- Finished size: 30 in (76.2 cm) wide x about 62 in (157.5 cm) long
- Valance depth: 8 in (20.3 cm) at the center of each scallop
- Skill level: Intermediate
- Terminology: US
- Yarn weight: Worsted (#4)
- Hook: 4.5 mm (US 7)
- Number of pieces: 5 fans, 6 stems, 48 flowers, 96 leaves
- Layout: 5 fans in one row; 6 vines spaced 6 in (15.2 cm) apart
- Fan size: 6 in (15.2 cm) wide x 3 in (7.6 cm) deep
- Valance before border: 30 in (76.2 cm) x 7.5 in (19.1 cm)
- Border depth: 0.5 in (1.3 cm)
Materials
Use a smooth worsted cotton or cotton blend with about 180 m per 100 g. Cotton holds the scallops crisp and hangs straight. Acrylic also works, but the vines may twist more.
- Navy (Color A): 170 g / 306 m. Used for the fans, band, tabs, 24 flowers, and 24 flower centers.
- Periwinkle (Color B): 60 g / 108 m. Used for 24 flowers and 24 flower centers.
- Forest green (Color C): 190 g / 342 m. Used for the border, stems, and leaves.
Tools:
– 4.5 mm (US 7) crochet hook
– Tapestry needle
– Stitch markers
– Rust-proof pins and a blocking surface
– Tape measure
– Spray bottle
– Tension rod or curtain rod up to 0.75 in (1.9 cm) thick
These quantities include a margin of about 10–15%.
Abbreviations (US Terms)
- ch – chain
- sl st – slip stitch
- sc – single crochet
- hdc – half double crochet
- dc – double crochet
- rev sc – reverse single crochet (crab stitch)
- sp – space
- sk – skip
- tch – turning chain
- st(s) – stitch(es)
Special stitch – Reverse single crochet (rev sc): Work from left to right (right to left if you are left-handed). Insert the hook into the next stitch to the right, yarn over, and pull up a loop. Then yarn over and pull through both loops on the hook.
Gauge and Checkpoints
- Sc gauge: 18 sts and 20 rows = 4 in (10.2 cm)
- Dc mesh gauge: 9 rows = 4 in (10.2 cm)
- Stem gauge: 16 sl sts worked along a chain = 4 in (10.2 cm)
Make one fan first and treat it as your gauge swatch. Pin it flat without stretching and check it against these measurements:
- After Fan Row 3: about 3.2 in (8.1 cm) across the straight edge
- After Fan Row 6: 6 in (15.2 cm) across the straight edge and 3 in (7.6 cm) deep
- After Band Row 1: 30 in (76.2 cm) wide
- After Band Row 11: band is 4.5 in (11.4 cm) deep
- Flower after Rnd 2: 1 in (2.5 cm) across
If your fan is wider than 6 in (15.2 cm), go down half a hook size. If it is narrower, go up half a size. Every later count depends on the fans being 6 in (15.2 cm) wide.
Fans (Make 5, Color A)
Each fan is a half circle worked back and forth in rows from a small ring. The ring sits at the center of the straight top edge, and the rows spread outward to form the scallop.
Ch 5 and sl st to the first ch to form a ring.
Row 1: Ch 4 (counts as dc + ch 1). Into the ring, work [dc, ch 1] 4 times, then dc. Turn. (6 dc, 5 ch-1 sps)
Row 2: Ch 5 (counts as dc + ch 2). [Dc in next dc, ch 2] 4 times, then dc in 3rd ch of tch. Turn. (6 dc, 5 ch-2 sps)
Row 3: Ch 4 (counts as dc + ch 1). Dc in next ch-2 sp, ch 1. [Dc in next dc, ch 1, dc in next ch-2 sp, ch 1] 4 times. Dc in 3rd ch of tch. Turn. (11 dc, 10 ch-1 sps)
Row 4: Ch 5 (counts as dc + ch 2). [Dc in next dc, ch 2] 9 times, then dc in 3rd ch of tch. Turn. (11 dc, 10 ch-2 sps)
Row 5: Ch 6 (counts as dc + ch 3). [Dc in next dc, ch 3] 9 times, then dc in 3rd ch of tch. Turn. (11 dc, 10 ch-3 sps)
Row 6 (solid rim): Ch 3 (counts as dc). 3 dc in next ch-3 sp, dc in next dc. Repeat from * across, working the last dc in 3rd ch of tch. Fasten off. (41 dc: 11 worked 1 per dc + 30 worked 3 per ch-3 sp)
The open rows give you the spokes and arcs of the trellis, and Row 6 closes them into a solid curved rim. Rows 2, 4, and 5 make the arcs longer by lengthening the chains. Rows 3 and 6 add stitches. This lets the half circle lie flat instead of cupping.
Make All Pieces
| Piece | Color | Quantity |
|---|---|---|
| Fans | A | 5 |
| Stems | C | 6 |
| Leaves | C | 96 (16 per vine) |
| Navy flowers, periwinkle centers | A + B | 24 |
| Periwinkle flowers, navy centers | B + A | 24 |
Layout grid (front view; V = vine position, F = fan):
[ tab ]   [ tab ]   [ tab ]   [ tab ]   [ tab ]   [ tab ]
|================ mesh band, 135 sts ==================|
V \__F1__/ V \__F2__/ V \__F3__/ V \__F4__/ V \__F5__/ V
|          |          |          |          |          |
vine 1     vine 2     vine 3     vine 4     vine 5     vine 6
The vines hang from the two outer corners and from the 4 points where the fans meet. That puts them 6 in (15.2 cm) apart.
Joining and Band
Joining method: Lay the 5 fans in a row with their straight edges at the top and right side facing up. The last dc of Row 6 on one fan touches the first dc of Row 6 on the next fan. With Color A, whipstitch those two corner stitches together with 2 small stitches. Do not join anything else. The band holds the fans together.
Stitch-to-stitch logic: Each fan’s straight edge has 12 row-ends (Rows 1–6 on each side) and the top of the ring. You will work 2 sc in each row-end and 3 sc over the ring, so each fan gets 24 + 3 = 27 sc. Five fans give 5 x 27 = 135 sc. No stitches are added at the seams.
Row 1: With the right side facing, join Color A at the top corner of Fan 1. Work 27 sc across each fan, moving straight from one fan to the next. Turn. (135 sc)
Checkpoint: The row should measure 30 in (76.2 cm). Keep your tension even and relaxed. If you pull tight at the seams, the fans will bunch together. If you work too loosely, the band will ripple.
Row 2: Ch 4 (counts as dc + ch 1). Sk next sc and dc in next sc. Ch 1, sk next sc, dc in next sc. Repeat from * across. Turn. (68 dc, 67 ch-1 sps)
Rows 3–10: Ch 4 (counts as dc + ch 1). Dc in next dc. Ch 1, dc in next dc. Repeat from * across, working the last dc in 3rd ch of tch. Turn. (68 dc, 67 ch-1 sps per row)
Row 11: Ch 1. Sc in each dc and in each ch-1 sp across. Turn. (135 sc: 68 + 67)
Checkpoint: The band should be 4.5 in (11.4 cm) deep and the valance 7.5 in (19.1 cm) deep at the center of each scallop.
Tabs (Color A)
Work 6 tabs on Row 11. Each tab is 10 sts wide, and there are 15 sts between tabs. The math: 6 x 10 + 5 x 15 = 135.
Place the tabs on sts 1–10, 26–35, 51–60, 76–85, 101–110, and 126–135.
Each tab: Join Color A in the first st of the tab. Ch 1 and sc in the same st and the next 9 sts, then turn (10 sc). Work 13 more rows of 10 sc. You will have 14 rows, about 2.8 in (7.1 cm). Fasten off and leave a 12 in (30.5 cm) tail.
Fold each tab to the back and whipstitch its last row to the back of Row 11. Each folded loop drops about 1.4 in (3.6 cm).
Border (Color C)
Border gauge: 18 sc = 4 in (10.2 cm), the same as the fabric.
The border runs only along the scalloped bottom edge. The starting count is 5 fans x 41 rim sts = 205 sc. No stitches are added at the seams.
Row 1: With the right side facing, join Color C in the first dc of Row 6 on Fan 1, at the left corner. Ch 1 and sc in each dc across the rim. At each seam, go straight from the last dc of one fan to the first dc of the next. Do not turn. (205 sc: 41 per fan)
Row 2: Ch 1. Working from left to right, rev sc in each sc across. Fasten off. (205 rev sc)
Why the math works: Each rim is about 9.1 in (23.1 cm) long along its curve. One sc per dc keeps the border exactly as long as the rim, so it will not ruffle or pull. The rev sc row gives a corded green edge. Together the two rows add about 0.5 in (1.3 cm), which brings the scallop centers to 8 in (20.3 cm).
Stems (Make 6, Color C)
Ch 225. Sl st in the back bump of the 2nd ch from the hook and in each ch across. Fasten off and leave a 12 in (30.5 cm) tail. (224 sl sts)
Checkpoint: Each stem should measure 56 in (142.2 cm). Measure after the first 40 sl sts. If 40 sl sts do not measure 10 in (25.4 cm), change your hook size.
Leaves (Make 96, Color C)
Ch 9.
Rnd 1: Sc in the 2nd ch from the hook, hdc in the next ch, dc in the next 3 ch, hdc in the next ch, and sc in the next ch. In the last ch, work (sc, ch 2, sc) for the tip. Working along the other side of the foundation chain: sc in the next ch, hdc in the next ch, dc in the next 3 ch, hdc in the next ch, and sc in the next ch. Sl st to the first sc. Fasten off and leave an 8 in (20.3 cm) tail. (16 sts + 1 ch-2 tip)
Each leaf is about 2 in (5.1 cm) long and 1 in (2.5 cm) wide, with a pointed tip and a vein down the center from the foundation chain.
Flowers (Make 48)
Make 24 navy flowers with periwinkle centers and 24 periwinkle flowers with navy centers.
Rnd 1 (center color): Make a magic ring. Ch 1 and work 5 sc in the ring. Pull the ring closed and sl st to the first sc. Fasten off. (5 sc)
Rnd 2 (petal color): Join in any sc. Ch 1 and work 2 sc in each st around. Sl st to the first sc. (10 sc)
Rnd 3: (Hdc, 3 dc, hdc) in the next st, sl st in the next st. Repeat from * 4 more times. Fasten off and leave an 8 in (20.3 cm) tail. (5 petals; 30 sts)
Each flower is about 2.25 in (5.7 cm) across.
Assembling the Vines
Lay one stem flat. Pin the flowers along it, starting 3 in (7.6 cm) from the top and repeating every 7 in (17.8 cm). That gives 8 flowers per stem. Alternate the flower colors along the stem. Vines 1, 3, and 5 start with a navy flower. Vines 2, 4, and 6 start with a periwinkle flower.
Pin a pair of leaves 3.5 in (8.9 cm) below each flower, one on each side, angled upward. That gives 8 pairs per stem, and the last pair sits 0.5 in (1.3 cm) from the end of the stem.
Sew the flowers through their centers and sew the leaves through their bases. Use the tails and keep your stitches on the back.
Sew the top of each vine to the valance at its point on the layout grid. Stitch through Border Row 1 and Band Row 1 so the stem hangs straight down.
Final Blocking
- Lay the valance face down on a blocking surface.
- Pin the band straight to 30 in (76.2 cm) wide and 4.5 in (11.4 cm) deep.
- Pin each scallop into a smooth half circle 3 in (7.6 cm) deep below the band, with the spokes straight.
- Mist the piece until it is damp, but not soaked.
- Let it dry completely before you unpin.
- Hang the vines and mist them lightly. Pull each one gently straight and let it dry hanging.
Final Quality-Control Checklist
- 5 fans, each 6 in (15.2 cm) wide with 41 rim sts
- Band Rows 1 and 11 each have 135 sc
- 6 tabs, evenly spaced and securely sewn
- Border has 205 sts per row and lies flat
- 6 vines, each 56 in (142.2 cm) long
- 8 flowers and 16 leaves on each vine
- All ends woven in on the back
Troubleshooting
- Fan cups: Your tension is too tight in Rows 4–5. Loosen the chains or go up a hook size.
- Fan ruffles: Your chains are too long. Keep them snug and check that Row 6 has 41 sts.
- Band wider than 30 in (76.2 cm): You worked extra sc at the row-ends. Count 27 per fan.
- Border flares: You added stitches at the seams. Rework with exactly 205 sts.
- Stems twist: Steam them lightly and let them dry hanging with a small weight on the end.
- Flowers spin: Add a second tacking stitch through one petal.
Care
Hand wash in cool water with mild soap. Press out the water in a towel, then reshape the curtain and dry it flat or hanging.
Final Notes
Everything starts from the first fan. A 6 in (15.2 cm) fan with 41 rim stitches gives you a 135-stitch band 30 in (76.2 cm) wide. The band gives you 6 evenly spaced tabs and a 205-stitch border, which brings the valance to 8 in (20.3 cm) deep. Six 56 in (142.2 cm) vines finish the curtain at about 62 in (157.5 cm) long. Check each measurement as you go, and the curtain will hang straight and even.
Happy crocheting!