

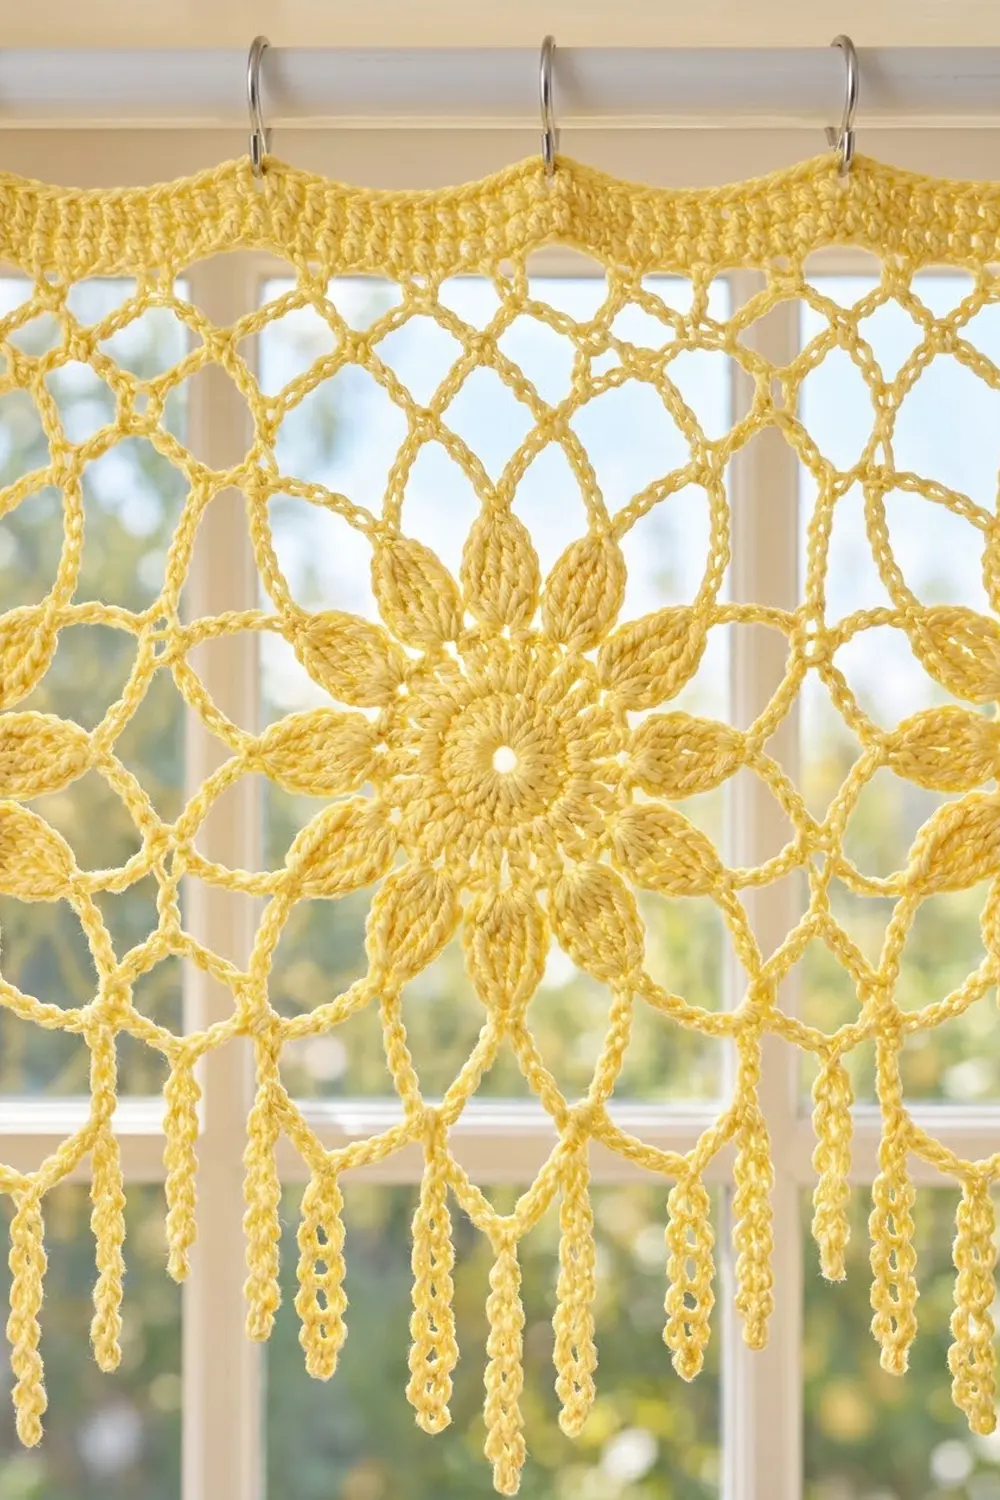
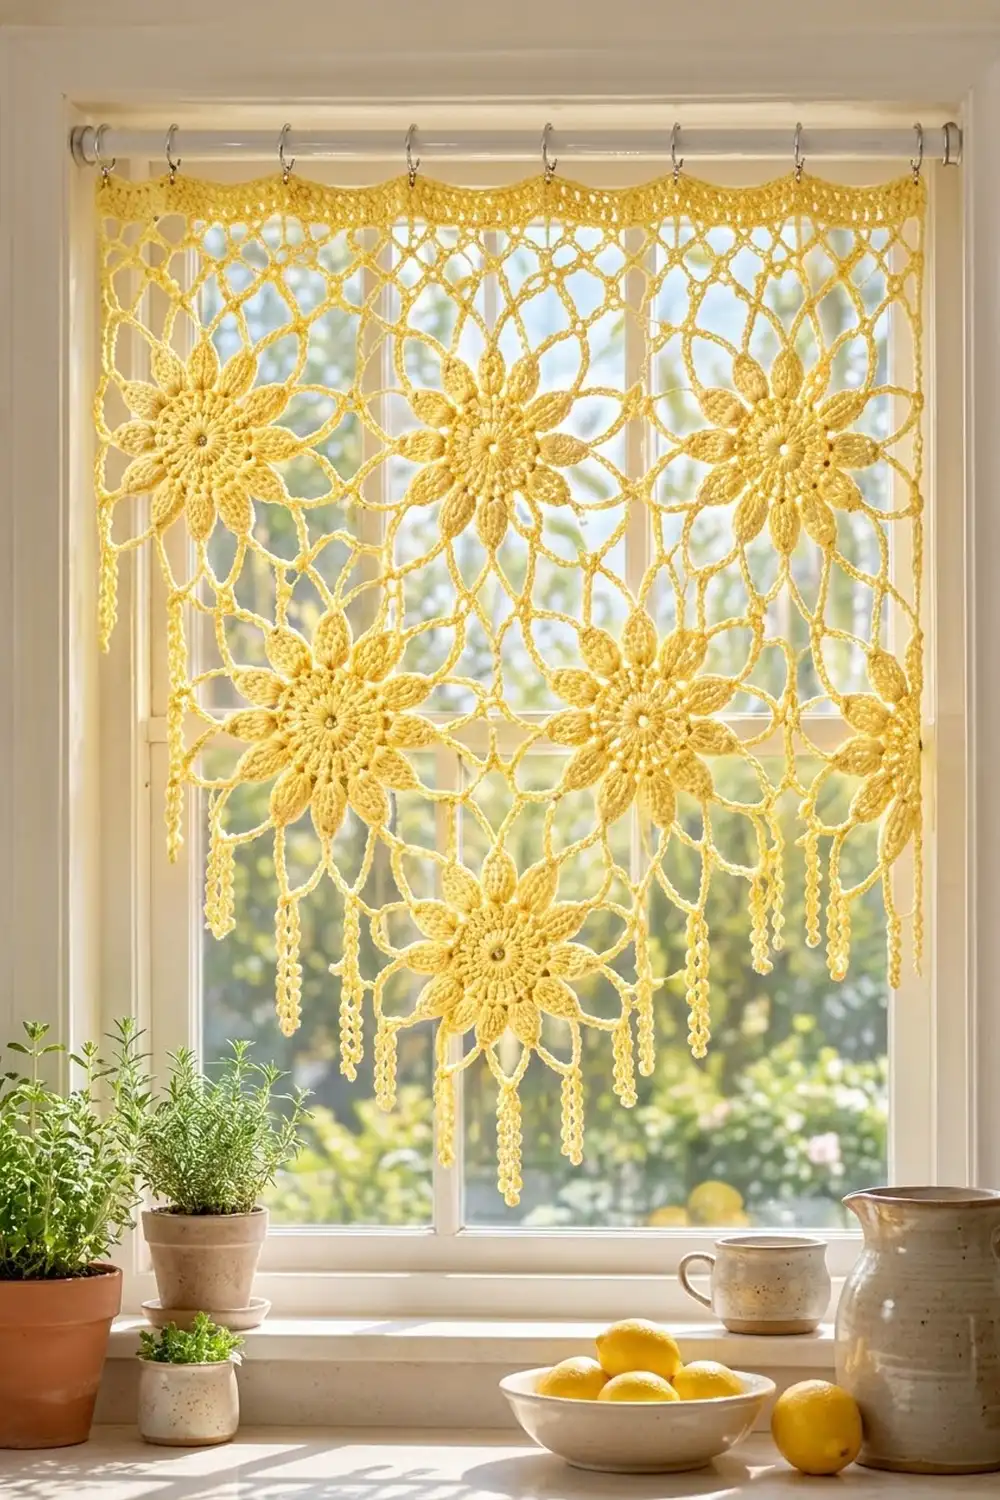
The Lemon Bloom café curtain fills a window with soft yellow flowers and filtered light. Each motif has a round center ringed by 12 pointed petals, and an open chain lattice connects the flowers so the sun comes through.
The curtain uses one color, a pale lemon yellow in DK cotton. A solid scalloped band across the top gives it structure. Fringe of two lengths hangs from the bottom edge for a relaxed, cottage-kitchen look.
The pattern uses US crochet terms. The finished curtain is 27 in (68.6 cm) wide and 20 in (50.8 cm) tall from the scalloped top to the bottom motif edge. The long fringe adds 6 in (15.2 cm), so the curtain is 26 in (66.0 cm) at its longest point.
To build it, you make one complete motif, then join the other five as you go on the last round. Then you add the top heading and the bottom fringe directly onto the joined panel.
Finished Size and Construction
- Finished size: 27 in x 20 in (68.6 cm x 50.8 cm), plus fringe up to 6 in (15.2 cm)
- Skill level: Intermediate
- Terminology: US crochet terms
- Yarn weight: DK / light (#3) cotton
- Hook: 4.0 mm (US G-6)
- Number of pieces: 6 motifs
- Layout: 3 motifs across x 2 motifs down
- Motif size: 9 in (22.9 cm) square, blocked
- Size before border: 27 in x 18 in (68.6 cm x 45.7 cm)
- Border depth: heading 2 in (5.1 cm) at the top; fringe 4 in (10.2 cm) and 6 in (15.2 cm) at the bottom; sides left open
Materials
Yarn: Choose a smooth mercerized or combed DK cotton, about 125 m per 50 g. Cotton gives crisp petals and clear stitches, and it blocks flat. Acrylic tends to drift and sag in a hanging lace piece.
- Lemon yellow: 125 g / 310 m
These quantities include a margin of about 25% for your gauge swatch and blocking adjustments.
Tools:
– 4.0 mm (US G-6) crochet hook
– 3.5 mm and 4.5 mm hooks for gauge adjustments
– Tapestry needle
– Scissors
– Rust-proof pins and a blocking mat or folded towels
– Spray bottle
– Tape measure
– 8 curtain clip rings or hooks
Abbreviations (US Terms)
- ch – chain
- sl st – slip stitch
- sc – single crochet
- hdc – half double crochet
- dc – double crochet
- tr – treble crochet
- sk – skip
- sp – space
- st(s) – stitch(es)
- RS – right side
Special stitch – Petal: Work (sc, hdc, 2 dc, 3 tr, 2 dc, hdc, sc) all into the same ch-7 loop. That is 11 sts per petal, and the 6th st (the center tr) is the petal tip.
Shell: Work 5 dc in the same st.
Gauge and Checkpoints
Make and block one complete motif before you start the others. It shows you your gauge, how much yarn one motif takes, and how the petals block.
Motif gauge: One motif measures 9 in (22.9 cm) square after blocking.
Heading gauge: 14 dc = 3 in (7.6 cm).
Checkpoints (measured flat across the center):
– After Round 3: 2.25 in (5.7 cm)
– After Round 5: 5.5 in (14.0 cm)
– After Round 6: 7 in (17.8 cm)
– After Round 7: 8.25 in (21.0 cm)
– After Round 8: 9 in (22.9 cm)
Adjusting: If your motif is bigger than 9.5 in (24.1 cm), switch to a 3.5 mm hook. If it is smaller than 8.5 in (21.6 cm), switch to a 4.5 mm hook. Small differences block out. A difference of more than 0.5 in (1.3 cm) per motif adds up to 1.5 in (3.8 cm) across the curtain.
Flower Motif
Work every round with the RS facing. Do not turn.
Round 1: Make a magic ring. Ch 3 (counts as dc), work 11 dc in the ring. Join with sl st to the top of ch-3. Pull the ring tight. (12 dc)
Round 2: Ch 3 (counts as dc), dc in the same st, then 2 dc in each st around. Join. (24 dc)
Round 3: Ch 1, sc in each st around. Join to the first sc. (24 sc)
This firm sc round makes the clean rim around the flower center.
Round 4: Ch 1, sc in the first st, ch 7, sk 1 st, sc in next st. Repeat from * 10 more times, then ch 7, sk the last st, and join to the first sc. (12 sc and 12 ch-7 loops)
Round 5: Sl st into the first ch-7 loop. Work 1 Petal in each ch-7 loop around. Join to the first sc. (12 petals, 132 sts)
The 3 tr at the middle of each loop push it into a pointed oval, which gives you the leaf-shaped petals.
Round 6: Sl st in the next 5 sts to reach the center tr of the first petal. Ch 1, sc in the same tr, ch 9, sc in the center tr of the next petal. Repeat from * 10 more times, then ch 9 and join to the first sc. (12 sc and 12 ch-9 loops)
Round 7 (squaring round): Sl st into the first ch-9 loop. Ch 1, work (sc, ch 9, sc) in this loop for the corner, [ch 9, sc in next loop] 2 times, ch 9, move to the next loop. Repeat from * 3 more times, then join to the first sc. (4 corner ch-9 loops and 12 side ch-9 loops, 16 loops total; 3 side loops per side)
Round 8 (edge round): Sl st into the corner ch-9 sp. Ch 1, work (sc, ch 7, sc) in the corner sp, [ch 7, sc in next ch-9 sp] 3 times, ch 7. Repeat from * 3 more times, then join to the first sc. (4 corner ch-7 loops and 16 side ch-7 loops, 20 loops total; 4 side loops per side)
Fasten off and weave in the ends. Block this first motif to 9 in (22.9 cm) square and check it against the gauge.
Make All Pieces
Make 6 motifs, all in lemon yellow.
- Motif 1: complete Rounds 1–8
- Motifs 2–6: complete Rounds 1–7, then work Round 8 with join-as-you-go (see Joining)
Layout grid (rows are top to bottom):
Row 1:  [ 1 ] [ 2 ] [ 3 ]
Row 2:  [ 4 ] [ 5 ] [ 6 ]
Join the motifs in number order.
Joining
Method: Join-as-you-go on Round 8.
Joining a ch-7 side loop: Instead of ch 7, work ch 3, then sl st into the matching ch-7 loop of the finished neighbor, then ch 3. The loop stays the same length and is linked at its midpoint.
Joining a corner: In the corner sp, work (sc, ch 3, sl st into the neighbor’s corner ch-7 loop, ch 3, sc).
Stitch-to-stitch logic: Each side has 4 side loops plus the 2 corner loops at its ends. Match them one to one: corner to corner, side loop 1 to side loop 1, and so on. Never skip a loop or join two loops into one. That way the lattice stays even across every seam.
Four-way corners: At the center points where four motifs meet (between Motifs 1, 2, 4 and 5, and between 2, 3, 5 and 6), sl st into the same joining sl st that is already there. Do not make a new link. This keeps all four corners on one point.
Tension: Keep the joining sl st snug but not tight. If it is too tight, the seam loops pucker. If it is too loose, the motifs gap and the curtain sags.
Size checkpoint: Lay the joined panel flat without stretching it. It should measure 27 in x 18 in (68.6 cm x 45.7 cm). Each row of 3 should be 27 in (68.6 cm) wide.
Border: Heading and Fringe
Heading gauge: 14 dc = 3 in (7.6 cm), which is about 4.67 sts per in.
Edge pickup per motif: Work 3 sc in each corner ch-7 loop and 9 sc in each of the 4 side ch-7 loops. That gives 3 + 36 + 3 = 42 sc per motif side. This count already includes both corner loops. At a seam, each motif’s corner loop gets its own 3 sc, so no extra stitches are added between motifs.
The left and right sides of the curtain are left as open loops, as shown in the photo.
Top Heading
Row 1 (RS): Join the yarn in the top-right corner loop of Motif 3. Ch 1, then work the edge pickup across Motifs 3, 2 and 1. Turn. (3 x 42 = 126 sc)
Row 2: Ch 3 (counts as dc), dc in each st across. Turn. (126 dc)
Row 3: Ch 3, dc in each st to the last st, 2 dc in the last st. Turn. (126 + 1 = 127 dc)
Row 4: Ch 3, dc in each st across. Turn. (127 dc)
Row 5 (scallop): Ch 1, sc in the first st, sk 2 sts, Shell in next st, sk 2 sts, sc in next st. Repeat from * 20 more times. (21 shells, 22 sc; 1 + 21 x 6 = 127 sts used)
Fasten off. The heading is 2 in (5.1 cm) deep.
Why the math works: 126 sts across 27 in (68.6 cm) is 4.67 sts per in, which matches the heading gauge. So the heading lies flat without gathering or flaring. The extra stitch in Row 3 brings the count to 127, which fits the 6-stitch scallop repeat plus 1 exactly.
Bottom Fringe
Row 1 (RS): Join the yarn in the bottom-left corner loop of Motif 4. Ch 1, then work the edge pickup across Motifs 4, 5 and 6. (3 x 42 = 126 sc) Do not turn.
Row 2 (fringe): Ch 1 and turn so the RS faces you. Sl st in the first sc.
- Long dangle: Ch 31. Sl st in the back bump of the 2nd ch from the hook and of each ch back to the base (30 sl sts). Sl st in the same sc as the base, then sl st in the next 5 sc.
- Short dangle: Ch 21. Sl st in the back bump of the 2nd ch from the hook and of each ch back (20 sl sts). Sl st in the same sc as the base.
Work 1 long dangle, then 1 short dangle, then sl st in the next 5 sc. Repeat from * 11 more times. Work 1 more long dangle, then end with 1 short dangle in the last sc. (26 dangles: 13 long, 13 short)
The dangles sit on sc 1, 6, 11, and so on up to 126. Since 1 + 5 x 25 = 126, the outer dangles land exactly on both ends.
Fasten off. The long dangles hang 6 in (15.2 cm) and the short ones 4 in (10.2 cm). Working the sl sts into the back bumps gives each dangle the twisted cord look.
Final Blocking
- Weave in all remaining ends along the chain lines so they don’t show against the light.
- Soak the curtain in cool water for 15 minutes, then press out the water. Do not wring it.
- Roll it in a towel to remove the excess moisture.
- Lay it on a mat, RS up. Pin the top heading straight at 27 in (68.6 cm).
- Pin the 4 outer motif corners, then the seam points, so the panel measures 27 in x 18 in (68.6 cm x 45.7 cm) below the heading.
- Pin the tip of each petal outward to sharpen it.
- Pull each side ch-7 loop into a smooth arc with a pin.
- Comb the dangles straight and lay them flat.
- Let the curtain dry completely, which takes about 24 hours.
Final Quality-Control Checklist
- 6 motifs, each 9 in (22.9 cm) square
- 12 petals per motif, each with a clear point
- Every seam joins 4 side loops and 2 corners, with no skipped loops
- Four-way corners share one joining point
- Heading Row 1 has 126 sc; Row 5 has 21 shells
- The heading is 27 in (68.6 cm) wide and lies flat
- 26 dangles alternating long and short, with one at each end
- Overall size: 27 in x 20 in (68.6 cm x 50.8 cm), plus fringe
- All ends are hidden
Troubleshooting
Petals look round instead of pointed: Check that you worked 3 tr at the middle of each Petal, and pin the tips when blocking.
The motif ruffles: Your Round 6 chains are too long for your tension. Go down to ch 8.
The motif cups: Your chains are too tight. Use a 4.5 mm hook for Rounds 6–8 only.
The heading gathers the panel: Count your Row 1 again. You need 42 sc per motif.
The heading flares: You added stitches. Rework Row 1 with exactly 9 sc per side loop.
The fringe curls: Steam it lightly and hang it while damp.
Seams gap: Tighten your joining sl sts.
Care
Hand wash in cool water with mild soap, then reshape and dry flat. Re-pin the petal tips if the curtain starts to look tired after washing.
Final Notes
The measurement chain is simple. One motif is 9 in (22.9 cm). Three across makes 27 in (68.6 cm), and two down makes 18 in (45.7 cm). Picking up 42 sc per motif gives 126 heading stitches, which matches the 4.67-per-inch heading gauge. The 2 in (5.1 cm) heading brings the height to 20 in (50.8 cm), and the fringe falls 4–6 in (10.2–15.2 cm) below that. If each stage checks out, the curtain hangs straight and even.
Happy crocheting!