

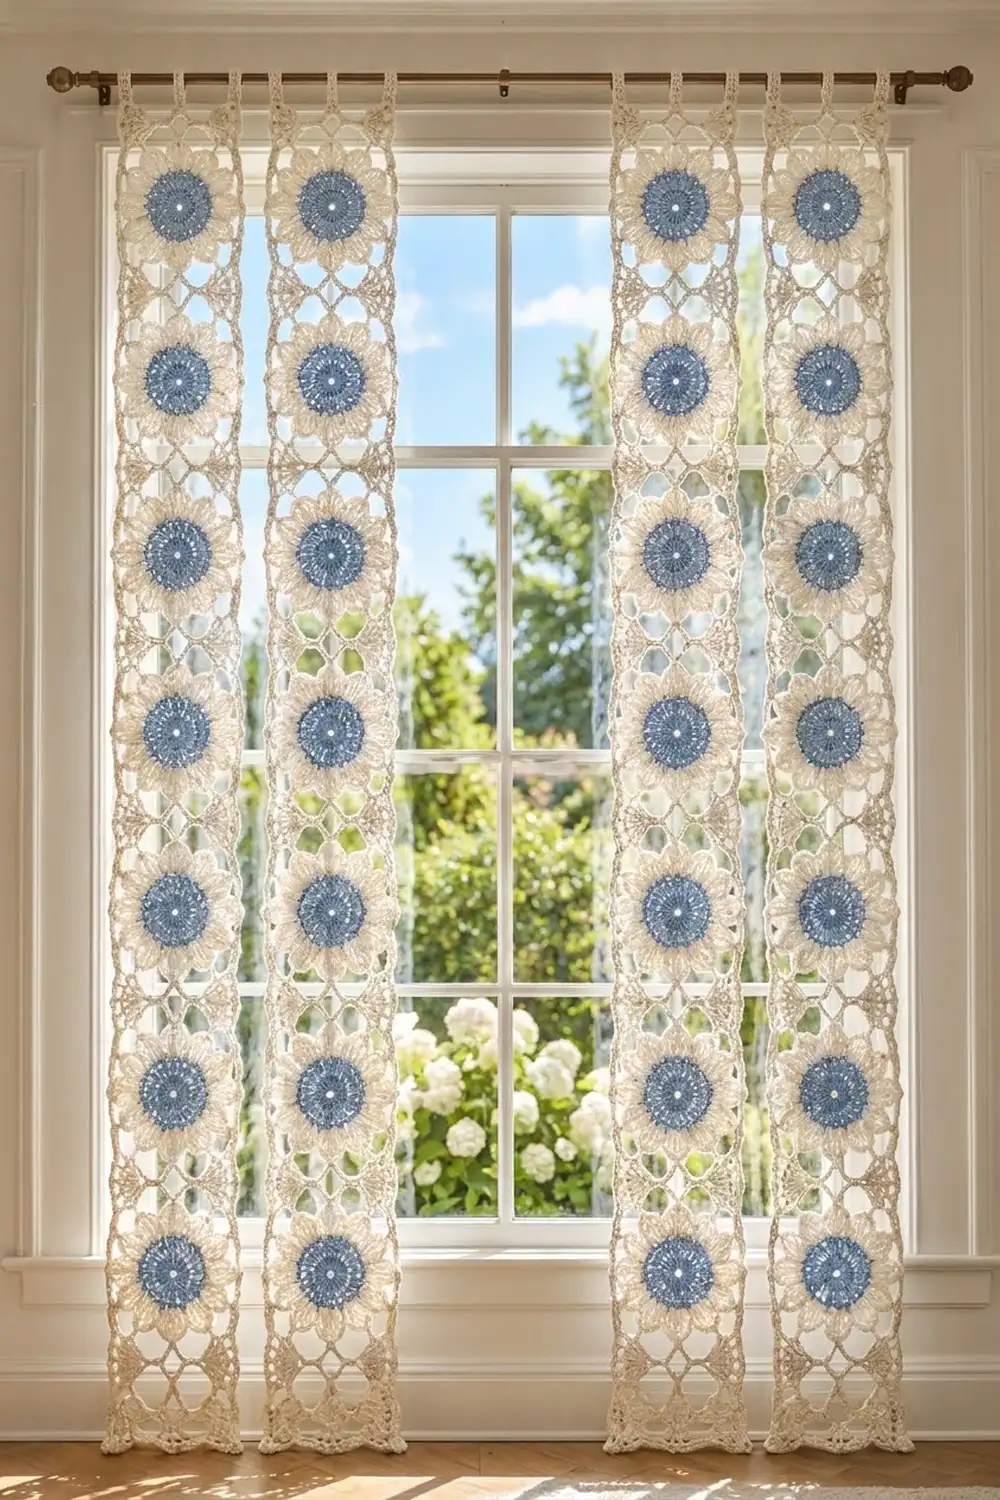
These airy curtain strips use a simple repeating flower square. Each square has a solid cornflower-blue center, a ring of plump cream petals, and an open lattice with fan-shaped corners. Seven squares join into one tall strip. You make four strips and hang them in pairs on either side of the window, so the light comes through the lace and the gaps between strips.
Only two colors are used: soft cornflower blue for the flower centers and warm cream for everything else. The look is fresh and cottage-style, and it works well in kitchens, sunrooms, and bedrooms.
This pattern uses US crochet terms. Each strip measures 9 in (22.9 cm) wide by 57 in (144.8 cm) long after the border. With the tabs, the hanging length is about 60 in (152.4 cm).
Here is the construction in brief. You work each motif in the round, from the blue center out to a square double-crochet frame. You join seven motifs in a column with slip stitches, then add a two-round single-crochet border. Last, you work three tabs across the top edge.
Finished Size and Construction
- Finished strip size: 9 in x 57 in (22.9 cm x 144.8 cm), plus 3 in (7.6 cm) tab loops
- Skill level: Intermediate
- Terminology: US
- Yarn weight: Worsted (#4) cotton or cotton blend
- Hook: 5.0 mm (H-8)
- Number of pieces: 28 motifs (7 per strip, 4 strips)
- Layout: each strip is 1 motif wide x 7 motifs long. The strips are not joined to each other.
- Motif size: 8 in (20.3 cm) square
- Strip size before border: 8 in x 56 in (20.3 cm x 142.2 cm)
- Border depth: 0.5 in (1.3 cm) on every side
Materials
Yarn: Use a smooth, mercerized or matte worsted cotton with good stitch definition. Cotton holds the petals crisp and hangs straight in sunlight. Avoid fuzzy yarns, because they blur the lattice.
- Cornflower blue: 150 g, about 270 m
- Cream: 850 g, about 1,530 m
These amounts assume a yarn of about 180 m per 100 g and cover all four strips. They include a margin of roughly 15% for gauge swatches, joining, and tension differences.
Tools:
– 5.0 mm (H-8) crochet hook
– Tapestry needle
– Stitch markers
– Rust-proof pins and blocking mats
– Spray bottle
– Measuring tape
Abbreviations (US Terms)
- ch – chain
- sl st – slip stitch
- sc – single crochet
- dc – double crochet
- tr – treble crochet
- sp – space
- st(s) – stitch(es)
- RS / WS – right side / wrong side
- rep – repeat
Special stitch – Corner Fan: (4 tr, ch 3, 4 tr) all in the same space.
Gauge and Checkpoints
Gauge: 14.5 dc = 4 in (10.2 cm) in the motif’s final round. That gives 29 dc across one 8 in (20.3 cm) side.
Make and block one full motif before you start the rest. Gauge for lace is easier to judge on a finished square than on a swatch.
Checkpoints for one motif (measured flat, lightly blocked):
– After Round 4: the blue disc is 4.5 in (11.4 cm) across.
– After Round 5: the petal ring is 6.5 in (16.5 cm) across from petal tip to petal tip.
– After Round 7: the side is 7.25 in (18.4 cm) between corner chain spaces.
– After Round 8: the side is 8 in (20.3 cm).
If your motif is more than 0.3 in (0.8 cm) off:
– If it is larger than 8.3 in (21.1 cm), go down one hook size.
– If it is smaller than 7.7 in (19.6 cm), go up one hook size.
– If only the petals ruffle, your Round 5 is too loose. Change hooks for that round only.
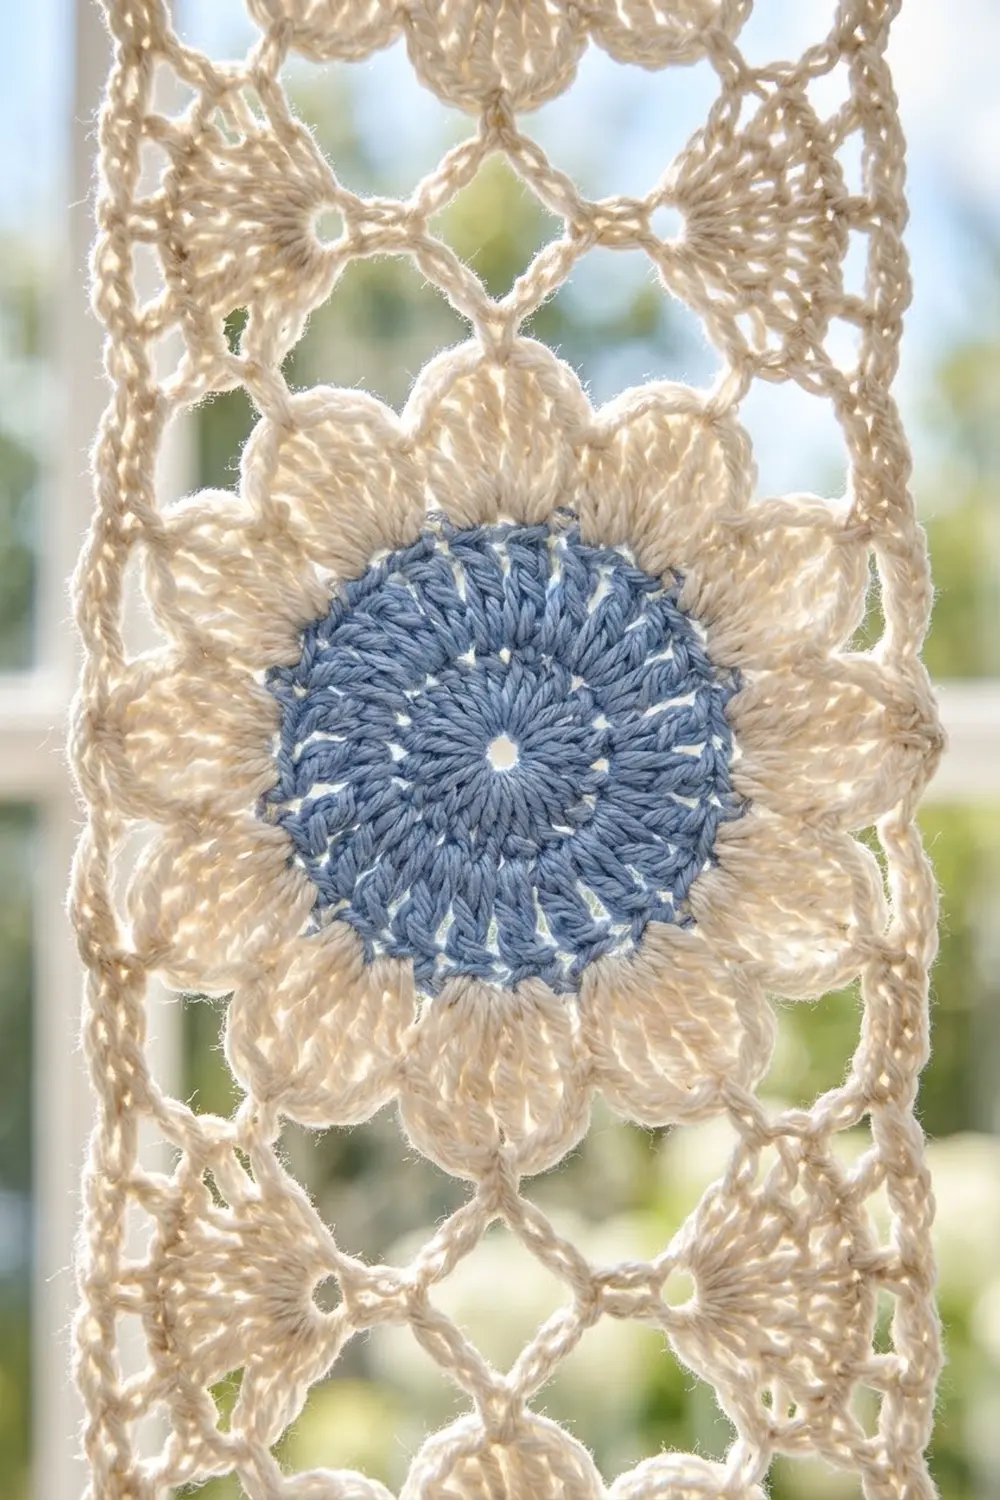
Motif (Make 28)
Round 1 (blue): Make a magic ring. Ch 3 (counts as dc), work 11 dc in the ring, then join with a sl st to the top of the ch-3. (12 dc)
Round 2: Ch 3, dc in the same st, then 2 dc in each st around. Join. (24 dc)
Round 3: Ch 3, 2 dc in the next st. Dc in the next st, 2 dc in the next st; rep from * around. Join. (36 dc)
Round 4: Ch 3, dc in the next st, 2 dc in the next st. Dc in the next 2 sts, 2 dc in the next st; rep from * around. Join. (48 dc) Fasten off blue.
Pull the magic ring snug but not fully closed. A tiny eye in the center matches the finished look.
Round 5 (cream, petals): Join cream with a sc in any st. Skip 1 st, 7 dc in the next st, skip 1 st, sc in the next st; rep from * around. On the final repeat, end with “skip 1 st” and join with a sl st to the first sc.
Each repeat uses 4 sts, so 48 ÷ 4 = 12 petals. (12 petals: 84 dc + 12 sc = 96 sts)
Round 6 (chain ring): Sl st in the next 4 dc, which brings you to the center dc of the first petal. Ch 1, sc in the same st, ch 5. Sc in the center (4th) dc of the next petal, ch 5; rep from * around. Join with a sl st to the first sc. (12 sc, 12 ch-5 sps)
The ch-5 arcs sit behind the petals, linking the petal tips into a ring.
Round 7 (lattice and corner fans): Sl st in the next 2 ch and into the ch-5 sp. Ch 4 (counts as tr), 3 tr in the same sp, ch 3, 4 tr in the same sp. This is the first Corner Fan.
Next, (ch 5, sc in the next sp) twice, ch 5, Corner Fan in the next sp. Rep from * 2 more times, then from * to ** once. Join with a sl st to the top of the ch-4.
Each side uses 3 of the 12 spaces (1 corner + 2 side). (32 tr, 8 sc, 4 corner ch-3 sps, 12 ch-5 sps: 3 per side)
Round 8 (frame): Sl st in the next 3 tr and into the corner ch-3 sp. Ch 3 (counts as dc), then work (dc, ch 2, 2 dc) in the same sp.
Dc in the next 4 tr, 5 dc in the next ch-5 sp, dc in the next sc, 5 dc in the next ch-5 sp, dc in the next sc, 5 dc in the next ch-5 sp, dc in the next 4 tr, (2 dc, ch 2, 2 dc) in the next corner sp. Rep from * 2 more times, then from * to ** once. Join. Fasten off and weave in the ends.
Between the corner groups, each side has 4 + 5 + 1 + 5 + 1 + 5 + 4 = 25 dc. Add the 2 corner dc at each end and you get 2 + 25 + 2 = 29 dc per side, including the corner dc. The ch-2 corner spaces are not counted as stitches. (116 dc + 4 ch-2 corner sps)
Make All Pieces
- Total motifs: 28 (7 per strip x 4 strips)
- Blue: 28 centers (Rounds 1–4)
- Cream: 28 outer sections (Rounds 5–8), plus the joining, borders, and tabs
Layout for one strip (make 4 strips):
[M1]   <- top (tabs here)
[M2]
[M3]
[M4]
[M5]
[M6]
[M7]   <- bottom
Block all the motifs to 8 in (20.3 cm) square before joining. Matching squares make straight seams.
Joining
Method: slip-stitch join through the outer loops, with cream.
- Hold two motifs with RS together and the edges aligned, so each dc on the front sits over its matching dc on the back.
- Insert the hook through both corner ch-2 spaces and sl st to start.
- Sl st through the outer loop of each matching pair of dc: 29 sl sts for the 29 dc on each side. The count is always 1 sl st per pair, with no extra stitches added.
- Sl st through the next two corner ch-2 spaces together. Fasten off, or continue to the next motif.
Join M1 to M2, M2 to M3, and so on, for 6 seams per strip. This makes the corner fans of neighboring motifs meet point to point and form the lacy band between flowers.
Tension: Keep each sl st as loose as the dc beneath it. If the seam pulls tighter than the motif edge, the strip will hourglass at every join. Go up one hook size for the seams if you need to.
Size checkpoint: The joined strip should measure 8 in x 56 in (20.3 cm x 142.2 cm). Lay it flat and measure before you start the border.
Border
Border gauge: 1 sc per dc along the edges. That is about 3.6 sc per inch, the same rate as the motif frame, so the edges stay flat. Two sc rounds add 0.5 in (1.3 cm) of depth.
Starting counts:
– Long sides: 7 motifs x 29 dc = 203 sts. Work nothing into the joined corner spaces at the seams, because those spaces are closed by the join.
– Short sides: 1 motif x 29 dc = 29 sts.
Round 1: With RS facing, join cream with a sc in the first dc after any outer corner. Sc in each dc along the side. At each seam, skip the joined corner spaces and keep working into the next motif’s dc. Work 3 sc in each of the 4 outer corner ch-2 spaces. Join.
- Long sides: 203 sc each
- Short sides: 29 sc each
- Corners: 3 sc each
- Total: 2 x 203 + 2 x 29 + 4 x 3 = 476 sc
Round 2: Ch 1. Sc in each st around, but work 3 sc in the center sc of each corner group. Join.
- Long sides: 203 sc each
- Short sides: 29 sc each
- Corners: 1 + 3 + 1 = 5 sc each
- Total: 2 x 203 + 2 x 29 + 4 x 5 = 484 sc
Fasten off.
Why the math works: Each side starts with exactly the dc that the motifs provide, and nothing is added at the seams. Only the 4 outer corners gain stitches, 2 each round, which is what a flat 90-degree corner needs. Because the sc rate matches the dc rate, the 56 in (142.2 cm) length does not stretch or gather.
Tabs (top edge only): The top edge has 39 sts from corner to corner (5 + 29 + 5). With the RS facing, mark sts 1–5, 18–22, and 35–39. That makes 3 tabs of 5 sts each, with 12 sts between them (5 + 12 + 5 + 12 + 5 = 39).
For each tab: join cream in the first marked st, ch 1, and sc in the 5 marked sts. Then work rows of 5 sc (ch 1 and turn each row) until the tab measures 6 in (15.2 cm), about 24 rows. Fold the tab to the WS and sew the last row to the base of the tab. This makes a 3 in (7.6 cm) loop. Each tab is about 1.4 in (3.6 cm) wide.
Final Blocking
- Wet-block the whole strip. Soak it in cool water for 10 minutes, then press the water out gently in a towel without wringing.
- Lay it flat on the mats with the RS up.
- Pin the four outer corners first, to 9 in x 57 in (22.9 cm x 144.8 cm).
- Pin each seam line straight across, at the 8 in (20.3 cm) intervals measured from the top corner plus 0.5 in (1.3 cm).
- Open each blue center into a round disc, and shape each petal into a smooth arc with your fingers.
- Pin the ch-5 lattice open so the diamonds are clear, and spread each Corner Fan.
- Let the strip dry completely before you unpin it. Block the tabs flat so they hang straight.
Final Quality-Control Checklist
- [ ] Every motif has 12 petals and 29 dc per side.
- [ ] Each strip has 7 motifs and 6 seams, all in one straight column.
- [ ] No extra stitches were worked at the seams in Border Round 1.
- [ ] Border Round 2 counts are 203 / 29 / 203 / 29, with 5 sts at each corner.
- [ ] The strip measures 9 in x 57 in (22.9 cm x 144.8 cm).
- [ ] The three tabs are evenly spaced, the same length, and securely sewn.
- [ ] All ends are woven into solid stitches, not into the lattice.
- [ ] All four strips match in length to within 0.5 in (1.3 cm).
Troubleshooting
- The blue disc cups: Your Round 4 is too tight. Rework it with a looser tension.
- The petals ruffle: Your Round 5 shells are too loose. Use a smaller hook for that round, or block it firmly.
- The square has rounded corners: Check that each Corner Fan has its ch 3 and that the Round 8 corners have their ch 2.
- The side count is not 29: Recount the ch-5 spaces in Round 7. There should be exactly 3 per side.
- The strip pinches at the seams: Your sl st join is too tight. Rejoin with a larger hook.
- The border waves: You added stitches at the seams. Recount the long side to 203.
- The strips differ in length: Block them together and pin them to the same 57 in (144.8 cm) measurement.
Care
Hand wash in cool water with a mild detergent, then lay flat to dry and reshape as needed. Do not hang the strips while wet, or they will stretch in length.
Final Notes
The measurement chain is simple. Gauge is 14.5 dc = 4 in (10.2 cm). That gives 29 dc per side and an 8 in (20.3 cm) motif. Seven motifs make 203 sts and 56 in (142.2 cm). The two-round border adds 0.5 in (1.3 cm) on each side, for a 9 in x 57 in (22.9 cm x 144.8 cm) strip. The 3 in (7.6 cm) tabs bring the hanging length to about 60 in (152.4 cm).
If you check the first motif carefully, all four strips will hang evenly. Make four strips, hang them in two pairs, and enjoy the light coming through the lace.
Happy crocheting!