

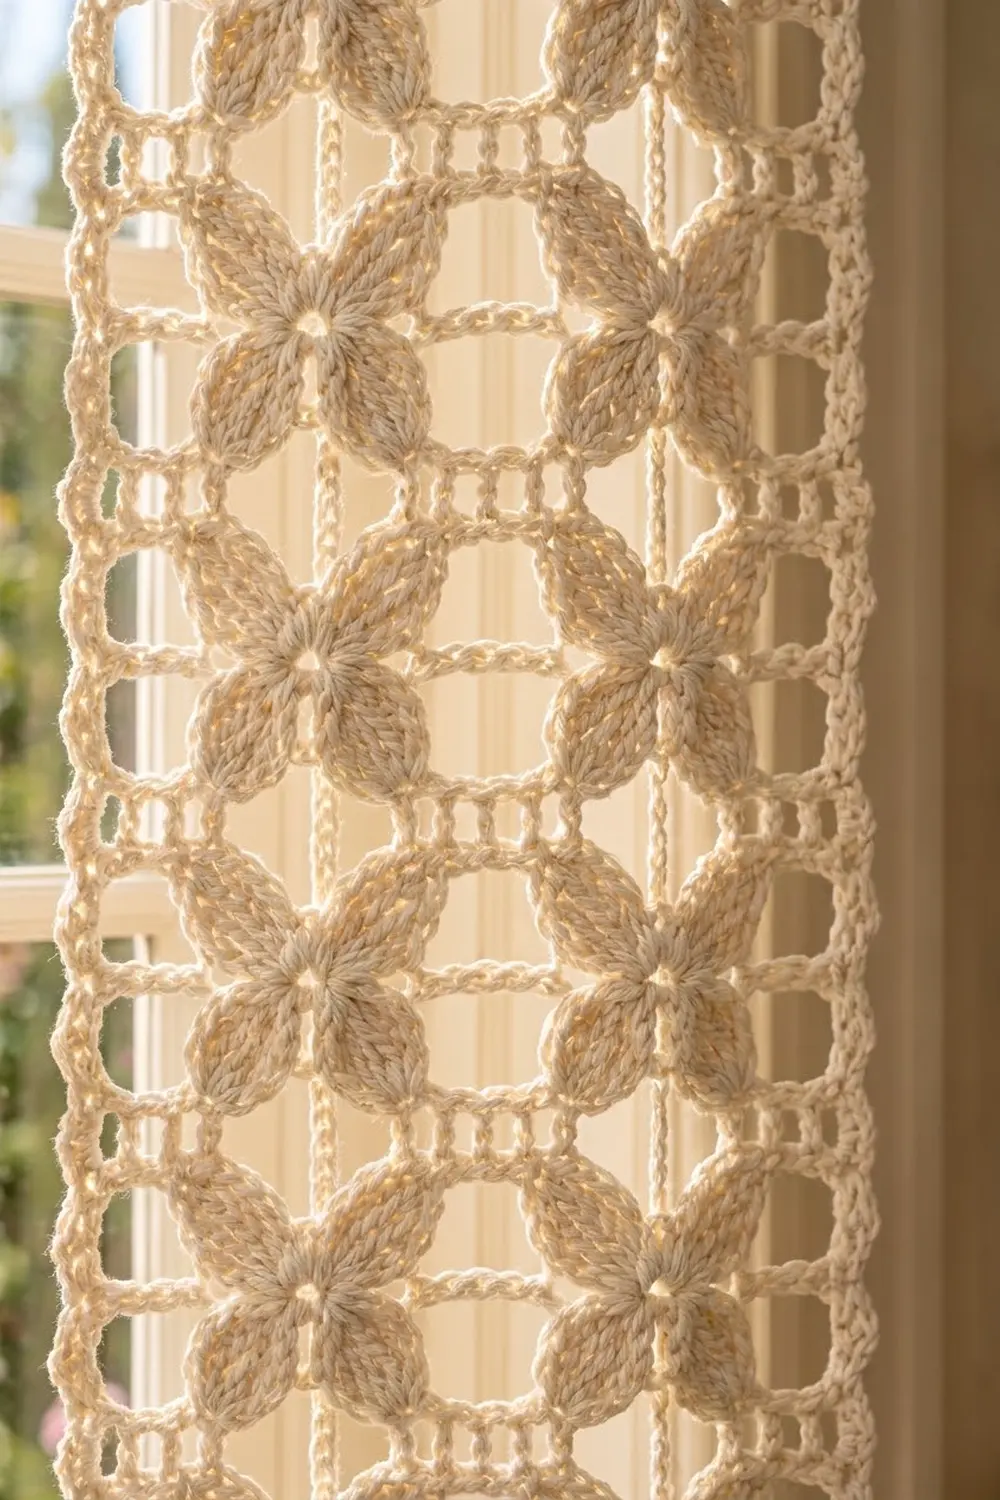
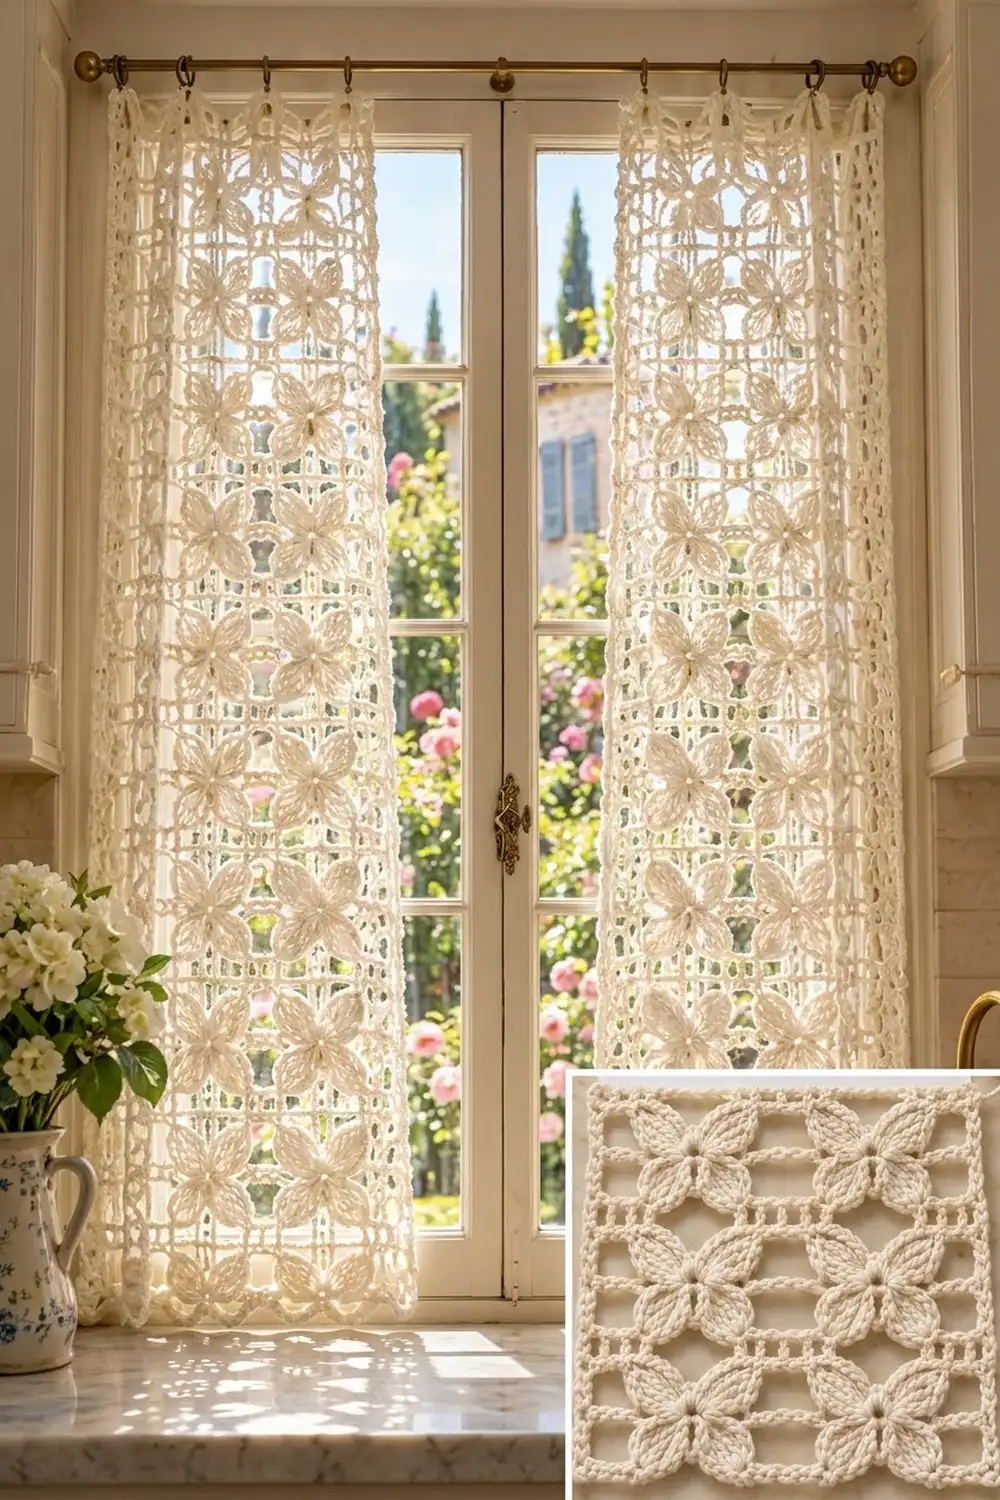
The Garden Window Lace curtain panels are made for a sunny window. Each panel is a grid of square motifs. Every square holds a plump four-petal flower inside an airy frame of chain bars and small three-stitch “ladders”. When the panels hang, the solid petals catch the light and the open frame lets the garden show through.
The design uses one color, a soft cream cotton, which keeps it light and classic. The petals are made of tightly packed stitches, so they stand out from the open mesh. The look is cottage-style lace, but chunkier and quicker than thread crochet.
This pattern uses US crochet terms. One finished panel measures 19 in × 73.5 in (48.3 cm × 186.7 cm), including the border and the scalloped bottom edge. The pattern makes a matching pair.
Construction is simple. Make 36 square motifs per panel, join them into a grid 3 squares wide and 12 squares tall, then add a two-round sc border and a scalloped bottom row. Hang the panels with ring clips.
Finished Size and Construction
- Finished panel size: 19 in × 73.5 in (48.3 cm × 186.7 cm)
- Skill level: Intermediate
- Terminology: US crochet terms
- Yarn weight: Worsted weight (#4) mercerized cotton
- Hook: 4.5 mm (US 7)
- Number of pieces: 36 motifs per panel, 72 motifs for the pair
- Layout: 3 motifs wide × 12 motifs tall per panel
- Motif size: 6 in × 6 in (15.2 cm × 15.2 cm)
- Size before border: 18 in × 72 in (45.7 cm × 182.9 cm)
- Border depth: 0.5 in (1.3 cm) on the top and sides, plus 0.5 in (1.3 cm) of scallops on the bottom
Materials
Use a smooth, mercerized worsted-weight cotton. Cotton holds the petal shapes well, blocks crisply, and hangs well in a window. Avoid fuzzy or very stretchy yarn, because the open frame can sag over a long drop.
- Cream: 600 g, about 1,020 m (300 g, about 510 m per panel), based on roughly 85 m per 50 g
These amounts include a margin of about 25% for your gauge swatch, joining, and small differences in tension.
Tools:
– 4.5 mm (US 7) crochet hook
– Tapestry needle
– Scissors
– Stitch markers
– Blocking mats and rust-proof pins
– Spray bottle
– Measuring tape
– Curtain rod with ring clips (about 8 clips per panel)
Abbreviations (US Terms)
- ch – chain
- sl st – slip stitch
- sc – single crochet
- hdc – half double crochet
- dc – double crochet
- tr – treble crochet
- sp – space
- st(s) – stitch(es)
- rep – repeat
- RS / WS – right side / wrong side
Special technique – Packed petal: Work all petal stitches around a ch-10 loop, not into the chains. The loop folds in half, and the 16 stitches crowd together into a plump, leaf-shaped petal with a pointed ch-3 tip.
Gauge and Checkpoints
Border gauge: about 15 sc = 4 in (10.2 cm). The exact working gauge is 23 sc = 6 in (15.2 cm).
Before you commit to 72 motifs, make one test motif and block it. It should measure 6 in (15.2 cm) square.
Checkpoints for the test motif:
– After Round 3: the flower measures about 4.5 in (11.4 cm) from one petal tip to the opposite petal tip.
– After Round 5: the motif measures about 5.5 in (14.0 cm) per side.
– After Round 6: the motif measures 6 in (15.2 cm) per side, with 23 sc on each side.
If your motif is too big, go down a hook size, to 4.0 mm. If it is too small, go up to 5.0 mm. A difference of only 0.25 in (0.6 cm) per motif adds up to 3 in (7.6 cm) over 12 motifs, so check carefully.
Motif (Make 36 per Panel)
Work in rounds with the RS facing. Don’t turn.
Round 1: Make a magic ring. Ch 1, work 8 sc in the ring. Pull the ring closed and sl st to the first sc. (8 sc)
Round 2: Ch 10, skip the next sc, sl st in the next sc. Rep from * 3 more times. The last sl st lands in the joining sc of Round 1. (4 ch-10 loops)
Round 3 (petals): In each ch-10 loop, work (sc, hdc, 2 dc, 3 tr, ch 3, 3 tr, 2 dc, hdc, sc), then sl st in the next sl st between loops. (64 sts plus 4 ch-3 tips: 16 sts per petal)
Push the stitches together as you work, so each loop folds into a plump leaf. The four petals sit in an X shape. These tips become the corners of the square.
Round 4 (frame): Sl st in the next sc, hdc, 2 dc, and 3 tr, then sl st into the ch-3 tip. Ch 1, work (sc, ch 3, sc) in the same tip. Ch 13, (sc, ch 3, sc) in the next tip. Rep from * 2 more times, then ch 13 and sl st to the first sc. (8 sc, 4 ch-3 corners, 4 ch-13 sides)
Round 5 (ladders): Sl st into the corner ch-3 sp. Ch 3 (counts as dc), work (2 dc, ch 3, 3 dc) in the same sp. Ch 5, skip the next sc and 5 ch, dc in each of the next 3 ch, ch 5, skip the last 5 ch and the next sc, then work (3 dc, ch 3, 3 dc) in the next corner sp. Rep from * 2 more times. Ch 5, skip 5 ch, dc in the next 3 ch, ch 5, skip the last 5 ch and sc, and sl st to the top of the beginning ch-3.
Each side uses all 13 chains: 5 skipped + 3 dc + 5 skipped. The three middle dc form the little ladder in the center of each side. (36 dc: 6 per corner group and 3 per side; 8 ch-5 sps; 4 ch-3 corners)
Round 6 (conversion round): Sl st in the next 2 dc and into the corner sp. Ch 1, work 3 sc in the corner sp. [Sc in the next 3 dc, 5 sc in the ch-5 sp, sc in the next 3 dc, 5 sc in the ch-5 sp, sc in the next 3 dc], 3 sc in the next corner sp. Rep from * 2 more times. Rep [ ] once, then sl st to the first sc. Fasten off and weave in the ends.
Count: 36 sc worked 1 per existing dc + 52 sc added into spaces (8 ch-5 sps × 5 + 4 corners × 3) = 88 sc.
Per side: 19 sc between corner groups. The middle sc of each 3-sc corner is the corner stitch. Counting both corner stitches, each side has 23 sts (1 + 1 + 19 + 1 + 1). Check: 4 sides × 23 = 92, minus the 4 shared corners = 88. ✓
Make All Pieces
- Per panel: 36 motifs in Cream
- For the pair: 72 motifs in Cream
Block all the motifs to 6 in (15.2 cm) before joining. Squares of the same size join much more neatly.
Layout per panel (3 wide × 12 tall):
Row 1  (top):    [M] [M] [M]
Row 2:           [M] [M] [M]
Row 3:           [M] [M] [M]
Row 4:           [M] [M] [M]
Row 5:           [M] [M] [M]
Row 6:           [M] [M] [M]
Row 7:           [M] [M] [M]
Row 8:           [M] [M] [M]
Row 9:           [M] [M] [M]
Row 10:          [M] [M] [M]
Row 11:          [M] [M] [M]
Row 12 (bottom): [M] [M] [M]
Turn every motif the same way, so the petals all point diagonally into the corners.
Joining
Method: Slip-stitch join on the RS. This makes the raised chain-like bars that outline every square.
- Hold two motifs with their WS together and the RS facing you. Line up the corner stitches.
- Join the yarn in the corner sc of both layers. Work 1 sl st through both loops of both layers in each matched pair of stitches, from corner sc to corner sc. (23 sl sts per seam)
- Always join stitch to stitch. Never skip a stitch, and never work 2 sts into 1.
Order: First join the motifs into 3 vertical columns of 12. Each column has 11 short seams. Then join the columns with 2 long seams. Each long seam passes through 12 motifs × 23 sts = 276 sl sts.
Tension: Keep the slip stitches as loose as the sc rounds. Tight seams pucker the panel and shorten it. If your seams pull, go up one hook size for joining only.
Checkpoint: The joined panel should measure 18 in × 72 in (45.7 cm × 182.9 cm). That is 69 sts across the top and bottom and 276 sts along each long side.
Border
Border gauge: 23 sc = 6 in (15.2 cm). This is the same as the motif edge.
Starting counts: The short edges have 3 motifs × 23 sts = 69 sts. The long edges have 12 motifs × 23 sts = 276 sts. Both counts already include the motif corner stitches, and nothing is added at the seams. At each seam, the two separate corner stitches of the neighboring motifs each get 1 sc.
Round 1: With the RS facing, join the yarn in the top-right outer corner stitch. Ch 1, work 3 sc in the corner stitch. Sc in each st along every edge, and work 3 sc in each of the other 3 outer corner stitches. Sl st to the first sc.
Count: 686 sts worked 1 per existing st + 8 extra corner sts = 694 sc.
Per side, including the corner stitches: 71 on the top and bottom and 278 on the long sides. (2 × 71 + 2 × 278 − 4 = 694 ✓)
Round 2: Ch 1. Sc in each st around, with 3 sc in each center corner sc. Sl st to the first sc.
Count: 694 + 8 = 702 sc.
Per side: 73 on the top and bottom and 280 on the long sides. (2 × 73 + 2 × 280 − 4 = 702 ✓) Fasten off.
Row 3 (bottom scallops only): With the RS facing, join the yarn in the bottom-right corner stitch. Ch 1, sc in the same st. Skip 2 sts, work 5 dc in the next st, skip 2 sts, sc in the next st. Rep from * 11 more times, so the last sc lands in the bottom-left corner stitch. Fasten off. (12 scallops)
Why the math works: The bottom edge has 73 sts, and 1 + (12 × 6) = 73. That gives exactly 12 even scallops, 4 per motif width, with a sc anchored in each corner. The two sc rounds add 0.5 in (1.3 cm) to each edge. That brings the width to 19 in (48.3 cm), and the scallops bring the length to 73.5 in (186.7 cm).
The top edge stays straight and solid, so ring clips grip it securely.
Final Blocking
- Weave in all the remaining ends along the seam bars, where they won’t show.
- Lay the panel flat on blocking mats with the RS up. Use a clean floor or bed if your mats are too small.
- Pin the four outer corners to 19 in × 73 in (48.3 cm × 185.4 cm) to the base of the scallops.
- Pin along each long edge every 6 in (15.2 cm), at each seam line, so the grid stays square.
- Pin out each scallop into a neat curve, so they add 0.5 in (1.3 cm).
- Gently push each petal into a rounded leaf that points into its corner.
- Mist the panel until it is damp but not soaked. Let it dry completely before you unpin it.
- Repeat for the second panel. Measure both panels side by side to confirm they match.
Final Quality-Control Checklist
- [ ] Every motif measures 6 in (15.2 cm) with 23 sts per side.
- [ ] All petals point diagonally into the corners.
- [ ] Every seam has 23 sl sts, joined corner to corner.
- [ ] The joined panel measures 18 in × 72 in (45.7 cm × 182.9 cm) before the border.
- [ ] Border Round 2 has 73 sts on the short edges and 280 on the long edges.
- [ ] There are 12 even scallops on the bottom edge.
- [ ] The finished panel measures 19 in × 73.5 in (48.3 cm × 186.7 cm).
- [ ] Both panels match in length to within 0.5 in (1.3 cm).
- [ ] All ends are woven in and trimmed.
Troubleshooting
Petals look flat or gappy. Your ch-10 loops are too long or loose. Chain more firmly, or push the 16 stitches closer together.
Petals curl forward. The loop is too tight for 16 stitches. Chain a little more loosely in Round 2.
Motif sides bow inward. Your ch-13 bars are too tight. Loosen your chain tension, or use a hook one size larger just for Round 4.
Motif is wavy. The chains are too loose compared with the corners. Chain more firmly, then block it flat.
Wrong stitch count in Round 6. Make sure you worked exactly 5 sc into each ch-5 sp and 3 sc into each corner. Count to 19 sts between corner groups.
Seams pucker. Your slip stitches are too tight. Take out the seam and rework it more loosely, or with a larger hook.
The panel stretches long when hung. Cotton relaxes over time. Block it again, and check that your motif gauge was not loose.
The scallops don’t come out even. Recount the 73 sts on the bottom edge after Border Round 2 before you start Row 3.
Care
Hand wash in cool water with mild soap, press out the water in a towel, and dry flat. Re-block lightly if the panels start to sag after washing.
Final Notes
The whole project follows one measurement chain. One motif is 6 in (15.2 cm) with 23 sts per side. Three motifs across make 69 sts, or 18 in (45.7 cm), and twelve motifs down make 276 sts, or 72 in (182.9 cm). Two border rounds bring each panel to 19 in (48.3 cm) wide, and the scallops finish it at 73.5 in (186.7 cm) long. Check your gauge on the first motif, keep your joins loose, and block carefully, and your two panels will hang evenly in your window.
Happy crocheting!