

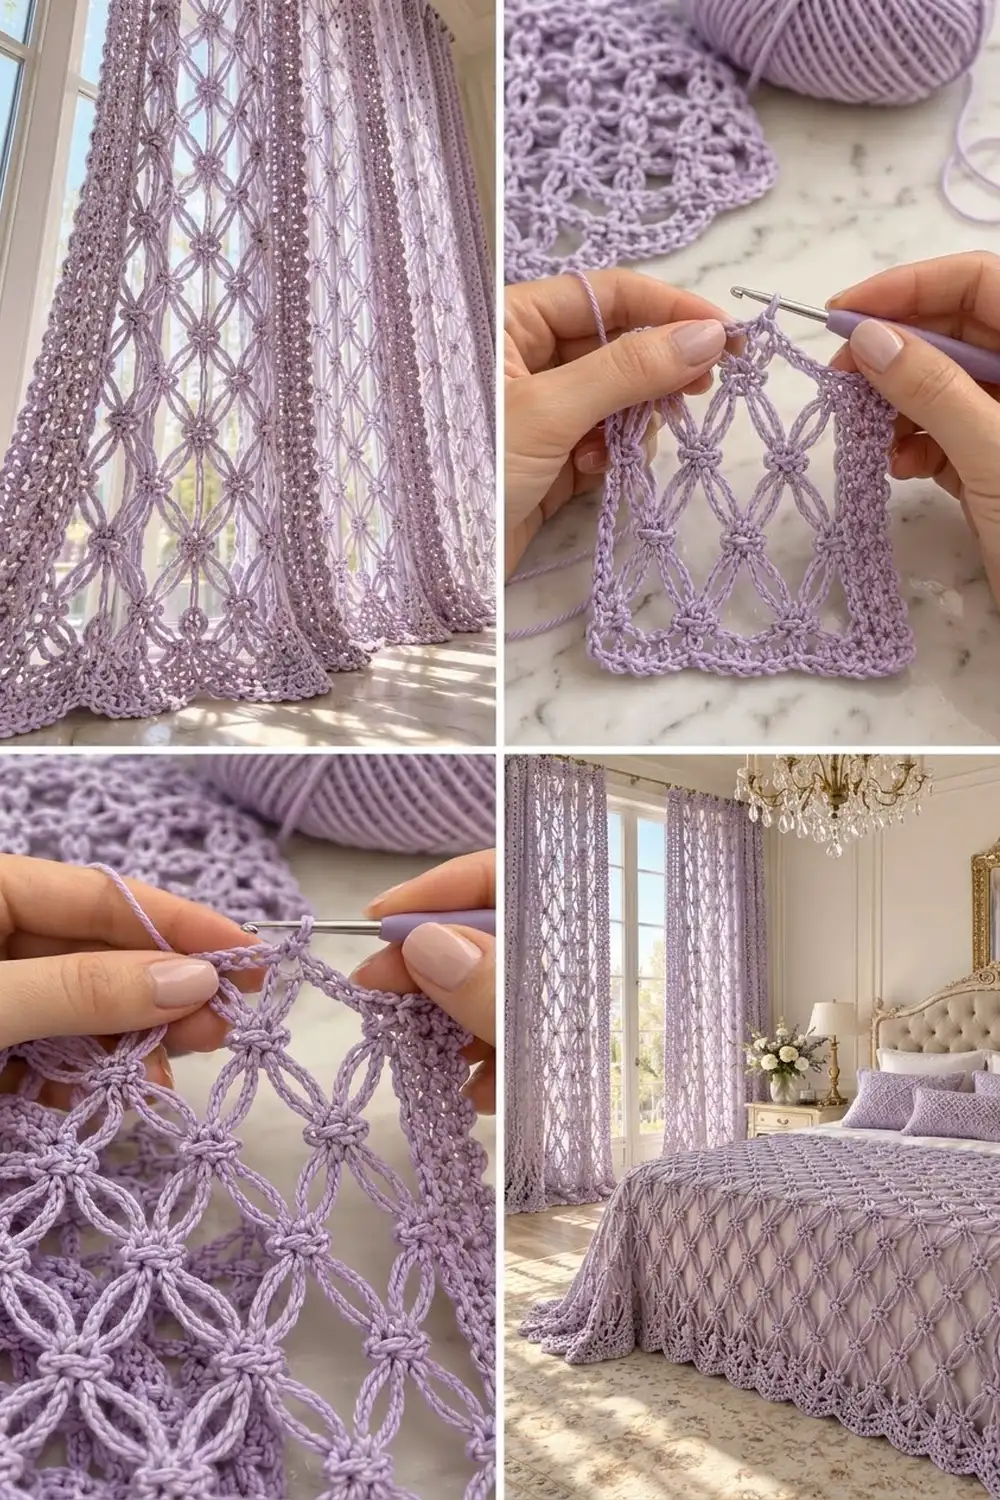
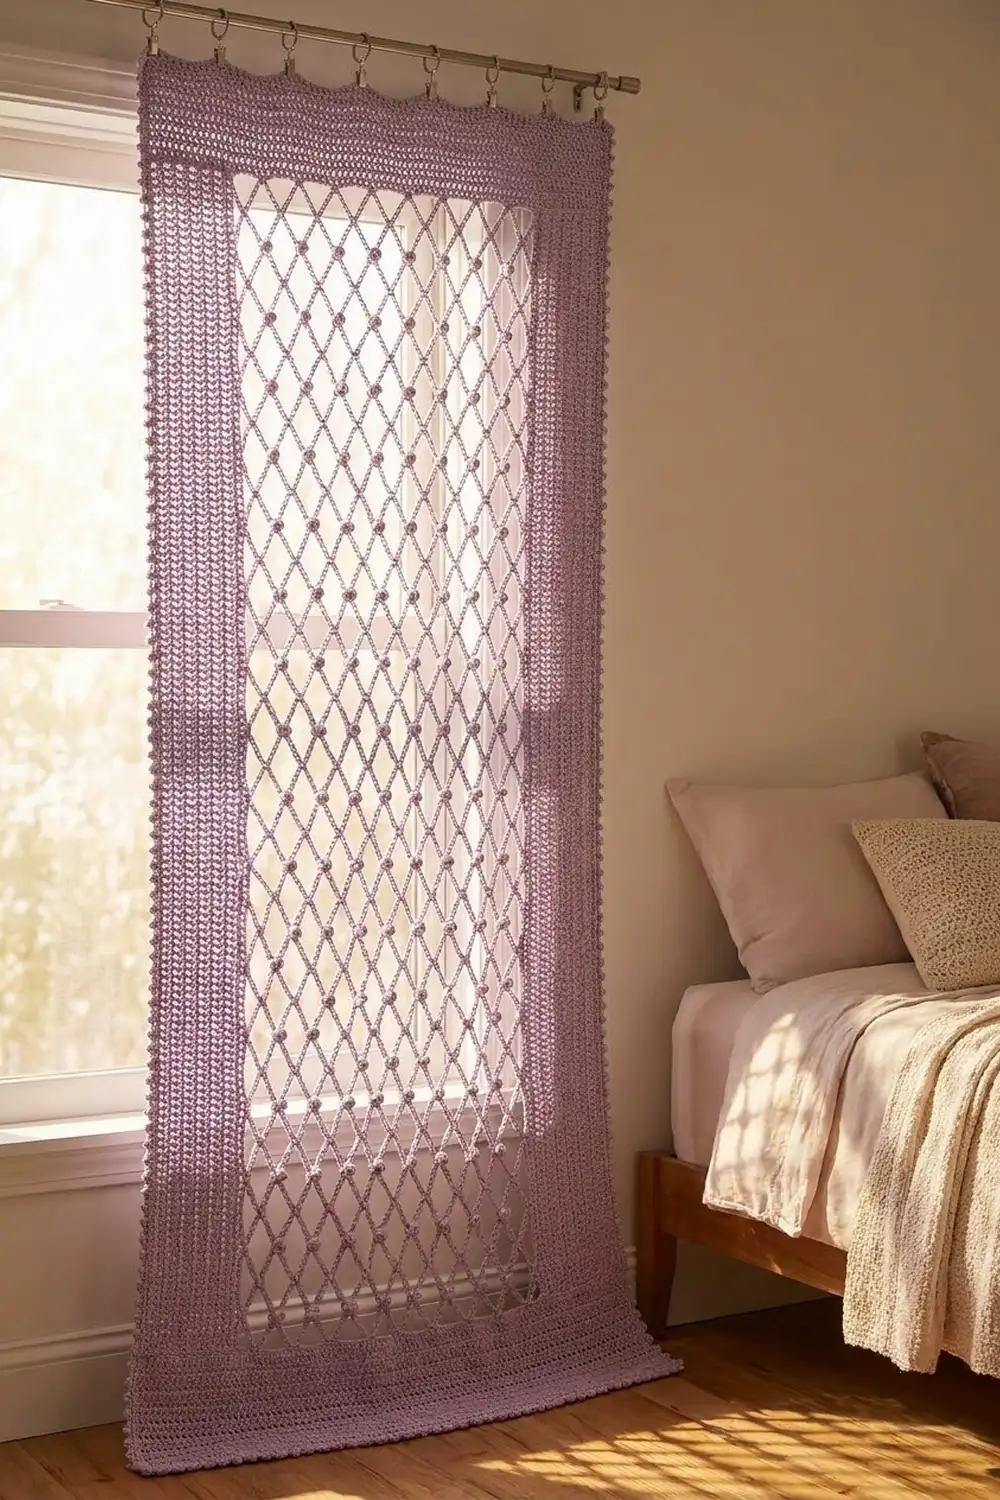
The Lilac Lattice Curtain Panel is an open, airy window covering. Long chain loops form a diamond lattice, and a small puff “knot” pulls them together at every crossing. Light comes through each diamond, while the solid side bands keep the panel hanging straight and help it drape evenly.
The panel is worked in one soft lilac shade. Using a single color lets the texture carry the design: the raised knots, the slight curve of each loop, and the denser hem bands at top and bottom. The overall look is romantic but simple, and it suits a bedroom, a sunroom or a reading corner.
This pattern uses US crochet terms. The finished panel measures 36.75 in wide x 84 in long (93.3 cm x 213.4 cm), including the border.
It is made in one piece from the bottom up, in rows. You start with a solid double crochet hem band. Then you work the lattice section, with treble crochet bands at both edges framing the chain-loop mesh. A conversion row turns the loops back into solid stitches for the top band. Two border rounds finish every edge.
Finished Size and Construction
- Finished size: 36.75 in x 84 in (93.3 cm x 213.4 cm)
- Skill level: Intermediate
- Terminology: US crochet terms
- Yarn weight: Worsted (#4), cotton or cotton blend
- Hook: 5.0 mm (H-8)
- Number of pieces: 1 (single panel, no joining)
- Layout: Bottom band, lattice section with side bands, top band
- Panel size before border: 35.75 in x 83 in (90.8 cm x 210.8 cm)
- Border depth: 0.5 in (1.3 cm) on each edge
- Stitch count across: 143 stitches on every solid row
Materials
Pick a smooth, round worsted-weight cotton or cotton blend. Cotton keeps the loops crisp and the knots well defined, and it hangs without stretching too much. Wool-rich yarns tend to go fuzzy, which blurs the lattice. Choose one dye lot for the whole panel, because color differences show clearly against light from the window.
- Lilac (single color): 1,200 g, about 2,280 m (2,494 yd). That is 12 balls of 100 g / 190 m.
These amounts include a margin of about 10% for the gauge swatch and small differences in tension.
Tools:
– 5.0 mm (H-8) crochet hook
– Tapestry needle
– 6–8 locking stitch markers
– Tape measure
– Rust-proof blocking pins and a spray bottle
– Scissors
– 10 curtain clip rings for hanging
Abbreviations (US Terms)
- ch – chain
- st(s) – stitch(es)
- sk – skip
- sc – single crochet
- dc – double crochet
- tr – treble crochet
- lp(s) – loop(s)
- RS / WS – right side / wrong side
- rev sc – reverse single crochet (crab stitch), worked left to right
Special stitch – Puff Knot (kn): Yarn over, insert hook in the indicated stitch or chain, yarn over and pull up a loop to 0.75 in (1.9 cm). Do this 3 times in the same place, so you have 7 loops on the hook. Yarn over and pull through all 7 loops, then ch 1 firmly to lock. The ch 1 does not count as a stitch. Each kn counts as 1 stitch.
Gauge and Checkpoints
Gauge:
– Dc: 16 sts x 8 rows = 4 in (10.2 cm)
– Tr: 16 sts = 4 in (10.2 cm); 4 rows = 3 in (7.6 cm)
– Lattice: one knot repeat (10 sts) = 2.5 in (6.4 cm) wide; 4 mesh rows = 3 in (7.6 cm)
Test one swatch first. Ch 29. Dc in the 4th ch from the hook and in each ch across. That gives 27 sts, because the skipped ch counts as a dc.
- Swatch Rows 2–4: Ch 3 (counts as dc), dc in each st across. You have 27 sts.
- Swatch Row 5: Ch 4 (counts as tr), tr in next 3 sts. Ch 9, sk 9 sts, kn in next st, ch 9, sk 9 sts, tr in last 4 sts.
- Swatch Row 6: Ch 4, tr in next 3 tr. Ch 4, kn in 5th ch of next ch-9 lp, ch 7, kn in 5th ch of next ch-9 lp, ch 4, tr in last 4 sts.
- Swatch Row 7: Ch 4, tr in next 3 tr. Ch 7, kn in 4th ch of center ch-7 lp, ch 7, tr in last 4 sts.
- Swatch Row 8: Ch 4, tr in next 3 tr. Ch 4, kn in 4th ch of next ch-7 lp, ch 7, kn in 4th ch of next ch-7 lp, ch 4, tr in last 4 sts.
- Swatch Rows 9–12: Repeat Swatch Rows 7–8 twice.
Block the swatch lightly and let it dry. It should measure 6.75 in (17.1 cm) wide and 8 in (20.3 cm) tall: 2 in (5.1 cm) of dc plus 6 in (15.2 cm) of mesh.
If your swatch is too big: go down 0.5 mm in hook size. If only the mesh is too tall, crochet the chains more snugly.
If your swatch is too small: go up 0.5 mm in hook size. If only the mesh is too short, pull the puff loops up a little taller.
Checkpoints on the panel:
– After Row 6: 35.75 in (90.8 cm) wide, 3 in (7.6 cm) tall
– After Row 46: 33 in (83.8 cm) tall
– After Row 86: 63 in (160.0 cm) tall
– After Row 109: 80.25 in (203.8 cm) tall
– After Row 114: 83 in (210.8 cm) tall
Measure while the panel lies flat. Never measure while it hangs, because the weight of the cotton stretches the lattice.
Pattern
Bottom Band
Row 1 (RS): Ch 145. Dc in 4th ch from hook and in each ch across. (143 sts) The skipped 3 ch count as 1 dc; the remaining 142 dc make 143.
Rows 2–6: Ch 3 (counts as dc, here and throughout), turn. Dc in each st across, working the last dc in the top of the turning ch. (143 sts per row)
The band now measures 3 in (7.6 cm) tall.
Lattice Section
Each side band has 12 sts, which is 3 in (7.6 cm). The center has 119 sts, which is 29.75 in (75.6 cm). Place a marker in the 12th st from each edge so the bands are easy to find.
Row 7 (set-up, RS): Ch 4 (counts as tr, here and throughout), turn. Tr in next 11 sts to finish the 12-st band. Ch 9, sk 9 sts, kn in next st. Repeat from * 10 more times, for 11 kn in total. Ch 9, sk 9 sts, tr in last 12 sts.
(12 ch-9 lps, 11 kn, 12 tr on each side band)
Check the center: 11 repeats of 10 sts = 110 sts, plus the final 9 skipped sts = 119 sts. ✓
Row 8 (WS): Ch 4, turn. Tr in next 11 tr. Ch 4, kn in 5th ch of next ch-9 lp. Ch 7, kn in 5th ch of next ch-9 lp. Repeat from * 10 more times. Ch 4, tr in last 12 sts.
(12 kn, 11 ch-7 lps, 2 ch-4 half lps, 12 tr on each side band)
Each new knot sits in the middle of a loop from the row below. This offset is what creates the diamonds.
Row 9 (RS): Ch 4, turn. Tr in next 11 tr. Ch 7, sk the ch-4 lp and the next kn, kn in 4th ch of next ch-7 lp. Ch 7, kn in 4th ch of next ch-7 lp. Repeat from * 9 more times. Ch 7, sk the last kn and the ch-4 lp, tr in last 12 sts.
(12 ch-7 lps, 11 kn, 12 tr on each side band)
Row 10 (WS): Ch 4, turn. Tr in next 11 tr. Ch 4, kn in 4th ch of next ch-7 lp. Ch 7, kn in 4th ch of next ch-7 lp. Repeat from * 10 more times. Ch 4, tr in last 12 sts.
(12 kn, 11 ch-7 lps, 2 ch-4 half lps, 12 tr on each side band)
Rows 11–108: Repeat Rows 9–10 another 49 times.
Row 109 (RS): Work as Row 9. (12 ch-7 lps, 11 kn)
The lattice section is Rows 7–109: 103 rows x 0.75 in (1.9 cm) = 77.25 in (196.2 cm).
Conversion Row and Top Band
Row 110 (conversion, WS): Ch 4, turn. Tr in next 11 tr. 9 tr in next ch-7 lp, tr in next kn. Repeat from * 10 more times. 9 tr in last ch-7 lp, tr in last 12 sts.
(143 sts = 12 band tr + [12 lps x 9 tr] 108 + [11 kn x 1 tr] 11 + 12 band tr)
Rows 111–114: Ch 3, turn. Dc in each st across. (143 sts per row)
Do not fasten off. Continue with the border.
The top section is 0.75 in (1.9 cm) for the conversion row plus 2 in (5.1 cm) of dc, for 2.75 in (7.0 cm). The total height is 3 + 77.25 + 2.75 = 83 in (210.8 cm). ✓
Border
Border gauge: 4 sc per inch (16 sc = 4 in / 10.2 cm) along every edge.
Side-edge spacing:
– 2 sc in the side of each dc row (each dc row is 0.5 in / 1.3 cm tall)
– 3 sc in the side of each tr row (each tr row is 0.75 in / 1.9 cm tall)
Round 1 (RS): Ch 1, turn so the RS faces you.
- Top edge: 3 sc in first st (corner). Sc in next 141 sts. 3 sc in last st (corner).
- First side: Work down the side, with 2 sc in each of 4 dc row-ends (8), 3 sc in each of 104 tr row-ends (312), and 2 sc in each of 6 dc row-ends (12). That is 332 sc.
- Bottom edge: Working into the free loops of the foundation ch, 3 sc in first st (corner), sc in next 141 sts, 3 sc in last st (corner).
- Second side: Work up the side as in step 2. That is 332 sc.
Sl st to first sc.
Count: (143 x 2 top and bottom, 1 per existing st) + (332 x 2 sides) + (2 extra sc x 4 corners) = 286 + 664 + 8 = 958 sc.
Per side, including the 3-sc corner groups:
– Top and bottom: 3 + 141 + 3 = 147 sc each
– Sides: 332 sc each, between the corner groups
Round 2: Ch 1. Do not turn. Rev sc in each sc around, working 1 rev sc in each corner center sc without increasing. Sl st to the first st and fasten off. (958 sts)
Why the math works:
– The 143 sts across each short edge measure 35.75 in (90.8 cm) at 4 sts per inch, so the border sits flat with no ruffling.
– Along each long edge, 332 sc / 4 = 83 in (210.8 cm), which matches the measured height of the panel.
– The 2 extra sc at each corner let the edging turn the corner without cupping.
– The two rounds add 0.5 in (1.3 cm) on every edge. This gives a final size of 36.75 in x 84 in (93.3 cm x 213.4 cm).
Final Blocking
- Weave in all ends inside the solid bands, never across the open loops.
- Lay the panel flat on a clean sheet or on blocking mats. A floor works well for a piece this size.
- Mist it evenly with water until it is damp but not dripping.
- Pin the four corners to 36.75 in x 84 in (93.3 cm x 213.4 cm).
- Pin the side bands straight, about every 4 in (10.2 cm).
- Gently pull each diamond open with your fingers and center each knot where its four loops meet.
- Let it dry completely, at least 24 hours, before unpinning.
- Clip 10 rings along the top edge, spaced about 4 in (10.2 cm) apart, with one ring at each corner.
Final Quality-Control Checklist
- Every solid row has 143 sts.
- Every Row 9-type row has 12 ch-7 lps and 11 kn.
- Every Row 10-type row has 12 kn.
- Both side bands are 12 sts wide all the way up.
- Knots line up in straight vertical columns, one column for every other row.
- The panel measures 35.75 in x 83 in (90.8 cm x 210.8 cm) before the border.
- Border Round 1 has 958 sc, with 332 on each side.
- The finished panel measures 36.75 in x 84 in (93.3 cm x 213.4 cm).
- No ends show in the lattice section.
Troubleshooting
The lattice is wider than the side bands and bows outward. Your chains are too loose. Use a smaller hook for the chains only, or work Rows 8 onward with ch 6 in place of ch 7.
The side bands are shorter than the mesh. Your tr stitches are too short. Pull up the first loop of each tr a little taller, or check that you are not working dc by mistake.
The knots look flat. Pull each puff loop up to the full 0.75 in (1.9 cm), and lock it with a firm ch 1.
The knot count is off. Count the knots after every row. Missing a skip at either end is the usual cause; re-check the ch-4 half loops.
The border ruffles along the sides. You have more than 332 sc on that side. Re-check how many sc you worked into each row-end: 2 per dc row and 3 per tr row.
The bottom edge cups. Make sure there are 3 sc in each corner and 141 sc between the corner groups.
Care
Hand wash or machine wash on a cool, gentle cycle inside a large mesh bag. Lay flat to dry, re-shaping the diamonds; never tumble dry or hang the panel while it is wet.
Final Notes
The measurement chain is simple:
– 143 sts at 4 per inch gives 35.75 in (90.8 cm) of width.
– The 3 in (7.6 cm) bottom band, 77.25 in (196.2 cm) of lattice and 2.75 in (7.0 cm) top band add up to 83 in (210.8 cm).
– Two border rounds of 0.5 in (1.3 cm) bring the panel to 36.75 in x 84 in (93.3 cm x 213.4 cm).
If your swatch matches gauge and your counts stay correct at each checkpoint, the panel will finish at the right size.
Happy crocheting!