

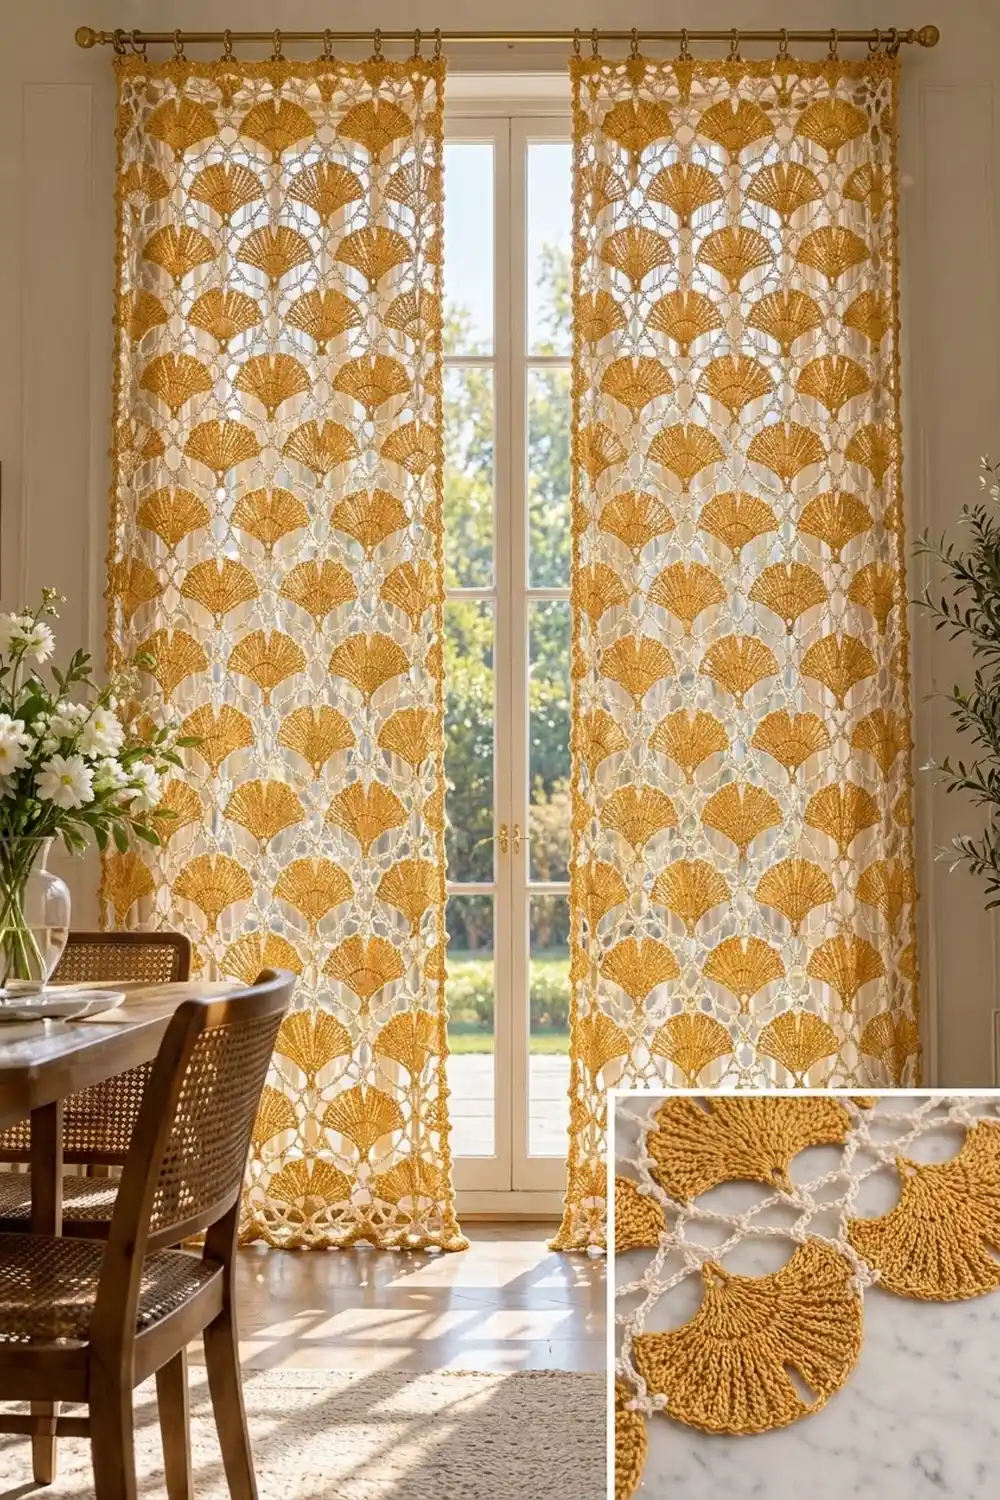
These lace curtains are made of solid mustard-gold ginkgo fans set into a light cream mesh. When sunlight comes through, the fans glow and the mesh almost disappears, so the window looks covered in falling leaves.
The palette is two colors only: a warm mustard for the fans and a soft cream for the net, seams, and border. The style is vintage filet lace with a modern, graphic layout. All instructions use US crochet terms.
Each finished panel measures 32 x 82 in (81.3 x 208.3 cm). The pattern makes one panel; work it twice for the pair in the photo.
Construction is modular. You crochet each fan in rows, frame it with three cream mesh rounds to make a neat rectangle, then sew the blocks together with slip stitch in offset brick rows. Half blocks fill the side edges of every other row. A four-round cream border finishes the panel.
Finished Size and Construction
- Finished size (one panel): 32 x 82 in (81.3 x 208.3 cm)
- Skill level: Intermediate
- Terminology: US crochet terms
- Yarn weight: DK (weight 3) cotton
- Hook: US G-6 (4.0 mm)
- Pieces per panel: 72 full blocks + 16 half blocks
- Layout: 16 rows of blocks, in a brick (half-drop) pattern
- Full block: 6 x 5 in (15.2 x 12.7 cm), 24 sts on the top and bottom, 20 sts on each side
- Half block: 3 x 5 in (7.6 x 12.7 cm), 12 sts on the top and bottom, 20 sts on each side
- Size before border: 30 x 80 in (76.2 x 203.2 cm)
- Border depth: 1 in (2.5 cm) on every side
Materials
Use a smooth, mercerized or combed cotton, or a cotton blend, in DK weight (about 115 m per 50 g). Cotton gives crisp fan ridges and hangs straight. Avoid fuzzy yarns, because they blur the mesh.
Amounts for the pair of panels:
- Color A, Mustard (fans): 650 g, about 1,495 m
- Color B, Cream (mesh, seams, border): 1,200 g, about 2,760 m
Quantities include a margin of about 15% for gauge differences and a test block.
Tools:
- US G-6 (4.0 mm) hook
- Tapestry needle
- Stitch markers
- Rust-proof pins, blocking mats, and a spray bottle
- Measuring tape
- 14 clip rings per panel for hanging
Abbreviations (US Terms)
- ch – chain
- sl st – slip stitch
- sc – single crochet
- hdc – half double crochet
- dc – double crochet
- rsc – reverse single crochet (crab stitch)
- sk – skip
- st(s) – stitch(es)
- rnd – round
- BLO – back loop only
Special stitch: rsc (crab stitch). Work left to right (right to left if you crochet left-handed). Insert the hook into the next stitch to the right, yarn over, pull up a loop, yarn over, and pull through both loops.
Counting rule: On Rnd 3 of every block, the ch-1 at each corner is the corner stitch. Each stated side count includes both of that side’s corner stitches.
Gauge and Checkpoints
Make one full block and block it before you start the panel.
- Fan gauge: after Row 5, the fan measures 4.5 in (11.4 cm) across the top and 2.5 in (6.4 cm) from point to top.
- Edge gauge: 4 sts = 1 in (2.5 cm) along the sc edge of Rnd 3.
- Full block: 6 x 5 in (15.2 x 12.7 cm) after Rnd 3.
- Half block: 3 x 5 in (7.6 x 12.7 cm) after Rnd 3.
If your block is too big, go down to a 3.75 mm hook. If it is too small, go up to a 4.5 mm hook. Change the hook, not the stitch counts, because the joining math depends on the exact counts.
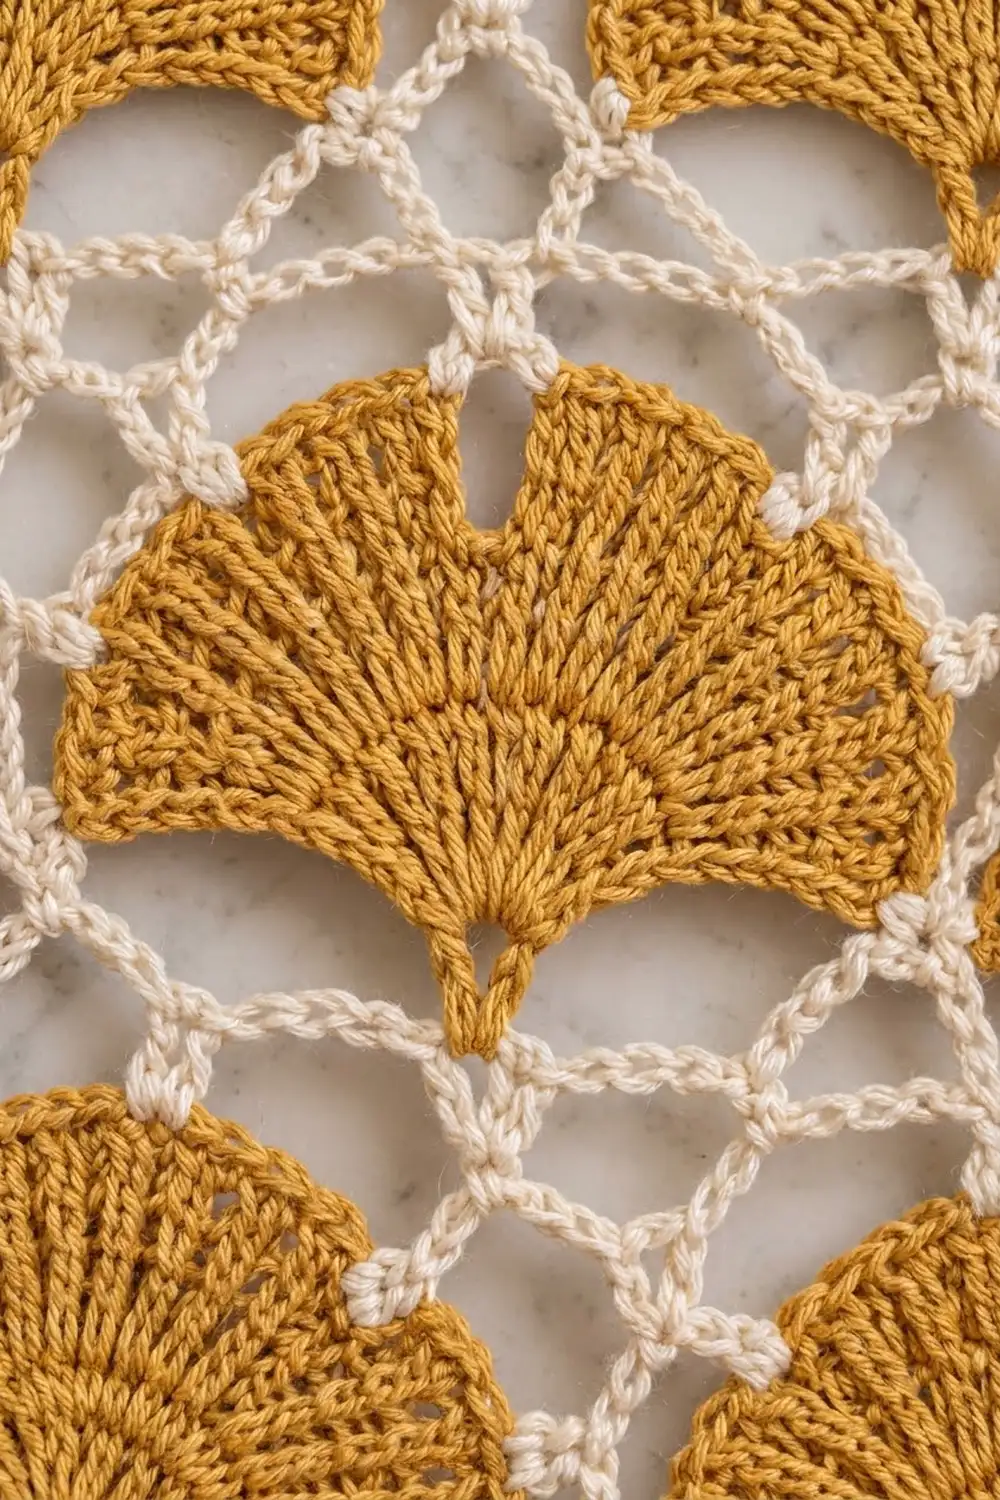
Full Fan (Color A)
Ch 4.
Row 1: 4 dc in 4th ch from hook (the skipped ch-3 counts as a dc), turn. (5 dc)
Row 2: Ch 3 (counts as dc throughout), dc in the first st, 2 dc in each st across, turn. (10 dc)
Row 3: Ch 3, 2 dc in the next st, dc in the next st, 2 dc in the next st; repeat from * across, turn. (15 dc)
Row 4: Ch 3, dc in the next st, 2 dc in the next st, dc in each of the next 2 sts, 2 dc in the next st; repeat from * across, turn. (20 dc)
Row 5 (ginkgo edge): Ch 1, sc in st 1, hdc in st 2, dc in sts 3–8, hdc in st 9, sl st in sts 10 and 11, hdc in st 12, dc in sts 13–18, hdc in st 19, sc in st 20. (20 sts) Fasten off.
The taller stitches make two curved lobes, and the slip stitches create the center dip. The beginning chain becomes the pointed base.
Half Fan (Color A)
Ch 4.
Row 1: 2 dc in 4th ch from hook, turn. (3 dc)
Row 2: Ch 3, dc in the first st, 2 dc in each st across, turn. (6 dc)
Row 3: Ch 3, 2 dc in the next st, dc in the next st, 2 dc in the next st; repeat from * across, turn. (9 dc)
Row 4: Ch 3, dc in the next st, 2 dc in the next st, dc in each of the next 2 sts, 2 dc in the next st; repeat from * across, turn. (12 dc)
Row 5: Ch 1, sc in st 1, hdc in st 2, dc in sts 3–10, hdc in st 11, sl st in st 12. (12 sts) Fasten off.
The side that ends with the slip stitch is the straight edge. It goes toward the outer edge of the panel.
Full Block Frame (Color B)
Rnd 1: With the fan point down, join B with sc in st 1 of Row 5. Ch 3, sk 3, sc in the next st; repeat from * 3 more times (sc in sts 5, 9, 13, 17). Ch 3, sk 2, sc in st 20. Ch 5, sc around the end of Row 3 (loop A). Ch 5, sc in the base point (loop B). Ch 5, sc around the end of Row 3 on the other side (loop C). Ch 5, sl st in the first sc (loop D). (5 ch-3 top loops, 4 ch-5 side loops)
Rnd 2: Sl st into the first top loop, ch 1, sc in the same loop. Ch 5, sc in the next top loop; repeat from * 3 more times. Ch 7 (TR corner), sc in loop A. Ch 9 (right), sc in loop B. Ch 15 (BR corner), sc in the base sc. Ch 15 (BL corner), sc in loop C. Ch 9 (left), sc in loop D. Ch 7 (TL corner), sl st in the first sc. (10 loops)
The two long ch-15 loops hang below the fan point. They form the diamond lattice.
Rnd 3 (edge): Work every stitch into the loop space. Sl st into the first ch-5, ch 1.
– 4 sc in each of the 4 top ch-5 loops (16 sc)
– TR loop: 3 sc, ch 1, 3 sc
– Right loop: 9 sc
– BR loop: 6 sc, ch 1, 11 sc
– BL loop: 11 sc, ch 1, 6 sc
– Left loop: 9 sc
– TL loop: 3 sc, ch 1, 3 sc
Sl st in the first sc to join. Fasten off.
Total: 84 sts. Count each side, including both corner ch-1s:
– Top: 1 + 3 + 16 + 3 + 1 = 24
– Right: 1 + 3 + 9 + 6 + 1 = 20
– Bottom: 1 + 11 + 11 + 1 = 24
– Left: 1 + 6 + 9 + 3 + 1 = 20
The sides use 2 x 22 + 2 x 18 + 4 corners = 84. Checkpoint: 6 x 5 in (15.2 x 12.7 cm).
Half Block Frame (Color B)
Rnd 1: With the point down, join B with sc in st 1 of Row 5. Ch 3, sk 3, sc in st 5. Ch 3, sk 3, sc in st 9. Ch 3, sk 2, sc in st 12. Then work ch 5 and sc 4 times around the sides and point (loops A to D), the same way as on the full block. Sl st in the first sc. (3 top loops, 4 side loops)
Rnd 2: Sl st into the first top loop, ch 1, sc in the same loop. Ch 5, sc in the next top loop twice. Ch 7, sc in A. Ch 9, sc in B. Ch 11, sc in the base sc. Ch 11, sc in C. Ch 9, sc in D. Ch 7, sl st in the first sc. (8 loops)
Rnd 3: Sl st into the first ch-5, ch 1.
– 3 sc in each of the 2 top loops (6 sc)
– TR loop: 2 sc, ch 1, 4 sc
– Right loop: 8 sc
– BR loop: 6 sc, ch 1, 5 sc
– BL loop: 5 sc, ch 1, 6 sc
– Left loop: 8 sc
– TL loop: 4 sc, ch 1, 2 sc
Join and fasten off.
Total: 60 sts.
– Top: 1 + 2 + 6 + 2 + 1 = 12
– Right: 1 + 4 + 8 + 6 + 1 = 20
– Bottom: 1 + 5 + 5 + 1 = 12
– Left: 1 + 6 + 8 + 4 + 1 = 20
The total checks out: 2 x 10 + 2 x 18 + 4 = 60. Checkpoint: 3 x 5 in (7.6 x 12.7 cm).
Make All Pieces
Per panel:
– Full blocks: 72 (Color A about 7.5 m and Color B about 10 m each)
– Half blocks: 16 (Color A about 4.5 m and Color B about 7 m each)
For the pair, make 144 full blocks and 32 half blocks. Use 8 of each panel’s half blocks as they are, and turn the other 8 over so their straight fan edge faces the opposite side.
Layout, Row 1 at the bottom (F = full block, H = half block):
Row 16:  H | F | F | F | F | H
Row 15:  F | F | F | F | F
Row 14:  H | F | F | F | F | H
  ...    (repeat this 2-row pattern)
Row 2:   H | F | F | F | F | H
Row 1:   F | F | F | F | F
Odd rows have 5 full blocks. Even rows have 1 half block, 4 full blocks, and 1 half block. Place each half fan’s straight edge toward the panel’s outer edge.
Joining
Method: Flat slip-stitch seam in Color B. Hold two blocks with right sides up, edge to edge, and work through the BLO of matching stitches.
Step 1, strips: Join the blocks in each row along their 20-st sides. Match corner ch-1 to corner ch-1 and stitch to stitch, so every seam is 20 sl sts. Each strip is 30 in (76.2 cm) wide:
– Odd rows: 5 x 24 = 120 sts along the top and bottom
– Even rows: 12 + (4 x 24) + 12 = 120 sts along the top and bottom
Step 2, rows: Join the strips with long 120-st horizontal seams, one slip stitch per stitch pair. Because the half blocks shift the even rows by 3 in (7.6 cm), the fans form the offset brick layout.
Tension: Keep the slip stitches as loose as the sc edge. Test by stretching 4 in (10.2 cm) of seam. It should stretch as much as the block edges next to it. If the seams pucker, go up one hook size for joining only.
Checkpoint: The joined panel measures 30 x 80 in (76.2 x 203.2 cm). That is 5 x 6 in wide and 16 x 5 in long.
Border (Color B)
Border gauge: 4 sts and 4 rnds of sc = 1 in (2.5 cm).
Starting count: Each top and bottom edge has 120 sts, which is 5 block widths x 24 sts. Each side has 320 sts, which is 16 block heights x 20 sts. The panel’s corner stitches are the outer corner ch-1s. This count includes the corner stitches. Between the corners there are 118 sts on the top and bottom and 318 on each side, for a total of 876 sts.
Rnd 1: Join B in any edge stitch, ch 1. Sc in each st around, with 3 sc in each panel corner st. Join. (Top/bottom 122, sides 322; total 884)
Rnd 2: Ch 1, sc in each sc, with 3 sc in each center corner sc. Join. (Top/bottom 124, sides 324; total 892)
Rnd 3: Repeat Rnd 2. (Top/bottom 126, sides 326; total 900)
Rnd 4: Ch 1, rsc in each st around, with 2 rsc in each center corner sc. Join and fasten off. (904 sts)
Why the math works: Rnd 1 places exactly one sc in each edge stitch, so the border matches the panel’s 4 sts per in (2.5 cm). The 2 stitches added at each corner every round allow the corner to turn without cupping. Four rounds add 1 in (2.5 cm) on each side. That gives 30 + 2 = 32 in (81.3 cm) wide and 80 + 2 = 82 in (208.3 cm) long.
Final Blocking
- Weave in all ends along the mesh chains, not through the fans.
- Soak the panel in cool water for 15 minutes. Press the water out gently, then roll the panel in towels.
- Lay it flat on the mats at 32 x 82 in (81.3 x 208.3 cm).
- Pin the straight edges first, every 3 in (7.6 cm).
- Shape each fan by easing its two lobes outward so the center dip shows.
- Pin the long ch-15 loops into clear diamonds.
- Let it dry completely before unpinning.
Final Quality-Control Checklist
- Every full block has 84 sts and every half block has 60.
- All 144 full and 32 half blocks face fan point down.
- Half fans have their straight edges toward the outer edges.
- Every horizontal seam is 120 sts and every vertical seam is 20 sts.
- The panel measures 30 x 80 in (76.2 x 203.2 cm) before the border and 32 x 82 in (81.3 x 208.3 cm) after.
- The border sides are straight and the corners are flat.
Troubleshooting
- Fans cup: Your dc rows are too tight. Use a hook one size larger for the fans only.
- Fans ruffle: Check that Row 4 has 20 sts, not more.
- No visible notch: Make sure you worked sl st in both sts 10 and 11 on Row 5.
- Blocks are different sizes: Recount Rnd 3 against the per-side counts, and rework any loop that has too many or too few sc.
- Seams pull in: Your joining is too tight. Rejoin with a larger hook.
- Border waves: Check that you put one sc in each edge stitch.
Care
Hand wash cold, or machine wash on a delicate cycle inside a mesh bag. Dry flat and re-pin the edges if needed. Sunlight fades colors over time, so rotate the panels every season.
Final Notes
Here is the full measurement chain:
– Fan: 4.5 x 2.5 in (11.4 x 6.4 cm)
– Full block: 6 x 5 in (15.2 x 12.7 cm); half block: 3 x 5 in (7.6 x 12.7 cm)
– Joined panel: 30 x 80 in (76.2 x 203.2 cm)
– Bordered panel: 32 x 82 in (81.3 x 208.3 cm)
If each stage measures correctly, the next stage will too. Make the second panel the same way, clip it to the rod, and let the light do the rest.
Happy crocheting!