

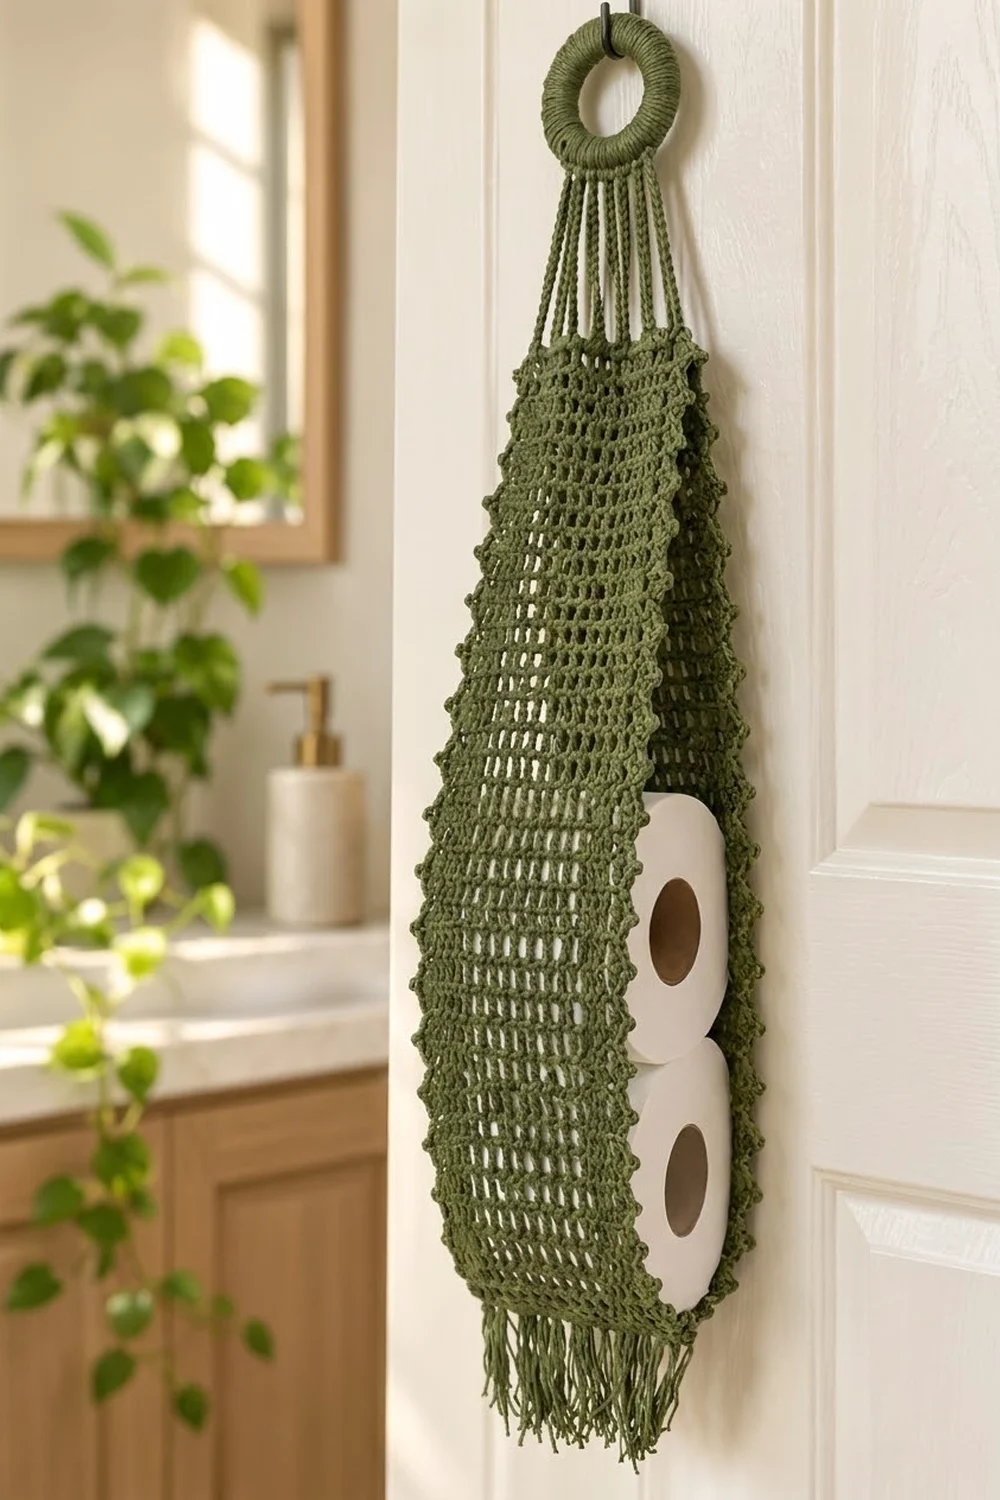
This hanging toilet paper holder is a simple, useful bathroom piece. An open grid of double crochet “ladder” mesh wraps around two standard rolls. Picot edges frame a narrow front opening, and eight slim cords gather up to a crochet-covered ring that hangs on any door hook.
The sample is worked in one calm sage green cotton. The grid shows the rolls through the mesh, the picots add a soft beaded edge, and a short fringe at the bottom gives it a slightly boho look.
The pattern uses US crochet terms. The finished body measures 15 in (38.1 cm) wide when opened out and 18.5 in (47.0 cm) tall, or about 7.5 in (19.1 cm) wide when folded and hanging. With the ring, cords and fringe, the total hanging length is about 31 in (78.7 cm).
Construction is simple. You crochet one flat mesh rectangle in rows, add a single crochet edge to the top and bottom, and work a picot border along both long sides. Then you fold the panel so the long edges meet at center front, sew the bottom closed, add the fringe, and attach the cords to a covered ring.
Finished Size and Construction
- Finished body (opened flat): 15 in x 18.5 in (38.1 cm x 47.0 cm)
- Finished body (folded, hanging): about 7.5 in (19.1 cm) wide
- Total hanging length: about 31 in (78.7 cm)
- Skill level: Easy / Advanced Beginner
- Terminology: US crochet terms
- Yarn weight: Worsted (#4), cotton
- Hook: 5.0 mm (H-8)
- Number of pieces: 1 mesh body plus 1 covered ring (the cords are worked directly between them)
- Layout: One panel wrapped into a tube with an open front
- Mesh panel before border: 14 in x 18 in (35.6 cm x 45.7 cm)
- Size after top/bottom edging: 14 in x 18.5 in (35.6 cm x 47.0 cm)
- Border depth: 0.5 in (1.3 cm) on each long side, picots included
Materials
Yarn: Use a smooth worsted-weight cotton or cotton blend. Cotton holds the mesh shape, stays firm under the weight of two rolls, and handles bathroom humidity well. Avoid very stretchy acrylic, because the holder may sag over time.
- Sage green: 170 g, about 290 m (317 yd)
These quantities include a margin of about 20% for your swatch, the fringe, and differences in tension.
Tools:
- 5.0 mm (H-8) crochet hook
- One metal or plastic ring, 2.5 in (6.4 cm) outer diameter
- Tapestry needle
- Scissors
- 4 locking stitch markers
- Measuring tape
- Blocking mats and rust-proof pins
- Spray bottle
Abbreviations (US Terms)
- ch – chain
- sl st – slip stitch
- sc – single crochet
- dc – double crochet
- sk – skip
- sp – space
- st(s) – stitch(es)
- RS – right side
Special stitch – Picot: Ch 3, then sl st into the 3rd ch from the hook. One picot sits on top of the sc just worked and does not count as a stitch.
Gauge and Checkpoints
Gauge: 20 sts (10 mesh squares) and 8 rows = 4 in (10.2 cm) in mesh pattern. Each mesh square is 0.4 in (1.0 cm) wide and each row is 0.5 in (1.3 cm) tall.
Test the piece first: The first 8 rows of the body work as your gauge swatch, so there is no need for a separate one. Chain the foundation, work 8 rows, and measure before you continue.
Checkpoints:
- After Row 8: 14 in (35.6 cm) wide and 4 in (10.2 cm) tall
- After Row 18: 9 in (22.9 cm) tall
- After Row 36: 18 in (45.7 cm) tall
- After Row 37 and the bottom edge: 18.5 in (47.0 cm) tall
- After the side borders: 15 in (38.1 cm) wide
If your panel is too big: Go down to a 4.5 mm hook and start again.
If your panel is too small: Go up to a 5.5 mm hook.
Width matters more than height, because the panel has to wrap around a roll about 4.25 in (10.8 cm) across. If only the height is off, you can add or remove rows in pairs. A side that is too long or short by 2 rows changes the side count by 4 sc. See the border section for how to adjust it.
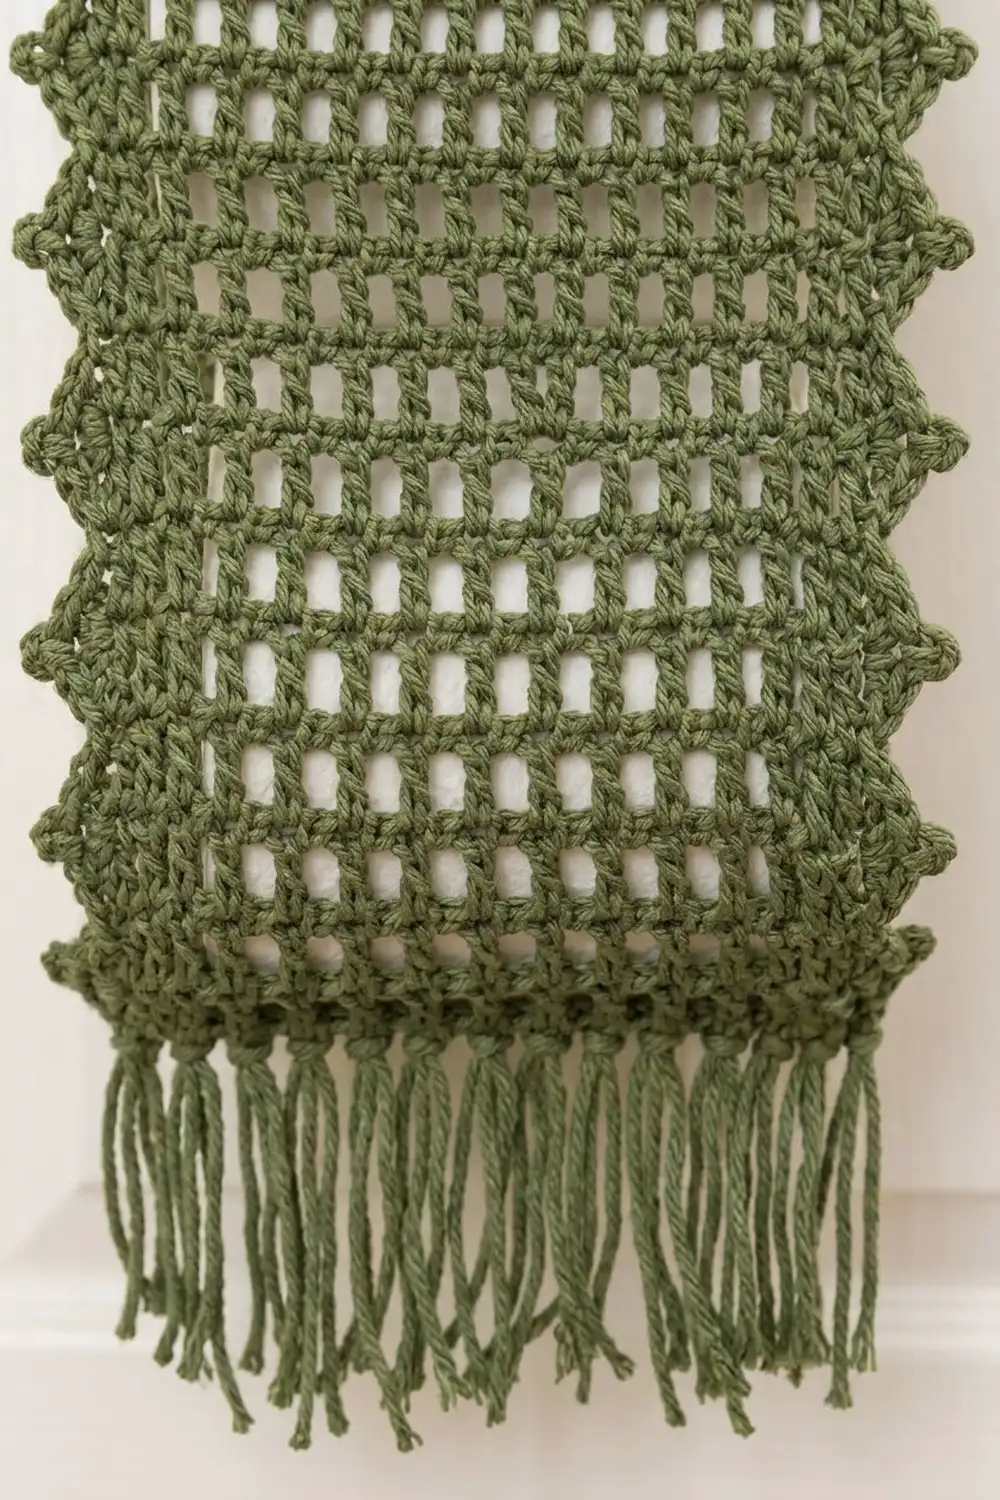
Main Body: Mesh Panel
Foundation: Ch 74.
Row 1 (RS): Dc in the 6th ch from hook (the 5 skipped chs count as the first dc, a ch-1 sp, and one skipped foundation ch). Ch 1, sk next ch, dc in next ch; repeat from * across. Turn.
(36 dc, 35 ch-1 sps = 71 sts)*
Check: after the first dc, 68 chs remain, which makes 34 repeats. That gives 1 turning dc + 1 dc + 34 dc = 36 dc.
Row 2: Ch 4 (counts as dc and ch 1), dc in next dc, ch 1, dc in next dc; repeat from * across, working the last dc in the 4th ch of the turning chain. Turn.
(36 dc, 35 ch-1 sps = 71 sts)*
Rows 3–36: Ch 4 (counts as dc and ch 1), dc in next dc, ch 1, dc in next dc; repeat from * across, working the last dc in the 3rd ch of the turning ch-4. Turn.
(36 dc, 35 ch-1 sps = 71 sts in every row)*
Check the panel against the Row 18 and Row 36 checkpoints. The dc posts should line up straight above each other to form clean ladder columns.
Row 37 (top edge): Ch 1, sc in first dc, sc in next ch-1 sp, sc in next dc; repeat from * across, working the last sc in the 3rd ch of the turning ch-4. Fasten off.
(36 sc in dc + 35 sc in sps = 71 sc)*
Bottom edge: With the RS facing, join yarn at the first foundation ch of the bottom edge. Ch 1, then work 1 sc at the base of each dc and 1 sc in each ch-1 sp along the foundation. Fasten off.
(36 + 35 = 71 sc)
The panel now measures 14 in x 18.5 in (35.6 cm x 47.0 cm).
Border: Picot Side Edging
The picot border goes along both long sides only. These are the edges that frame the front opening.
Border gauge: 4 sc per 1 in (2.5 cm) along the side edge.
Side Row A: With the RS facing, join yarn at the top corner of one long side. Ch 1, then work 1 sc into the end of Row 37, 2 sc around the post of each dc row end (Rows 36 down to Row 1), and 1 sc into the end of the bottom edge row. Turn.
(1 + (36 x 2) + 1 = 74 sc)
Side Row B: Ch 1, sc in first 2 sc, picot, sc in next 3 sc; repeat from * 24 times. Fasten off.
(2 + (24 x 3) = 74 sc, 24 picots)*
Repeat Side Rows A and B on the second long side, with the same counts.
Why the math works: Each dc row is 0.5 in (1.3 cm) tall, and 2 sc per row end gives 4 sc per inch. The two sc edge rows add 1 sc each at 0.25 in (0.6 cm). That makes 74 sc along an 18.5 in (47.0 cm) side, or exactly 4 sc per inch, so the edge lies flat without ruffling or pulling in. In Row B, the 2 starting sc plus 24 groups of 3 sc uses all 74 sc. The picots sit every 0.75 in (1.9 cm), close to one picot every 1.5 mesh rows.
Each side border adds 0.5 in (1.3 cm), picots included. The width becomes 14 + 0.5 + 0.5 = 15 in (38.1 cm).
If you changed the row count: Adding or removing 2 mesh rows changes the side count by 4 sc. The count then becomes 70 (2 + 68 = 2 + 3 x 22.67), which does not divide evenly. Fix the end instead: work the last 1 or 2 sc without a picot.
Shaping the Holder
- Lay the panel RS down. Fold both long edges toward the center so they meet at center front. Top-edge sc 1–18 and sc 54–71 become the front, and sc 19–53 become the back.
- The folded piece should measure about 7.5 in (19.1 cm) wide.
- Place a marker at each bottom corner fold to keep the layers aligned.
Close the bottom: Thread a tapestry needle with a 24 in (61.0 cm) tail. Whipstitch through both layers of the bottom-edge sc, from one fold to the other. Pull each stitch snug but not tight, so the seam stays the same width as the body. At center front, where the two picot edges meet, catch both edges together securely. Weave in the ends.
Fringe
- Cut 36 strands, each 7 in (17.8 cm) long.
- Hold 2 strands together and fold them in half.
- With the hook, pull the fold through the bottom seam from front to back, catching both layers. Then pull the ends through the loop and tighten.
- Place 18 fringes evenly across the seam, about one every 0.4 in (1.0 cm), which is one per front-edge sc pair.
- Trim all strands to an even 3 in (7.6 cm).
Covered Ring
Ring cover: Make a slip knot on the hook. Hold the yarn behind the ring, insert the hook through the ring, and work 44 sc over the ring, pushing the stitches together so no plastic or metal shows. Sl st to the first sc. Fasten off and weave in the end.
(44 sc)
Count the stitches around the ring and mark sc 19 and sc 26. The 8 stitches from sc 19 to sc 26 form the bottom of the ring, where the cords attach.
If 44 sc doesn’t fully cover your ring, add sc in pairs and keep the 8 cord stitches centered at the bottom.
Hanging Cords
Count the 71 sc of Row 37 (top edge) from the left front edge. Mark these 8 positions: sc 4, 13, 22, 31, 41, 50, 59, 68. The gaps between them are 9, 9, 9, 10, 9, 9, 9 sts, with 3 sts outside each end cord, so the layout is symmetrical around the front opening.
Each cord: Join yarn in the marked top sc. Ch 30. Sl st into the matching ring sc. Then turn and sl st into the back bump of each ch back down (30 sl st). Sl st into the same top sc and fasten off.
Attach the cords in order: top sc 4 to ring sc 19, sc 13 to sc 20, sc 22 to sc 21, sc 31 to sc 22, sc 41 to sc 23, sc 50 to sc 24, sc 59 to sc 25, and sc 68 to sc 26.
Cord checkpoint: Each cord should measure about 7 in (17.8 cm). Lay them side by side and make sure all eight are the same length. A single short cord will tilt the holder.
Final Blocking
- Weave in all ends securely along the dc posts.
- Lay the holder flat, folded, on a blocking mat.
- Spritz with water until damp, not soaked.
- Pin the body to 7.5 in x 18.5 in (19.1 cm x 47.0 cm), keeping the mesh columns straight.
- Pin each picot out slightly so it sits round.
- Straighten the cords and comb the fringe flat.
- Let it dry completely, then trim any uneven fringe back to 3 in (7.6 cm).
Final Quality-Control Checklist
- Every mesh row has 36 dc and 35 ch-1 spaces.
- The top and bottom edges each have 71 sc.
- Each side border has 74 sc and 24 picots.
- The opened-out panel measures 15 in x 18.5 in (38.1 cm x 47.0 cm).
- The front edges meet neatly at the bottom seam.
- All 8 cords are equal at about 7 in (17.8 cm).
- The ring is fully covered.
- There are 18 fringes, trimmed even at 3 in (7.6 cm).
- Two standard rolls slide in through the front opening and sit snugly.
Troubleshooting
Mesh columns lean diagonally: You are probably working the last dc into the wrong turning-chain stitch. Recount: every row starts with ch 4 and ends in the turning chain.
Panel is narrower at the top than the bottom: You are dropping the last dc in some rows. Count to 36 dc every few rows.
Side border ruffles: Your row ends are taller than 0.5 in (1.3 cm). Work a few row ends with 1 sc each, then adjust the picot spacing at the end of Row B.
Side border pulls in: Use a hook one size larger for the border only.
Holder tilts when hanging: One or more cords are a different length. Pull out and rework the odd cord to match.
Rolls slip out of the front: The panel is too wide. Add a few whipstitches joining the front edges 2 in (5.1 cm) up from the bottom seam.
Care
Hand wash in cool water with mild soap, gently squeeze out the water, and dry flat, reshaping the mesh and fringe. Do not wring or tumble dry.
Final Notes
The measurement chain is simple. A gauge of 10 mesh squares to 4 in (10.2 cm) gives a 71-stitch panel 14 in (35.6 cm) wide. Thirty-six rows at 0.5 in (1.3 cm) each give 18 in (45.7 cm), and two sc edge rows bring the height to 18.5 in (47.0 cm). Seventy-four border sc at 4 per inch match that side exactly, and two 0.5 in (1.3 cm) picot borders give the final 15 in (38.1 cm) width. That width wraps neatly into a 7.5 in (19.1 cm) holder for two rolls. If you check each stage as you go, the finished holder will hang straight and hold its shape.
Happy crocheting!