

The Lime Lattice Curtain Panel is a bright, airy window piece. Lime-green oval flowers sit inside a deep forest-green chain lattice, so the panel glows when light comes through the window and still looks crisp and graphic from across the room.
The palette uses just two colors. Lime fills the puffy oval centers and half of the fringe beads. Forest green makes the mesh frames, the joins, the border, the hanging tabs and the other half of the beads. The look is part vintage filet lace, part modern botanical.
This pattern uses US crochet terms. The finished panel measures 26 in (66.0 cm) wide by 29 in (73.7 cm) tall before tabs and fringe. Including the tab loops and the beaded drops, it measures about 33.75 in (85.7 cm) from rod to bead tips.
Here is how it is built. You crochet 20 oval motifs. Each motif starts with lime rounds and finishes with dark green rounds that square it into a 5 x 7 in (12.7 x 17.8 cm) rectangle. You join the motifs stitch-to-stitch into a 5 x 4 grid, work a 2-round border, then add 10 tabs across the top and 19 beaded drops along the bottom.
Finished Size and Construction
- Finished size: 26 x 29 in (66.0 x 73.7 cm) without tabs and fringe
- Total length with tabs and fringe: about 33.75 in (85.7 cm)
- Skill level: Intermediate
- Terminology: US
- Yarn weight: Worsted (#4) cotton
- Hook: 5 mm (H-8)
- Number of pieces: 20 motifs
- Layout: 5 motifs across x 4 motifs down
- Motif size: 5 x 7 in (12.7 x 17.8 cm)
- Size before border: 25 x 28 in (63.5 x 71.1 cm)
- Border depth: 0.5 in (1.3 cm), 2 rounds
- Tabs: 10 loops, each about 1.75 in (4.4 cm) tall
- Fringe: 19 drops, each about 3 in (7.6 cm) long
Materials
Choose a smooth worsted-weight cotton or cotton blend at about 100 m per 50 g (2 m per gram). Cotton keeps the lattice crisp and doesn’t sag much on the rod. Mercerized cotton gives the most stitch definition. Avoid fuzzy yarns, because they blur the mesh.
- Lime green: 175 g (350 m) for motif centers and 9 fringe drops
- Forest green: 300 g (600 m) for motif frames, joining, border, tabs and 10 fringe drops
These amounts include a margin of about 15%.
Tools:
– 5 mm (H-8) crochet hook
– Tapestry needle
– 4 locking stitch markers
– Scissors
– Measuring tape
– Blocking mats and rust-proof pins
– Spray bottle
Abbreviations (US Terms)
- ch – chain
- sl st – slip stitch
- sc – single crochet
- hdc – half double crochet
- dc – double crochet
- tr – treble crochet
- sp(s) – space(s)
- st(s) – stitch(es)
- RS / WS – right side / wrong side
Puff stitch (puff): (Yarn over, insert hook in st, yarn over, pull up a loop to about 0.5 in) 3 times, so you have 7 loops on the hook. Yarn over and pull through all 7 loops.
Popcorn bead: Work 5 dc in the indicated ch. Remove the hook from the loop. Insert the hook front to back in the top of the first dc, pick up the dropped loop and pull it through. Ch 1 to lock.
Gauge and Checkpoints
Gauge: In Round 6 of the motif, 22 sc = 5 in (12.7 cm) along the short side and 31 sc = 7 in (17.8 cm) along the long side. That is about 4.4 sc per inch.
Make one complete motif before you start the others. Measure it flat, without stretching, at each checkpoint:
- After Rnd 1: about 3 x 1.25 in (7.6 x 3.2 cm)
- After Rnd 2: about 4.25 x 2.5 in (10.8 x 6.4 cm)
- After Rnd 3: about 4.75 x 3 in (12.1 x 7.6 cm)
- After Rnd 4: about 5.5 x 3.75 in (14.0 x 9.5 cm), measured as an oval
- After Rnd 5: about 6.5 x 4.5 in (16.5 x 11.4 cm), now a rectangle
- After Rnd 6: 7 x 5 in (17.8 x 12.7 cm)
If the motif is more than 0.25 in (0.6 cm) too big on either side, go down a hook size. If it is too small by the same amount, go up a size. A small error adds up: being off by 0.25 in (0.6 cm) on each motif changes the panel width by 1.25 in (3.2 cm).
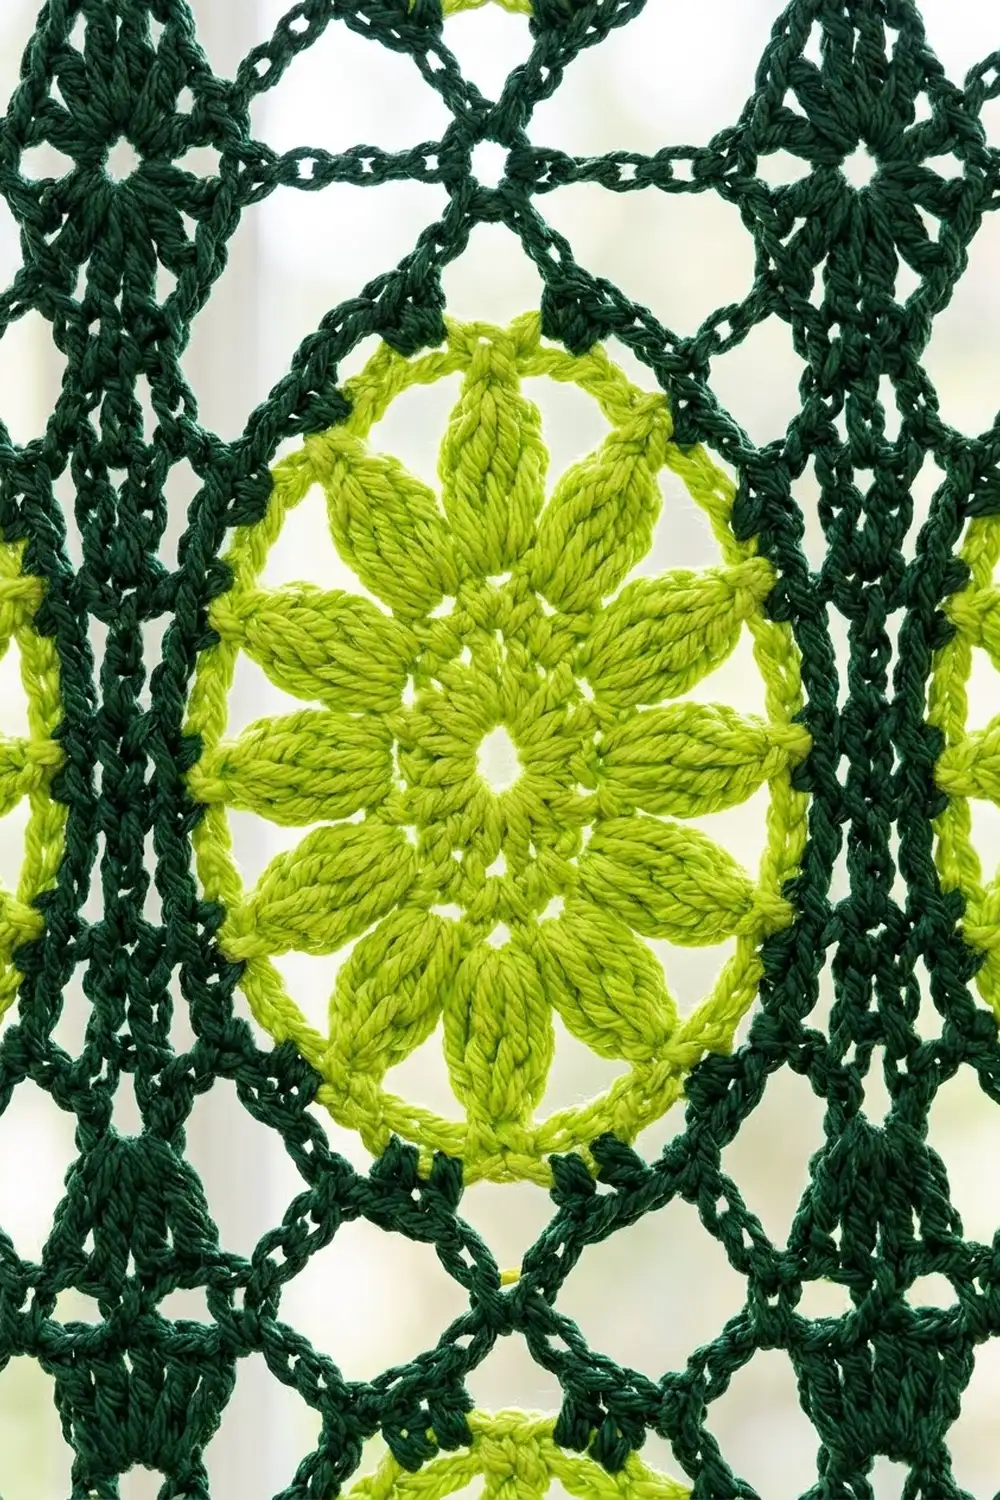
Motif (Make 20)
Lime Center
With lime, ch 10.
Rnd 1: Work 3 dc in the 4th ch from hook. The 3 skipped ch count as the first dc, so there are 4 dc in that ch. Dc in each of the next 5 ch. Work 8 dc in the last ch. Turn the work to the other side of the foundation chain. Dc in each of the next 5 ch, then 4 dc in the same ch as the first group. Join with a sl st to the top of the beginning ch. (26 dc: an 8-dc fan at each end and 5 dc along each side.)
Rnd 2: Ch 2 (does not count as a stitch). Puff in the same st, ch 2. Puff in the next st, ch 2; repeat from * around. Join with a sl st to the top of the first puff. (26 puffs, 26 ch-2 sps.)
Rnd 3: Sl st into the first ch-2 sp, ch 1. Work 3 sc in each ch-2 sp around. Join with a sl st to the first sc. (78 sc.) Fasten off lime.
Forest-Green Frame
Rnd 4: Join forest green with a sc in any sc. Ch 5, skip 2 sc, sc in the next sc; repeat from * around, ending with ch 5, skip 2 sc, sl st to the first sc. (26 ch-5 loops.)
Mark the corners: Lay the motif with its long axis vertical. Mark the 4 loops that sit centered across the top tip. Skip the next loop to the right, then count 7 loops down the side. Mark the next 4 loops centered across the bottom tip, then count 7 loops up the other side. The 4 unmarked loops left between these groups are the corner loops. Move your markers onto those 4 corner loops. The layout is 4 tip loops + 1 corner + 7 side loops + 1 corner, repeated twice, which makes 26 loops.
Rnd 5: Sl st to the center of the top-right corner loop.
– In that loop: ch 4 (counts as tr), tr, ch 3, 2 tr.
– Long side: Ch 2, dc in the next loop; repeat 7 times. Ch 2.
– Corner: (2 tr, ch 3, 2 tr) in the corner loop.
– Short side: Ch 2, dc in the next loop; repeat 4 times. Ch 2.
– Work the next corner, the second long side and the last corner the same way, then the second short side.
– Join with a sl st to the top of the beginning ch-4.
Count per side, between corner ch-3 sps:
– Long side: 2 tr + 7 dc + 8 ch-2 sps (16 ch) + 2 tr = 27
– Short side: 2 tr + 4 dc + 5 ch-2 sps (10 ch) + 2 tr = 18
– Total: 90, plus 4 corner ch-3 sps
The tr corners fill the gaps at the oval’s shoulders. The dc-and-chain sides make the open lattice.
Rnd 6: Ch 1. Sc in the same st and in the next tr. Work 3 sc in the corner ch-3 sp. Continue around, working sc in each tr and dc, 2 sc in each ch-2 sp, and 3 sc in each corner ch-3 sp. Join with a sl st to the first sc. Fasten off.
Rnd 6 counts: The middle sc of each 3-sc corner group is the corner stitch.
– Long side: 27 + 2 (outer sc of the two corner groups) + 2 corner sts = 31 sts including corners
– Short side: 18 + 2 + 2 = 22 sts including corners
– Total: (2 × 27) + (2 × 18) + 12 = 102 sc
– Check: (2 × 31) + (2 × 22) − 4 shared corners = 102 ✓
Weave in all ends securely. Cotton ends tend to slip, so weave each one in at least 2 directions.
Make All Pieces
- Lime: Rnds 1–3 on all 20 motifs
- Forest green: Rnds 4–6 on all 20 motifs
Block each motif lightly to 5 x 7 in (12.7 x 17.8 cm) before joining. Lay them out with the long sides vertical:
[M] [M] [M] [M] [M]   ← Row 1 (top)
[M] [M] [M] [M] [M]   ← Row 2
[M] [M] [M] [M] [M]   ← Row 3
[M] [M] [M] [M] [M]   ← Row 4 (bottom)
 5 columns × 4 rows = 20 motifs
Joining
Method: Use a forest-green sl st join through the back loops. Hold 2 motifs RS together and work through the back loop of each motif, so the front loops stay on the RS and frame the seam.
Stitch-to-stitch logic:
– Vertical strips: Join 4 motifs end to end along their short sides. Match corner st to corner st, then work 1 sl st in each pair of sts: 22 sl sts per seam. Make 5 strips.
– Long seams: Join the strips along their long sides. Each strip edge has 4 × 31 = 124 sts. Match them 1-to-1, so each motif’s corner st lines up with its neighbor’s corner st. Work 124 sl sts per seam, for 4 long seams.
Tension: Keep each sl st as loose as one sc is tall. Tight sl sts pull the seams in and pucker the lattice. If the seam ripples, go up one hook size for the joins only.
Size checkpoint: The joined panel should measure 25 x 28 in (63.5 x 71.1 cm). No stitches are added at the seams.
Border
Border gauge: Same as the motif, about 4.4 sc per inch. Each round adds about 0.25 in (0.6 cm).
Starting counts: Each side is worked 1 st per motif st, and corner sts are counted on every side:
– Top and bottom: 5 motifs × 22 = 110 sts
– Left and right: 4 motifs × 31 = 124 sts
Rnd 1: With RS facing, join forest green in the top-right panel corner st. Ch 1, then 3 sc in that corner st. Sc in each st around, working 3 sc in each of the 3 remaining panel corner sts. Join with a sl st to the first sc.
– Top and bottom: 110 + 2 = 112 sts including corners
– Sides: 124 + 2 = 126 sts including corners
– Total: 472
Rnd 2: Ch 1. Sc in each st, working 3 sc in each corner (the middle sc of the 3-sc group). Join with a sl st.
– Top and bottom: 114 sts including corners
– Sides: 128 sts including corners
– Total: 480
– Check: (2 × 114) + (2 × 128) − 4 = 480 ✓
Fasten off.
Why the math works: 110 sts ÷ 4.4 per inch = 25 in (63.5 cm), which matches the joined width. Because you work 1 sc per edge stitch, the border neither gathers nor flares. The 3-sc corners add exactly the 2 sts per round that each turn needs to stay flat.
Size checkpoint: 26 x 29 in (66.0 x 73.7 cm).
Hanging Tabs
The top edge has 114 sts. Divide it into 10 tabs of 6 sts with 9 gaps of 6 sts between them: 60 + 54 = 114.
Tab: With RS facing, join forest green in st 1 of the top edge.
– Row 1: Ch 1, sc in the next 6 sts. (6 sc.)
– Rows 2–16: Ch 1, turn, sc in each st. (6 sc.)
Fasten off, leaving a 12 in (30.5 cm) tail. Fold the tab to the WS and whipstitch Row 16 to the base of Rnd 1 of the border. This makes a loop about 1.75 in (4.4 cm) tall that fits a rod up to 1 in (2.5 cm) in diameter.
Skip 6 sts and start the next tab. Tabs start at sts 1, 13, 25, 37, 49, 61, 73, 85, 97 and 109. The last tab covers sts 109–114.
Beaded Fringe
The bottom edge has 114 sts, which divide into 19 sections of 6 sts. Work one drop in the 3rd st of each section: sts 3, 9, 15 … 111.
Alternate the colors: odd-numbered drops are forest green (10 drops) and even-numbered drops are lime (9 drops).
Drop:
1. With RS facing, join yarn with a sl st in the marked st.
2. Ch 14. Work a popcorn bead in the 4th ch from hook.
3. Sl st in the back bump of each of the remaining 10 ch, back up to the edge.
4. Sl st in the same border st and fasten off.
Each drop measures about 3 in (7.6 cm). Weave the ends up into the border, not down the drop.
Final Blocking
- Weave in any remaining ends and trim them.
- Pin the panel RS up to 26 x 29 in (66.0 x 73.7 cm). Pin the corners first, then the middle of each side.
- Add pins at every motif seam so the seams run straight and square.
- Open each motif’s ch-2 mesh gently with your fingers so the lattice looks even.
- Spray until damp, not soaked.
- Let the panel hang the fringe drops straight down off the mat edge, or pin each drop straight.
- Let it dry completely, at least 24 hours, before unpinning.
Final Quality-Control Checklist
- Every motif has 102 sc in Rnd 6 (31 per long side and 22 per short side, including corners).
- All 20 motifs measure 5 x 7 in (12.7 x 17.8 cm).
- The 5 vertical strips each have 3 short seams of 22 sl sts.
- The 4 long seams each have 124 sl sts, with corners matched.
- The joined panel is 25 x 28 in (63.5 x 71.1 cm).
- Border Rnd 2 has 114 sts along the top and bottom and 128 along each side.
- There are 10 evenly spaced tabs, each the same height.
- There are 19 drops in alternating colors, and all the beads are closed and round.
- The panel hangs flat with no rippling along the border.
Troubleshooting
- The oval is round, not long: Make sure you worked 5 dc along each side in Rnd 1, not fewer.
- The puffs lean or bunch up: Pull every loop up to the same height, and keep the ch-2 between puffs loose.
- The corners pucker in Rnd 5: Check that the tr groups are in the corner loops. Count 4 tip loops and 7 side loops again.
- The motif is curled or cupped: Rnd 4 chains are too tight. Try ch 6 instead of ch 5, keeping the counts the same.
- The seams are too tight: Use a larger hook for joining only.
- The border ruffles: You probably added sts at the seams. Work exactly 1 sc per motif st.
- The beads are flat: Pull the dropped loop through firmly, then ch 1 to lock it.
Care
Hand wash in cool water with mild soap, press out the water in a towel, and dry the panel flat, pinned to size. Keep it out of the dryer so the tabs and fringe don’t stretch.
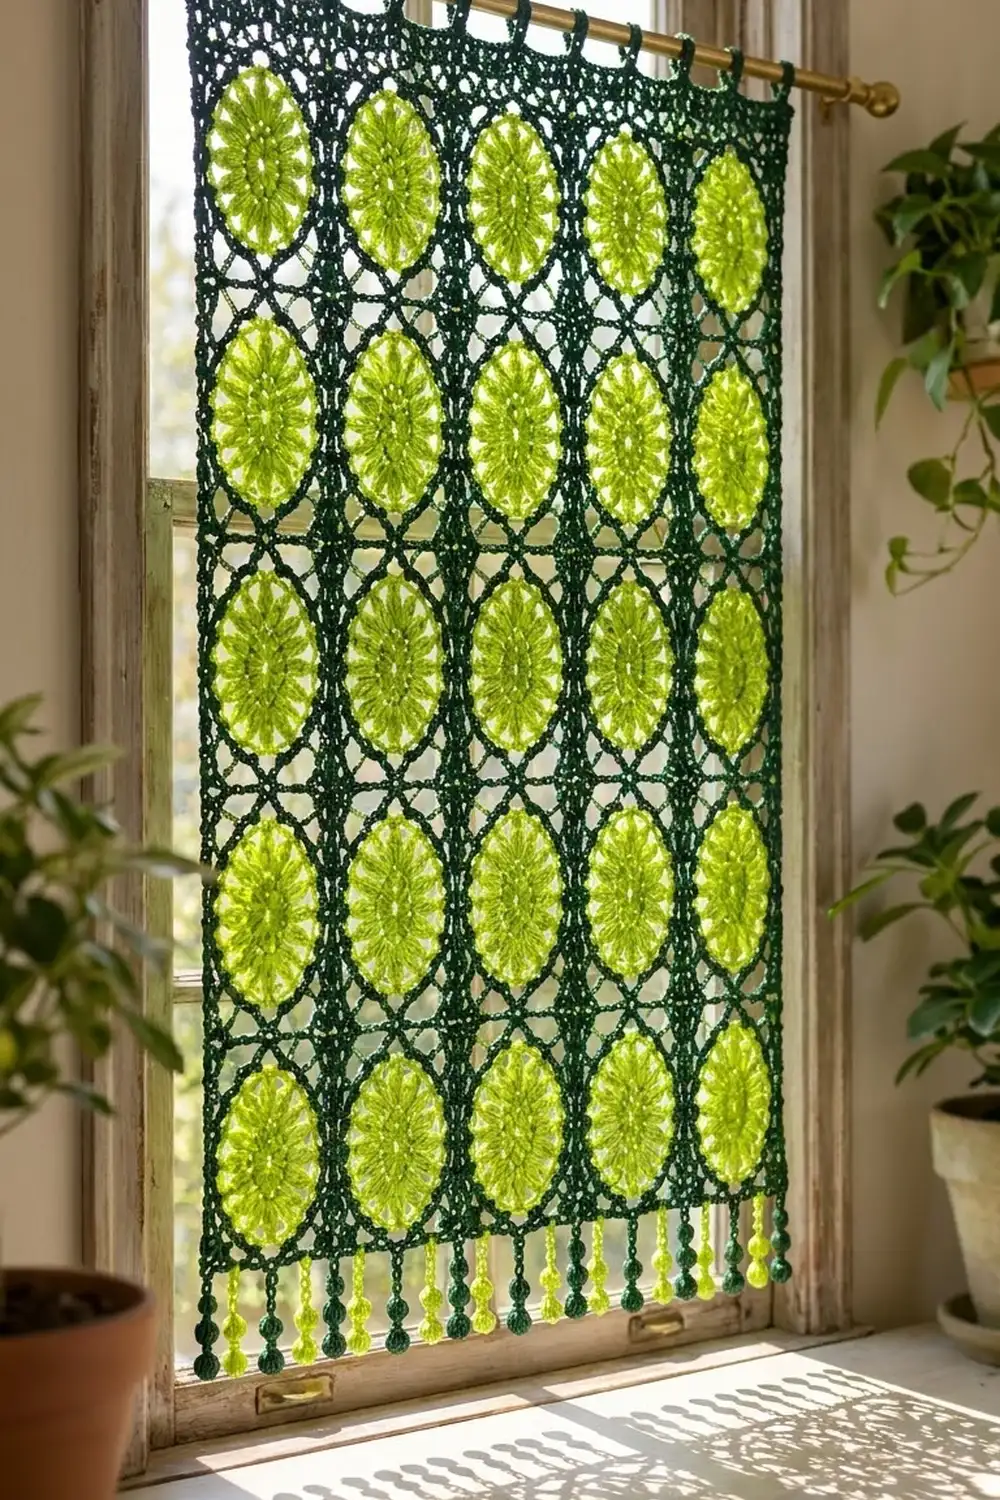
Final Notes
Every measurement depends on the one before it. The motif gauge of 22 sc = 5 in (12.7 cm) gives a 5 x 7 in (12.7 x 17.8 cm) motif. Twenty motifs in a 5 x 4 grid make a 25 x 28 in (63.5 x 71.1 cm) panel. The 2-round border brings it to 26 x 29 in (66.0 x 73.7 cm). The tabs and fringe bring the total length to about 33.75 in (85.7 cm). If your test motif is on gauge, the rest follows.
Happy crocheting!