

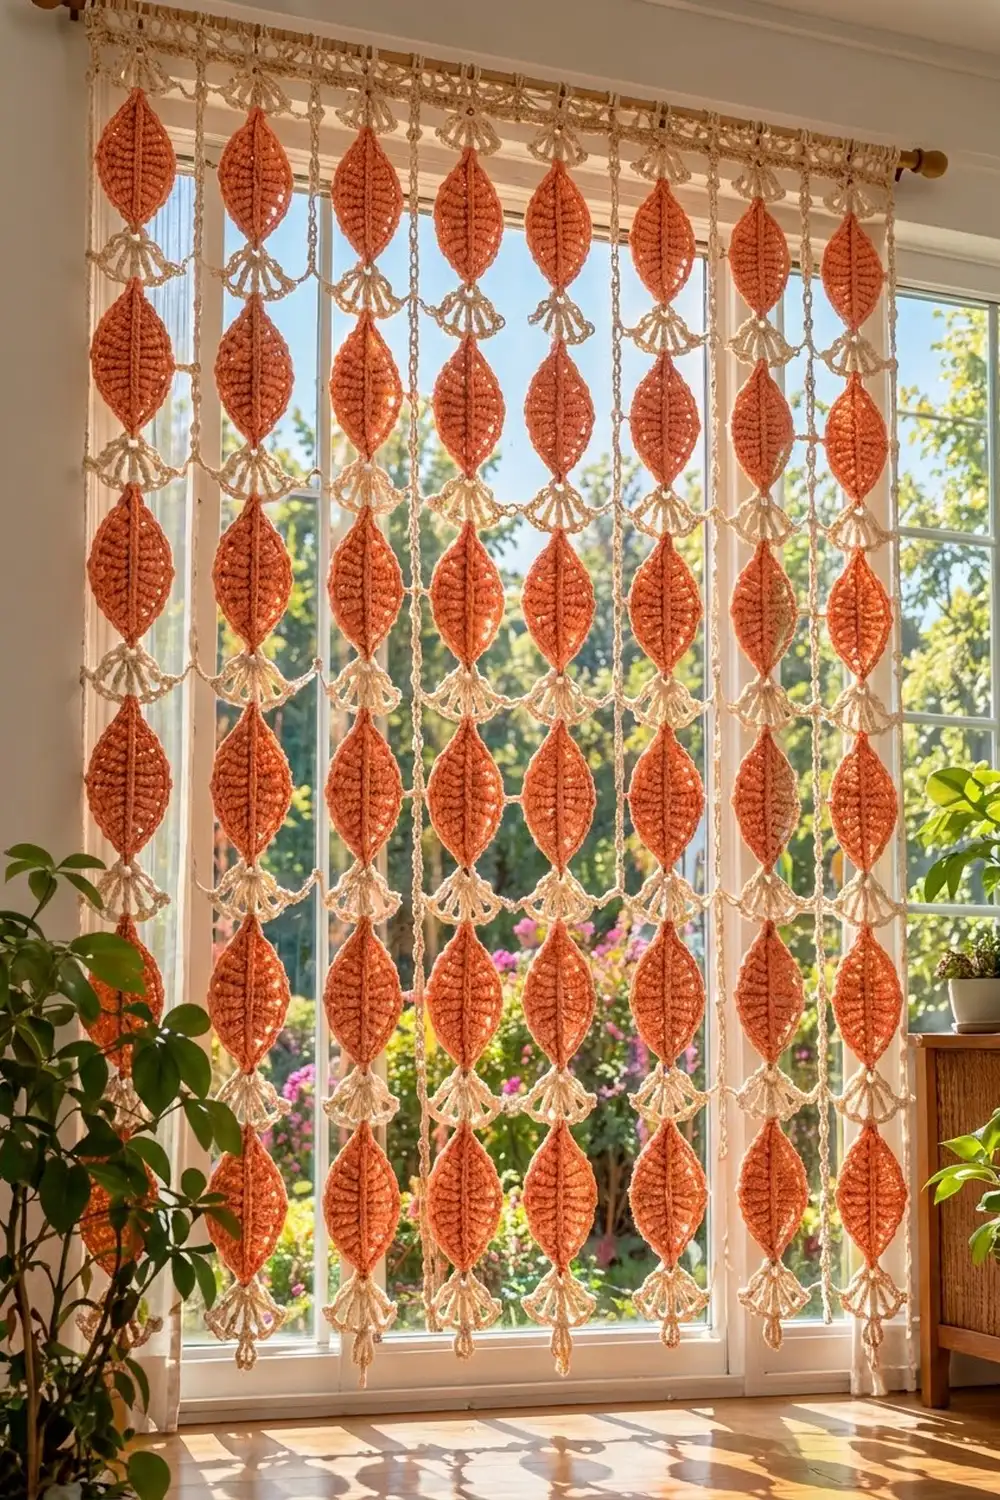
The Ember Leaf Window Curtain is a light, open panel of terracotta leaves hanging on cream lace connectors. Sunlight comes through the mesh around the leaves, and the solid leaves cast warm shadows across the room. It suits boho, cottage, and autumn-themed spaces.
The palette is two colors: a warm terracotta for the leaves and a soft cream for the fans, net chains, and header. Each leaf has a raised center vein, and its stitches run outward from the vein, so ridges form across each half of the leaf.
This pattern uses US crochet terms. The finished curtain measures 40.2 in wide x 50.1 in long (102.1 x 127.3 cm), not counting the hanging tabs.
Construction is simple and modular. You make 48 leaves and work a small cream fan onto the tip of each one. Then you join the leaves level by level with net rows that also attach the next leaf below. A short header with tab loops finishes the top.
Finished Size and Construction
- Finished size: 40.2 x 50.1 in (102.1 x 127.3 cm), plus 1.5 in (3.8 cm) tabs
- Skill level: Intermediate
- Terminology: US
- Yarn weight: DK / light worsted (#3) cotton
- Hook: 4.0 mm (G-6)
- Number of pieces: 48 leaves, each with its fan(s) worked on
- Layout: 8 strands across x 6 leaves down
- Leaf size: 5.5 x 3 in (14.0 x 7.6 cm)
- Fan size: 2.9 in wide x 2 in deep (7.4 x 5.1 cm)
- Size before border: 40.2 x 49.5 in (102.1 x 125.7 cm)
- Border (header) depth: 0.6 in (1.5 cm)
Materials
Use a smooth mercerized or combed cotton. It shows the stitch ridges clearly, holds the leaf shape, and does not stretch much when it hangs. Avoid acrylic: a long hanging piece in acrylic tends to stretch over time.
- Color A, terracotta: 250 g / about 525 m (574 yd)
- Color B, cream: 150 g / about 315 m (344 yd)
Both quantities include a margin of about 20% for swatching and dye-lot safety.
Tools:
– 4.0 mm (G-6) crochet hook
– Tapestry needle
– Stitch markers (at least 10)
– Measuring tape
– Rust-proof pins and a large blocking surface
– Spray bottle
– Scissors
Abbreviations (US Terms)
- ch – chain
- sl st – slip stitch
- sc – single crochet
- hdc – half double crochet
- dc – double crochet
- sp – space
- st(s) – stitch(es)
- RS – right side
Special stitch – surface slip stitch: Hold the yarn behind the work. Insert the hook from front to back through the fabric, pull up a loop, and pull it through the loop on the hook. This makes a raised chain on the front. Use it for the leaf vein.
Gauge and Checkpoints
Gauge: 18 sc x 20 rows = 4 in (10.2 cm) in sc. Chain loosely so that 9 ch measure 2 in (5.1 cm). Chains should match sc width, because the net and header math depends on it.
Make one leaf with its fan before you start the batch, and check these sizes:
- Leaf after Rnd 1: 4.75 x 1.5 in (12.1 x 3.8 cm)
- Leaf after Rnd 2: 5.25 x 2.6 in (13.3 x 6.6 cm)
- Leaf after Rnd 3: 5.5 x 3 in (14.0 x 7.6 cm)
- Fan after Row 2: 2.9 in wide x 1.7 in deep (7.4 x 4.3 cm)
If your leaf is too big by more than 1/4 in (0.6 cm), go down a hook size. If it is too small, go up a hook size. A small difference adds up: 0.25 in (0.6 cm) extra per leaf becomes 1.5 in (3.8 cm) extra on the length of each strand.
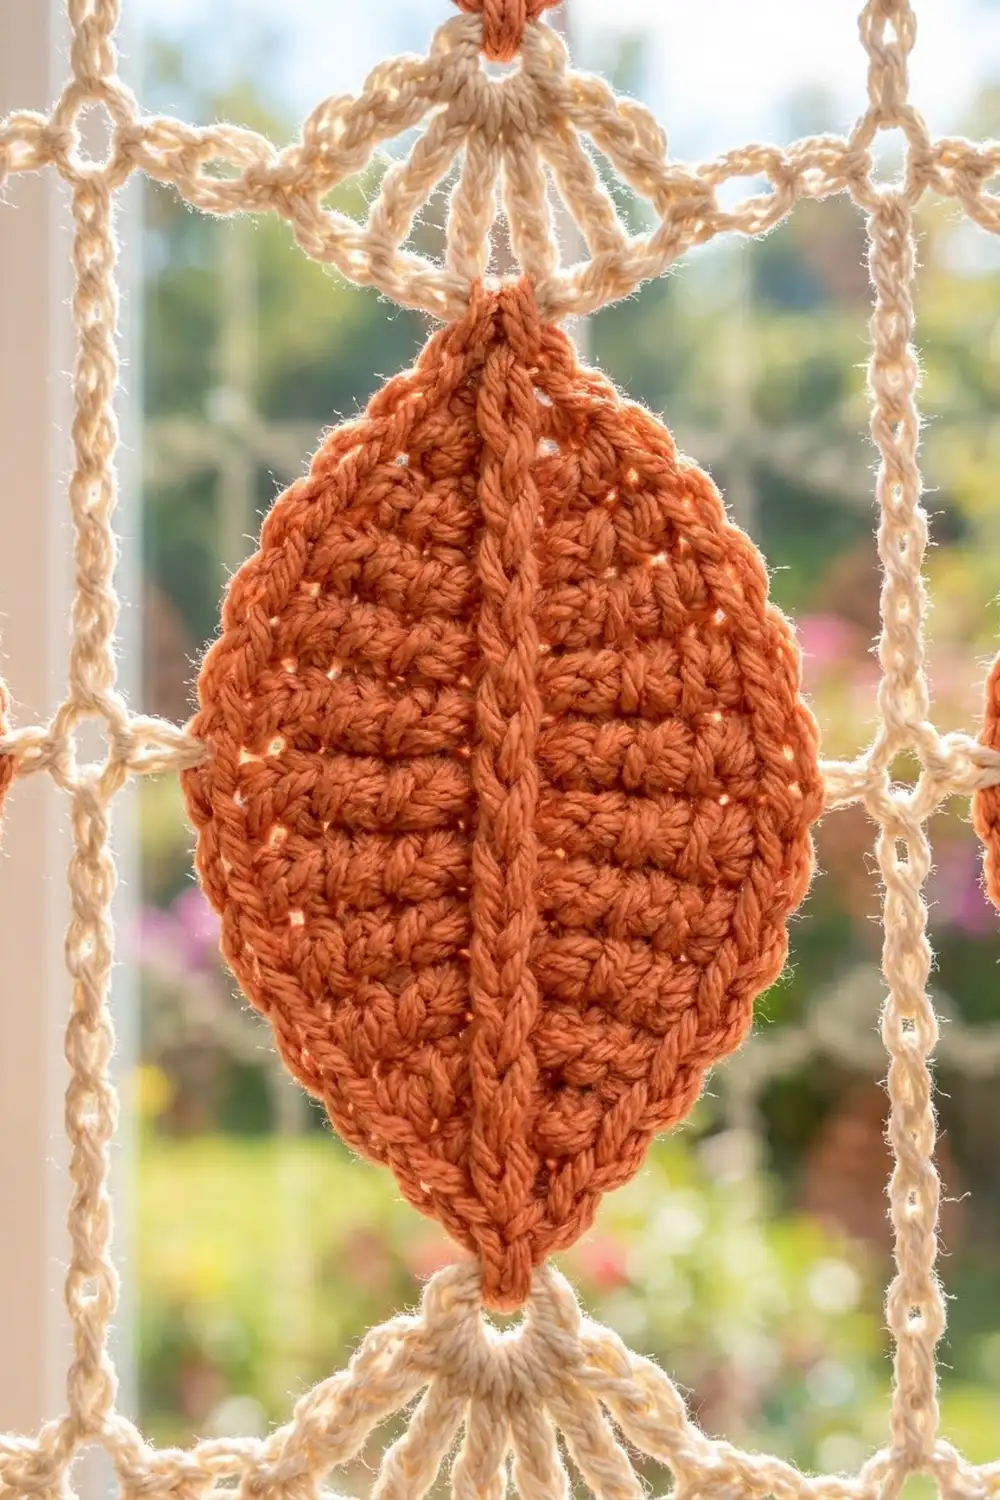
Leaf (Make 48)
Use Color A. Leaves are worked in rounds around a foundation chain. The chain end you started from is the stem tip (top), and the end where you finish the round is the point tip (bottom).
Ch 20.
Rnd 1: Work along the first side of the chain:
– Sc in 2nd ch from hook and in next 2 ch.
– Hdc in next 3 ch, dc in next 6 ch, hdc in next 3 ch.
– Sc in next 3 ch (18 sts on this side).
In the last ch, work (sc, ch 2, sc) for the point tip. Rotate and work along the opposite side of the chain:
– Sc in next 3 ch.
– Hdc in next 3 ch, dc in next 6 ch, hdc in next 3 ch.
– Sc in next 3 ch (18 sts on this side).
Ch 2 for the stem tip, then sl st to the first sc. (38 sts and 2 ch-2 tip sps)
The tall dc in the middle and the short sc at each end make the almond shape. The stitch posts sit at right angles to the center line, which creates the ridges.
Rnd 2: Ch 1. Work the first side:
– Sc in first 3 sts.
– Hdc in next 3 sts, dc in next 6 sts, hdc in next 3 sts.
– Sc in next 3 sts.
At the point tip: sc in next sc, (sc, ch 2, sc) in ch-2 sp, sc in next sc.
Work the second side:
– Sc in next 3 sts.
– Hdc in next 3 sts, dc in next 6 sts, hdc in next 3 sts.
– Sc in next 3 sts.
Work (sc, ch 2, sc) in the stem-tip ch-2 sp, then sl st to the first sc. (42 sts and 2 ch-2 tip sps: 18 + 4 + 18 + 2)
Rnd 3 (outline): Ch 1. Sc in each st around, working (sc, ch 2, sc) in each ch-2 tip sp. Sl st to the first sc. (46 sc and 2 ch-2 tip sps) Fasten off and weave in the ends.
Vein: With the RS facing, join Color A at the stem tip. Work 19 surface sl sts down the foundation chain to the point tip. This makes the raised, braid-like spine. Fasten off and weave in the ends.
Fan Connector
Use Color B. The fan is worked straight onto a leaf tip.
Row 0 (ring): Join Color B with a sl st in the tip ch-2 sp. Ch 5, then sl st in the 4th ch from the hook. This makes a 1-ch stem and a 4-ch ring.
Row 1: Work into the ring: ch 3 (counts as dc), 6 dc in ring. (7 dc)
Row 2: Turn. Ch 4 (counts as dc + ch 1). Dc in next dc, then ch 1, dc in next dc; repeat from * across, working the last dc in the top of the turning ch-3. (7 dc and 6 ch-1 sps = 13 sts) Fasten off and leave a 4 in (10.2 cm) tail.
How many fans:
– Point-tip fans: Work one on every leaf’s point tip, so the fan opens downward. That is 48 fans.
– Top fans: On 8 leaves only (the top row), also work a fan on the stem tip, opening upward.
That makes 56 fans in total.
Bottom fringe fans (8 leaves only): On the leaves for the bottom row, add Row 3 to the point-tip fan: turn, ch 1, sc in each dc and ch-1 sp across. (13 sc) Fasten off.
Make All Pieces
- Color A: 48 leaves.
- Color B: 48 point-tip fans, plus 8 top fans on the Row 1 leaves. Add Row 3 to the 8 point-tip fans of the Row 6 leaves.
Lay the leaves out face up in this layout grid. “L” is a leaf; “T” marks the leaves that have a top fan, and “F” marks the leaves whose fans get the Row 3 fringe.
Strand:  1  2  3  4  5  6  7  8
Row 1:   T  T  T  T  T  T  T  T
Row 2:   L  L  L  L  L  L  L  L
Row 3:   L  L  L  L  L  L  L  L
Row 4:   L  L  L  L  L  L  L  L
Row 5:   L  L  L  L  L  L  L  L
Row 6:   F  F  F  F  F  F  F  F
Joining (Net Rows)
The leaves are joined with six net rows, one at each fan level, worked from top to bottom in Color B. Each net row adds one row of sc to every fan, chains across the gaps, and (from Level 1 on) hangs the next leaf.
Net Row, Level 0 (top): Work across the 8 top fans of Row 1.
1. With the fan’s Row 2 facing up, join in the first st of the strand 1 fan. Ch 1.
2. Sc in each dc and ch-1 sp across the fan. (13 sc)
3. Ch 11, then sc in each of the 13 sts of the next fan. Repeat from * across.
(8 x 13 sc + 7 x 11 ch = 104 + 77 = 181 sts) Fasten off.
Net Rows, Levels 1–5: Work across the point-tip fans of leaf Rows 1 to 5, in the same way as Level 0, with one change. When you work the 7th (center) sc of each fan, attach the leaf below:
– Work the sc, then ch 2.
– Sl st in the stem-tip ch-2 sp of the leaf directly below.
– Ch 2, then sl st in the top of the sc you just made.
This doubled chain stem is 0.5 in (1.3 cm) long, and it is not counted in the 13. Each net row still has 181 sts.
Stitch logic: One sc per dc and ch-1 sp keeps each fan at 13 sts, which is 2.9 in (7.4 cm). Each 11-ch gap is 2.4 in (6.1 cm). That puts the strands 5.3 in (13.5 cm) apart, center to center.
Tension: Chain at your gauge. If the chains are tight, the panel pulls in. If they are loose, they sag into droopy swags.
Size checkpoint: Each net row should measure 40.2 in (102.1 cm), and each strand should measure 49.5 in (125.7 cm) from the top of Level 0 to the bottom of its fringe fan.
Border (Header)
The border is a header band along the top edge only. The side edges stay as open strands, and the bottom stays as a free fringe.
Border gauge: 18 sc = 4 in (10.2 cm), the same as the net row, so the header lies flat.
Join Color B in the first st of the Level 0 net row.
Row 1: Ch 1, sc in each st across. (181 sc)
Row 2: Turn, ch 1, sc in each st across. (181 sc)
Row 3 (tabs): Turn, ch 1.
1. Sc in first 2 sts.
2. Work a tab in the next st: (sc, ch 14, sl st in that same sc).
3. Sc in next 21 sts, then work a tab in the next st. Repeat from * 7 more times.
4. Sc in last 2 sts.
(2 + 1 + 8 x 22 + 2 = 181 sc, plus 9 tabs) Fasten off.
Why the math works:
– Net Row 0 has exactly 181 sts. Each header row keeps 181 sts, one sc per st, so the width stays at 40.2 in (102.1 cm).
– The 9 tabs are placed symmetrically: 2 sts outside each end tab and 21 sts between tabs. That is a tab about every 4.9 in (12.4 cm).
– Each 14-ch tab measures 3.1 in (7.9 cm) around, which fits rods up to 0.75 in (1.9 cm) in diameter.
– The 3 header rows add 0.6 in (1.5 cm), bringing the length to 50.1 in (127.3 cm).
Final Blocking
- Weave in all the remaining tails, and hide each one inside the same color.
- Lay the curtain flat with the RS up on a large blocking surface, such as a bed with towels or foam mats.
- Pin the header straight to 40.2 in (102.1 cm).
- Pin each strand straight down, checking the spacing of 5.3 in (13.5 cm) between strand centers.
- Pin each leaf to 5.5 x 3 in (14.0 x 7.6 cm) with the tips pointed. Fan each cream fan out evenly.
- Spray until damp, not soaked. Pinch the veins upright with your fingers.
- Leave it to dry completely, which takes 24 hours. Unpin, then hang it on the rod and let it settle for a day.
Final Quality-Control Checklist
- [ ] All 48 leaves measure 5.5 x 3 in (14.0 x 7.6 cm) and have a raised vein.
- [ ] Every fan has 7 dc and 6 ch-1 sps, plus 13 sc in its net row or fringe row.
- [ ] Every net row has 181 sts and measures 40.2 in (102.1 cm).
- [ ] Every stem attaches at the 7th sc, so each leaf hangs centered.
- [ ] The header rows each have 181 sc, with 9 evenly spaced tabs.
- [ ] All strands are 50.1 in (127.3 cm) long, including the header.
- [ ] No tails show from the front.
Troubleshooting
- Leaves curl: Rnd 2 is too tight. Use a hook one size larger for Rnds 2–3 only.
- Leaf tips are blunt: Make sure you work (sc, ch 2, sc) into the ch-2 sp, not into a stitch.
- A leaf hangs crooked: The stem is not on the 7th sc. Count again from the edge of the fan.
- The net sags: Your chains are too loose. Measure 11 ch against 2.4 in (6.1 cm).
- The panel narrows: Your chains are too tight, or the fans have fewer than 13 sc.
- Fans cup: Ch-1 sps are missing in Row 2. Check for 13 sts.
- One strand is longer: Its leaves are oversized. Re-block or remake that leaf.
Care
Hand wash in cool water with a mild detergent. Press out the water in a towel, and dry the curtain flat and pinned to shape. Do not machine dry it, because the leaves will distort.
Final Notes
Every measurement builds on the last. Gauge of 18 sc = 4 in (10.2 cm) gives a 5.5 x 3 in (14.0 x 7.6 cm) leaf and a 13-st fan of 2.9 in (7.4 cm). Eight fans and seven 11-ch gaps give 181 sts and 40.2 in (102.1 cm) across. Six leaves, five connectors, the top and bottom fans, and the header give 50.1 in (127.3 cm) of length. If you check each link in that chain, the curtain will hang straight and even.
Happy crocheting!