

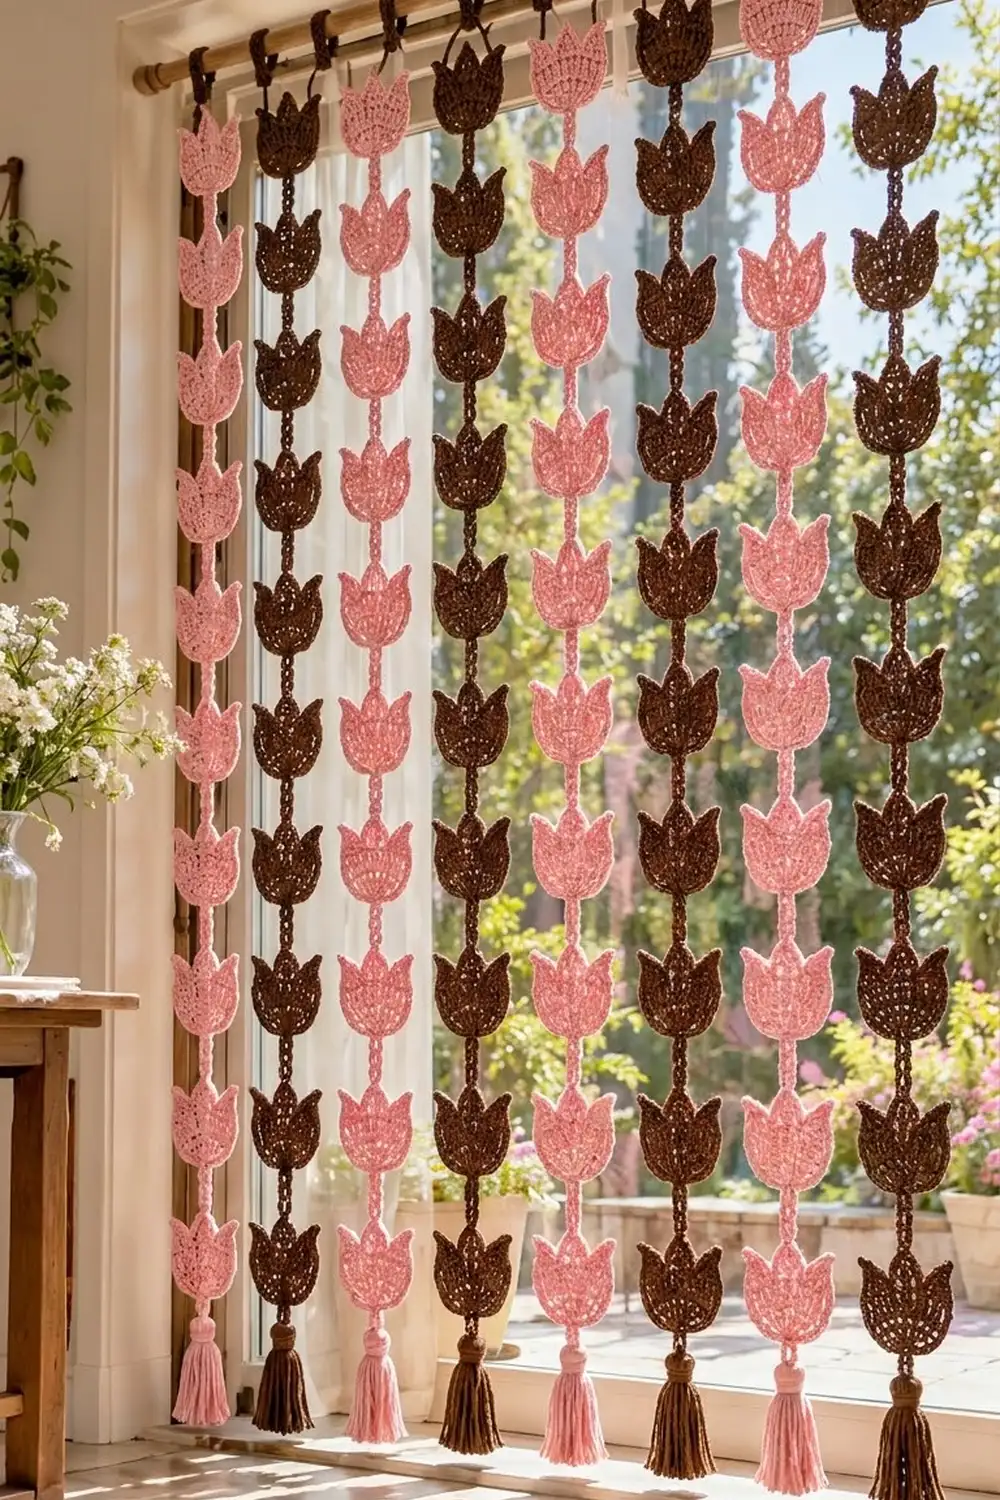
This curtain is made of nine strands of flat tulip motifs, linked one above the other by short chain stems. It hangs from a curtain rod and lets light pass between the strands, which makes it a good fit for a doorway, a window or a room divider.
The sample alternates soft rose pink and deep chocolate brown, with pink at both outer edges. Each tulip has a fan-shaped base, three pointed petals and a single crochet edging. Every strand ends in a matching tassel.
The pattern uses US crochet terms. The finished curtain is about 39.5 in (100.3 cm) wide and 63.5 in (161.3 cm) long, measured from the top of the hanging loops to the ends of the tassels.
You crochet each tulip separately: a base worked in rows, three petals worked in rows on top of it, and one edging round. Then you join the tulips into strands with slip-stitched chain stems and finish each strand with a hanging loop and a tassel.
Finished Size and Construction
- Finished size: 39.5 in (100.3 cm) wide x 63.5 in (161.3 cm) long
- Skill level: Easy-intermediate
- Terminology: US
- Yarn weight: DK (#3) cotton
- Hook: 4.0 mm (G-6)
- Number of pieces: 117 tulip motifs (65 pink, 52 brown) and 9 tassels
- Layout: 9 strands of 13 tulips each, colors alternating by strand
- Piece size: 3.5 in (8.9 cm) wide x 3 in (7.6 cm) tall
- Size before edging: 3.25 in (8.3 cm) wide x 2.75 in (7.0 cm) tall
- Edging depth: about 0.125 in (0.3 cm) on each side
Materials
Choose a smooth mercerized or combed DK cotton. Cotton holds the petal points crisply, hangs straight and won’t stretch over time the way acrylic can.
- Color A – Rose Pink: 450 g (1,080 m)
- Color B – Chocolate Brown: 400 g (960 m)
These quantities assume a yarn of about 120 m per 50 g. They include a safety margin of roughly 10–20% for gauge swatches, tassels and tails.
Tools:
– 4.0 mm (G-6) crochet hook
– Tapestry needle
– Scissors
– A stiff card 4.5 in (11.4 cm) tall for the tassels
– Rustproof pins and a blocking mat
– Spray bottle
– Measuring tape
– Curtain rod, plus 9 clip rings if you prefer them to plain loops
Abbreviations (US Terms)
- ch – chain
- sl st – slip stitch
- sc – single crochet
- hdc – half double crochet
- dc – double crochet
- st(s) – stitch(es)
- sp – space
- RS / WS – right side / wrong side
- dc2tog – (yarn over, insert hook in next st, pull up a loop, yarn over, pull through 2 loops) twice, then yarn over and pull through all 3 loops on hook
- hdc2tog – (yarn over, insert hook in next st, pull up a loop) twice, then yarn over and pull through all 5 loops on hook
Special stitch – back-bump slip stitch: turn a chain over and slip stitch into the bump on its back. This makes a firm, rounded stem that won’t stretch.
Gauge and Checkpoints
Gauge: 18 dc and 9 rows = 4 in (10.2 cm). Chain gauge: 6 ch = 1 in (2.5 cm).
Before making the rest, crochet one complete tulip and measure it. The checkpoints:
- After Row 1: base is 1.25 in (3.2 cm) wide
- After Row 2: base is 2 in (5.1 cm) wide
- After Row 3: base is 2.75 in (7.0 cm) wide and 1.4 in (3.6 cm) tall
- After the petals: 3.25 in (8.3 cm) wide x 2.75 in (7.0 cm) tall
- After the edging: 3.5 in (8.9 cm) wide x 3 in (7.6 cm) tall
If your tulip comes out bigger than 3.5 in (8.9 cm) wide, go down half a hook size. If it is smaller than 3.25 in (8.3 cm) after the edging, go up half a size. A difference of 0.25 in (0.6 cm) per motif adds up to 3.25 in (8.3 cm) over a strand of 13, so get this right before moving on.
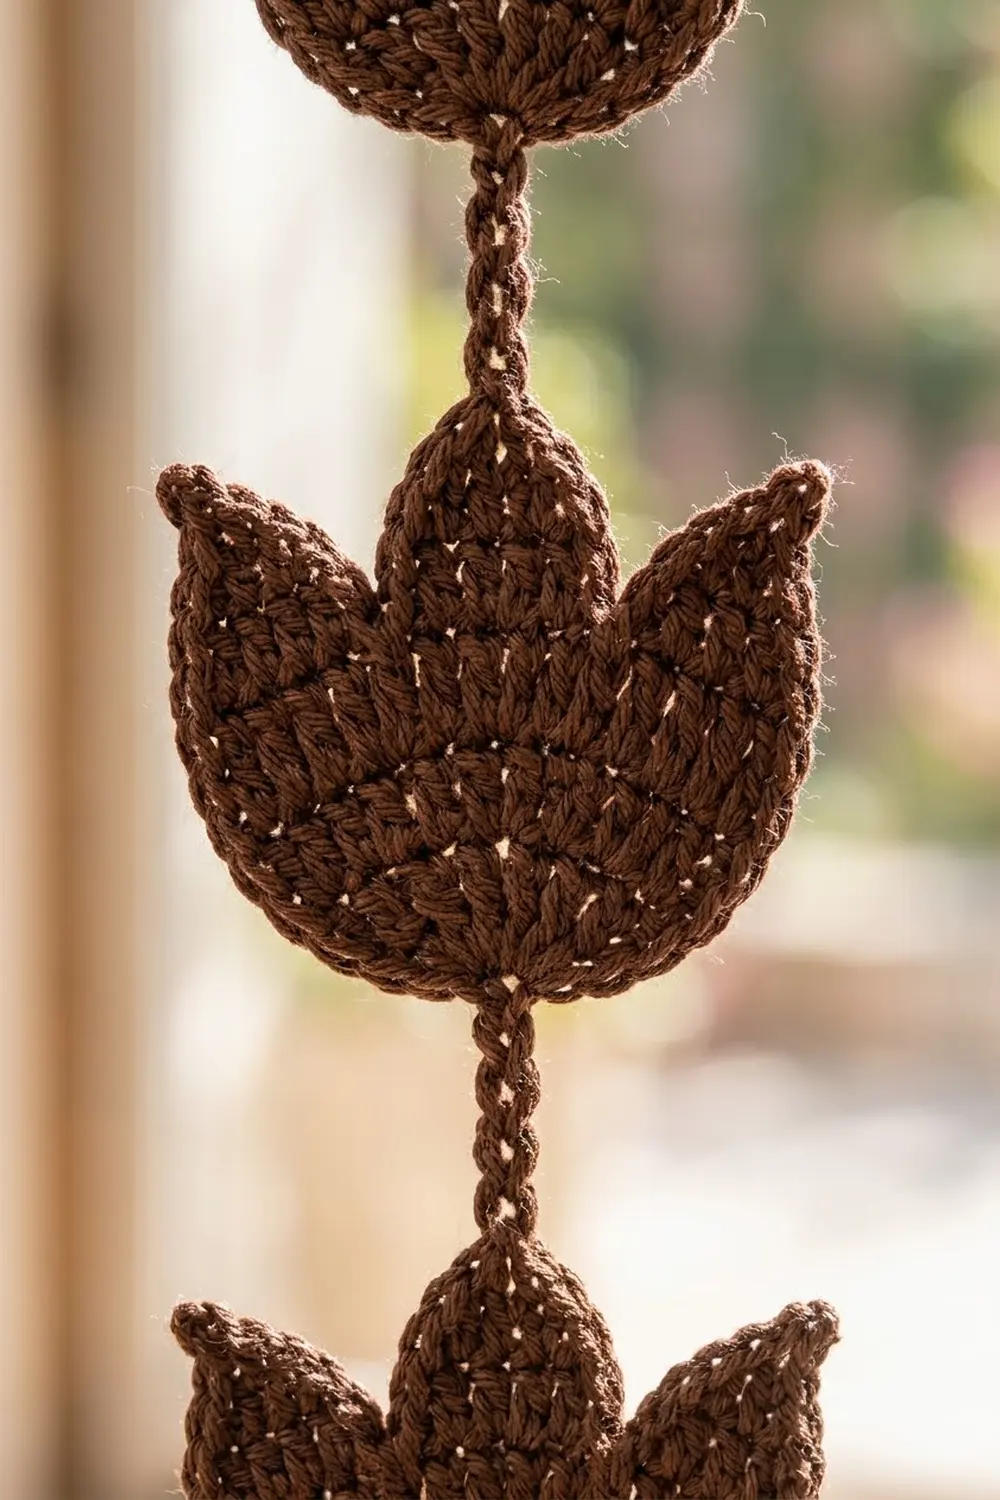
Tulip Motif
Make 65 in Color A and 52 in Color B.
Base
Make a magic ring.
Row 1 (RS): Ch 2 (does not count as a st), 7 dc in the ring. Pull the ring closed. Turn. (7 dc)
Row 2 (WS): Ch 2, 2 dc in each st across. Turn. (14 dc)
Row 3 (RS): Ch 2, dc in next st, 2 dc in next st; repeat from * 6 more times. Turn. (21 dc)*
The base is now a half-round fan. Its stitches radiate from the ring, which sits at the bottom center of the motif. The 21 stitches along the curved top are shared equally among the three petals, 7 each.
Petals
First petal (worked over sts 1–7 of Row 3):
Petal Row 1 (WS): Ch 2, dc in each of the next 7 sts. Turn and leave the remaining sts unworked. (7 dc)
Petal Row 2 (RS): Ch 2, dc2tog, dc in each of the next 3 sts, dc2tog. Turn. (5 dc)
Petal Row 3 (WS): Ch 1, hdc2tog, hdc in next st, hdc2tog. (3 hdc) Fasten off.
Second petal (center): With the WS facing, join yarn in the 8th st of Row 3. Repeat Petal Rows 1–3 over sts 8–14. Fasten off.
Third petal: With the WS facing, join yarn in the 15th st of Row 3. Repeat Petal Rows 1–3 over sts 15–21. Fasten off.
The center petal sits on the highest point of the arch, so it stands upright. The side petals sit on the sloping ends of the arch, so they naturally flare outward.
Edging Round
Round 1 (RS): With the RS facing, join yarn with a sc into the magic ring at the bottom center. Then work:
- Bottom edge, first half: 2 sc in the side of each of Rows 1, 2 and 3. (6 sc)
- First petal, outer side: 2 sc in the side of Petal Row 1, 2 sc in the side of Petal Row 2, sc in the first hdc of Petal Row 3. (5 sc)
- Tip: (sc, ch 2, sc) in the center hdc.
- First petal, inner side: sc in the last hdc, 2 sc in the side of Petal Row 2, 2 sc in the side of Petal Row 1. (5 sc)
- Valley: sl st between the first and second petals.
- Repeat the outer side, tip and inner side for the center petal, then sl st in the next valley.
- Repeat the outer side, tip and inner side for the third petal.
- Bottom edge, second half: 2 sc in the side of each of Rows 3, 2 and 1. (6 sc)
Sl st to the first sc. Fasten off, leaving a 6 in (15.2 cm) tail.
Round count: 1 + 6 + (12 x 3) + 6 = 49 sc, plus 2 valley sl sts and 3 ch-2 tips.
The first sc, at the bottom center, is where the stem will attach. Weave in all ends except the 6 in (15.2 cm) tail, which you can use to close any gap at the ring.
Make All Pieces
- Color A (pink): 65 tulips (5 strands x 13)
- Color B (brown): 52 tulips (4 strands x 13)
Lay the tulips out in columns with the RS up and the petals pointing toward the top:
Strand:  1  2  3  4  5  6  7  8  9
Color:   A  B  A  B  A  B  A  B  A
Row 1:   T  T  T  T  T  T  T  T  T
Row 2:   T  T  T  T  T  T  T  T  T
...      (13 tulips per strand)
Row 13:  T  T  T  T  T  T  T  T  T
Base:    tassel under every strand, same color
Joining (Stems)
Each strand has 13 tulips joined by 12 stems. Use the same color as the strand. Work from the top tulip down, keeping every tulip RS up.
Stem: With the RS facing, join yarn with a sl st in the bottom-center sc of the upper tulip. Ch 9, then sl st in the ch-2 tip sp of the center petal of the tulip below. Turn the chain and work a back-bump sl st in each of the 9 ch. Sl st into the same bottom-center sc and fasten off. (9 ch + 9 sl st = 1.5 in / 3.8 cm)
Stitch-to-stitch logic: Each stem links exactly one bottom-center sc to exactly one center-tip ch-2 sp. This keeps every tulip lined up straight under the one above, without tilting.
Tension: Work the slip stitches loosely enough that the stem lies flat. If you pull them too tight, the stem curls and shortens. Measure a few stems: every one should be 1.5 in (3.8 cm).
Strand checkpoint: (13 x 3 in) + (12 x 1.5 in) = 39 + 18 = 57 in (144.8 cm) from the top petal tip to the bottom-center sc. If a strand is off by more than 1 in (2.5 cm), look for a stem with the wrong chain count.
Border (Top and Bottom Edge Finishing)
This curtain has no fabric border. Its “border” is the row of hanging loops along the top and the row of tassels along the bottom. Both are worked to the chain gauge of 6 ch = 1 in (2.5 cm).
Top Edge: Hanging Loops (9 total, 1 per strand)
Round 1: Join yarn in the ch-2 tip sp of the center petal of the top tulip. Ch 18, then sl st in the same ch-2 sp. (18-ch loop)
Round 2: Ch 1, work 24 sc into the loop, sl st to the first sc. Fasten off. (24 sc)
The loop measures 3 in (7.6 cm) around and hangs 1.5 in (3.8 cm) below the rod. Slip it over the rod, or clip a curtain ring to it.
Bottom Edge: Tassel Stems and Tassels (9 total)
Stem: Join yarn with a sl st in the bottom-center sc of tulip 13. Ch 6, then fasten off and leave an 8 in (20.3 cm) tail. (6 ch = 1 in / 2.5 cm)
Tassel:
- Wrap yarn 25 times around the 4.5 in (11.4 cm) card.
- Thread a 10 in (25.4 cm) strand under the wraps at the top and tie it tightly.
- Slide the wraps off the card and wrap the neck 0.5 in (1.3 cm) below the top.
- Cut the bottom loops and trim the tassel to 4 in (10.2 cm) total.
- Tie the tassel to the end of the ch-6 with the stem tail and the tie strands, then hide the ends inside the tassel.
Why the Math Works
- Length per strand: 1.5 in (3.8 cm) loop drop + 57 in (144.8 cm) strand + 1 in (2.5 cm) tassel stem + 4 in (10.2 cm) tassel = 63.5 in (161.3 cm).
- Width: Space the loops 4.5 in (11.4 cm) apart, center to center, on the rod. That gives (8 x 4.5 in) + 3.5 in = 39.5 in (100.3 cm) across, with about 1 in (2.5 cm) of light between neighboring tulips.
- Edging: Each dc row-end gets 2 sc because a dc row is about as tall as 2 sc rows. Each hdc row-end gets 1 sc. That is why the edging lies flat instead of rippling or cupping.
Final Blocking
- Lay each strand flat on a mat or towel with the RS up.
- Mist every tulip until it is evenly damp, but not soaked.
- Pin each tulip to 3.5 in (8.9 cm) wide x 3 in (7.6 cm) tall. Put one pin in each ch-2 petal tip.
- Ease the side petals outward so they match from tulip to tulip, and keep the center petal upright.
- Straighten each stem so it measures 1.5 in (3.8 cm).
- Let the strand dry completely before unpinning it.
- Steam the tassels lightly and comb the strands straight. Trim them evenly to 4 in (10.2 cm).
- Hang the strands and let them settle for a day. Then check the lengths again.
Final Quality-Control Checklist
- [ ] All 117 tulips measure 3.5 in (8.9 cm) x 3 in (7.6 cm)
- [ ] Every edging round has 49 sc, 2 valley sl sts and 3 ch-2 tips
- [ ] Every strand has 13 tulips and 12 stems of 1.5 in (3.8 cm)
- [ ] Every strand measures 57 in (144.8 cm) before the loop and tassel
- [ ] Colors alternate A, B, A, B, A, B, A, B, A from left to right
- [ ] The 9 loops are spaced 4.5 in (11.4 cm) apart on the rod
- [ ] All tassels are 4 in (10.2 cm) and evenly trimmed
- [ ] All ends are woven in securely
Troubleshooting
- The base cups or ruffles: Recount Row 3, which should have 21 dc. If it still ruffles, tighten your tension or go down a hook size.
- The petals lean or come out uneven: Check that each petal starts on the correct stitch (1, 8 and 15) and uses exactly 7 sts.
- The edging pulls in: You probably worked 1 sc into a dc row-end instead of 2. Check the 6-sc counts on the bottom edge.
- The tulips twist on the strand: A stem is attached off-center. Remove it and rejoin it at the bottom-center sc and the center-tip ch-2 sp.
- The strands come out different lengths: Measure every stem. Even one ch-10 stem makes that strand 0.17 in (0.4 cm) longer.
- The tassels look skimpy: Increase to 30 wraps.
Care
Hand wash the curtain cool, or machine wash it on a gentle cycle in a mesh bag. Lay it flat and reshape it while damp, then hang it to finish drying. Don’t tumble dry.
Final Notes
The measurement chain works like this: a 2.75 in (7.0 cm) base, then a 3.25 in (8.3 cm) tulip with petals, then a 3.5 in (8.9 cm) x 3 in (7.6 cm) finished motif. Thirteen motifs and twelve stems make a 57 in (144.8 cm) strand. The loop and tassel bring each strand to 63.5 in (161.3 cm), and nine strands spaced 4.5 in (11.4 cm) apart fill a 39.5 in (100.3 cm) rod. If you check each step against these numbers, the curtain will hang straight and even.
Happy crocheting!