

This lace table runner is made of 42 small flower motifs, each turned on point so it sits like a diamond. The motifs touch only at their tips, so open diamond-shaped windows run the full length of the runner and both long edges zigzag. A soft tassel hangs from each point at both ends.
The sample uses one color, a blush pink cotton, which looks warm next to gold and greenery but still works on an ordinary table. The style is light and airy, a little vintage, and quick to repeat once you know the motif.
The pattern uses US crochet terms. The finished runner measures 15 in (38.1 cm) wide from tip to tip and 70 in (177.8 cm) long. The tassels add 4 in (10.2 cm) at each end, for an overall length of 78 in (198.1 cm).
Construction is simple. You crochet one complete motif, then work the remaining 41 with join-as-you-go on the last round, linking corner loops only. Then you add six tassels and block the runner.
Finished Size and Construction
- Finished size: 15 in (38.1 cm) wide × 70 in (177.8 cm) long; 78 in (198.1 cm) long including tassels
- Skill level: Easy intermediate
- Terminology: US crochet terms
- Yarn weight: DK (light worsted / #3), cotton or cotton blend
- Hook: 3.5 mm (US E-4)
- Number of pieces: 42 identical motifs
- Layout: 3 motifs across × 14 motifs long, set on point
- Motif size: 3.5 in (8.9 cm) per side; 5 in (12.7 cm) from tip to tip
- Size before border: 15 in × 70 in (38.1 cm × 177.8 cm)
- Border depth: none. Round 6 of each motif forms the finished edge, and the tassels add 4 in (10.2 cm) at each short end.
Materials
Yarn advice: Choose a smooth, mercerized or combed DK cotton. Cotton gives clear stitch definition, holds its shape after blocking, and won’t fuzz on a table. Avoid very stretchy acrylic, because the open loops tend to sag.
- Blush pink: 350 g / approximately 805 m (about 7 balls of 50 g / 115 m)
- Motifs: about 6 g each × 42 = 252 g
- Tassels: about 4 g each × 6 = 24 g
The listed quantity includes a margin of about 25% for gauge differences, swatching and tails. Buy all the yarn from one dye lot.
Tools:
– 3.5 mm (US E-4) crochet hook
– Tapestry needle
– Scissors
– Stitch markers (4)
– A piece of stiff card 4 in (10.2 cm) tall, for the tassels
– Blocking mats and rust-proof pins
– Spray bottle
– Tape measure
Abbreviations (US Terms)
- ch – chain
- sl st – slip stitch
- sc – single crochet
- hdc – half double crochet
- dc – double crochet
- sp(s) – space(s)
- sk – skip
- st(s) – stitch(es)
- FP sc – front post single crochet
- MR – magic ring
Special stitch: corner join. Work (sc, ch 3) in the corner sp of the motif you are working on. Insert the hook from front to back into the ch-7 corner loop of the finished neighbor motif and sl st. Then ch 3 and sc back into the same corner sp of the motif you are working on. The join replaces the 7-ch loop: 3 ch + 1 sl st + 3 ch.
Gauge and Checkpoints
Make 1 test motif first and block it lightly before you start the full runner. Gauge matters here because small differences multiply across 14 rows.
Checkpoints for one motif:
– After Round 4, the flower measures 2.5 in (6.4 cm) across.
– After Round 5, the square measures 3 in (7.6 cm) per side.
– After Round 6, the square measures 3.5 in (8.9 cm) per side and 5 in (12.7 cm) from tip to tip.
Your motif is acceptable if it measures between 4.75 in and 5.25 in (12.1 cm to 13.3 cm) from tip to tip.
If your motif is too big, go down to a 3.25 mm hook (US D-3). If it is too small, go up to a 3.75 mm hook (US F-5). Change the hook rather than the stitch counts, because the corner loops must line up for joining.
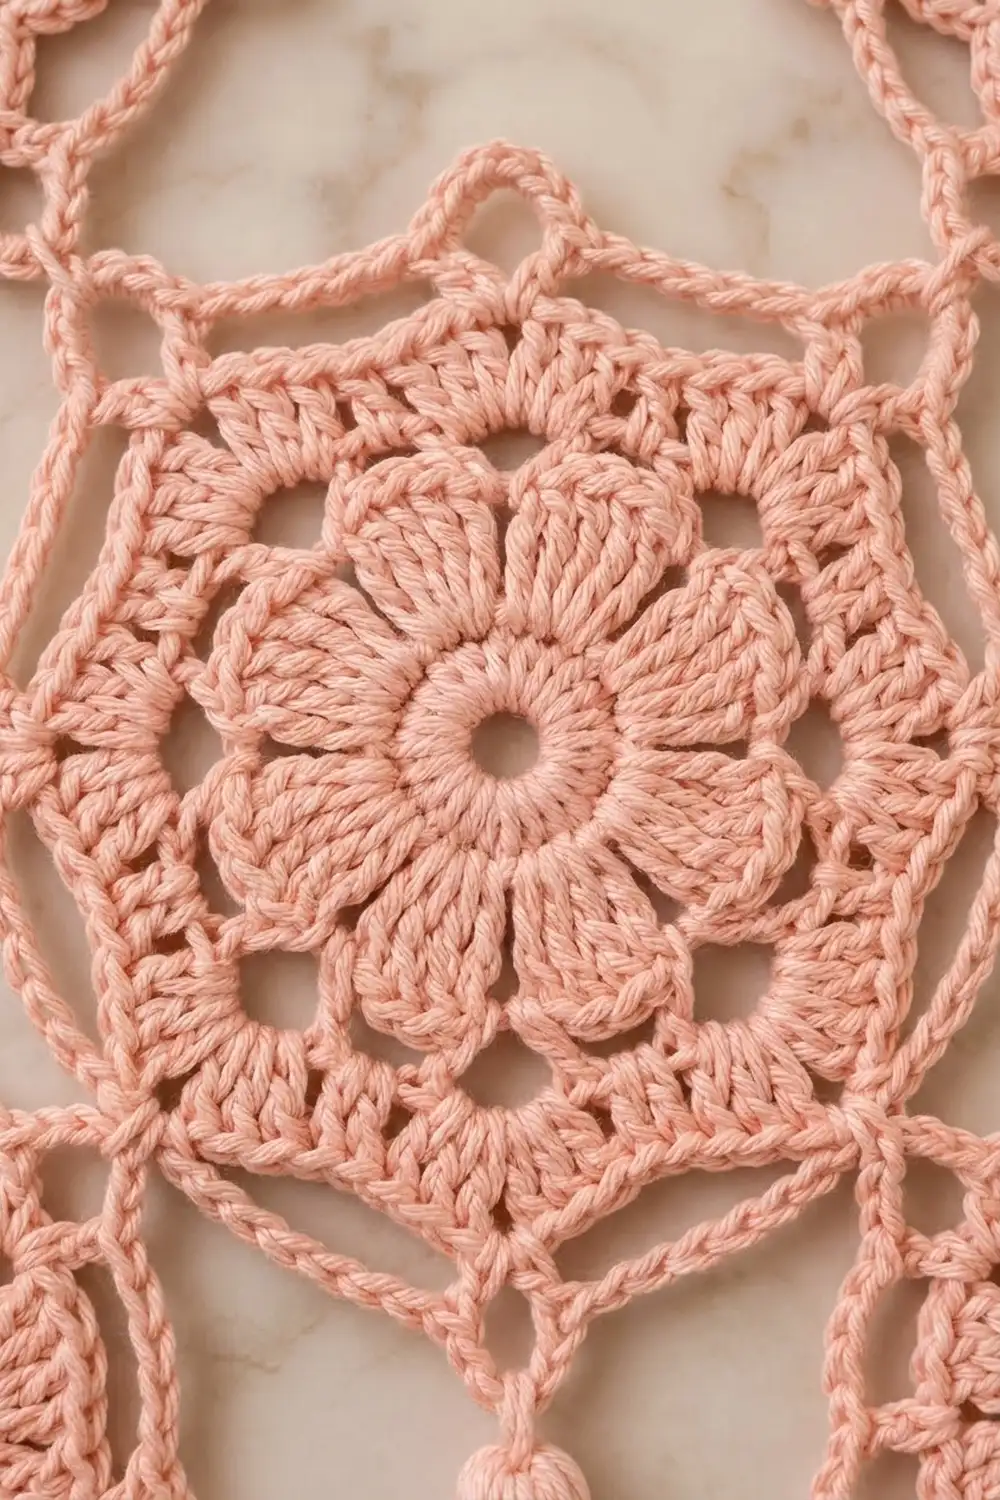
Motif Pattern
Round 1 (center ring)
Make an MR. Ch 3 (counts as first dc), then work 15 dc into the ring. Pull the ring closed, leaving a small open center about 0.25 in (0.6 cm) across. Join with sl st to the top of the beginning ch-3.
(16 dc)
Round 2 (petal bases)
Ch 1, sc in the same st, ch 3, sk 1 st, sc in the next st, ch 3, sk 1 st. Repeat from * to * 6 more times. Join with sl st to the first sc.
(8 sc, 8 ch-3 sps)
Round 3 (petals)
Sl st into the first ch-3 sp. In each ch-3 sp, work (sc, hdc, 3 dc, hdc, sc). Join with sl st to the first sc.
(8 petals, 7 sts each = 56 sts)
The petals sit side by side and form a rounded flower.
Round 4 (loops behind the petals)
Ch 1, FP sc around the post of the next Round 2 sc from behind the petals, ch 5. Repeat from * to * 7 more times. Join with sl st to the first FP sc.
(8 FP sc, 8 ch-5 loops)
The loops sit behind the petals and support the square frame. The flower should measure 2.5 in (6.4 cm).
Round 5 (square frame)
Sl st into the first ch-5 loop. Ch 3 (counts as dc), then work (2 dc, ch 3, 3 dc) in the same loop for the first corner. Ch 1, 4 dc in the next loop, ch 1.
(3 dc, ch 3, 3 dc) in the next loop for a corner, ch 1, 4 dc in the next loop, ch 1. Repeat from * to * 2 more times. Join with sl st to the top of the beginning ch-3.
Count: 40 dc, 4 corner ch-3 sps and 8 ch-1 sps. Each side holds 10 dc (3 + 4 + 3) between corner sps.
Place a marker in each corner sp. The square should measure 3 in (7.6 cm) per side.
Round 6 (lace loops), first motif only
Sl st in the next 2 dc and into the corner ch-3 sp. Ch 1 and work (sc, ch 7, sc) in the same corner sp.
Side sequence:
1. Ch 5, sk 3 dc, sc in the ch-1 sp.
2. Ch 5, sk 2 dc, sc in the gap between the 2nd and 3rd dc of the 4-dc group.
3. Ch 5, sk 2 dc, sc in the next ch-1 sp.
4. Ch 5, sk 3 dc.
After step 4, work (sc, ch 7, sc) in the next corner sp. Repeat the side sequence and corner 2 more times. Work the side sequence a final time, then sl st to the first sc instead of making the next corner. Fasten off and weave in the ends.
Count: 20 sc, 16 ch-5 loops and 4 ch-7 corner loops (4 ch-5 loops per side + 1 ch-7 loop per corner).
The square should measure 3.5 in (8.9 cm) per side and 5 in (12.7 cm) from tip to tip.
Make All Pieces
Make 42 motifs in blush pink. Work Rounds 1–5 on all 42. Work Round 6 in full on Motif 1 only, and work Round 6 with joins on the other 41.
Layout grid (◇ = 1 motif on point; joins at the tips):
Row 1:   ◇ ◇ ◇
Row 2:   ◇ ◇ ◇
Row 3:   ◇ ◇ ◇
Row 4:   ◇ ◇ ◇
Row 5:   ◇ ◇ ◇
Row 6:   ◇ ◇ ◇
Row 7:   ◇ ◇ ◇
Row 8:   ◇ ◇ ◇
Row 9:   ◇ ◇ ◇
Row 10:  ◇ ◇ ◇
Row 11:  ◇ ◇ ◇
Row 12:  ◇ ◇ ◇
Row 13:  ◇ ◇ ◇
Row 14:  ◇ ◇ ◇
That is 3 columns × 14 rows = 42 motifs.
Joining
Method: Join as you go on Round 6, using the corner join only. The side ch-5 loops are never joined, and that is what creates the open diamond windows.
Tip logic: Turn each motif so that one corner points up, one right, one down and one left.
- A motif’s left tip joins the right tip of the motif before it in the same row.
- A motif’s top tip joins the bottom tip of the motif directly above it.
Joins needed for each motif:
– Row 1, column 1: no joins
– Row 1, columns 2–3: 1 join (left tip)
– Rows 2–14, column 1: 1 join (top tip)
– Rows 2–14, columns 2–3: 2 joins (left and top tips)
Total joins: 28 horizontal (2 per row × 14 rows) + 39 vertical (3 per column join between rows × 13) = 67 corner joins.
Working order: Start Round 6 at a corner that does not need a join. When you reach a corner that does, use the corner join in place of (sc, ch 7, sc). Stitch counts stay the same: every corner still holds 2 sc, and every side still has 4 ch-5 loops.
Tension advice: Keep the 3-ch halves of each join the same length as your ch-7 loops, neither looser nor tighter. If the joins are tight, the tips pucker. If they are loose, the runner grows longer than planned.
Size checkpoint: After Row 3, lay the piece flat. It should measure 15 in (38.1 cm) wide tip to tip and 15 in (38.1 cm) long tip to tip. After Row 14, it should measure 70 in (177.8 cm) long.
Border (Tassel-End Finish)
This runner has no continuous border. Round 6 of each motif is the finished edge, and its loops are already the edging.
Why the math works: Each motif’s edge is 4 ch-5 loops per side plus 1 ch-7 loop per corner. These counts are fixed and identical on every motif, so they repeat evenly along the zigzag edge. Across the width, there are 3 motifs × 5 in (12.7 cm) = 15 in (38.1 cm). Down the length, there are 14 motifs × 5 in (12.7 cm) = 70 in (177.8 cm).
The zigzag edge has 3 outward tips at each short end and 14 at each long side. A straight border would pull those tips inward and distort the diamonds, so the edge is left as it is.
Tassels (make 6):
1. Wrap the yarn 30 times around the 4 in (10.2 cm) card.
2. Slide a 10 in (25.4 cm) length of yarn under the wraps at the top and tie it tightly. Keep these tails long for attaching.
3. Cut the wraps open along the bottom edge. Each strand is about 8 in (20.3 cm) long and folded in half.
4. To make the rounded head, wrap a separate 20 in (50.8 cm) length of yarn 8 times around the tassel 0.75 in (1.9 cm) below the top. Tie it off and bury the ends inside the tassel.
5. Trim the tassel to an even 4 in (10.2 cm).
Attaching: Thread the top tie through the free ch-7 loop at the outward bottom tip of each Row 14 motif, and at the outward top tip of each Row 1 motif. That is 3 tassels per end. Knot the tie securely and bury the tails inside the tassel head.
Final Blocking
- Weave in all remaining ends, about 2 in (5.1 cm) each, through the dc of Round 5.
- Soak the runner in cool water for 10 minutes. Press out the water gently; do not wring it.
- Roll it in a towel to remove the extra moisture.
- Lay it flat on the blocking mats with the motifs on point.
- Pin each corner tip first, setting each column 5 in (12.7 cm) apart and the total width at 15 in (38.1 cm).
- Pin the tips down the length, checking that the body measures 70 in (177.8 cm).
- Open the ch-5 loops with pins so they form even arches.
- Comb the tassels straight and leave them unpinned.
- Let the runner dry completely, which usually takes 24 hours.
Final Quality-Control Checklist
- 42 motifs, set 3 across and 14 long
- Every motif has 8 petals, 40 dc in Round 5 and 20 loops in Round 6
- All 67 joins are present, with no missed tips
- The windows between motifs are all open and even
- Width is 15 in (38.1 cm) and body length is 70 in (177.8 cm)
- 6 tassels, each 4 in (10.2 cm) long, are attached to the end tips
- All ends are woven in and none are visible from the right side
Troubleshooting
The petals ruffle. Your MR or Round 1 may be too tight. Pull the ring closed less firmly, or check that you have exactly 8 ch-3 sps in Round 2.
The square looks round. Make sure every corner has ch 3 between the dc groups, and block the corners to sharp points.
The runner is drifting longer than planned. Your joins are loose. Shorten the 3-ch halves or work them a little more firmly.
A tip puckers. The join is too tight. Undo it and rework it with relaxed chains.
The tassels look thin. Add more wraps, up to 40, and keep all 6 tassels identical.
Care
Hand wash in cool water with mild soap and lay flat to dry, pinning out the tips if needed. Do not tumble dry, and press with a cool iron through a cloth only if necessary.

Final Notes
The measurement chain works like this. A 2.5 in (6.4 cm) flower becomes a 3 in (7.6 cm) square, which becomes a 3.5 in (8.9 cm) motif measuring 5 in (12.7 cm) from tip to tip. Three motifs across give 15 in (38.1 cm), and fourteen rows give 70 in (177.8 cm). Tassels at both ends bring the full length to 78 in (198.1 cm).
If the test motif matches its checkpoints, the whole runner will match too. Keep your joins steady and block every tip, and the runner will lie flat with clean, open windows.
Happy crocheting!