

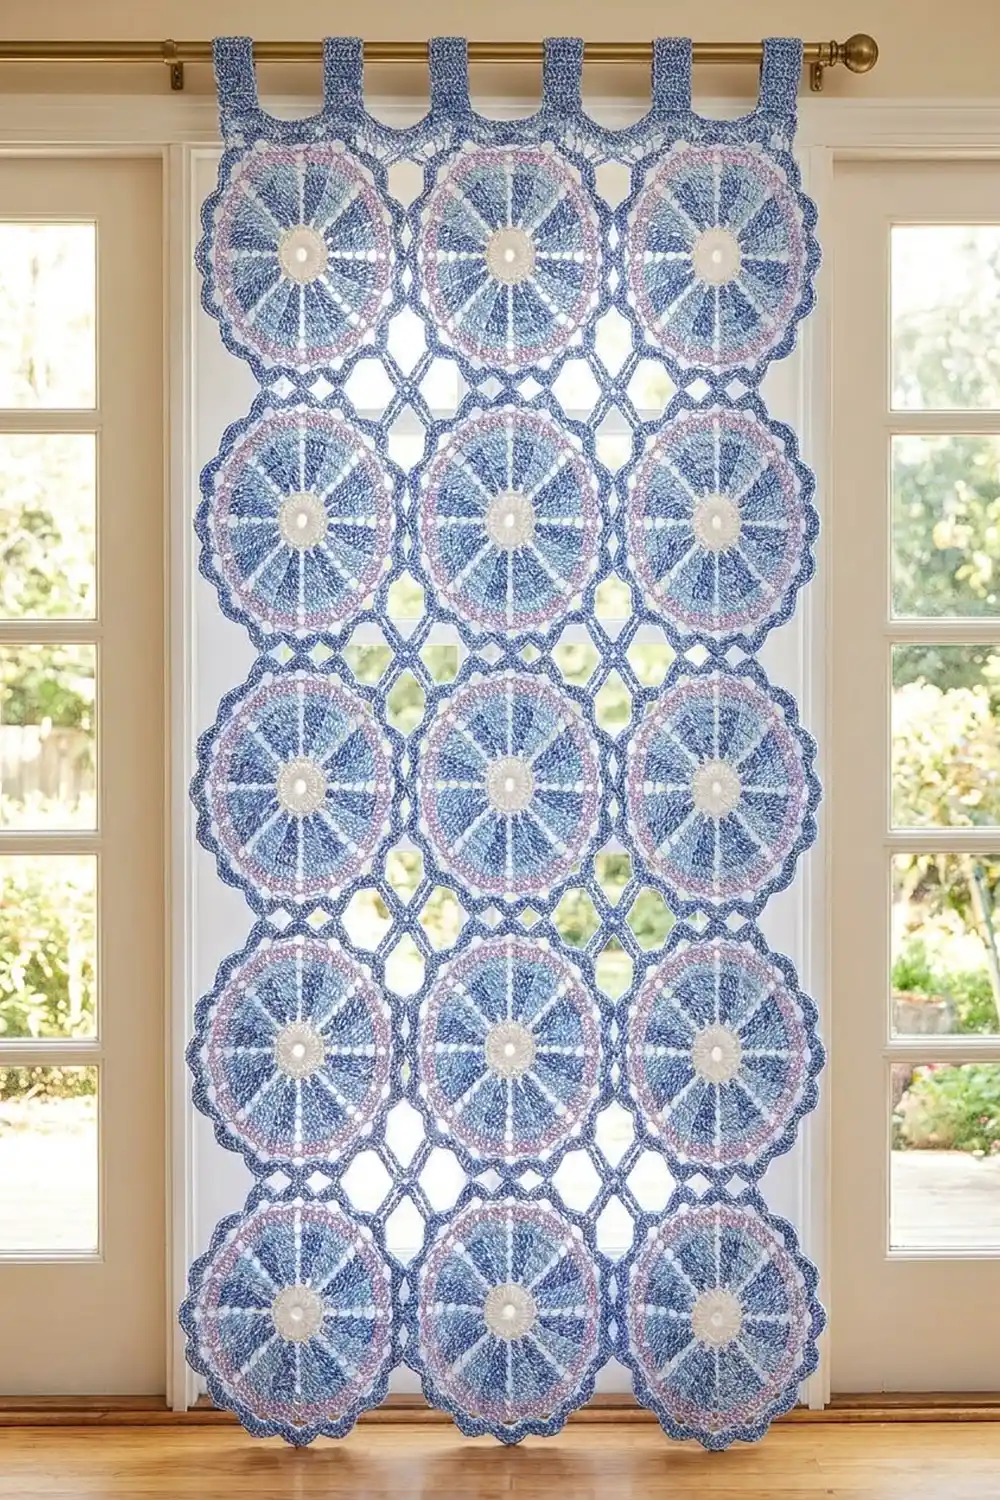
The Cornflower Wheel Lace Curtain Panel is made from round wheel motifs that hang in neat vertical columns. Each motif has a crisp white center ring, eight fanned wedges of tall blue spokes and two rounds of open chain scallops, so daylight comes through every one.
The colors are soft and fresh. White is used for the ring, cornflower blue and pale sky blue for the spokes, and lavender for the first scallop round. Together they look like a gently heathered blue, a bit like classic blue-and-white porcelain.
This pattern uses US crochet terms. One finished panel measures 18 in (45.7 cm) wide and 85.5 in (217.2 cm) long, not counting the tab loops.
You’ll make 42 identical motifs, each 6 in (15.2 cm) across, and join them as you go into 3 columns of 14. A short solid heading band straightens the top edge, and 7 tabs hang the panel from a rod. The side and bottom edges are left scalloped on purpose.
Finished Size and Construction
- Finished panel: 18 in (45.7 cm) wide x 85.5 in (217.2 cm) long, plus tab loops of about 2 in (5.1 cm)
- Skill level: Intermediate
- Terminology: US crochet terms
- Yarn weight: DK (#3) mercerized cotton
- Hook: 4.0 mm (G-6)
- Number of pieces: 42 motifs, joined as you go
- Layout: 3 motifs wide x 14 motifs long
- Piece size: 6 in (15.2 cm) across after blocking
- Size before border: 18 in (45.7 cm) x 84 in (213.4 cm)
- Border depth: a heading band 1.5 in (3.8 cm) deep above the motif tips, on the top edge only
Materials
Choose a smooth mercerized cotton or cotton blend in DK weight. Cotton keeps the spokes straight, blocks crisply and holds its shape while hanging. Avoid fuzzy or very stretchy yarns. They blur the lace, and the panel will get longer over time.
The yardage below assumes about 115 m per 50 g:
- Color A, White: 50 g (115 m), for the center rings
- Color B, Cornflower Blue: 270 g (621 m), for Rnds 2, 4 and 6, the heading and the tabs
- Color C, Pale Sky Blue: 100 g (230 m), for Rnd 3
- Color D, Lavender: 75 g (173 m), for Rnd 5
All quantities include about 15% extra for swatching, joins and weaving in ends.
Tools:
- 4.0 mm (G-6) crochet hook
- Locking stitch markers
- Tapestry needle
- Scissors
- Measuring tape
- Blocking mats and rustproof pins
- Spray bottle
- Curtain rod
Abbreviations (US Terms)
- ch: chain
- sl st: slip stitch
- sc: single crochet
- dc: double crochet
- tr: treble crochet
- dtr: double treble crochet
- sp(s): space(s)
- st(s): stitch(es)
- rnd(s): round(s)
- RS / WS: right side / wrong side
- rep: repeat
Standing dc: Start with a slip knot on the hook. Yarn over, insert the hook into the stitch and finish a dc as usual. This lets you start a new color without a starting chain.
Standing sc: Start with a slip knot on the hook. Insert the hook, pull up a loop, yarn over and draw through both loops.
Join-loop: Ch 3 and drop the loop from your hook. Insert the hook from front to back into the 4th (center) ch of the matching ch-7 loop on the finished motif. Pick up the dropped loop, pull it through, then ch 3. A join-loop replaces one ch 7.
Gauge and Checkpoints
Gauge: 17 sc and 16 rows = 4 in (10.2 cm) in sc rows, for the heading. One motif = 6 in (15.2 cm) across after blocking.
Make one full motif first, block it and measure it before you start the rest. Flatten it lightly and measure across at each checkpoint:
- After Rnd 1: 1.25 in (3.2 cm)
- After Rnd 2: 2.25 in (5.7 cm)
- After Rnd 3: 3.25 in (8.3 cm)
- After Rnd 4: 4.5 in (11.4 cm)
- After Rnd 5: 5.25 in (13.3 cm)
- After Rnd 6, blocked: 6 in (15.2 cm)
Being off by up to 0.25 in (0.6 cm) is fine. If your motif is too big, try a 3.75 mm hook. If it’s too small, try a 4.5 mm hook. If only the scallop rounds are off, check your chains. Each chain should be the same size as the hook shank.
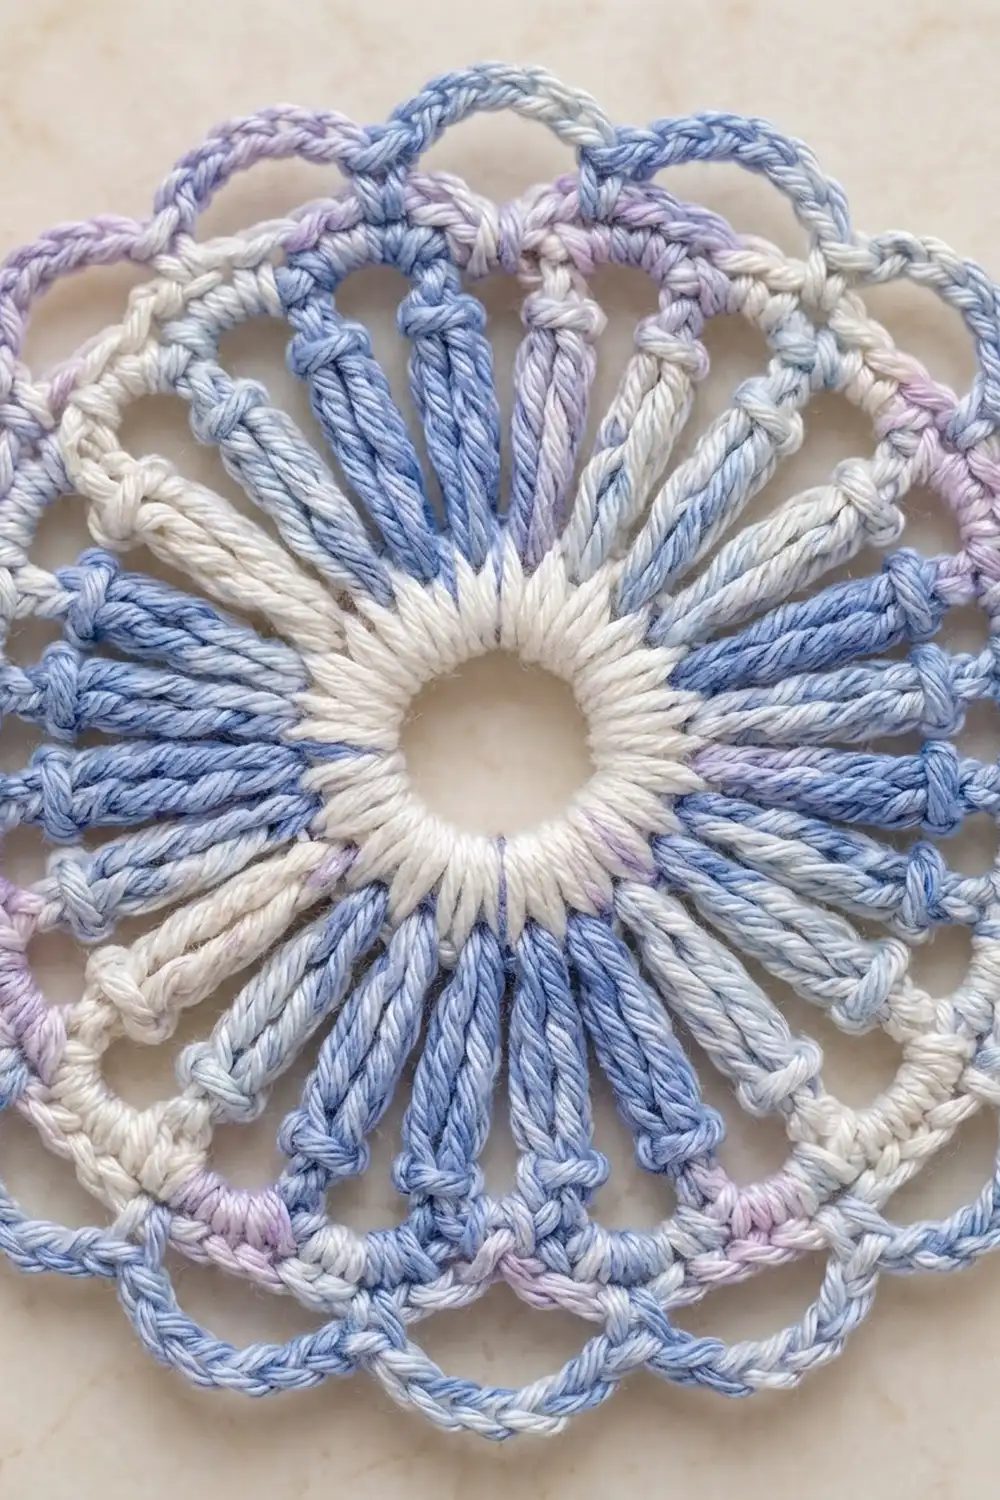
Motif (Make 42)
Rnd 1 (RS, Color A): Ch 8 and sl st in the first ch to form a ring. Ch 1 and work 24 sc into the ring, packing them tightly so the ring looks padded. Join with a sl st to the first sc. Fasten off. (24 sc)
The center opening should be about 0.5 in (1.3 cm) across.
Rnd 2 (Color B): Standing dc in any sc, dc in the next 2 sc, ch 2. Dc in the next 3 sc, ch 2; rep from * 6 more times. Join with a sl st to the first dc. Fasten off. (24 dc in 8 groups of 3, 8 ch-2 sps)*
Rnd 3 (Color C): Standing dc in the first dc of any 3-dc group. Dc in the same st, dc in the next dc, 2 dc in the next dc, ch 2, skip the ch-2 sp. 2 dc in the next dc, dc in the next dc, 2 dc in the next dc, ch 2, skip the ch-2 sp; rep from * 6 more times. Join and fasten off. (40 dc in 8 groups of 5, 8 ch-2 sps)*
Rnd 4 (Color B): Standing dc in the first dc of any 5-dc group. Dc in the same st, dc in the next 3 dc, 2 dc in the next dc, ch 3, skip the ch-2 sp. 2 dc in the next dc, dc in the next 3 dc, 2 dc in the next dc, ch 3, skip the ch-2 sp; rep from * 6 more times. Join and fasten off. (56 dc in 8 groups of 7, 8 ch-3 sps)*
You now have eight separate fanned wedges with open gaps between them. Each wedge has 7 spokes.
Rnd 5 (Color D): Standing sc in any ch-3 sp. Ch 5, skip 3 dc, sc in the next dc (the center dc of the wedge), ch 5. Sc in the next ch-3 sp, ch 5, skip 3 dc, sc in the next dc, ch 5; rep from * 6 more times. Join and fasten off. (16 sc, 16 ch-5 loops)*
Rnd 6 (Color B): Standing sc in any ch-5 loop, ch 7. Sc in the next ch-5 loop, ch 7; rep from * 14 more times. Join with a sl st to the first sc and fasten off. (16 sc, 16 ch-7 loops)*
Loop numbering: Call the first ch-7 loop you work loop 1. Number the rest in the order you make them, ending with loop 16. Turn the motif so loop 1 points up. If you crochet right-handed, loop 5 now points left, loop 9 points down and loop 13 points right. If you’re left-handed, left and right are swapped. Only loops 1, 5, 9 and 13 are used for joining.
Make All Pieces
Make 42 motifs. Work Rnds 1–5 on all of them first. Then work Rnd 6 on each motif as you join it.
For all 42 motifs you’ll work:
- Color A: 42 rings (Rnd 1)
- Color B: 42 each of Rnds 2, 4 and 6
- Color C: 42 of Rnd 3
- Color D: 42 of Rnd 5
Layout grid (3 wide x 14 long, top row first):
Row 1:  M1   M2   M3
Row 2:  M4   M5   M6
Row 3:  M7   M8   M9
...
Row 13: M37  M38  M39
Row 14: M40  M41  M42
Row 1 is the top of the curtain and gets the heading. Row 14 is the bottom and hangs free.
Joining
Method: Join as you go on Rnd 6. At each contact point, one loop joins to one loop, which makes the small X-shaped crossing between motifs.
Which loops to join:
- M1: Work Rnd 6 as written, with no joins.
- M2 and M3: At loop 5, work a join-loop into loop 13 of the motif to the left.
- First motif in every later row (M4, M7 and so on): At loop 1, work a join-loop into loop 9 of the motif directly above.
- All other motifs: At loop 1, join to loop 9 of the motif above. At loop 5, join to loop 13 of the motif to the left.
The diamond-shaped gaps between each group of four motifs are part of the lace.
Tension: Work each join-loop at the same tension as a normal ch 7. Tight joins make the motifs pucker and shorten the columns. Loose joins make the panel sag. Lay both motifs flat, RS up, before each join so nothing twists.
Size checkpoint: After Row 1, the strip should be 18 in (45.7 cm) wide, give or take 0.75 in (1.9 cm). Measured flat and unstretched, the panel should be 42 in (106.7 cm) long after Row 7 and 84 in (213.4 cm) long after Row 14.
Border (Top Heading Band and Tabs)
The border goes along the top edge only. The sides and bottom keep their natural ch-7 scallops.
Border gauge: 17 sc = 4 in (10.2 cm). 4 rows = 1 in (2.5 cm).
Row 1 (RS, leveling row, Color B): Hold the panel RS up with Row 1 at the top. Start at the top-right motif. Each top motif has 7 free loops across its top: loops 14, 15, 16, 1, 2, 3 and 4. Loops 5 and 13 are already joined, so skip them.
On each top motif, work across its free loops in order: dtr in the first free loop, ch 3, tr in the next loop, ch 3, dc in the next loop, ch 3, sc in loop 1, ch 3, dc in the next loop, ch 3, tr in the next loop, ch 3, dtr in the last free loop. Between motifs, ch 1, then start the next motif with its dtr. Turn.
Count: 7 sts and 6 ch-3 sps per motif. Across 3 motifs that’s 21 sts and 18 ch-3 sps, plus 2 ch-1 sps between motifs. The tall stitches fill the dips and the sc sits on each crest, so the top edge comes out straight.
Row 2 (WS): Ch 1. Work 1 sc in each st, 3 sc in each ch-3 sp and 1 sc in each ch-1 sp across. Turn. (77 sc)
Each motif gives 7 sc worked in stitches plus 18 sc worked in spaces, for 25 sc. Three motifs give 75 sc. The 2 ch-1 sps add 2 more, for 77.
Rows 3–6: Ch 1, sc in each st across. Turn. (77 sc)
After Row 6, the band is 1.5 in (3.8 cm) deep above the motif crests.
Tabs (make 7): Place the tabs on stitches 1–5, 13–17, 25–29, 37–41, 49–53, 61–65 and 73–77 of Row 6. For each tab, join Color B in its first stitch, ch 1, and sc in the same st and the next 4 sts. (5 sc) Work 15 more rows of 5 sc, for 16 rows in all. The tab will be 4 in (10.2 cm) long and about 1.25 in (3.2 cm) wide. Fasten off, leaving a 12 in (30.5 cm) tail. Fold the tab to the back and whipstitch its last row to the back of Row 2.
Why the math works: 7 tabs x 5 sts = 35 sts, and 6 gaps x 7 sts = 42 sts. Since 35 + 42 = 77, the first and last tabs sit right at the panel edges. At 17 sc per 4 in, 77 sc measures 18.1 in (46.0 cm). That matches the 18 in (45.7 cm) width of the motifs, so the heading won’t ruffle or pull in.
Final Blocking
- Weave in all ends along the spokes or inside the white ring.
- Lay the panel flat, RS up. Block it in sections if you’re short on space.
- Mist it evenly until it’s damp but not soaking.
- Pin the heading straight at 18 in (45.7 cm) wide.
- Pin each motif to a 6 in (15.2 cm) circle, with a pin in every outer ch-7 loop along the sides and bottom.
- Check that the columns run straight and measure 84 in (213.4 cm) from the motif crests to the bottom loop tips.
- Open up the wedge gaps and the center rings with your fingertips.
- Leave it to dry for at least 24 hours before unpinning.
Final Quality-Control Checklist
- All 42 motifs have the right counts: 24 sc, 24 dc, 40 dc, 56 dc, 16 ch-5 loops and 16 ch-7 loops.
- Every motif measures 6 in (15.2 cm) across.
- Joins use only loops 1, 5, 9 and 13, and no loop is twisted.
- Before the heading, the panel measures 18 in x 84 in (45.7 cm x 213.4 cm).
- Heading Rows 2–6 each have 77 sc.
- All 7 tabs are evenly spaced and securely sewn.
- All ends are woven in.
Troubleshooting
Motif cups or ruffles: Make sure Rnd 4 has exactly 7 dc per wedge. Cupping usually means your chains are too tight. Ruffling means they’re too long.
Center ring looks gappy: Push the 24 sc closer together, or use a hook one size smaller for Rnd 1 only.
Columns drift sideways: You’ve probably joined a loop next to the correct one. Count again from loop 1.
Heading waves: Recount Row 2 to make sure it has 77 sc. If your sc is loose, work the heading with a 3.75 mm hook.
Panel stretches after hanging: Re-block it and keep the tension on your joins even.
Care
Hand wash in cool water with a mild detergent and press the water out in a towel. Dry flat, and don’t hang the panel while it’s wet.
Final Notes
The size of the panel comes down to a simple chain of measurements. Each motif blocks to 6 in (15.2 cm). Three motifs across make 18 in (45.7 cm), and 14 rows make 84 in (213.4 cm). The 77-stitch heading matches that width and adds 1.5 in (3.8 cm), so the finished panel is 85.5 in (217.2 cm) long. If your first motif measures correctly, the rest of the panel will follow.
Happy crocheting!