

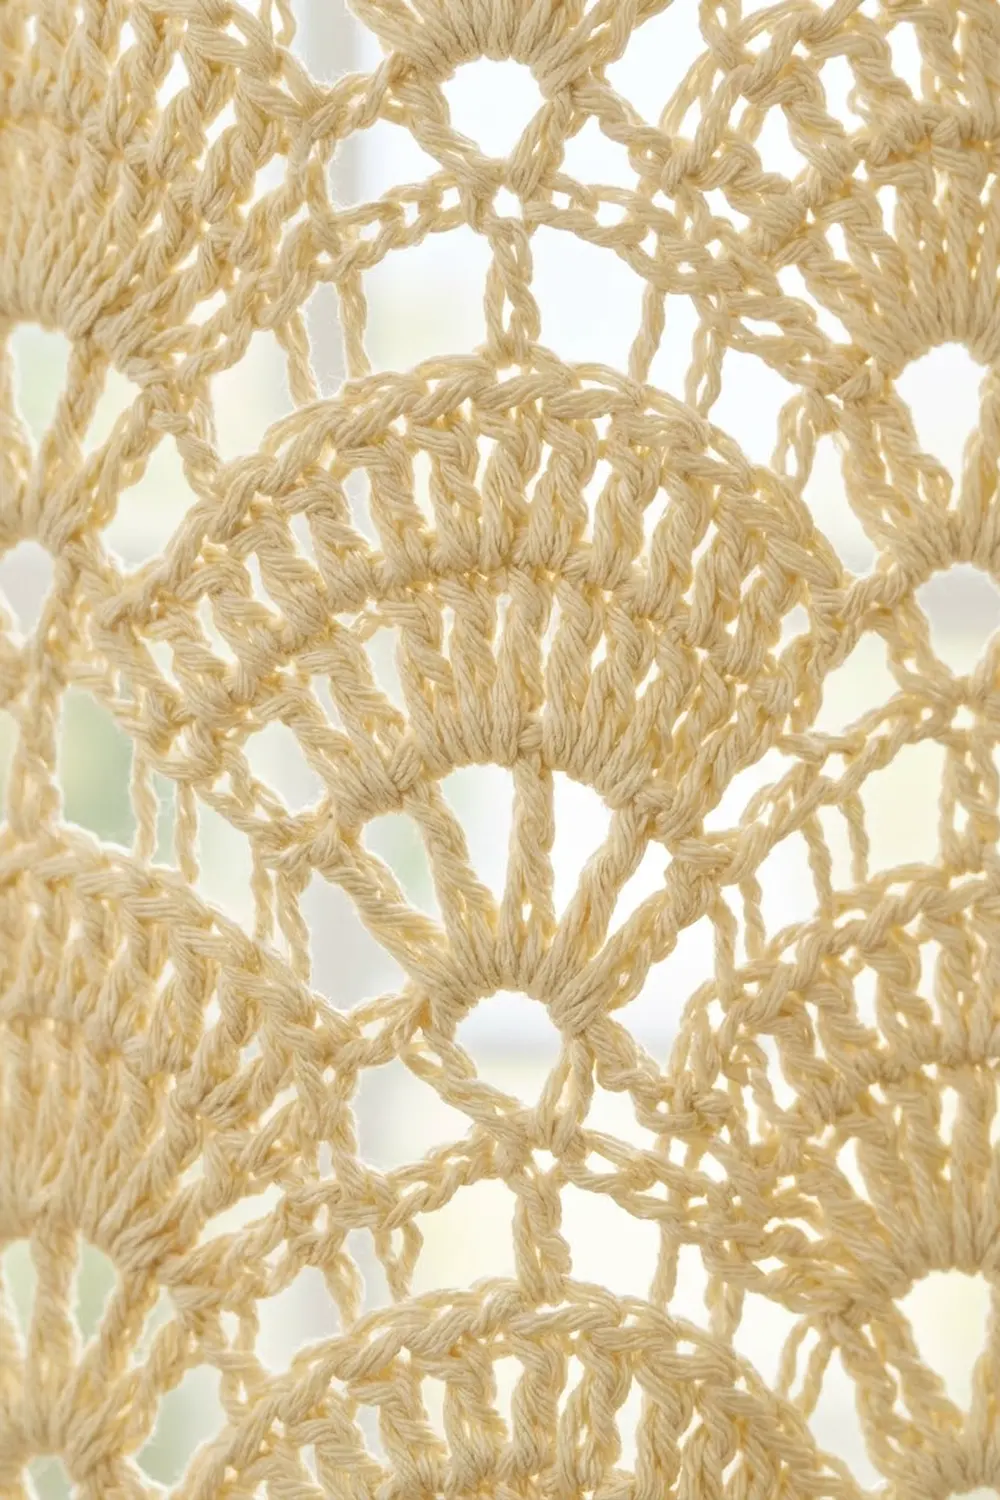
These lace curtain panels glow when sunlight comes through them. Rows of solid fans are set in a brick pattern, and an open V-stitch mesh runs between them, so the fabric looks both detailed and see-through. Each panel ends in a soft, wavy shell-stitch hem.
The set has four separate panels in one cream or off-white shade. They hang side by side from one rod and are not joined to each other. The style is classic cottage lace: light, airy and easy to wash.
The pattern uses US crochet terms. Each finished panel measures 28.5 in wide × 62 in long (72.4 cm × 157.5 cm), including the border.
Each panel is worked flat from the bottom up. You start with a foundation row of dc, then work a 4-row fan-and-mesh repeat. A solid dc band at the top folds over to make a rod pocket. Last, you add a side-and-bottom sc edging and a two-row scalloped hem.
Finished Size and Construction
- Finished size (each panel): 28.5 in × 62 in (72.4 cm × 157.5 cm)
- Skill level: Intermediate
- Terminology: US crochet terms
- Yarn weight: Worsted (#4) cotton
- Hook: 5.0 mm (H-8)
- Number of pieces: 4 separate panels
- Layout: 4 panels hung side by side on one rod, not joined to each other
- Piece size: 28.5 in × 62 in (72.4 cm × 157.5 cm)
- Size before border: 28 in × 60.5 in (71.1 cm × 153.7 cm), with the rod pocket folded
- Border depth: 0.25 in (0.6 cm) on the sides and 1.5 in (3.8 cm) at the bottom hem
Materials
Yarn: Use a worsted weight 100% cotton or cotton blend, about 170 m per 100 g. Cotton gives crisp fans and holds up to sunlight and washing. Avoid fuzzy yarns, because they blur the openwork. Buy all skeins from the same dye lot so the four panels match in the window.
- Cream: 950 g (1,615 m) per panel, or 3,800 g (6,460 m) for all four panels
These quantities include a margin of roughly 10% for swatching, tension differences and blocking.
Tools:
- 5.0 mm (H-8) crochet hook
- Tapestry needle
- Scissors
- Stitch markers
- Tape measure
- Rust-proof pins and a large flat surface or blocking mats
- Curtain rod up to 1 in (2.5 cm) in diameter
Abbreviations (US Terms)
- ch – chain
- sc – single crochet
- dc – double crochet
- sk – skip
- sp – space
- st(s) – stitch(es)
- tch – turning chain
- RS / WS – right side / wrong side
Special stitches:
- V-st (V-stitch): (dc, ch 2, dc) in the same stitch.
- Fan: 9 dc in the same stitch or space.
- Half fan: 5 dc at the edge of a row. When a row starts with a half fan, the beginning ch 3 counts as the first dc.
Gauge and Checkpoints
Gauge:
- Plain dc: 16 dc and 8 rows = 4 in (10.2 cm).
- Pattern: one 8-stitch fan repeat = 2 in (5.1 cm) wide, and the 4-row repeat (Rows 2–5) = 2 in (5.1 cm) tall.
Test swatch: Make a small test piece before starting a full panel.
- Ch 27.
- Work the Foundation Row. You will have 25 dc.
- Work Row 1, then Rows 2–5 twice. Use 3 fan repeats wherever the pattern says 14.
- Wet the swatch and let it dry flat.
It should measure 6 in × 5 in (15.2 cm × 12.7 cm).
Panel checkpoints:
- Foundation Row: 28 in (71.1 cm) wide.
- After Row 1 and the first Rows 2–5: 3 in (7.6 cm) tall.
- After 10 repeats of Rows 2–5: 21 in (53.3 cm) tall.
- End of body (117 rows): 58.5 in (148.6 cm) tall.
- After the top band, unfolded: 62.5 in (158.8 cm) tall.
If your swatch is too big, go down 0.5 mm in hook size. If it is too small, go up 0.5 mm. Swatch again until it matches.
Width matters most, because the four panels must match each other. You can correct small height differences with blocking.
Panel Pattern
Foundation Row (WS): Ch 115. Dc in the 4th ch from the hook and in each ch across. The skipped 3 ch count as the first dc. Turn. (113 sts)
113 = 8 × 14 + 1, which gives 14 fan repeats plus 1 edge stitch.
Row 1 (RS, setup fans):
- Ch 1, sc in the first st.
- Sk 3 sts, fan in the next st, sk 3 sts, sc in the next st. Repeat from * 13 more times. The last sc goes in the top of the tch.
- Turn.
(14 fans + 15 sc = 141 sts)
Row 2 (WS, mesh):
- Ch 5 (counts as dc + ch 2), dc in the first sc. This makes the edge V-st.
- Ch 2, sk 4 dc, sc in the next dc (the center of the fan), ch 2, sk 4 dc, V-st in the next sc. Repeat from * across. The last V-st goes in the last sc.
- Turn.
(15 V-sts, 14 sc, 28 ch-2 sps between them)
Row 3 (RS, offset fans):
- Ch 3 (counts as dc), 4 dc in the first V-st sp. This is the first half fan.
- Sc in the next sc, fan in the next V-st sp. Repeat from * 12 more times.
- Sc in the next sc, then 5 dc in the last ch-5 sp. This is the second half fan.
- Turn.
(2 half fans of 5 sts + 13 fans + 14 sc = 141 sts)
Row 4 (WS, mesh):
- Ch 1, sc in the first dc, ch 2, sk 4 dc, V-st in the next sc.
- Ch 2, sk 4 dc, sc in the next dc (the center of the fan), ch 2, sk 4 dc, V-st in the next sc. Repeat from * 12 more times.
- Ch 2, sk 4 dc, sc in the top of the tch.
- Turn.
(15 sc, 14 V-sts, 28 ch-2 sps)
Row 5 (RS, fans):
- Ch 1, sc in the first sc.
- Fan in the next V-st sp, sc in the next sc. Repeat from * across, skipping the ch-2 sps.
- Turn.
(14 fans + 15 sc = 141 sts)
The fans in Row 5 sit directly above the fans in Row 1. The fans in Row 3 sit between them. This creates the brick-set seashell layout, with V-stitch lattice in between.
Continue the body:
- Repeat Rows 2–5 until you have worked them 28 times in total. This adds 112 rows.
- Work Rows 2–4 once more.
Body total: 1 Foundation Row + Row 1 + 112 rows + 3 rows = 117 rows. At 0.5 in (1.3 cm) per row, the body measures 58.5 in (148.6 cm).
Top Band
Row T1 (RS):
- Ch 3 (counts as dc). This sits in the first sc.
- 2 dc in the next ch-2 sp, dc in the next dc, dc in the V-st sp, dc in the next dc, 2 dc in the next ch-2 sp, dc in the next sc. Repeat from * across.
- Turn.
(1 + 14 × 8 = 113 sts)
Rows T2–T8: Ch 3 (counts as dc), dc in each st across. Turn. (113 sts per row)
The band is 8 rows, or 4 in (10.2 cm) tall. Fasten off and leave a 60 in (152.4 cm) tail for sewing the pocket.
Make All Pieces
Make 4 identical panels, all in Cream.
Count the rows on each panel as you go. Every panel must have 117 body rows and 8 band rows so the hems line up.
Layout grid (left to right on one rod):
ROD: CREAM CREAM CREAM CREAM
The panels are not joined to each other. Each one hangs on the rod by its own pocket.
Joining: Closing the Rod Pocket
The panels stay separate, so the only seam on each one is the rod pocket.
Method:
- Fold the band along the line between Rows T4 and T5, toward the WS.
- The top of Row T8 should now lie along the base of Row T1.
- Use the long tail and a tapestry needle to whipstitch the pocket closed.
Stitch-to-stitch logic: Each of the 113 top loops of Row T8 is sewn to the base of the matching T1 stitch, so 113 stitches meet 113 stitches. Leave both short ends of the pocket open so the rod can slide through.
Tension: Pull each stitch just snug enough to close the gap. If you pull too tight, the RS will pucker in a line across the panel.
Size checkpoint: The pocket should be 2 in (5.1 cm) tall. The panel should now measure 28 in × 60.5 in (71.1 cm × 153.7 cm).
Border
Border gauge: 4 sc per inch, the same as the dc gauge across the stitches.
- Along the sides, each row end is 0.5 in (1.3 cm) tall, so it gets 2 sc.
- Along the bottom, each foundation stitch gets 1 sc.
Row 1 (RS, sc edging on sides and bottom):
- Join yarn at the side edge, just below the band.
- Work 234 sc down the first side (2 sc in each of the 117 row ends).
- Work 3 sc in the first foundation st.
- Work 1 sc in each of the next 111 foundation sts.
- Work 3 sc in the last foundation st.
- Work 234 sc up the second side, stopping below the band.
- Fasten off.
Do not edge the band. Its sides are the pocket openings.
Count for Row 1:
| Part | Stitches |
|---|---|
| Each side | 234 sc |
| Bottom | 117 sc (113 worked 1-per-stitch + 4 corner extras) |
| Total | (234 + 234 + 113) + 4 = 585 sc |
Row 2 (RS, bottom only, shells):
- With the RS facing, join yarn in the last sc of the first corner group.
- Sc in that st.
- Sk 3 sc, 9 dc in the next sc, sk 3 sc, sc in the next sc. Repeat from * 13 more times. The last sc goes in the first sc of the second corner group.
- Turn.
(14 shells + 15 sc = 141 sts)
Row 3 (picot edge):
- Ch 1, sc in the first sc.
- Sc in the next 4 dc, (sc, ch 3, sc) in the next dc, sc in the next 4 dc, sc in the next sc. Repeat from * across.
- Fasten off.
(15 + 14 × 10 = 155 sc, plus 14 ch-3 picots)
Why the math works:
- From one corner to the other, Row 2 works over 113 sc. That is 1 + 14 × 8, so each 8-stitch shell sits directly below a body fan.
- The sides use 234 sc for 117 rows, which is 58.5 in (148.6 cm) at 4 sc per inch. That matches the body height exactly, so the side edges lie flat.
- The bottom hem adds 1.5 in (3.8 cm): Row 1 is 0.25 in (0.6 cm), Row 2 is 0.75 in (1.9 cm), and Row 3 is 0.5 in (1.3 cm).
Final Blocking
- Weave in all ends along solid dc or sc, never across mesh spaces.
- Soak each panel in cool water for 15 minutes.
- Press out the water gently. Do not wring.
- Roll the panel in towels to remove extra moisture.
- Lay it flat and pin it to 28.5 in × 62 in (72.4 cm × 157.5 cm).
- Pin each scallop point and each picot so the hem curves evenly.
- Open the fans with your fingers so the V-st spaces form clean diamonds.
- Let the panel dry completely flat before you hang it.
Final Quality-Control Checklist
- [ ] All 4 panels have 117 body rows and 8 band rows.
- [ ] The Foundation Row and Row T1 each have 113 sts.
- [ ] Fan rows have 141 sts.
- [ ] Each panel measures 28.5 in × 62 in (72.4 cm × 157.5 cm) after blocking.
- [ ] Each side border has 234 sc, and the bottom has 117 sc.
- [ ] Each hem has 14 shells, lined up with the fans.
- [ ] The pocket is 2 in (5.1 cm) tall, with both ends open.
- [ ] All ends are hidden in solid stitches.
Troubleshooting
- The fans cup or ruffle: Your tension is too loose for the 9-dc fan. Go down 0.5 mm, or tighten the dc in the fans only.
- The mesh looks squashed: Your ch-2 spaces are too tight. Chain more loosely, or use a hook 0.5 mm larger for the chains.
- The panel narrows near the top: Your gauge tightened as you worked. Measure the width every 10 repeats against the 28 in (71.1 cm) target.
- The side edges wave: Pull out the side border and re-space it at exactly 2 sc per row end.
- The panels hang at different lengths: Cotton stretches when it hangs. Re-block the longer panels slightly shorter, and check your row counts.
- The rod won’t fit: Unpick the pocket seam and whipstitch it more loosely, or add one dc row to the band.
Care
Hand wash in cool water with a mild detergent, then dry flat to the blocked size. Do not hang the panels while they are wet, because cotton lace stretches under its own weight.

Final Notes
Everything in this pattern follows one measurement chain:
- 16 dc = 4 in (10.2 cm), so one 8-stitch fan = 2 in (5.1 cm).
- 14 fans = 28 in (71.1 cm) wide.
- 117 rows = 58.5 in (148.6 cm) of body.
- The folded band adds 2 in (5.1 cm), for 60.5 in (153.7 cm) before the border.
- The side edging adds 0.25 in (0.6 cm) per side, and the scalloped hem adds 1.5 in (3.8 cm).
- Final size: 28.5 in × 62 in (72.4 cm × 157.5 cm) per panel.
Optional: For a wider window, add or remove fans in 8-stitch steps. Each step changes the panel width by 2 in (5.1 cm).
Happy crocheting!