

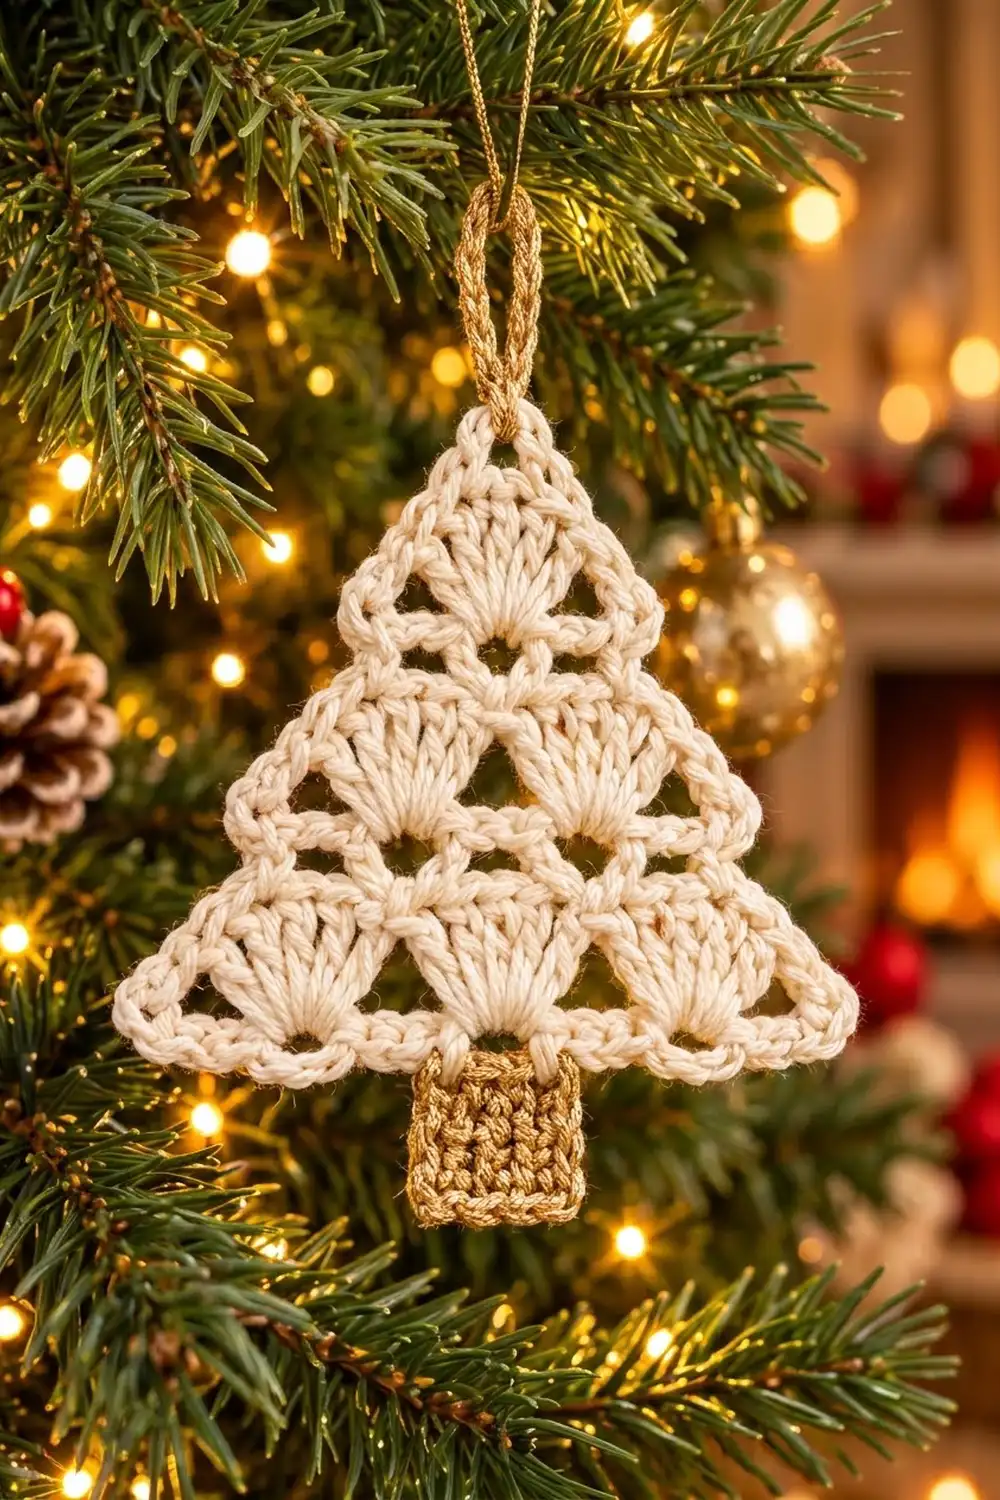
This little tree is made of lace and light. Three tiers of cream fan shells stack into a neat triangle, with small open windows between the fans and a dense gold trunk at the bottom. A gold chain loop at the tip makes it ready to hang.
The colors are simple: cream or ivory cotton for the tree, and gold or metallic-gold yarn for the trunk and loop. The style is classic and a little vintage. It looks just as good on a real pine as it does tied to a gift.
The pattern uses US crochet terms. The finished ornament is 4.75 in (12.1 cm) wide and 5 in (12.7 cm) tall including the trunk, or 6.25 in (15.9 cm) tall including the hanging loop.
Construction is quick. You work the tree body bottom-up in four short rows of fan shells, then add a two-round single crochet border. Last, you work the trunk directly onto the bottom edge and the loop onto the tip. It’s all one piece, with just one change to the gold yarn.
Finished Size and Construction
- Finished size: 4.75 in (12.1 cm) wide x 5 in (12.7 cm) tall with trunk; 6.25 in (15.9 cm) tall with loop
- Skill level: Easy-intermediate
- Terminology: US crochet terms
- Yarn weight: Light (3) / DK cotton, worked firmly
- Hook: 3.25 mm (US D-3)
- Number of pieces: 1 (trunk and loop are worked directly onto the tree)
- Layout: Single triangular ornament
- Tree body before border: 4.25 in (10.8 cm) wide x 3.25 in (8.3 cm) tall
- Tree body after border: 4.75 in (12.1 cm) wide x 4 in (10.2 cm) tall
- Border depth: 0.25 in (0.6 cm) on each side
- Trunk: about 1.2 in (3.0 cm) wide x 1 in (2.5 cm) tall
Materials
Choose a smooth mercerized cotton or cotton blend. Cotton shows the fan stitches crisply and keeps its shape after blocking. Avoid fuzzy or very soft acrylic, which blurs the openings and lets the points droop.
- Color A, Cream/Ivory: 8 g, about 20 m
- Color B, Gold or metallic gold: 3 g, about 8 m
If your gold is a fine metallic thread, hold two strands together so it matches the thickness of the cream yarn. A gold trunk that is thinner than the tree will look narrow and loose.
If you swap yarns, keep both colors the same weight. Swatch Row 1 before you commit, because cotton blends vary in how much they stretch.
Tools:
- 3.25 mm (US D-3) crochet hook
- Tapestry needle
- Scissors
- Rust-proof pins and a foam blocking mat
- Spray bottle with water
- Optional: spray starch for a stiffer finish
The quantities include a margin of about 25 percent for swatching and weaving in ends.
Abbreviations (US Terms)
- ch – chain
- sl st – slip stitch
- sc – single crochet
- tr – treble crochet
- st(s) – stitch(es)
- sp – space
- RS – right side
Special stitch – Fan: 7 tr worked into the same stitch. The fan starts at one point and spreads upward into a half-circle.
Gauge and Checkpoints
Make one complete tree body (Rows 1–4) and measure it before you add the border. If you plan to make a whole set, this test tree becomes your reference.
Base gauge: 6 sc and 8 sc rows = 1 in (2.5 cm), worked firmly. One fan repeat in Row 1 is about 1.4 in (3.6 cm) wide, and each fan tier adds about 1 in (2.5 cm) of height.
Checkpoints:
- After Row 1: 4.25 in (10.8 cm) wide x 1 in (2.5 cm) tall
- After Row 2: 2 in (5.1 cm) tall
- After Row 3: 3 in (7.6 cm) tall
- After Row 4: 3.25 in (8.3 cm) tall
- After the border: 4.75 in (12.1 cm) wide x 4 in (10.2 cm) tall
- After the trunk: 5 in (12.7 cm) tall
If your tree is too big, go down to a 3 mm hook or pull your tr stitches a little snugger. If it’s too small, go up to a 3.5 mm hook. Check Row 1 first. If Row 1 is right, the rest usually follows.

Tree Body
You work the body bottom-up in rows. Each new row starts with slip stitches that move the yarn to the center of the first fan. This creates the stepped, triangular outline.
With Color A, ch 26.
Row 1 (RS): Sc in 2nd ch from hook, skip 3 ch, 7 tr in next ch (fan made), skip 3 ch, sc in next ch; repeat from * 2 more times. Turn.
(3 fans [21 tr] + 4 sc = 25 sts)*
The fans spread upward from a single chain, and the skipped chains leave small openings beneath each fan. Keep every tr the same height so the fans come out as even half-circles.
Row 2: Sl st in first sc and in next 4 tr (you are now in the 4th tr, the center of the first fan). Ch 1, sc in same st, ch 3, 7 tr in next sc, ch 3, sc in center (4th) tr of next fan; repeat from * once more. Turn.
(2 fans [14 tr] + 3 sc + 4 ch-3 sps)*
Each new fan sits in the valley between two lower fans. The ch-3 spaces form the triangular windows.
Row 3: Sl st in each of next 3 ch and in first 4 tr of the next fan (you end in the center tr). Ch 1, sc in same st, ch 3, 7 tr in next sc, ch 3, sc in center tr of next fan. Turn.
(1 fan [7 tr] + 2 sc + 2 ch-3 sps)
Row 4 (tip): Sl st in each of next 3 ch and in first 4 tr of the fan. Ch 1, sc in same st. Do not fasten off.
(1 sc – the tip)
Keep the slip stitches loose. Tight slip stitches pull the sides inward and make the steps between tiers harder to cover in the border.
Measure now: the body should be 4.25 in (10.8 cm) wide at the base and 3.25 in (8.3 cm) tall.
Border
Border gauge: about 6 sc per inch (2.5 cm) along each edge. Each corner gets 3 sc worked into one stitch, and the middle sc of the three is the corner stitch. Each side count below includes the corner stitches at both ends of that side.
Round 1: Ch 1, 3 sc in the tip sc (apex corner). Working down the left side, work 22 sc evenly over the row ends: 7 sc along the Row 3 fan edge, 7 sc along the Row 2 fan edge, and 8 sc along the Row 1 fan edge. Working in the free loops of the foundation chain, 3 sc in the first ch (bottom corner), sc in each of the next 23 ch, 3 sc in the last ch (bottom corner). Work 22 sc evenly up the right side, mirroring the left side (8, 7, 7). Sl st to first sc.
(76 sc = 23 bottom + 22 + 22 sides + 9 corner sts)
Per side, including corner stitches: bottom 27, each slanted side 26.
Round 2: Ch 1, sc in each st around, working 3 sc in each corner stitch. Sl st to first sc. Fasten off.
(82 sc = 76 worked 1-per-stitch + 6 extra corner sts)
Per side, including corner stitches: bottom 29, each slanted side 28.
Why the math works: The bottom edge has 25 foundation loops. In Round 1, two of them hold the corners and 23 are worked straight. Counting the corner stitches at both ends, the bottom has 1 + 1 + 23 + 1 + 1 = 27 sts. Round 2 adds one stitch at each end of every side, giving 29.
At 6 sc per inch, 29 sts is about 4.8 in (12.2 cm), which eases neatly to 4.75 in (12.1 cm) after blocking. Each slanted side has 28 sts, about 4.7 in (11.9 cm), which matches the roughly 4.6 in (11.7 cm) sides of a triangle 4.75 in (12.1 cm) wide and 4 in (10.2 cm) tall. Total check: 29 + 28 + 28 – 3 shared corners = 82.
The border adds more height at the apex than along the sides because the point is narrow. That’s why the height grows from 3.25 in (8.3 cm) to 4 in (10.2 cm).
Trunk
You work the trunk in rows directly into the bottom of Round 2. Number the 29 bottom sts from the left corner stitch (st 1) to the right corner stitch (st 29). The center stitch is st 15.
Hold the ornament upside down with the RS facing you. Join Color B in st 12.
Row 1: Ch 1, sc in sts 12 through 18. Turn. (7 sc)
Rows 2–8: Ch 1, sc in each st across. Turn. (7 sc each row)
After Row 8, fasten off. The trunk is about 1.2 in (3.0 cm) wide x 1 in (2.5 cm) tall. It sits exactly in the center, with 11 border sts on each side.
Work the trunk firmly. Metallic yarn tends to loosen, and a tight trunk keeps its square shape against the lacy tree.
Hanging Loop
Join Color B in the apex corner stitch of Round 2. Ch 15, sl st in the same stitch. Fasten off. The loop stands about 1.25 in (3.2 cm) above the tip.
Weave in all ends along the border or inside the trunk rows, so nothing shows through the open windows.
Final Blocking
- Lightly mist the ornament until it’s damp, not soaked.
- Draw a triangle 4.75 in (12.1 cm) wide and 4 in (10.2 cm) tall on paper. Place it under a clear sheet on your mat.
- Pin the three corners first: the apex and the two bottom points.
- Pin along each side every 0.5 in (1.3 cm) so the edges are straight.
- Use a pin to gently open each fan and each ch-3 window.
- Pin the trunk square to 1.2 in (3.0 cm) x 1 in (2.5 cm).
- For a stiffer ornament, spray it lightly with starch.
- Let it dry completely before unpinning, usually 4–6 hours.
Final Quality-Control Checklist
- Row 1 has 3 fans of 7 tr each and 4 sc (25 sts).
- Rows 2, 3, and 4 have 2 fans, 1 fan, and 1 tip sc.
- Every fan is centered in a valley below it.
- Border Round 1 has 76 sc, and Round 2 has 82 sc.
- In Round 2, the bottom side has 29 sts and each slanted side has 28 sts.
- The trunk is 7 sc wide and 8 rows tall, and it’s exactly centered.
- The finished tree body is 4.75 in (12.1 cm) x 4 in (10.2 cm).
- Total height with the trunk is 5 in (12.7 cm).
- The hanging loop is secure and all ends are hidden.
Troubleshooting
Fans are cupping or ruffling. Your tr are too loose or your hook is too large. Go down a hook size.
Base row pulls in. The foundation chain is too tight. Make the chain with a hook one size larger, then switch back.
Windows look closed. Make the ch-3 spaces a little looser, and open them with a pin during blocking.
Slanted sides are wavy. You worked too many sc along the row ends. Stick to 8, 7, and 7 per side.
Sides pull in at the tier steps. You worked too few sc. Make sure each tier gets its full count.
Trunk is off-center. Recount the bottom sts from corner to corner and join in st 12.
Corners are rounded. Work all 3 sc into the single corner stitch, and pin the points sharply when blocking.
Care
Hand wash in cool water with mild soap and lay flat to dry. Reblock or restarch as needed, and store flat in tissue paper.
Final Notes
The measurements build in a short chain. Row 1 sets the 4.25 in (10.8 cm) base. Three fan tiers and the tip bring the body to 3.25 in (8.3 cm) tall. The two-round border adds 0.25 in (0.6 cm) on each side, for 4.75 in (12.1 cm) x 4 in (10.2 cm). The 1 in (2.5 cm) trunk brings the total to 5 in (12.7 cm), and the loop takes it to 6.25 in (15.9 cm).
Make one tree, check it against the checkpoints, and then make a whole forest for your tree.
Happy crocheting!