

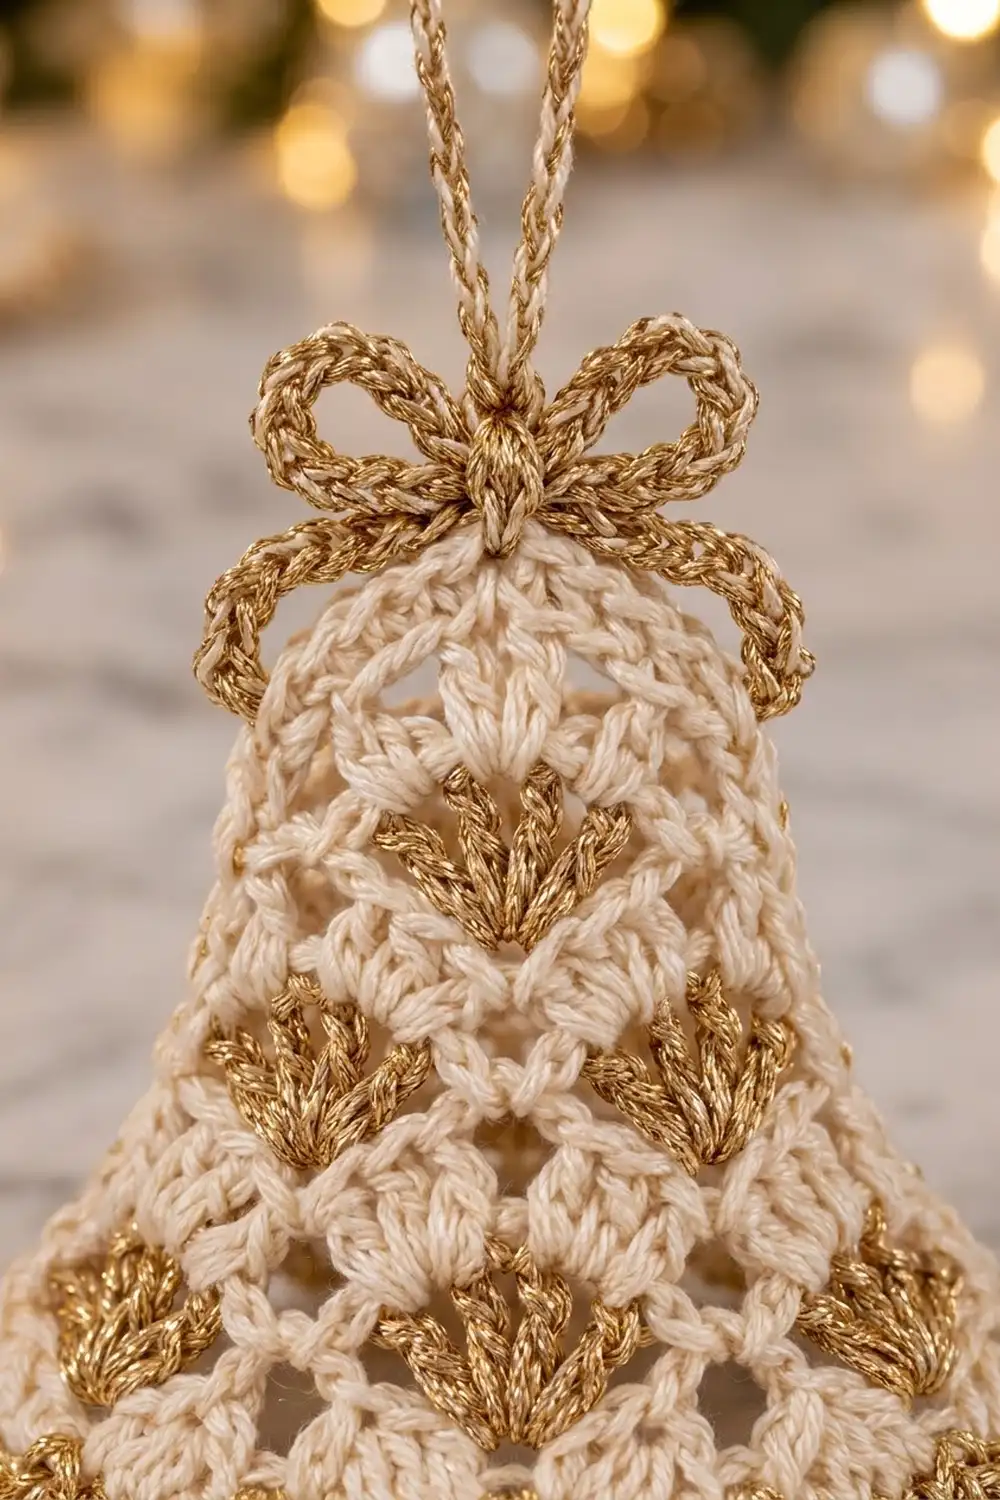
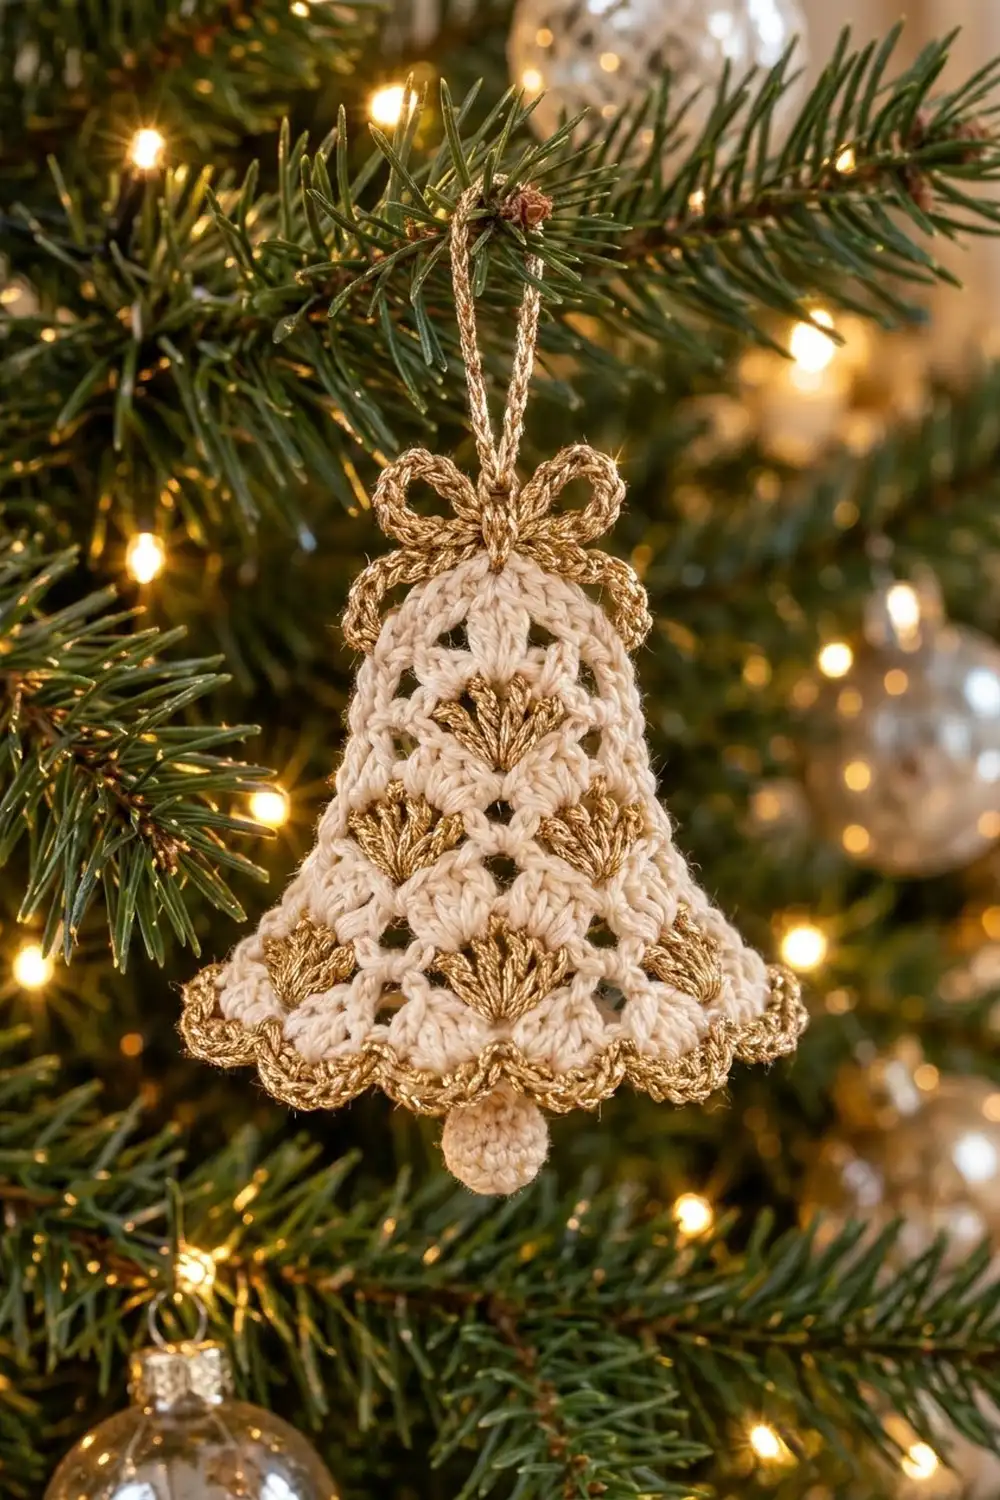
This lacy bell ornament gives the tree an heirloom look. It’s worked in soft ivory thread, with small gold fans set into an open diamond lattice. A gold twisted-cord edge, a tiny bow and a round clapper finish it off.
The palette uses just two colors. Cream is for the lace body, the scallops and the clapper. Metallic gold is for the fans, the edging and the bow. The result is classic and elegant, and it looks great under warm tree lights.
The pattern uses US crochet terms. The finished bell is 3.75 in (9.5 cm) wide at the hem and 3.125 in (7.9 cm) tall, not counting the loop and clapper.
You’ll work the bell flat in rows from the top down. Each row adds one chain space, so the bell widens toward the hem. In every other row, fans replace some of the anchor stitches. After the rows, you’ll work a three-round border, then make the bow, loop and clapper and sew them on. Blocking with starch keeps the shape crisp.
Finished Size and Construction
- Finished size: 3.75 in (9.5 cm) wide × 3.125 in (7.9 cm) tall
- Skill level: Intermediate
- Terminology: US
- Yarn weight: Lace (0), size 10 crochet thread
- Hook: 1.75 mm (US steel 6)
- Number of pieces: 1 bell body, plus 3 small attachments (bow, hanging loop, clapper)
- Layout: single flat ornament, worked top-down in 8 rows
- Piece size before border: 3.25 in (8.3 cm) wide at the hem × 2.5 in (6.4 cm) tall
- Border depth: 0.25 in (0.6 cm) on the top and sides, 0.375 in (1.0 cm) at the hem
Materials
Use mercerized cotton size 10 thread for crisp stitch definition. For the gold, pick a metallic thread of similar thickness (size 10). A thicker metallic will crowd the fans.
- Cream: 8 g, about 25 m
- Gold metallic: 4 g, about 12 m
These quantities include a margin for the gauge test and tails.
Metallic thread can be springy and may untwist. Cut working lengths of about 1 yd (91.4 cm) for each section. Every few fans, let the thread hang so it can relax. Knot the cut ends lightly so they don’t fray before you weave them in.
Tools:
– 1.75 mm (US steel 6) hook
– Tapestry needle with a small eye
– Scissors
– Rustproof pins and a foam blocking board
– Fabric stiffener or spray starch
– Cream thread scraps for stuffing the clapper
Abbreviations (US Terms)
- ch – chain
- sc – single crochet
- dc – double crochet
- sl st – slip stitch
- rev sc – reverse single crochet (crab stitch)
- sc2tog – single crochet 2 together
- sk – skip
- st(s) – stitch(es)
- sp(s) – space(s), meaning any ch-3 or ch-5 space
- RS / WS – right side / wrong side
Special stitches
- Fan: 7 dc in the same space.
- Gold Fan (GF): Work the last ch before the fan in cream, but draw its final loop through with gold, leaving a 4 in (10.2 cm) gold tail. With gold, work 7 dc in the space. As you go, lay the cream strand and the gold tail along the top of the space and work over them. On the last yarn over of the 7th dc, draw through with cream. Cut the gold, leaving a 4 in (10.2 cm) tail to weave in later.
Gauge and Checkpoints
Gauge matters here because the scallop border depends on exact stitch counts and the bow is sized to the top.
Work Rows 1–4 first as your test, and measure at each stage:
- After Row 1: 1 in (2.5 cm) wide
- After Row 4: 2 in (5.1 cm) wide at the bottom edge, 1.25 in (3.2 cm) tall
- After Row 8: 3.25 in (8.3 cm) wide × 2.5 in (6.4 cm) tall
- Border gauge: 12 sc = 1 in (2.5 cm) along a straight edge
- After the border: 3.75 in (9.5 cm) × 3.125 in (7.9 cm)
To measure, lay the piece flat and gently ease the arches open without stretching them. Measure width across the bottom edge of the last row, from the outer edge of one corner loop to the other. Measure height straight down the center. Being off by 0.125 in (0.3 cm) is fine.
If Row 4 is more than 0.25 in (0.6 cm) too wide, change to a 1.5 mm hook. If it’s more than 0.25 in (0.6 cm) too narrow, change to a 2.0 mm hook. Don’t change the chain counts, because the stitch counts drive the border.
Bell Body
Work in cream unless a Gold Fan is called for. Turn at the end of every row. The ch 1 at the start of a row doesn’t count as a stitch.
Each row puts one anchor in every space of the row below, plus an extra anchor in the first and last spaces. That makes each row one space wider than the one before.
Keep your ch-5 arches relaxed and all the same size. The lattice only forms neat diamonds if every arch matches.
Row 1 (RS): Ch 14. Sc in 2nd ch from hook, [ch 5, sk 3 ch, sc in next ch] 3 times. Turn. (4 sc, 3 ch-5 arches)
Row 2 (top cream fan): Ch 1, (sc, ch 5, sc) in first arch, ch 3, Fan in next arch, ch 3, (sc, ch 5, sc) in last arch. Turn. (4 sc, 1 Fan, 4 sps: 2 ch-5 and 2 ch-3)
Row 3: Ch 1, (sc, ch 5, sc) in first sp, [ch 5, sc in next sp] 3 times, ch 5, sc in same sp. Turn. (6 sc, 5 ch-5 arches)
The ch-5 arch made over the Fan isn’t anchored to it. Instead, it frames the fan to make the diamond cell.
Row 4 (2 gold fans): Ch 1, (sc, ch 5, sc) in first arch, ch 3, GF in next arch, ch 3, sc in next arch, ch 3, GF in next arch, ch 3, (sc, ch 5, sc) in last arch. Turn. (5 sc, 2 GF, 6 sps: 2 ch-5 and 4 ch-3)
Checkpoint: 2 in (5.1 cm) wide and 1.25 in (3.2 cm) tall.
Row 5: Ch 1, (sc, ch 5, sc) in first sp, [ch 5, sc in next sp] 5 times, ch 5, sc in same sp. Turn. (8 sc, 7 ch-5 arches)
Row 6 (3 gold fans): Ch 1, (sc, ch 5, sc) in first arch, ch 3, [GF in next arch, ch 3, sc in next arch, ch 3] 2 times, GF in next arch, ch 3, (sc, ch 5, sc) in last arch. Turn. (6 sc, 3 GF, 8 sps: 2 ch-5 and 6 ch-3)
Row 7: Ch 1, (sc, ch 5, sc) in first sp, [ch 5, sc in next sp] 7 times, ch 5, sc in same sp. Turn. (10 sc, 9 ch-5 arches)
Row 8 (4 gold fans): Ch 1, (sc, ch 5, sc) in first arch, ch 3, [GF in next arch, ch 3, sc in next arch, ch 3] 3 times, GF in next arch, ch 3, (sc, ch 5, sc) in last arch. (7 sc, 4 GF, 10 sps: 2 ch-5 and 8 ch-3) Fasten off cream.
Checkpoint: 3.25 in (8.3 cm) wide × 2.5 in (6.4 cm) tall. Below the single cream fan, the gold fans should form rows of 2, 3 and 4. Each new fan should sit centered between the two fans above it.
Weave in all the gold tails now on the WS. Run them through the backs of the gold dc so they stay hidden.
Border
Border gauge: 12 sc = 1 in (2.5 cm). The side counts below do not include corners. Each corner gets its own 3-sc group, counted separately.
Rnd 1 (cream): With RS facing, join cream in the first ch-5 corner loop of Row 8.
- First hem corner: 3 sc in the corner loop.
- Hem: Across Row 8, work 1 sc in each ch-3 sp (8), 1 sc in each dc of each GF (28), and 1 sc in each of the 3 sc between the fans (3). Skip the sc beside each corner loop. (39 sc)
- Second hem corner: 3 sc in the last corner loop.
- First side: Work up the row ends of Rows 7 to 1. Work 4 sc in the end of each net row (Rows 7, 5, 3 and 1) and 5 sc in the end of each fan row (Rows 6, 4 and 2), because the fan rows sit slightly taller. (31 sc)
- Top: 3 sc in the first foundation ch (corner), sc in the next 11 ch, 3 sc in the last ch (corner).
- Second side: Work down Rows 1 to 7 the same way. (31 sc)
Join with sl st to the first sc. (124 sc: 39 + 31 + 11 + 31, plus 4 corners × 3)
Rnd 2 (cream, hem scallops): Sl st in the next sc, which is the center of the corner group. Ch 1, sc in the same st.
- Hem: [Sk 2, 5 dc in next st, sk 2, sc in next st] 7 times. The last sc lands in the center sc of the next hem corner.
- Side and top: Sc in the next st, then sc in each of the 31 side sts. Sc in the next st, 3 sc in the corner center sc, sc in the next st. Sc in each of the 11 top sts. Sc in the next st, 3 sc in the corner center sc, sc in the next st.
- Second side: Sc in each of the 31 side sts, then sc in the last st.
Join to the first sc. (85 sc on the sides and top, plus 7 scallops and 8 sc on the hem = 128 sts)
Why the math works: Each scallop repeat uses 6 sts. From one hem corner center to the next there are 43 sts: 1 center + 1 corner st + 39 hem sts + 1 corner st + 1 center. Since 43 = 1 + (7 × 6), you get exactly 7 scallops with a sc on each corner. The 4th scallop sits at the hem center, ready for the clapper.
Rnd 3 (gold): Join gold in any st on a side. Ch 1, rev sc in each st around. (128 rev sc) Join and fasten off.
Rev sc is worked from left to right (right-handed). Insert the hook under both loops of each stitch so the cord twists evenly. Keep the round relaxed over the scallops so they don’t cup.
Bow, Hanging Loop and Clapper
Bow (gold): Ch 46. Sl st in the back bump of the 2nd ch from hook and in each ch across. (45 sl st) The cord is about 4.5 in (11.4 cm) long. Tie it into a bow with two 0.5 in (1.3 cm) loops and short tails, about 1.25 in (3.2 cm) wide. Sew it to the top center over Rnd 3, tacking down the knot and both loops so they hold their shape.
Hanging loop (1 strand of cream and 1 strand of gold held together): Ch 30, about 3 in (7.6 cm). Fold it in half and sew both ends to the WS behind the bow, for a 1.5 in (3.8 cm) loop.
Clapper (cream):
- Rnd 1: 6 sc in a magic ring. (6)
- Rnd 2: 2 sc in each st. (12)
- Rnd 3: Sc in each st. (12)
- Rnd 4: Sc2tog 6 times. (6)
Stuff with cream scraps, close the opening and leave an 8 in (20.3 cm) tail. The ball is about 0.5 in (1.3 cm) across. Sew it to the WS behind the center dc of the 4th scallop so that it hangs just below the hem.
Final Blocking
- Mix the fabric stiffener following its label, or get your spray starch ready.
- Dip the bell (you can leave the clapper dry) and press out the extra liquid in a towel.
- Pin it flat on foam, RS up, to 3.75 in (9.5 cm) wide at the hem × 3.125 in (7.9 cm) tall.
- Pin each scallop point and each top shoulder so the outline stays smooth.
- Open each diamond cell with a pin so the gold fans spread evenly.
- Check that the sides are mirror images. Measure from the center line to each side at the same height.
- Shape the bow loops with a little stiffener.
- Let everything dry completely, ideally overnight, then unpin.
Final Quality-Control Checklist
- The fans sit in rows of 1 (cream), then 2, 3 and 4 (gold), each centered between the fans above it.
- Row 8 has 4 GF and 10 spaces.
- Rnd 1 has 124 sc, and Rnd 2 has exactly 7 scallops.
- The gold rev sc edge is even all the way around, with no puckers.
- The bow is centered, and the loop is secure behind it.
- The clapper hangs at the exact center of the hem.
- The bell measures 3.75 in (9.5 cm) × 3.125 in (7.9 cm).
- No tails show on either side.
Troubleshooting
Fans look crowded or ruffled: Your ch-3 spaces are too tight. Keep the chains loose, or go up a hook size.
Cream shows through the gold fans: Keep the carried strand flat along the top of the space, and snug each dc gently over it.
The bell curls: Your tension differs between the net and fan rows. Block firmly with stiffener.
The scallop count is off: Recount the hem in Rnd 1. There should be 39 sts between the corners.
The sides wave: Use 4 sc per net row end, not more.
The crab stitch flares: Use a hook 0.25 mm smaller for Rnd 3.
The diamonds look lopsided: Some arches are tighter than others. Count your chains, and try to keep the loop on your hook the same size every time.
Gold thread frays or splits: Work with shorter lengths, and don’t pull the metallic tight through the stitches.
Care
Hand wash in cool water with mild soap and lay flat to dry. If the bell softens, re-stiffen it and pin it again. Store it flat in tissue paper between seasons.
Final Notes
To recap the measurements: Row 1 is 1 in (2.5 cm) wide and Row 4 is 2 in (5.1 cm) wide. Row 8 measures 3.25 in (8.3 cm) × 2.5 in (6.4 cm). The border adds 0.25 in (0.6 cm) to the top and sides and 0.375 in (1.0 cm) to the hem, for a finished size of 3.75 in (9.5 cm) × 3.125 in (7.9 cm). If every checkpoint matches, the 124-stitch first border round gives you exactly 7 scallops. Make one for every branch, or tie one onto a special gift.
Happy crocheting!