

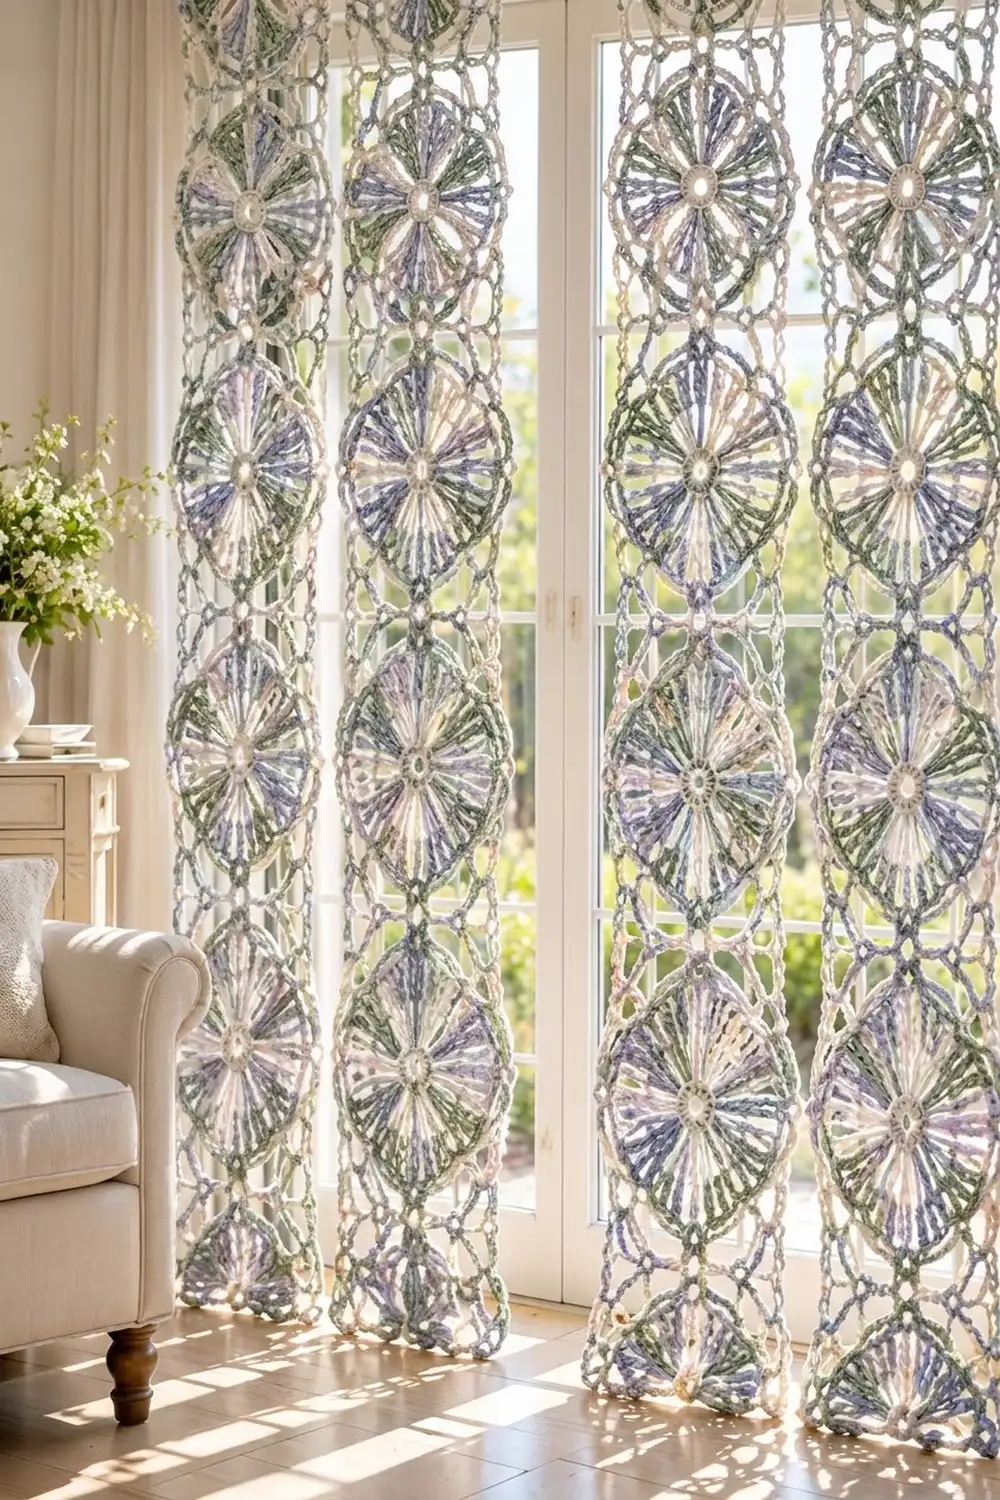
The Pastel Windrose Lace Curtain Panel is a sheer, airy panel built from on-point lace motifs. Each motif has a padded cream ring at the center and four fan petals around it. The petals are framed by a cream chain lattice and an outer ring of soft, multicolored chain loops. The motifs touch only at their points, so light comes through the diamond-shaped gaps between them.
The palette is quiet and garden-like. A cream yarn carries the center ring, spokes, frame, and border. A pastel variegated yarn in sage green, periwinkle blue, lavender, and cream carries the petals and outer loops, so every motif comes out slightly different.
This pattern uses US crochet terms. One finished panel measures 14.5 in (36.8 cm) wide by 77.5 in (196.9 cm) long after blocking and border. Make two panels for a pair.
For construction, you work 22 motifs in five rounds each and join them as you go in the last round, linking corner points only. The finished panel is 2 motifs wide and 11 motifs tall. A single round of cream border then finishes the zigzag outer edge.
Finished Size and Construction
- Finished panel size: 14.5 in x 77.5 in (36.8 cm x 196.9 cm)
- Skill level: Intermediate
- Terminology: US crochet terms
- Yarn weight: DK (weight 3) cotton or cotton blend
- Hook: 4.0 mm (US G-6)
- Number of pieces: 22 motifs per panel
- Layout: 2 columns x 11 rows, motifs set on point
- Motif size: 7 in (17.8 cm) point to point
- Size before border: 14 in x 77 in (35.6 cm x 195.6 cm)
- Border depth: 0.25 in (0.6 cm) on every edge
Materials
Choose a smooth, mercerized DK cotton for crisp stitch definition and good drape. Cotton blocks flat and hangs without stretching much. For Color B, pick a short-repeat pastel variegated yarn so the color changes land within each petal, not across whole motifs.
Quantities for one panel (based on 50 g / 110 m balls):
- Color A, Cream: 100 g, about 220 m
- Color B, Pastel Variegated (sage, periwinkle, lavender, cream): 100 g, about 220 m
For a pair of panels, double these amounts. All quantities include roughly a 15% safety margin for gauge swatching and weaving in ends.
Tools:
- 4.0 mm (US G-6) crochet hook
- Tapestry needle
- Stitch markers
- Scissors
- Rust-proof pins and a blocking surface (foam mats or a large towel-covered area)
- Spray bottle
- Measuring tape
- 3 curtain clip rings for hanging (optional)
Abbreviations (US Terms)
- ch – chain
- sl st – slip stitch
- sc – single crochet
- tr – treble crochet
- sp(s) – space(s)
- sc2tog – single crochet 2 together
- st(s) – stitch(es)
Special stitch: sc2tog across two loops. Insert the hook in the first loop, yarn over and pull up a loop. Insert the hook in the second loop, yarn over and pull up a loop. Yarn over and pull through all 3 loops on the hook. This is used only in the border, at the inner corners where motifs meet.
Gauge and Checkpoints
Make one complete test motif before starting the panel. Block it lightly and measure it. Every later measurement depends on this single number.
- After Round 1: ring is 1.25 in (3.2 cm) across
- After Round 2: 1.75 in (4.4 cm) across
- After Round 3: 4.5 in (11.4 cm) from fan tip to opposite fan tip
- After Round 4: 5.5 in (14.0 cm) across
- After Round 5: 7 in (17.8 cm) from point to point
A finished motif between 6.75 in (17.1 cm) and 7.25 in (18.4 cm) is acceptable. If your motif is larger, go down to a 3.75 mm hook. If it is smaller, go up to a 4.5 mm hook. A difference of 0.25 in (0.6 cm) per motif adds up to 2.75 in (7.0 cm) over 11 rows, so take the time to match gauge.
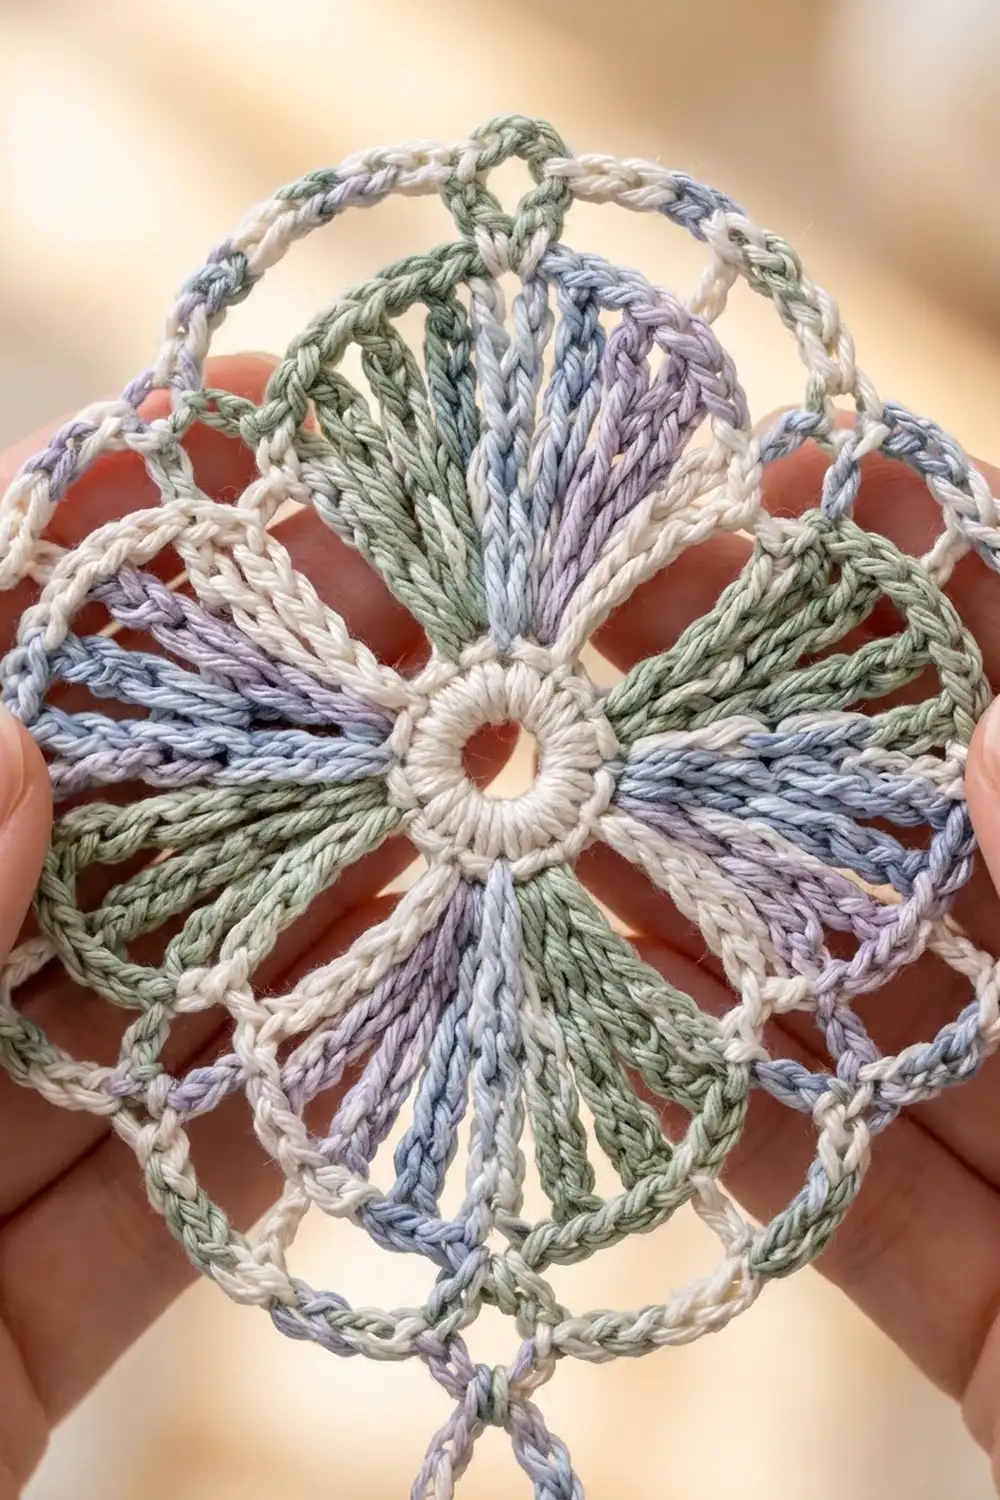
Motif (Make 22)
Hold the motif so that one fan points straight up. The four corner points of Round 5 sit above the four fan tips, at north, east, south, and west.
Round 1 (Color A): Ch 6, sl st to the first ch to form a ring. Ch 1, work 16 sc into the ring, sl st to the first sc. (16 sc)
Keep the ring firm but open. The center hole should stay about 0.5 in (1.3 cm) wide.
Round 2 (Color A): Ch 1, sc in the first sc, ch 5, skip 3 sc, sc in the next sc, ch 5, skip 3 sc 3 times, sl st to the first sc. (4 sc, 4 ch-5 sps)
Fasten off Color A. The 4 sc form the cream spokes, and the ch-5 spaces hold the fans.
Round 3 (Color B): Join Color B in any ch-5 sp. Ch 4 (counts as tr), work 10 tr in the same sp, ch 3, sc in the next sc, ch 3, 11 tr in the next ch-5 sp, ch 3, sc in the next sc, ch 3 3 times, sl st to the top of the beginning ch-4. (44 tr in 4 fans of 11, 4 sc, 8 ch-3 sps)
Fasten off. Each fan should open into a smooth half circle. The ch-3 sections on either side of each spoke make the V-shaped gaps between petals.
Round 4 (Color A): Join Color A in the first tr of any fan. Ch 1, sc in the same st, [ch 3, skip 1 tr, sc in the next tr] 5 times, ch 7, skip the ch-3, sc, and ch-3 between fans, sc in the first tr of the next fan 3 times, [ch 3, skip 1 tr, sc in the next tr] 5 times, ch 7, sl st to the first sc. (24 sc, 20 ch-3 sps, 4 ch-7 sps)
Fasten off. Each fan now has 6 sc and 5 ch-3 sps along its edge. The ch-7 bars bridge the gaps between fans. The 3rd (center) ch-3 sp of each fan is the corner for Round 5. Place a marker in each of these 4 center spaces.
Round 5 (Color B), first motif only: Join Color B with sc in any marked center ch-3 sp, ch 7, sc in the same sp (corner made). [Ch 5, sc in the next sp] 5 times, ch 5, (sc, ch 7, sc) in the next marked sp 3 times, [ch 5, sc in the next sp] 5 times, ch 5, sl st to the first sc. (28 sc, 24 ch-5 loops, 4 ch-7 corner loops)
Fasten off. Per-side count: each side runs from one corner loop to the next and holds exactly 6 ch-5 loops. The ch-7 corner loops are counted separately and are not part of either side. Here “per side” counts loops, not stitches.
Make All Pieces
Each panel needs 22 motifs. Work Rounds 1 to 4 on all 22 motifs first. Then work Round 5 with joins, following the layout below.
- Color A: Rounds 1, 2, and 4 on all 22 motifs, plus the border
- Color B: Rounds 3 and 5 on all 22 motifs
Layout (C = column, R = row, motifs on point):
      C1    C2
R1    M1    M2
R2    M3    M4
R3    M5    M6
R4    M7    M8
R5    M9    M10
R6    M11   M12
R7    M13   M14
R8    M15   M16
R9    M17   M18
R10   M19   M20
R11   M21   M22
Joining
Motifs are joined as you go, during Round 5, at corner points only. No side loops are joined. This keeps the open diamond gaps between motifs.
Joined corner: In place of (sc, ch 7, sc) in a marked sp, work (sc, ch 3, sl st in the matching ch-7 corner loop of the finished neighbor, ch 3, sc) in that sp.
The two ch-3 halves plus the sl st take up the same length as one ch-7 loop. That is why each motif still measures 7 in (17.8 cm) from point to point after joining.
Order of joins:
- M1: no joins.
- M2: join its west corner to the east corner of M1.
- M3, M5, and so on down Column 1: join the north corner to the south corner of the motif above.
- M4, M6, and so on down Column 2: join the north corner to the motif above, and the west corner to the motif on the left.
Each corner joins only once, so no point ever carries more than two motifs.
Tension advice: Keep the ch-3 joining chains the same tension as your ch-5 loops. A tight join makes the points pucker. A loose join lets the column sag when the panel hangs.
Size checkpoint: After Row 3, the panel should measure 14 in (35.6 cm) wide and 21 in (53.3 cm) long when laid flat. When all 11 rows are done, it should measure 14 in x 77 in (35.6 cm x 195.6 cm).
Border
Border gauge: 5 sc fill one ch-5 loop, and the round adds 0.25 in (0.6 cm) to every edge.
The outer edge is a zigzag. It has free points, where a corner loop is unjoined, and valleys, where two motifs meet. Along the outside of the panel there are 26 free points and 22 valleys.
Round 1 (Color A): Join Color A in the free north corner loop of M1. Work around the whole panel as follows:
- Each free corner loop: (3 sc, ch 3, 3 sc)
- Each ch-5 loop: 5 sc
- Each valley: work 4 sc in the last ch-5 loop before the junction, then sc2tog (first leg in that same loop, second leg in the first ch-5 loop of the next motif), then 4 sc in that next loop. Skip the joined corner loops entirely.
Sl st to the first sc and fasten off.
Counts per edge:
- Left edge (11 W points, 22 sides, 10 valleys): 22 x 6 = 132 loops x 5 = 660 sc, minus 10 for valleys = 650, plus 11 x 6 = 66 point sc = 716 sc and 11 ch-3 tips
- Right edge (11 E points, 22 sides, 10 valleys): 716 sc and 11 ch-3 tips
- Top edge (north points of M1 and M2, 2 sides, 1 valley): 2 x 6 = 12 loops x 5 = 60 sc, minus 1 = 59, plus 12 point sc = 71 sc and 2 ch-3 tips
- Bottom edge (south points of M21 and M22, 2 sides, 1 valley): 71 sc and 2 ch-3 tips
Total: 1,574 sc and 26 ch-3 tips.
Why the math works: Every exposed side holds exactly 6 loops because that is each motif’s own per-side count. The 48 exposed sides give 48 x 6 = 288 loops, or 1,440 sc. Each of the 22 valleys merges two stitches into one, giving 1,440 – 22 = 1,418 sc. The 26 free points add 6 sc each, so 1,418 + 156 = 1,574 sc. Nothing is added at the seams because the joined corner loops are skipped.
Final Blocking
- Weave in all ends along the chain loops of matching color before blocking.
- Lay the panel flat on foam mats or towels. Work in sections if your surface is shorter than 77.5 in (196.9 cm).
- Spray it evenly with water until it is damp but not dripping.
- Pin every free point, then every valley, measuring to 14.5 in (36.8 cm) wide.
- Pin down the length, checking that each motif is 7 in (17.8 cm) point to point and the total is 77.5 in (196.9 cm).
- Open each fan gently with your fingers so the tr stitches spread evenly.
- Let it dry completely before unpinning.
Final Quality-Control Checklist
- All 22 motifs have 4 fans of 11 tr each.
- Every motif side shows exactly 6 ch-5 loops.
- Each joined corner carries one sl st link, with no doubled joins.
- Columns hang straight with no twisted motifs.
- Border counts match: 716 sc per long edge, 71 sc per short edge, 26 tips.
- Panel measures 14.5 in x 77.5 in (36.8 cm x 196.9 cm).
- All ends are woven in and invisible from both sides.
Troubleshooting
- Fans cup or ruffle: Your tr are too tight or too loose for the ch-5 sp. Adjust the ch-5 in Round 2 to ch 4 or ch 6.
- Center hole closes up: Work Round 1 more loosely, or begin with ch 7.
- Points curl after blocking: Re-block with more water and pin each corner loop fully open.
- Panel is too long: Your loops are loose. Re-check gauge on a new motif and change hook size for the remaining motifs.
- Border ripples or pulls: Keep the 5-sc count, but loosen or tighten your tension. If that isn’t enough, work the border with a hook 0.5 mm smaller or larger.
- Color pooling in petals: Start Color B at a different point in the color repeat for each motif.
Care
Hand wash in cool water with mild soap and lay flat to dry, reshaping the points as needed. Avoid hanging the panel wet, because the weight will stretch the columns.
Final Notes
The measurement chain is simple. A 7 in (17.8 cm) motif with 6 loops per side builds a 14 in x 77 in (35.6 cm x 195.6 cm) grid of 2 by 11. The 0.25 in (0.6 cm) border brings the panel to 14.5 in x 77.5 in (36.8 cm x 196.9 cm). Check your first motif, and the rest will follow. Hang the panel with clip rings on the two top points and the top valley.
Happy crocheting!