

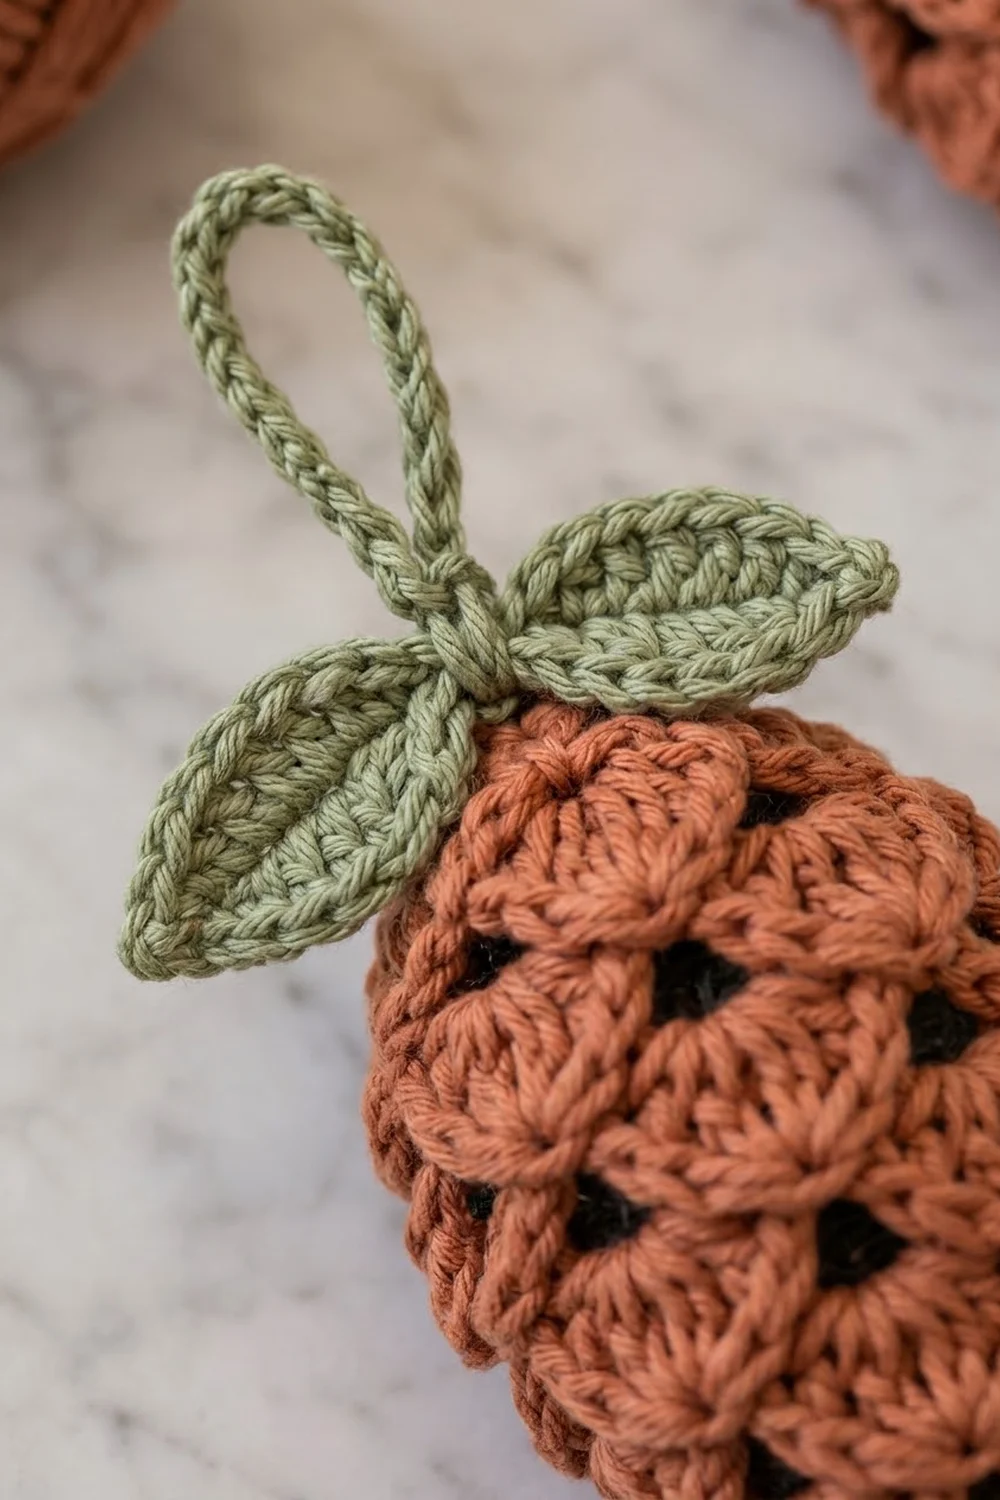
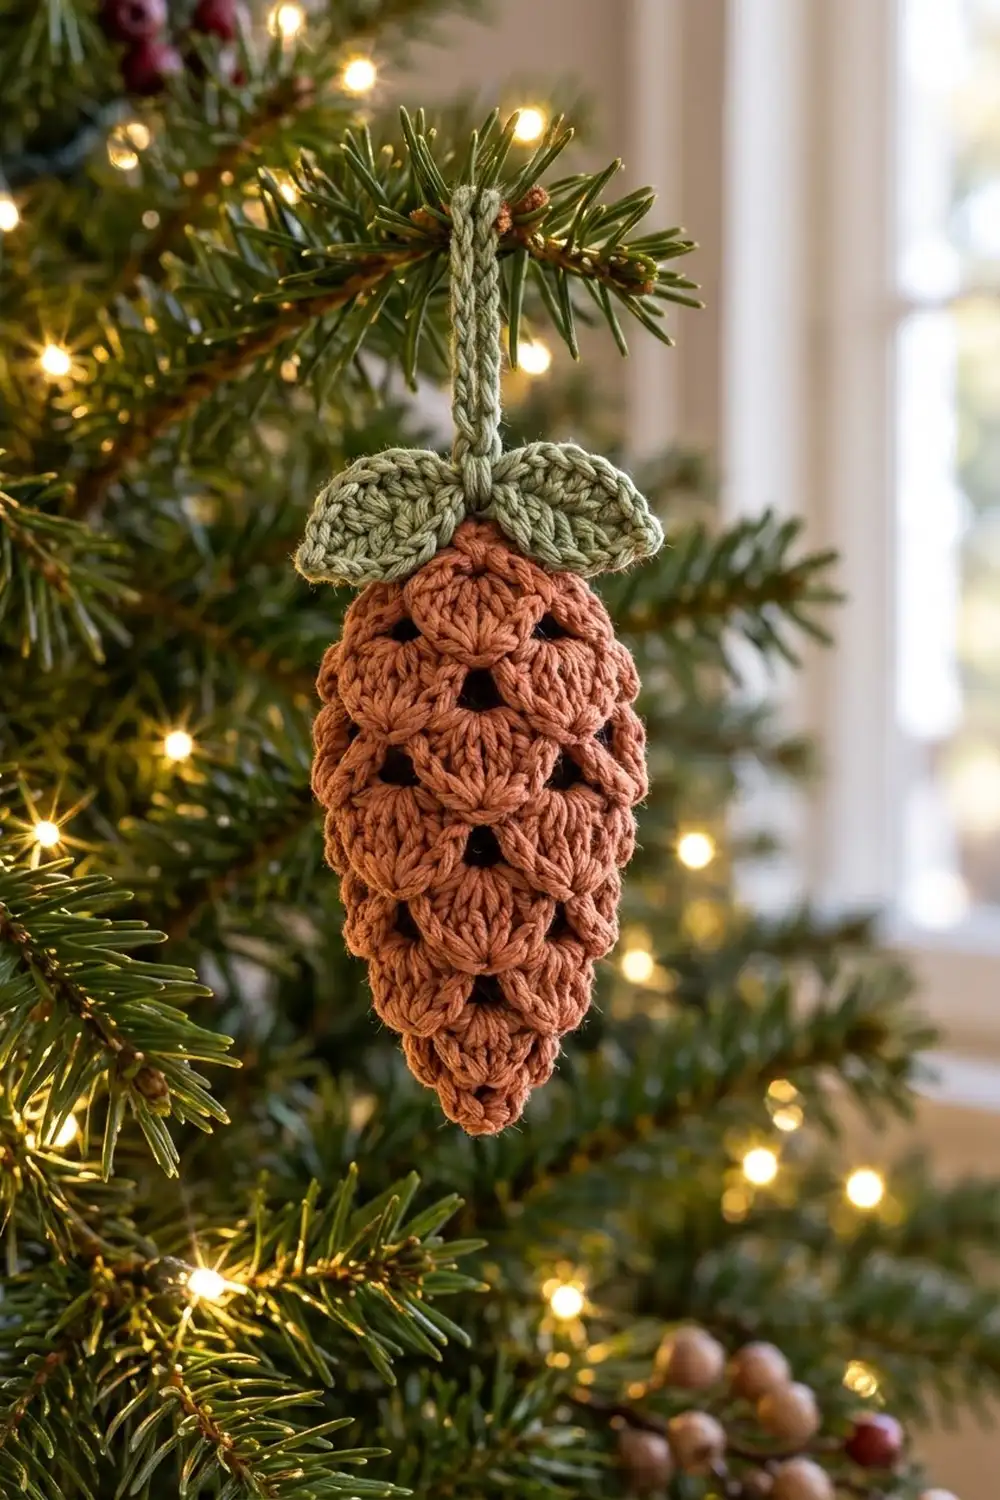
This little pinecone ornament has a warm terracotta body covered in overlapping fan-shaped scales. It hangs from a sage green twisted cord, with two small sage leaves sitting right at the top. Between the scales you get small open gaps that read as dark shadows, which gives it real depth on the tree.
The palette is just two colors: a rusty cinnamon terracotta and a soft sage green. It feels rustic and calm, and it suits a natural or farmhouse tree. One ornament uses so little yarn that cotton scraps are enough.
All instructions use US crochet terms. With the edging done, the body is 2.7 in (6.9 cm) wide and 4.0 in (10.2 cm) tall. Including the hanging loop, the whole ornament hangs 6.25 in (15.9 cm) long.
You start at the top with a foundation chain and work down in rows of 5-dc shells. Each row is offset by half a shell, which stacks the scales like a real pinecone. The last three rows step in to make the pointed tip. A single round of sc tidies the edge. Then you make two leaves and a slip-stitch cord and sew them to the top.
Finished Size and Construction
- Finished size: 2.7 in x 4.0 in (6.9 cm x 10.2 cm) body; 6.25 in (15.9 cm) total hanging length
- Skill level: Easy to intermediate
- Terminology: US crochet terms
- Yarn weight: DK (#3) cotton or cotton blend
- Hook: 3.0 mm (C/2-D/3)
- Number of pieces: 1 body, 2 leaves, 1 hanging cord (4 parts, sewn into one ornament)
- Layout: Single ornament; there are no motifs to join
- Body size before edging: 2.4 in x 3.7 in (6.1 cm x 9.4 cm)
- Edging depth: 0.15 in (0.4 cm) per side
- Leaf size: 1.25 in x 0.6 in (3.2 cm x 1.5 cm)
- Hanging loop: 2.25 in (5.7 cm) folded
Materials
Use a smooth DK cotton, either mercerized or matte. Cotton gives crisp shells and holds its scale shape on the tree. Acrylic is fine too, but it makes softer, rounder scales and the gaps between them close up a little. Pick a terracotta with some depth. A rust or cinnamon shade shows the shadows between the scales better than a pale peach.
- Color A, Terracotta (body and edging): 10 g / 24 m
- Color B, Sage Green (leaves and cord): 4 g / 10 m
These quantities already include a margin for your gauge check and weaving in ends.
Tools:
- 3.0 mm (C/2-D/3) crochet hook
- Tapestry needle
- Scissors
- Stitch marker
- Ruler or tape measure
- Blocking mat and rust-proof pins
- Spray bottle with water
Abbreviations (US Terms)
- ch – chain
- sl st – slip stitch
- sc – single crochet
- hdc – half double crochet
- dc – double crochet
- sk – skip
- st(s) – stitch(es)
- BL – back loop only
Special stitches:
- Shell: 5 dc in the same stitch. The 3rd dc is the center dc.
- Half shell: 3 dc in the same stitch. When it starts a row, ch 3 counts as the first dc, so you work ch 3 + 2 dc.
Gauge and Checkpoints
The body is small, so the body itself is your gauge test. Work Rows 1–4, then measure before going on.
- Shell repeat (1 shell + 1 sc = 6 sts): 0.75 in (1.9 cm) wide
- Row height (one shell row): 0.5 in (1.3 cm)
Checkpoints:
- After Row 1: width is 2.4 in (6.1 cm)
- After Row 4: height is 2 in (5.1 cm)
- After Row 7: height is 3.5 in (8.9 cm)
- After Row 8: height is 3.7 in (9.4 cm)
- After the edging: 2.7 in x 4.0 in (6.9 cm x 10.2 cm)
If your piece is too big: go down to a 2.75 mm hook. Keep the foundation chain firm and even, because a loose chain makes the top edge flare.
If your piece is too small: go up to a 3.25 mm hook. Pull each dc up to its full height.
A difference of 0.1 in (0.3 cm) is fine. Blocking will even it out.
Body
Use Color A. The body is worked from the top down in turned rows. The shells always open downward, so the rounded edge of each scale overlaps the row below.
Foundation: Ch 20.
Row 1 (3 shells): Sc in 2nd ch from hook, sk 2 ch, shell in next ch, sk 2 ch, sc in next ch; repeat from * 2 more times. Turn.
(19 sts: 3 shells + 4 sc)*
Row 2 (2 shells + 2 half shells): Ch 3 (counts as dc), 2 dc in first sc (half shell made), sc in center dc of next shell, shell in next sc, sc in center dc of next shell, shell in next sc, sc in center dc of last shell, 3 dc in last sc. Turn.
(19 sts: 3 + 1 + 5 + 1 + 5 + 1 + 3)
Row 3 (3 shells): Ch 1, sc in first dc, sk next 2 dc, shell in next sc, sc in center dc of next shell, shell in next sc, sc in center dc of next shell, shell in next sc, sk next 2 dc, sc in top of turning ch-3. Turn.
(19 sts: 3 shells + 4 sc)
Row 4: Repeat Row 2. (19 sts)
Checkpoint: the body is 2.4 in (6.1 cm) wide and 2 in (5.1 cm) tall.
Row 5: Repeat Row 3. (19 sts)
That finishes the straight upper part, with five tiers of offset scales. Place a stitch marker on the side facing you so you can find the right side later. Either side can be the front, so pick the one with the neater shells.
Row 6 (taper, 2 shells): Sl st in first 3 sts (the sc and the first 2 dc of the first shell), ch 1, sc in next st (the center dc), shell in next sc, sc in center dc of next shell, shell in next sc, sc in center dc of last shell. Leave the last 3 sts unworked. Turn.
(13 sts: 2 shells + 3 sc)
Row 7 (taper, 1 shell): Sl st in first 3 sts, ch 1, sc in next st (center dc), shell in next sc, sc in center dc of last shell. Leave the remaining sts unworked. Turn.
(7 sts: 1 shell + 2 sc)
Checkpoint: height is 3.5 in (8.9 cm).
Row 8 (tip): Ch 1, sc in first sc, sk 2 dc, 3 dc in center dc, sk 2 dc, sc in last sc. Do not turn and do not fasten off.
(5 sts: 3 dc + 2 sc)
Checkpoint: height is 3.7 in (9.4 cm). The tip comes to a soft point.
On each tapered row, starting with slip stitches and ending at a center dc moves the edge in by half a shell. Rows 5–7 drop from 3 shells to 2 to 1, and Row 8 makes a smaller fan for the tip.
Edging
Keep working with Color A, with the right side of Row 8 facing you.
Edging gauge: Along the sides, work 2 sc per shell-row end, which is 4 sc per 1 in (2.54 cm). Across the top, work 1 sc per foundation chain, which is 19 sc over 2.4 in (6.1 cm).
Edging round: Ch 1, then work around the body in this order:
- Side A (15 sc): Work along the row ends up to the top. Work 1 sc in the end of Row 8, then 2 sc in the end of each of Rows 7 to 1. On the stepped edges of Rows 6–7, spread the 2 sc across the slip-stitch edge. (1 + 14 = 15 sc)
- Top (23 sc): Work into the underside of the foundation chain. Work 3 sc in the first ch (corner), 1 sc in each of the next 17 ch, and 3 sc in the last ch (corner). (19 sc worked 1 per ch + 4 extra corner sc = 23 sc)
- Side B (15 sc): Work down the other side. Work 2 sc in the end of each of Rows 1 to 7, then 1 sc in the end of Row 8. (14 + 1 = 15 sc)
- Tip (7 sc): Work across the Row 8 sts: sc in the sc, sc in the next dc, 3 sc in the center dc, sc in the next dc, sc in the last sc. (5 sc worked 1 per st + 2 extra = 7 sc)
Sl st to the first sc. Fasten off.
(Total: 15 + 23 + 15 + 7 = 60 sc)
Why the math works: A shell row is about 0.5 in (1.3 cm) tall, and 2 sc fill that height without ruffling. Row 8 is shorter because it starts and ends with sc, so its end gets just 1 sc. That gives each side 7 x 2 + 1 = 15. The top has exactly one sc per foundation chain, so it can’t stretch, and the 4 extra sc only turn the corners. The 3-sc group at the tip keeps the point sharp. The edging adds 0.15 in (0.4 cm) on each side. That brings the width from 2.4 in (6.1 cm) to 2.7 in (6.9 cm) and the height from 3.7 in (9.4 cm) to 4.0 in (10.2 cm).
Leaves (Make 2)
Use Color B.
Rnd 1: Ch 8. Starting in 2nd ch from hook, work: sc, hdc, dc, dc, hdc, sc (6 sts). Work 3 sc in the last ch (leaf base). Rotate and work along the underside of the chain: sc, hdc, dc, dc, hdc, sc (6 sts). Ch 2, sl st in 2nd ch from hook (pointed tip), then sl st to the first sc.
(15 sts + tip point)
Rnd 2 (outline): Sl st in BL of each st around, working (sl st, ch 1, sl st) at the tip point. Fasten off, leaving a 6 in (15.2 cm) tail.
(15 sl st + tip)
Each leaf is a pointed oval about 1.25 in (3.2 cm) long and 0.6 in (1.5 cm) wide. The BL outline gives it a neat raised rim. If you’d like a center vein, use the tail to surface sl st from the base to the tip.
Hanging Cord
Use Color B.
Ch 33. Sl st in the back bump of the 2nd ch from hook and in each ch across. (32 sl st)
Fasten off, leaving an 8 in (20.3 cm) tail. The cord is about 4.5 in (11.4 cm) long.
Assembly
- Fold the cord in half and twist it 3–4 times so the two strands wrap around each other. The folded loop is 2.25 in (5.7 cm) long.
- Sew both cord ends to the center of the top edging, about 0.2 in (0.5 cm) apart.
- Lay the leaves over the cord ends with their bases together, so they form a shallow V that angles up and out. Let them overlap the top edging by about 0.3 in (0.8 cm).
- Sew each leaf base through all layers with 3–4 small stitches. Tack each leaf at its widest point so it lies flat.
- Weave in all ends on the back.
Final Blocking
- Spray the ornament lightly so it’s damp, not soaked.
- Lay it face up on the blocking mat.
- Pin the top corners 2.7 in (6.9 cm) apart, and pin the tip 4.0 in (10.2 cm) below the top edge.
- Use your fingertips to round each shell into a fan and open the gaps between the scales.
- Pin each leaf tip so it angles slightly outward.
- Let it dry completely, about 4–6 hours, before unpinning.
Final Quality-Control Checklist
- The body measures 2.7 in x 4.0 in (6.9 cm x 10.2 cm)
- Rows 1–5 have 19 sts each, Row 6 has 13, Row 7 has 7, and Row 8 has 5
- Every shell has exactly 5 dc and sits centered on the sc below
- The edging totals 60 sc: 15 + 23 + 15 + 7
- Both leaves are the same size, 1.25 in (3.2 cm) long
- The loop is 2.25 in (5.7 cm) long and hangs straight
- All ends are woven in securely on the back
Troubleshooting
Scales look flat or ruffled: You probably missed a center dc or worked into the wrong stitch. Count 5 dc in every shell, and check that each sc goes into the 3rd dc.
Top edge flares: The foundation chain is too loose. Redo it with a smaller hook, and make sure you work exactly 1 sc per ch in the edging.
Tip is crooked: The slip stitches on Rows 6–7 weren’t matched on both sides. Leave exactly 3 sts unworked at the end of each tapered row.
Sides pucker after the edging: You worked fewer than 2 sc into some shell-row ends. Rework the edging with 15 sc per side.
Gaps look too small: The dc are too short. Pull each one up to its full height, or go up 0.25 mm in hook size.
Leaves curl: Block them flat, or loosen your tension on the BL outline round.
Ornament hangs tilted: The cord is off center. Re-sew it at the middle stitch of the top edge.
Care
Hand wash in cool water with mild soap, roll it in a towel to press out the water, and dry flat. Store it flat or hanging so the scales keep their shape.
Final Notes
The measurements build in a short, easy chain. One shell repeat is 0.75 in (1.9 cm) wide. Three repeats plus an edge sc make the 2.4 in (6.1 cm) width. Seven shell rows add 0.5 in (1.3 cm) each, and the tip row brings the height to 3.7 in (9.4 cm). The 0.15 in (0.4 cm) edging all around takes the body to 2.7 in x 4.0 in (6.9 cm x 10.2 cm). With the 2.25 in (5.7 cm) loop, the ornament is 6.25 in (15.9 cm) long overall. Make one, check it against these numbers, then make a whole set for the tree.
Happy crocheting!