

The Frosted Leaf Tree is a lacy, triangular Christmas tree ornament with a raised leaf spray at its heart. A single top leaf and two pairs of side leaves climb a slender stem. Four larger leaves fan out to the left and right from a small center ring. Open chain mesh links every leaf tip to a crisp double-line frame, and a small ribbed trunk and a sturdy hanging loop finish the tree.
The samples are worked in soft cornflower blue and in creamy white. Each ornament uses one color only, so the pattern is the same for both. The look is light and vintage, a little like Irish lace. The leaves stand up from the mesh with a clear center vein.
This pattern uses US crochet terms. The finished triangle measures about 4.25 in (10.8 cm) across the base and 5 in (12.7 cm) tall. With the trunk and hanging loop, the ornament is about 6.45 in (16.4 cm) tall overall.
The ornament is worked continuously as one single piece. First you crochet the leaf spray around a center ring. Next, two rounds of chain mesh pull the outline into a triangle, and two border rounds make the frame. Last, you add the trunk sideways off the base and the hanging loop at the top.
Finished Size and Construction
- Finished size: triangle 4.25 in (10.8 cm) at the base x 5 in (12.7 cm) tall; 6.45 in (16.4 cm) tall including trunk and loop
- Skill level: Intermediate
- Terminology: US crochet terms
- Yarn weight: Size 3 mercerized cotton crochet thread (fingering weight)
- Hook: 2.25 mm (US B-1)
- Number of pieces: 1
- Layout: one triangular ornament, point up, with the trunk centered on the base
- Piece size before border: about 3.75 in (9.5 cm) at the base x 4.5 in (11.4 cm) tall
- Border depth: 2 rounds, about 0.25 in (0.6 cm)
- Trunk: about 0.85 in (2.2 cm) wide x 0.7 in (1.8 cm) tall
- Hanging loop: about 0.75 in (1.9 cm) tall
Materials
Choose a smooth, tightly plied mercerized cotton. It shows the leaf veins clearly, blocks to sharp corners and does not get fuzzy on the tree. Avoid fluffy or splitty fibers, which hide the mesh.
Yarn (one ornament, one color):
– Cornflower blue or creamy white: 8 g, about 24 m (26 yd)
To make one ornament in each color as shown, get 8 g of each color.
These amounts include a margin of about 20 percent for your gauge swatch and for weaving in ends.
Tools:
– 2.25 mm (US B-1) crochet hook
– Tapestry needle with a small eye
– 2 locking stitch markers
– Scissors
– Blocking mat or folded towel
– Rustproof pins
– Spray bottle with water
– Optional: fabric stiffener or diluted white glue
Abbreviations (US Terms)
- ch – chain
- sl st – slip stitch
- sc – single crochet
- hdc – half double crochet
- dc – double crochet
- rev sc – reverse single crochet (crab stitch)
- BLO – back loop only
- sp – space
- st(s) – stitch(es)
Special stitches
Ribbed Leaf (RL): Ch 9.
– Side 1: Skip the last ch made (the tip ch). Sc in next ch, hdc in next ch, dc in next 4 ch, hdc in next ch, 3 sc in the last ch at the base (10 sts).
– Side 2: Rotate and work into the free loops of the same chains, back toward the tip: hdc, dc in next 4, hdc, sc (7 sts).
– Tip: (sc, ch 2, sc) in the skipped tip ch, then sl st in the first sc of Side 1.
– Vein: Work 8 surface sl sts down the center line of the leaf to get back to the base.
One RL is 19 sts plus a ch-2 tip. It measures about 1 in (2.5 cm) long and 0.5 in (1.3 cm) wide.
Large Ribbed Leaf (LRL): Ch 11. Work it like the RL, but with dc in the next 6 ch on each side.
– Side 1: sc, hdc, 6 dc, hdc, 3 sc (12 sts)
– Side 2: hdc, 6 dc, hdc, sc (9 sts)
– Tip: (sc, ch 2, sc)
– Vein: 10 surface sl sts
One LRL is 23 sts plus a ch-2 tip, about 1.25 in (3.2 cm) long.
The surface sl st vein makes the raised center ridge. The tall dc posts angle toward the vein, which gives the ribbed look.
Gauge and Checkpoints
Gauge: 14 sc and 16 rows = 2 in (5.1 cm) square, or 7 sc = 1 in (2.5 cm).
Make one ornament and check it at each stage before you make a set. Lace stretches, so measure it flat and unpinned while you work. Pin it only for the final blocking.
- After the spray: about 2.75 in (7.0 cm) from the top leaf tip to the bottom of the ring, and about 3 in (7.6 cm) between the tips of the two lowest leaves.
- After Mesh Round 1: about 3.25 in (8.3 cm) wide and 3.25 in (8.3 cm) tall.
- After Mesh Round 2: about 3.75 in (9.5 cm) at the base x 4.5 in (11.4 cm) tall.
- After Border Round 1: the base edge of 28 sc measures 4 in (10.2 cm), and each slanted side of 36 sc measures about 5.1 in (13.0 cm).
- After Border Round 2: 4.25 in (10.8 cm) at the base x 5 in (12.7 cm) tall.
Too big? Go down to a 2.0 mm hook, or chain the loops more tightly. Too small? Go up to a 2.5 mm hook. If any checkpoint is off by more than 0.25 in (0.6 cm), the difference will carry through to the end, so fix it early.
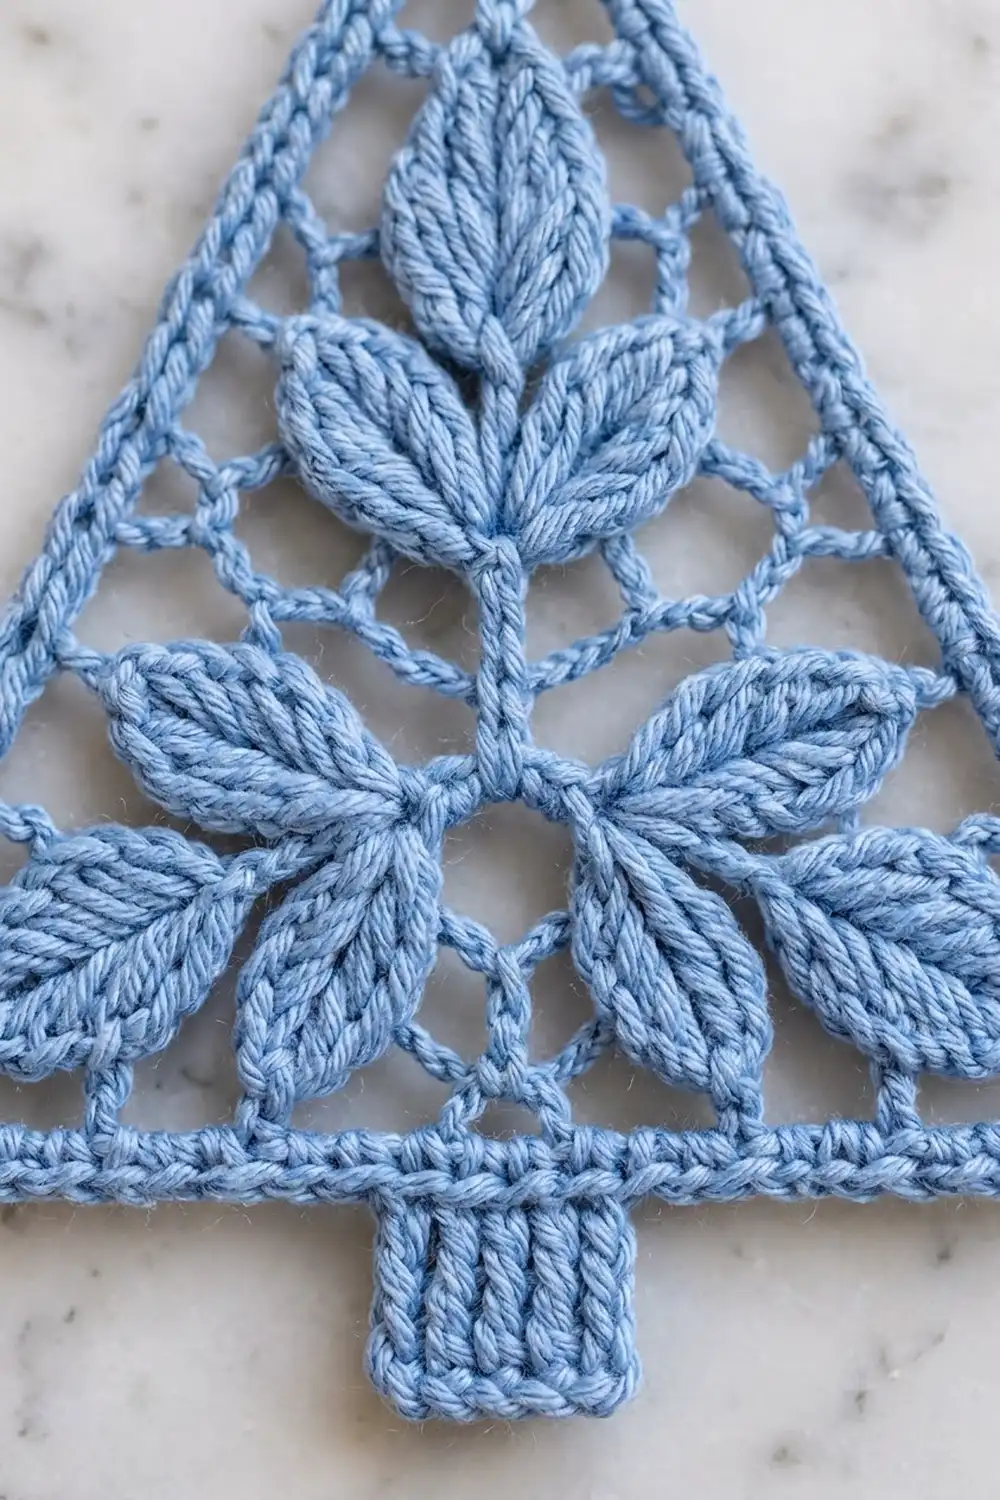
Leaf Spray
Ring: Ch 4, sl st in first ch to form a ring.
Spray round: Ch 1, sc in ring, LRL (Leaf A), sc in ring, LRL (Leaf B), sc in ring, work the Stem (below), sc in ring, LRL (Leaf C), sc in ring, LRL (Leaf D), sc in ring, sl st in first sc.
Count: 6 sc in the ring, 4 large leaves, and 1 stem with 5 small leaves.
Stem (worked as part of the spray round):
1. Ch 15 for the stem.
2. Work an RL at the end of the stem (the top leaf).
3. Sl st in each of the next 5 stem ch.
4. [RL, sl st in the same stem ch] twice (first leaf pair).
5. Sl st in each of the next 5 stem ch.
6. [RL, sl st in the same stem ch] twice (second leaf pair).
7. Sl st in each of the last 5 stem ch to get back to the ring.
That is 15 sl sts back down the 15-ch stem, with 5 RLs in total.
Leaves A and D point down and outward. Leaves B and C sit beside the stem and point outward. Press each leaf into position with your fingers now. The 1st and 6th sc of the ring sit at the bottom center of the spray. This point is called the hub bottom. Fasten off.
Mesh
The mesh is anchored in the 9 leaf tips and the hub bottom. It then reshapes the outline into a triangle.
Mesh Round 1: Join with sc in the ch-2 tip of the top leaf (T). Work clockwise:
– ch 5, sc in the tip of the right upper small leaf
– ch 5, sc in the tip of the right lower small leaf
– ch 7, sc in the tip of Leaf B
– ch 7, sc in the tip of Leaf A
– ch 9, sc in the hub bottom sc
– ch 9, sc in the tip of Leaf D
– ch 7, sc in the tip of Leaf C
– ch 7, sc in the tip of the left lower small leaf
– ch 5, sc in the tip of the left upper small leaf
– ch 5, sl st in first sc
Count: 10 sc and 10 loops (4 ch-5, 4 ch-7, 2 ch-9), using 66 ch.
Mesh Round 2: Sl st in the first ch-5 loop (the loop from T to the right upper leaf).
1. Right side: sc in this loop, ch 5, sc in same loop; [ch 5, sc in next loop, ch 5, sc in same loop] 3 times; ch 5, sc in the Round 1 sc at the tip of Leaf A. (8 ch-5 loops)
2. Right base corner: ch 7, sc in the next (ch-9) loop. (1 ch-7 loop)
3. Base: [ch 5, sc in same loop] twice; ch 5, sc in the hub bottom sc; ch 5, sc in the next ch-9 loop; [ch 5, sc in same loop] twice. (6 ch-5 loops)
4. Left base corner: ch 7, sc in the Round 1 sc at the tip of Leaf D. (1 ch-7 loop)
5. Left side: [ch 5, sc in next loop, ch 5, sc in same loop] 4 times. (8 ch-5 loops)
6. Top corner: ch 7, sl st in first sc. (1 ch-7 loop)
Count: 25 sc and 25 loops. That is 22 ch-5 loops (8 + 6 + 8) and 3 ch-7 corner loops. Do not fasten off.
Border
Border gauge: 7 sc = 1 in (2.5 cm). Each ch-5 loop takes 4 sc. Four sc span about the same width as a relaxed ch-5 loop at this gauge. Five sc would make the edge ruffle, and three would make it cup.
In this pattern, a side count means the stitches between two corner spaces. The corner ch spaces are not counted as stitches.
Border Round 1: Sl st in the next ch-5 loop (the first right-side loop). Ch 1, 4 sc in the same loop, 4 sc in each of the next 7 loops, (2 sc, ch 2, 2 sc) in the corner loop, 4 sc in each of the 6 base loops, (2 sc, ch 2, 2 sc) in the corner loop, 4 sc in each of the 8 left-side loops, (2 sc, ch 2, 2 sc) in the top corner loop, sl st in first sc.
Counts per side:
– Right side: 2 + (8 x 4) + 2 = 36 sc
– Base: 2 + (6 x 4) + 2 = 28 sc
– Left side: 2 + (8 x 4) + 2 = 36 sc
– Total: 100 sc and 3 corner ch-2 sps
Check: 22 loops x 4 = 88, plus 3 corners x 4 = 12, gives 100.
Border Round 2: Ch 1. Working from left to right, rev sc in each sc around, and work (rev sc, ch 1, rev sc) in each corner ch-2 sp. Sl st in first rev sc. Fasten off.
Counts per side:
– Right side: 36 + 2 = 38 rev sc
– Base: 28 + 2 = 30 rev sc
– Left side: 36 + 2 = 38 rev sc
– Total: 106 rev sc and 3 corner ch-1 sps
Why the math works: each corner adds exactly one stitch to each end of every side. Both slanted sides stay equal, so the triangle stays symmetrical. The base of 30 rev sc measures about 4.25 in (10.8 cm). The 38-st sides measure about 5.4 in (13.7 cm), which gives a height of about 5 in (12.7 cm).
Trunk
The trunk is worked sideways, so the BLO ridges run up and down like bark.
Count the 30 base rev sc starting from the right base corner. The trunk uses sts 13 through 18, which leaves 12 sts on each side.
- Row 1: Join with sl st in st 13, ch 6, sc in 2nd ch from hook and in next 4 ch. (5 sc)
- Row 2: Ch 1, turn, sc BLO in each sc across, sl st in sts 14 and 15. (5 sc)
- Row 3: Turn, sc BLO in each sc across. (5 sc)
- Row 4: Ch 1, turn, sc BLO in each sc across, sl st in sts 16 and 17. (5 sc)
- Row 5: Turn, sc BLO in each sc across. (5 sc)
- Row 6: Ch 1, turn, sc BLO in each sc across, sl st in st 18. (5 sc)
- Row 7: Turn, sc BLO in each sc across. (5 sc) Fasten off.
The 7 rows cover the 6 base sts. The trunk is about 0.85 in (2.2 cm) wide and 0.7 in (1.8 cm) tall.
Hanging Loop
Join with sl st in the top corner ch-1 sp. Ch 14, sl st in the same sp. Turn, work 20 sc into the ch-14 loop, then sl st in the top corner sp. Fasten off. The loop is about 0.75 in (1.9 cm) tall and firm enough to hold its teardrop shape.
Final Blocking
- Weave in all ends through the backs of the frame stitches, not through the mesh, so they stay hidden.
- Soak the ornament in cool water for 10 minutes, then roll it in a towel to remove extra water.
- Pin the three corners first, so the base is 4.25 in (10.8 cm) and the height is 5 in (12.7 cm).
- Pin along each side every 0.5 in (1.3 cm) to keep the edges straight.
- Open each mesh loop with a pin. Shape every leaf so its vein runs straight and its tip points into its mesh anchor.
- Pin the trunk square and the loop into a teardrop.
- For extra crispness, brush on fabric stiffener before it dries.
- Let it dry completely, at least 12 hours, before you remove the pins.
Final Quality-Control Checklist
- Base 4.25 in (10.8 cm) and height 5 in (12.7 cm), within 0.125 in (0.3 cm)
- Both slanted sides the same length
- Border Round 2 counts: 38 / 30 / 38 rev sc
- All 9 leaves have a straight raised vein
- Every mesh loop open and evenly sized
- Corners sharp, not rounded
- Trunk centered, with 12 sts on each side
- Loop firm and centered on the top point
- No ends showing
Troubleshooting
Leaves curl or twist: your chains are tighter than your stitches. Chain more loosely, or use a hook 0.25 mm larger for the leaf chains only.
Triangle leans to one side: recount Mesh Round 2. Each slanted side must have exactly 8 ch-5 loops.
Edges ruffle: some loops have more than 4 sc. Recount Border Round 1 against 36 / 28 / 36.
Edges cup inward: your ch-5 loops are too long. Chain more firmly. If your gauge is otherwise correct, you can work 4 hdc instead of 4 sc in each loop.
Corners look rounded: check that each corner has (2 sc, ch 2, 2 sc) in Border Round 1, and pin the corners tightly when blocking.
Trunk too wide or too narrow: keep exactly 7 rows on 6 base sts, and press the trunk flat when blocking.
Care
Hand wash in cool water with mild soap, roll in a towel and dry flat, pinning again if needed. Store the ornament flat in tissue paper between seasons.

Final Notes
Here is the measurement chain from start to finish:
– The spray measures 2.75 in (7.0 cm) from the top leaf tip to the ring.
– The mesh reshapes it to 3.75 in (9.5 cm) x 4.5 in (11.4 cm).
– Border Round 1 has 36 / 28 / 36 sc.
– The finished crab-stitch edge has 38 / 30 / 38 sts and measures 4.25 in (10.8 cm) x 5 in (12.7 cm).
Add the 0.7 in (1.8 cm) trunk and the 0.75 in (1.9 cm) loop, and the ornament is 6.45 in (16.4 cm) tall. Check each stage, and every tree in your set will match.
Happy crocheting!