

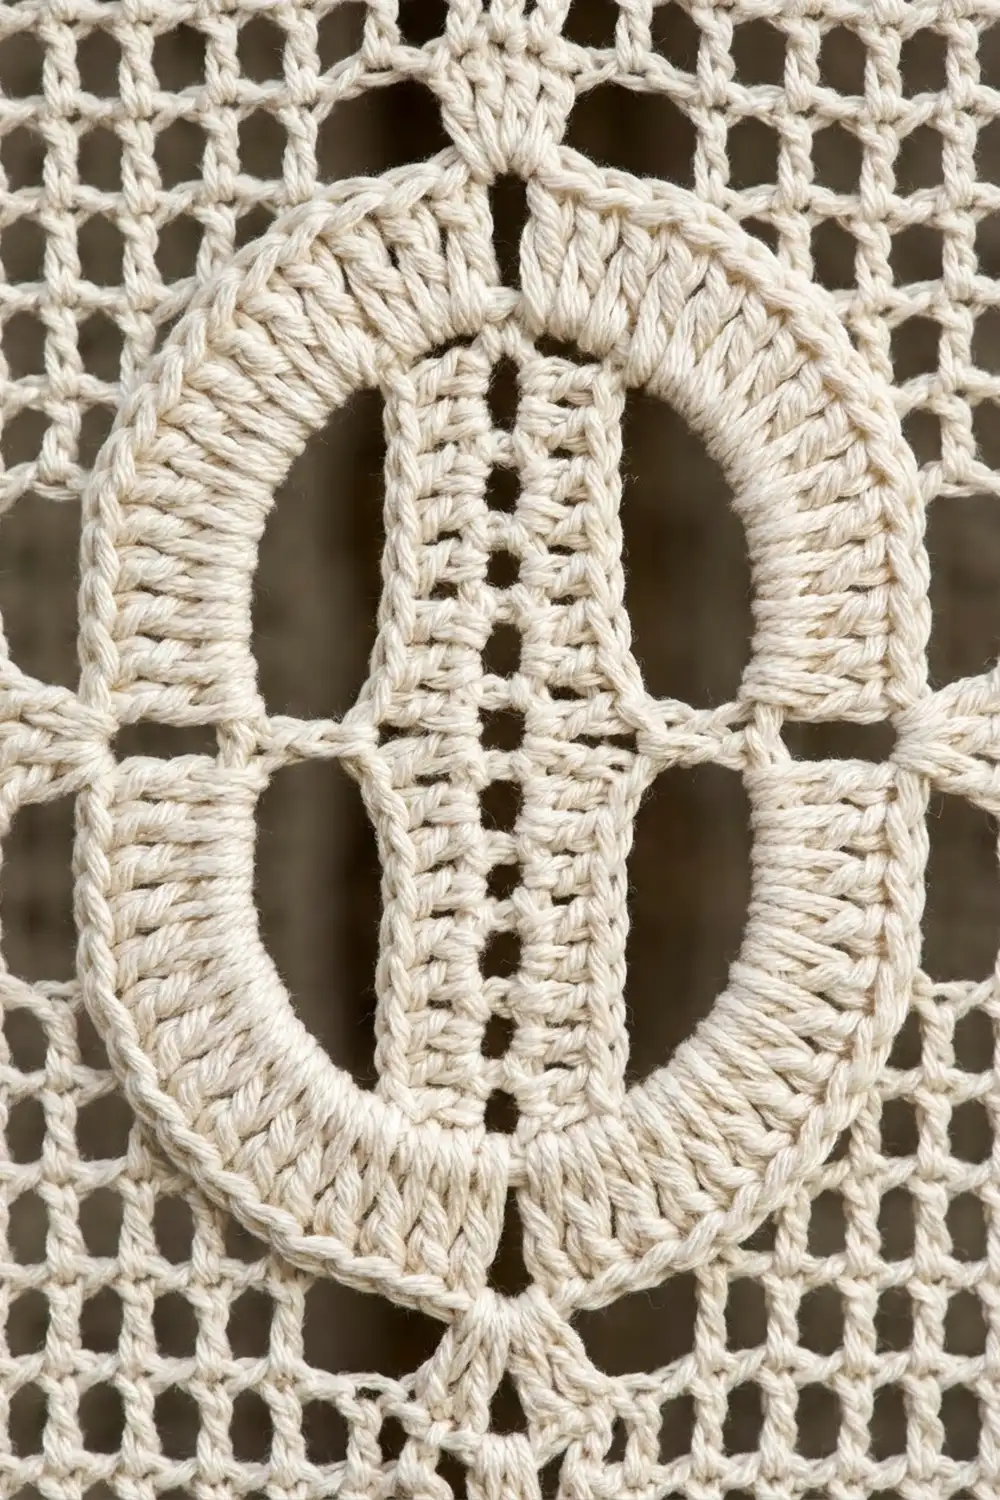
These curtains are made from long, narrow filet crochet strips in two colors: natural cream and deep navy. Down the center of each strip runs a chain of linked ovals. Each oval is a thick ring of solid blocks with a dotted spine inside, and the ovals meet at small cross-shaped links. Solid vertical frame lines run along both long edges. The cream strips are worked in one color. The navy strips have the ovals worked in cream with intarsia, so each strip is the reverse of its neighbor.
The style is simple, graphic, and a little rustic. It suits linen, wood, and plaster interiors. Light comes through the open mesh, and the solid blocks show the motif against it.
This pattern uses US crochet terms. One finished strip measures 8.9 in x 84.9 in (22.6 cm x 215.6 cm). Each curtain panel has four strips hung side by side, for a 35.6 in (90.4 cm) wide panel. The set shown is a pair of panels, so you will make eight strips.
Each strip is worked flat in rows of standard filet mesh, from the bottom up. You work a solid band, a frame row, twelve oval repeats, a closing link, another frame row, and a solid top band. Then you add a two-round single crochet border, block the strip, and attach wooden rings for hanging. The strips are not sewn to each other.
Finished Size and Construction
- Finished strip size: 8.9 in x 84.9 in (22.6 cm x 215.6 cm)
- Skill level: Intermediate (filet mesh plus simple intarsia)
- Terminology: US
- Yarn weight: Fingering / #1 super fine mercerized cotton
- Hook: 2.75 mm (US C-2)
- Number of pieces: 8 strips (4 cream, 4 navy) for two panels of 4 strips each
- Layout: Strips hang side by side from rings and are not joined
- Strip size before border: 8.4 in x 84.4 in (21.3 cm x 214.4 cm), which is 21 squares x 211 rows
- Border depth: 0.25 in (0.6 cm) on every side
- Panel width: 4 x 8.9 in = 35.6 in (90.4 cm)
Materials
Use a smooth mercerized cotton or a cotton-linen blend in fingering weight, about 155 m per 50 g. Mercerized cotton gives crisp blocks and clean mesh, and it doesn’t stretch much while it hangs. Avoid soft acrylics, which sag over a long drop.
- Cream (natural): 500 g, about 1,550 m. This covers 4 cream strips at about 85 g each, plus about 25 g for the ovals in each navy strip.
- Navy: 300 g, about 930 m. This covers 4 navy strips at about 65 g each.
The quantities include a margin of about 10%. Buy every ball of each color from the same dye lot.
Tools:
- 2.75 mm (US C-2) crochet hook
- 5 yarn bobbins for the navy strips
- Stitch markers
- Tapestry needle
- Measuring tape
- Rustproof pins and a blocking surface at least 90 in (228.6 cm) long, or a clean floor with towels
- Spray bottle
- 16 wooden curtain rings, 2 in (5.1 cm) across, and a curtain rod
Abbreviations (US Terms)
- ch – chain
- sc – single crochet
- dc – double crochet
- sk – skip
- sp – space
- st(s) – stitch(es)
- RS / WS – right side / wrong side
Special stitches
- Space (open square): ch 2, sk 2 sts, dc in next st.
- Block (solid square): dc in each of next 3 sts. When you work a block over a space, work 2 dc in the ch-2 sp and 1 dc in the next dc.
- Square count: Every row has 21 squares. The beginning ch 3 counts as the first dc, and each square adds 3 sts, so every row has 64 sts when you count each chain as a stitch.
Gauge and Checkpoints
Gauge: 10 squares and 10 rows = 4 in (10.2 cm) in filet mesh, blocked. One square is 0.4 in (1.0 cm) wide and one row is 0.4 in (1.0 cm) tall. The single crochet gauge is 7.5 sc = 1 in (2.5 cm).
Make a test piece before you commit to the full strip. Chain 34 and work 10 rows of mesh: 10 squares wide, 10 rows tall. Block it, let it dry, and measure.
Checkpoints:
- After Row 3: the width is 8.4 in (21.3 cm).
- After the first oval repeat (Row 20): the length is 8 in (20.3 cm).
- After 6 repeats (Row 105): the length is 42 in (106.7 cm).
- After Row 211: the length is 84.4 in (214.4 cm) when blocked.
- Each oval is 11 squares wide and 17 rows tall, so 4.4 in x 6.8 in (11.2 cm x 17.3 cm).
If your work is too big, go down to a 2.5 mm hook. If it is too small, go up to a 3.0 mm hook. If only the row height is off, change the height of your dc, not the hook. Measure lengths flat, because a hanging strip stretches.
Strip Pattern
Columns are numbered 1 to 21 from right to left on RS rows. The design is symmetrical, so you can read the same column numbers on WS rows and the motif will match. Begin every row with ch 3, which counts as the first dc, and end every row with a dc in the top of the turning ch.
Fixed frame: Columns 1, 3, 19, and 21 are blocks on every row. Columns 2 and 20 are spaces on every row, except in the solid bands.
Bottom Band
Foundation: Ch 66.
Row 1: Dc in 4th ch from hook. The skipped ch count as 1 dc. Dc in each remaining ch. Turn. (64 sts = 21 blocks)
Row 2: Ch 3, dc in each st across. Turn. (21 blocks)
Row 3 (frame row): Ch 3. Block in column 1, space in column 2, block in column 3, spaces in columns 4–18, block in column 19, space in column 20, block in column 21. Turn. (4 blocks, 17 spaces = 21 squares)
Oval Repeat (Pattern Rows P1–P17)
Each row below lists its blocks. Every column not listed is a space.
- P1 (link): 1, 3, 10–12, 19, 21. (7 blocks, 14 spaces)
- P2: 1, 3, 9–10, 12–13, 19, 21. (8 blocks, 13 spaces)
- P3: 1, 3, 8–9, 13–14, 19, 21. (8 blocks, 13 spaces)
- P4: 1, 3, 7–8, 14–15, 19, 21. (8 blocks, 13 spaces)
- P5–P6: 1, 3, 6–7, 15–16, 19, 21. (8 blocks, 13 spaces)
- P7: 1, 3, 6–7, 11, 15–16, 19, 21. (9 blocks, 12 spaces)
- P8: Same as P5.
- P9–P10: Same as P7.
- P11: Same as P5.
- P12: Same as P7.
- P13–P14: Same as P5.
- P15: Same as P4.
- P16: Same as P3.
- P17: Same as P2.
The ring is 2 blocks thick. It starts at the cross-shaped link in P1, widens one column per row on each side through P4, and runs straight from P5 to P14, where it is 11 squares wide (columns 6–16). Then it narrows back through P17. The single blocks in column 11 on P7, P9, P10, and P12 make the dotted spine. The next P1 closes the oval and starts the next one.
Rows 4–207: Work P1–P17 a total of 12 times.
Row 208: Work P1 once more to close the last oval.
Top Band
Row 209: Work as Row 3.
Rows 210–211: Work as Row 2. Fasten off. (64 sts)
Total: 211 rows, 84.4 in (214.4 cm).
Navy Strips (Intarsia Ovals)
Work the navy strips from the same rows, starting with navy. All blocks in columns 6–16 are cream. Everything else is navy: the mesh, the frame blocks, and the spine blocks in column 11.
Color rule: The dc that closes a square takes that square’s color. To change color, work the last dc before the new color until 2 loops remain on the hook, then complete it with the new color.
Bobbins:
- Navy L for columns 1 to the ring
- Cream L for the left half of the ring
- Navy C for the inside of the oval
- Cream R for the right half of the ring
- Navy R for the ring to column 21
Wind 5 bobbins. On P1, Cream L works columns 10–11 and Cream R works column 12. Join Navy C on P2 and cut it after P17, because each oval interior gets its own short length. Keep every color change and tail on the WS. Weave in tails along the solid blocks so they don’t show in the mesh.
Make All Pieces
Make 8 strips in total:
- Cream strips: 4. Each uses about 85 g of cream.
- Navy strips: 4. Each uses about 65 g of navy and 25 g of cream.
Layout, as seen from inside the room (C = cream strip, N = navy strip):
Left panel:   [C] [N] [C] [N]
Right panel:  [N] [C] [N] [C]
The two panels are mirror images, so the outermost and innermost strips are different colors.
Joining (Hanging Layout)
The strips are not sewn together. Each one hangs from its own two rings, and the strips touch edge to edge on the rod. This lets them move freely and makes them easy to wash one at a time.
Rings: Place one ring above column 4 and one above column 18, measured on the top border. Hold a ring against the WS of the top edge. Join matching yarn in the border stitch below the ring, then work 6 sc through the border stitches and around the ring together. Fasten off and weave in the ends. Both rings must sit at the same height so the strip hangs straight.
Tension: Keep the sc around each ring firm but not tight, or the top edge will pucker.
Size checkpoint: Hang the 4 strips of a panel next to each other. The panel measures 35.6 in (90.4 cm) across, and every bottom edge should line up within 0.25 in (0.6 cm).
Border
The border has 2 rounds of sc, worked on each strip separately. Border gauge is 7.5 sc = 1 in (2.5 cm).
Round 1: With RS facing, join yarn in the last st of Row 211. Use cream for cream strips and navy for navy strips.
- Corners: 3 sc in each corner st.
- Top and bottom: 1 sc in each of the 62 sts between the corner sts.
- Long sides: 3 sc in each of the 211 row ends, for 633 sc per side.
Join with sl st to the first sc. Count: 4 corners x 3 = 12, short sides 2 x 62 = 124, long sides 2 x 633 = 1,266. (1,402 sc)
Round 2: Ch 1. Work 3 sc in the center sc of each corner group and 1 sc in every other sc. Join. Each short side now has 64 sc between corner groups and each long side has 635. Count: 12 + 128 + 1,270. (1,410 sc) Fasten off.
Why the math works: On the short sides, 62 sc over 8.4 in (21.3 cm) is about 7.5 sc per inch. On the long sides, each 0.4 in (1.0 cm) row end gets 3 sc, which is exactly 7.5 sc per inch. Both match the sc gauge, so the edges neither flare nor pull in. The 3-sc corners turn the corners flat, and Round 2 adds 2 sc per side for the larger outline. Two rounds add 0.25 in (0.6 cm) on each side, so the strip grows from 8.4 x 84.4 in (21.3 x 214.4 cm) to 8.9 x 84.9 in (22.6 x 215.6 cm).
Final Blocking
- Weave in all ends first. Leave the ring attachment until after blocking.
- Soak the strip in cool water for 15 minutes, then roll it in towels to press out the water. Don’t wring it.
- Lay it flat on your blocking surface, RS up.
- Pin the long edges straight at 8.9 in (22.6 cm) wide, placing a pin about every 4 in (10.2 cm).
- Ease the length to 84.9 in (215.6 cm). Don’t stretch it further, because it will lengthen a little when it hangs.
- Square up the mesh openings, and pin the oval rings so their sides run parallel.
- Let it dry completely, then unpin it and attach the rings.
Final Quality-Control Checklist
- [ ] Every row has 21 squares and 64 sts.
- [ ] Frame columns 1, 3, 19, and 21 are solid all the way up.
- [ ] There are 12 complete ovals, with a closing link on Row 208.
- [ ] Each oval has 4 spine blocks in column 11.
- [ ] Navy strips have only cream in columns 6–16 of the ring, and no cream shows through the mesh.
- [ ] Border counts are 1,402 sc and then 1,410 sc.
- [ ] The blocked strip is 8.9 x 84.9 in (22.6 x 215.6 cm).
- [ ] The rings sit above columns 4 and 18 at equal height.
Troubleshooting
- The strip leans sideways: You lost or added a square. Count all 21 squares on every frame row.
- The ovals are lopsided: You read a row from the wrong edge. Check P2–P4 against the column list.
- Cream shows on the navy mesh: You carried a bobbin across a space. Use a separate bobbin for each color region.
- The edges ruffle: Your border is too loose. Work the long sides with a 2.5 mm hook.
- The strip stretches too much while hanging: Re-block it, and switch to mercerized cotton for future strips.
- The tops pucker at the rings: Rework the ring sc with looser tension.
Care
Hand wash in cool water with mild soap and dry flat. Re-pin to 8.9 x 84.9 in (22.6 x 215.6 cm) if needed, and never tumble dry.

Final Notes
Everything depends on the gauge. The test piece gives 10 squares per 4 in (10.2 cm). That makes the strip 21 squares, or 8.4 in (21.3 cm) wide, and 211 rows, or 84.4 in (214.4 cm) long. A 0.25 in (0.6 cm) border on every side brings it to 8.9 x 84.9 in (22.6 x 215.6 cm). Four strips make one panel of 35.6 in (90.4 cm), and two panels finish the window. Check your measurements at each stage and the long strips will hang straight.
Happy crocheting!