

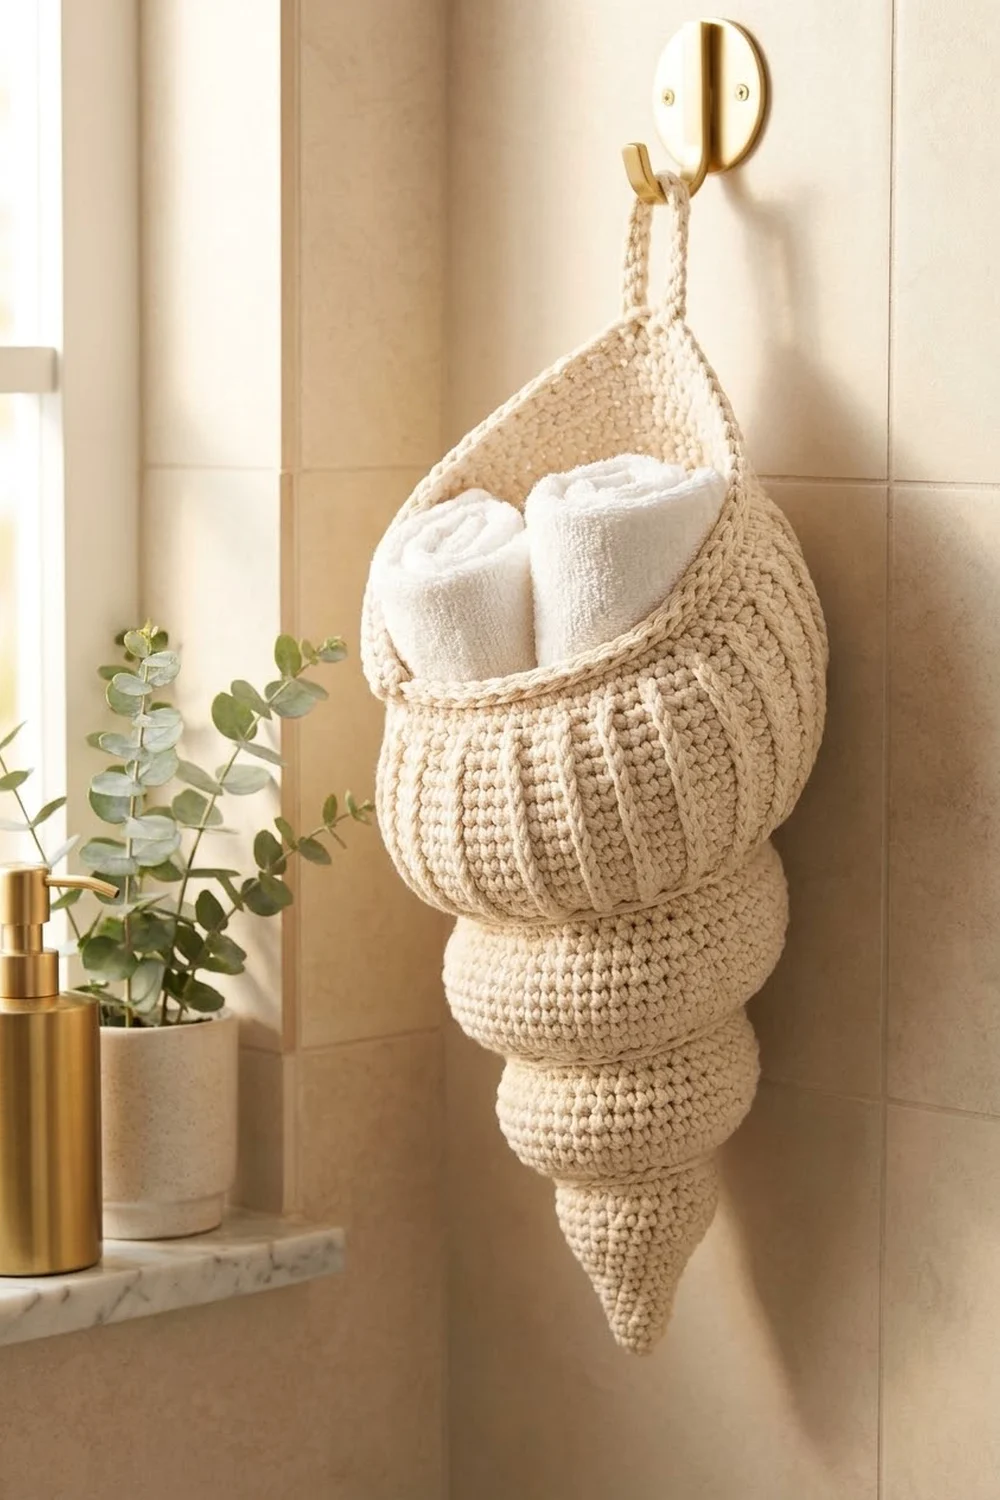
This chunky seashell wall pocket looks like a conch you might find on the beach, and it’s sturdy enough to hold rolled washcloths, hair ties, or small bathroom items. The shell starts at a pointed tip and grows through three rounded whorls. It finishes in a deep body whorl covered in raised vertical ribs.
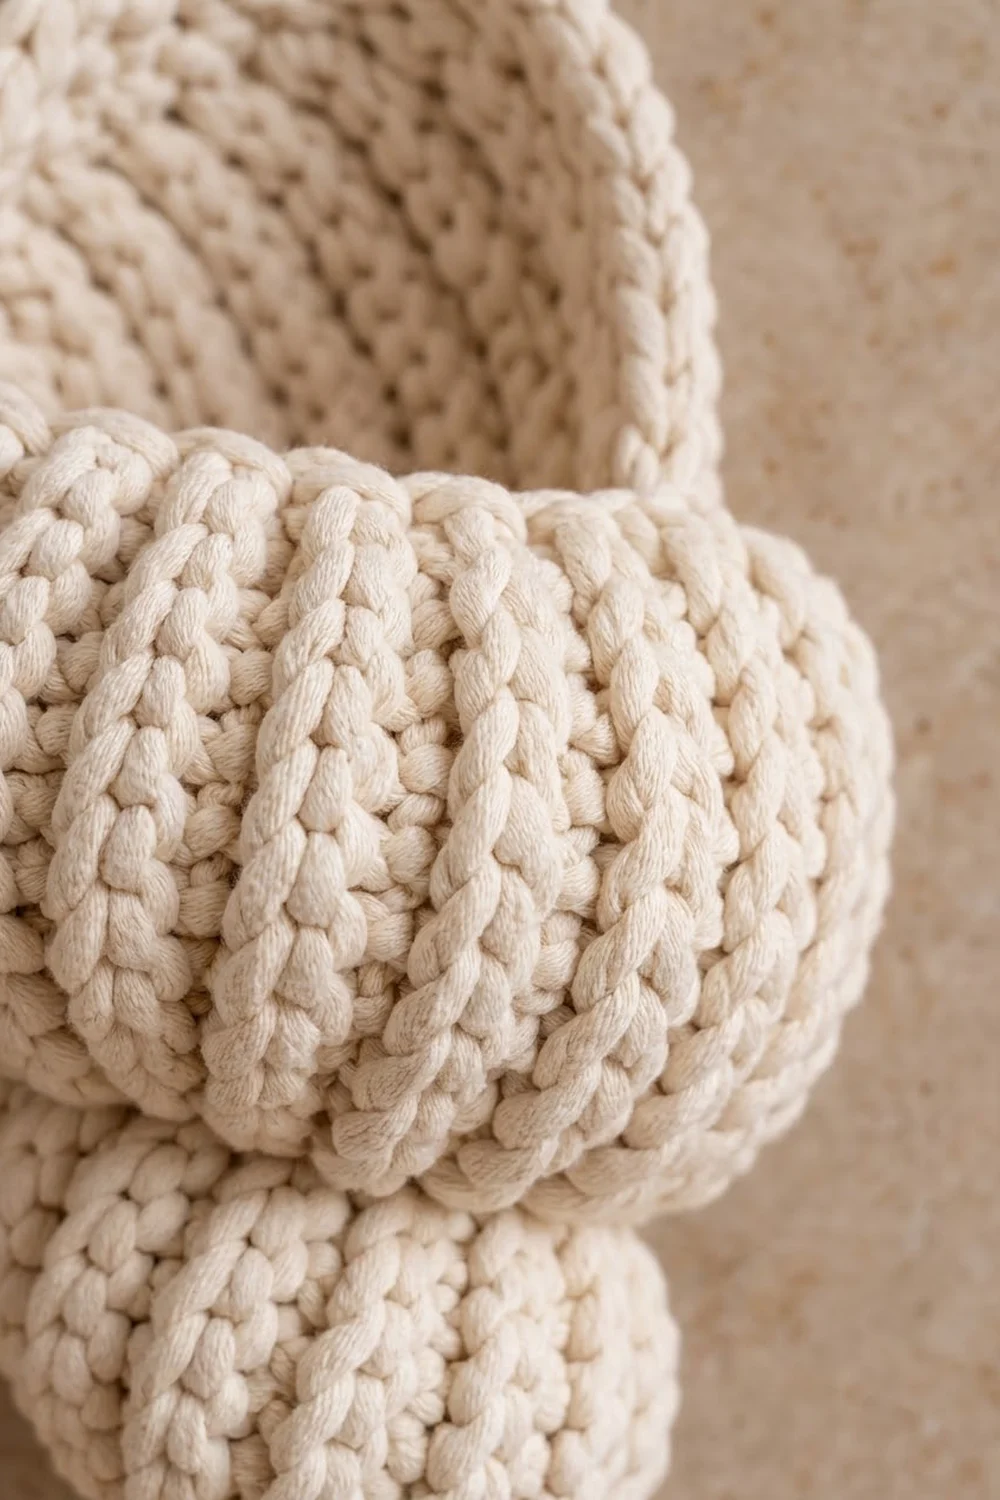
It’s worked in one cream yarn, so the texture does the work. Soft grooves separate the whorls, front-post ribs climb the body, and a braided crab-stitch edge outlines the opening. A tapered back panel rises behind the pocket and ends in a hanging loop.
The pattern uses US crochet terms. The finished shell is about 16.7 in (42.4 cm) tall including the loop and about 6.5 in (16.5 cm) wide at the body whorl.
The shell is one seamless piece. You work joined rounds from the tip up, then work the back panel in rows over half the stitches. After that you add the loop and one round of edging, then reverse single crochet around the opening.
Finished Size and Construction
- Finished size: 16.7 in (42.4 cm) tall including the loop; 6.5 in (16.5 cm) wide at the body whorl
- Skill level: Intermediate
- Terminology: US crochet terms
- Yarn weight: Bulky (#5)
- Hook: 6.0 mm (US J-10)
- Number of pieces: 1 (single seamless piece)
- Layout: Vertical shell: tip, three whorls, ribbed body whorl, back panel, loop
- Shell body size (tip to front rim): about 9.5 in (24.1 cm) tall
- Size before border: 14.2 in (36.1 cm) from tip to top of back panel, plus a 2.5 in (6.4 cm) loop
- Border depth: about 0.25 in (0.6 cm)
Materials
Yarn: Choose a bulky-weight cotton or cotton blend with a smooth, rounded ply so the ribs and edging look clean and braided. Cotton holds the shell’s shape better than acrylic and stands up to bathroom humidity.
- Cream / ivory: 150 g, about 180 m (197 yd)
This quantity includes a margin of about 20% for your gauge swatch and tension differences.
Tools:
- 6.0 mm (US J-10) crochet hook
- Stitch markers (at least 2)
- Tapestry needle
- Scissors
- Measuring tape
- Spray bottle and small towels for blocking
Abbreviations (US Terms)
- ch: chain
- sl st: slip stitch
- sc: single crochet
- inc: 2 sc in the same stitch
- sc2tog: single crochet 2 together
- dc: double crochet
- FPdc: front post double crochet
- BLO: back loop only
- rev sc: reverse single crochet (crab stitch)
- st(s): stitch(es)
- rnd(s): round(s)
Special stitches:
- FPdc: Yarn over, insert the hook from front to back to front around the post of the indicated stitch in the previous round, then complete a dc. This counts as 1 stitch and replaces the top of the stitch it wraps.
- Rev sc (crab stitch): Work from left to right (right-handers). Insert the hook into the next stitch to the right, pull up a loop, yarn over and pull through both loops.
Round notes: Join every round with a sl st to the first sc. Ch 1 at the start of each round; it doesn’t count as a stitch. The joins form a seam along one side of the shell, which is correct.
Gauge and Checkpoints
Gauge: 11 sc and 12 rows = 4 in (10.2 cm) in sc.
Test one piece first. Chain 16 and work 14 rows of sc on 15 stitches. Then measure 4 in (10.2 cm) across the center. If you count more than 11 stitches, go up a hook size. If you count fewer, go down a size.
Measure circumference with a soft tape wrapped around the outside of the shell:
- After Rnd 7 (whorl 1): 5.5 in (14.0 cm)
- After Rnd 12 (whorl 2): 8.7 in (22.1 cm)
- After Rnd 18 (whorl 3): 13.1 in (33.3 cm)
- After Rnd 23 (body whorl base): 20.4 in (51.8 cm)
- After Rnd 31 (ribs done): 20 to 20.5 in (50.8 to 52.1 cm), because the ribs pull in slightly
- Tip to Rnd 19 groove: about 5.5 in (14.0 cm), measured straight along the side
If you’re more than 0.5 in (1.3 cm) over at any checkpoint, frog back to the last checkpoint and change hooks. Small errors grow fast in the larger whorls.
Pattern
Tip (Rnds 1–4)
Rnd 1: Make a magic ring, ch 1, 4 sc in ring. Pull the ring closed and join. (4)
Rnd 2: [Sc 1, inc] 2 times. (6)
Rnd 3: [Sc 1, inc] 3 times. (9)
Rnd 4: Sc in each st around. (9)
Whorl 1 (Rnds 5–8)
Rnd 5: [Sc 2, inc] 3 times. (12)
Rnd 6: [Sc 3, inc] 3 times. (15)
Rnd 7: Sc in each st around. (15)
Rnd 8 (groove): Working in BLO, [sc 3, sc2tog] 3 times. (12)
The BLO round leaves a line of front loops on the outside. The decreases pull the fabric in, so together they make the groove between whorls.
Whorl 2 (Rnds 9–13)
Rnd 9: Working in both loops, [sc 1, inc] 6 times. (18)
Rnd 10: [Sc 2, inc] 6 times. (24)
Rnds 11–12: Sc in each st around. (24)
Rnd 13 (groove): Working in BLO, [sc 2, sc2tog] 6 times. (18)
Whorl 3 (Rnds 14–19)
Rnd 14: Working in both loops, [sc 2, inc] 6 times. (24)
Rnd 15: [Sc 3, inc] 6 times. (30)
Rnd 16: [Sc 4, inc] 6 times. (36)
Rnds 17–18: Sc in each st around. (36)
Rnd 19 (groove): Working in BLO, [sc 4, sc2tog] 6 times. (30)
Each whorl starts from a smaller count than the last one ended at, then grows past it. That’s what gives the stacked, bulging conch profile.
Body Whorl (Rnds 20–32)
Rnd 20: Working in both loops, [sc 4, inc] 6 times. (36)
Rnd 21: [Sc 5, inc] 6 times. (42)
Rnd 22: [Sc 6, inc] 6 times. (48)
Rnd 23: [Sc 5, inc] 8 times. (56)
Rnd 24 (rib setup): [Sc 3, dc 1] 14 times. (56: 42 sc + 14 dc)
Rnds 25–31: [Sc 3, FPdc around the dc or FPdc of the previous round] 14 times. (56 each round)
You’ll have 14 raised vertical ribs with 3 sc between each pair.
Rnd 32 (rim): Sc in each st around. (56) Do not fasten off.
Place a marker in the first and last of the 28 stitches that run across the back of the shell, opposite the opening side you want facing out. The seam should sit at one side edge. The 28 marked back stitches cover 7 ribs, and the 28 front stitches cover the other 7 ribs.
Back Panel (Rows 1–14)
Work in turned rows over the 28 back stitches only. The 28 front stitches stay unworked; they become the front rim.
Row 1: Sl st along to the first marked stitch if needed. Ch 1, sc in each of the 28 back stitches, turn. (28)
Row 2: Ch 1, sc across, turn. (28)
Row 3: Ch 1, sc2tog, sc 22, sc2tog, turn. (26)
Rows 4–14: Ch 1, sc2tog, sc across to the last 2 sts, sc2tog, turn.
Each row is 2 stitches shorter than the one before: Row 4 has 24, Row 5 has 22, and so on down to Row 14: (4).
The panel is 14 rows, about 4.7 in (11.9 cm) tall. It tapers from 10.2 in (25.9 cm) across at Row 1 to a narrow point.
Hanging Loop
At the end of Row 14, don’t turn. Ch 14 and sl st into the first stitch of Row 14 to form a loop.
Turn, then work 20 sc over the ch-14 loop. Sl st into the last stitch of Row 14 and fasten off.
The loop is about 2.5 in (6.4 cm) tall. The extra stitches pack the chain tightly, making a firm, rope-like hanger.
Border
Border gauge: Same as the body: 11 sts = 4 in (10.2 cm).
Join yarn at the junction where the front rim meets the left edge of the back panel.
Rnd 1 (sc edging): Ch 1, then work:
- Front rim: 1 sc in each of the 28 unworked front stitches of Rnd 32 (28)
- Right panel edge: 1 sc in each row end, up to the base of the loop (14)
- Left panel edge: skip across the base of the loop, then 1 sc in each row end down to the starting point (14)
Join to the first sc. (56 total)
Don’t add stitches at the two junctions where the rim meets the panel. These are inside corners, so extra stitches would make them bulge.
Rnd 2 (crab stitch): Ch 1, rev sc in each st around. (56) Join and fasten off.
Why the math works:
- Front rim: These 28 stitches are worked 1 per existing stitch, so the rim keeps its 10.2 in (25.9 cm) length and doesn’t flare.
- Panel edges: Rows 3–14 step in by 1 stitch per row, so each row end is slightly longer than a single stitch is wide. Working 1 sc per row end keeps these edges a little firm, which helps the panel stand upright.
- Crab stitch: Rnd 2 is worked 1 per stitch, so it adds texture, not length. It gives the twisted cord look on the edge.
Final Blocking
- Weave in all ends securely, burying them inside the whorls.
- Lightly mist the whole shell with water until it’s damp but not soaked.
- Stuff the tip and whorls with rolled small towels or plastic bags to round out each bulge.
- Pinch each groove gently between your fingers to sharpen the line.
- Run a fingertip up each of the 14 ribs to straighten them.
- Stand the back panel upright and shape it into an even teardrop.
- Hang the shell by its loop and let it dry completely, at least 24 hours.
- Remove the stuffing once it’s dry.
Final Quality-Control Checklist
- [ ] Three distinct whorls below the body, each larger than the last
- [ ] Three clean grooves (Rnds 8, 13, 19)
- [ ] 14 straight ribs that are evenly spaced
- [ ] Body circumference 20 to 20.5 in (50.8 to 52.1 cm)
- [ ] Front rim 28 stitches, back panel tapering from 28 to 4 stitches
- [ ] Loop firm and centered at the top of the panel
- [ ] Crab-stitch border even, with 56 stitches all around
- [ ] All ends woven in and secure
- [ ] Hangs straight without tilting
Troubleshooting
The whorls look flat: Your tension may be too loose. Go down half a hook size, and make sure groove rounds are worked in BLO.
The ribs lean in a spiral: Each FPdc must wrap the rib directly below it. Count 3 sc between ribs in every round.
The shell is twisting: Joined rounds should prevent this. Check that every round starts in the same stitch as its join.
The back panel flops forward: Work the Rnd 1 edging firmly, and block the panel upright. If it still flops, add a second sc round on the panel edges only.
The front rim ruffles: You added stitches. Rnd 1 of the border must have exactly 28 stitches on the front.
The loop stretches: Pack the 20 sc tightly, or work a second pass of sl sts around the loop.
Care
Hand wash in cool water and lay flat or hang to dry, reshaping the whorls while damp. Don’t tumble dry.
Final Notes
The measurement chain is simple:
- Gauge: 11 sc = 4 in (10.2 cm) controls every checkpoint.
- Circumference: 5.5 in (14.0 cm) at whorl 1, 8.7 in (22.1 cm) at whorl 2, 13.1 in (33.3 cm) at whorl 3, and 20.4 in (51.8 cm) at the body.
- Height: The shell body stands 9.5 in (24.1 cm). The back panel adds 4.7 in (11.9 cm) and the loop adds 2.5 in (6.4 cm), for a finished height of 16.7 in (42.4 cm).
- Border: 56 stitches (28 + 14 + 14) in both rounds.
Hit each checkpoint and your conch will hold its shape on the wall for years.
Happy crocheting!