

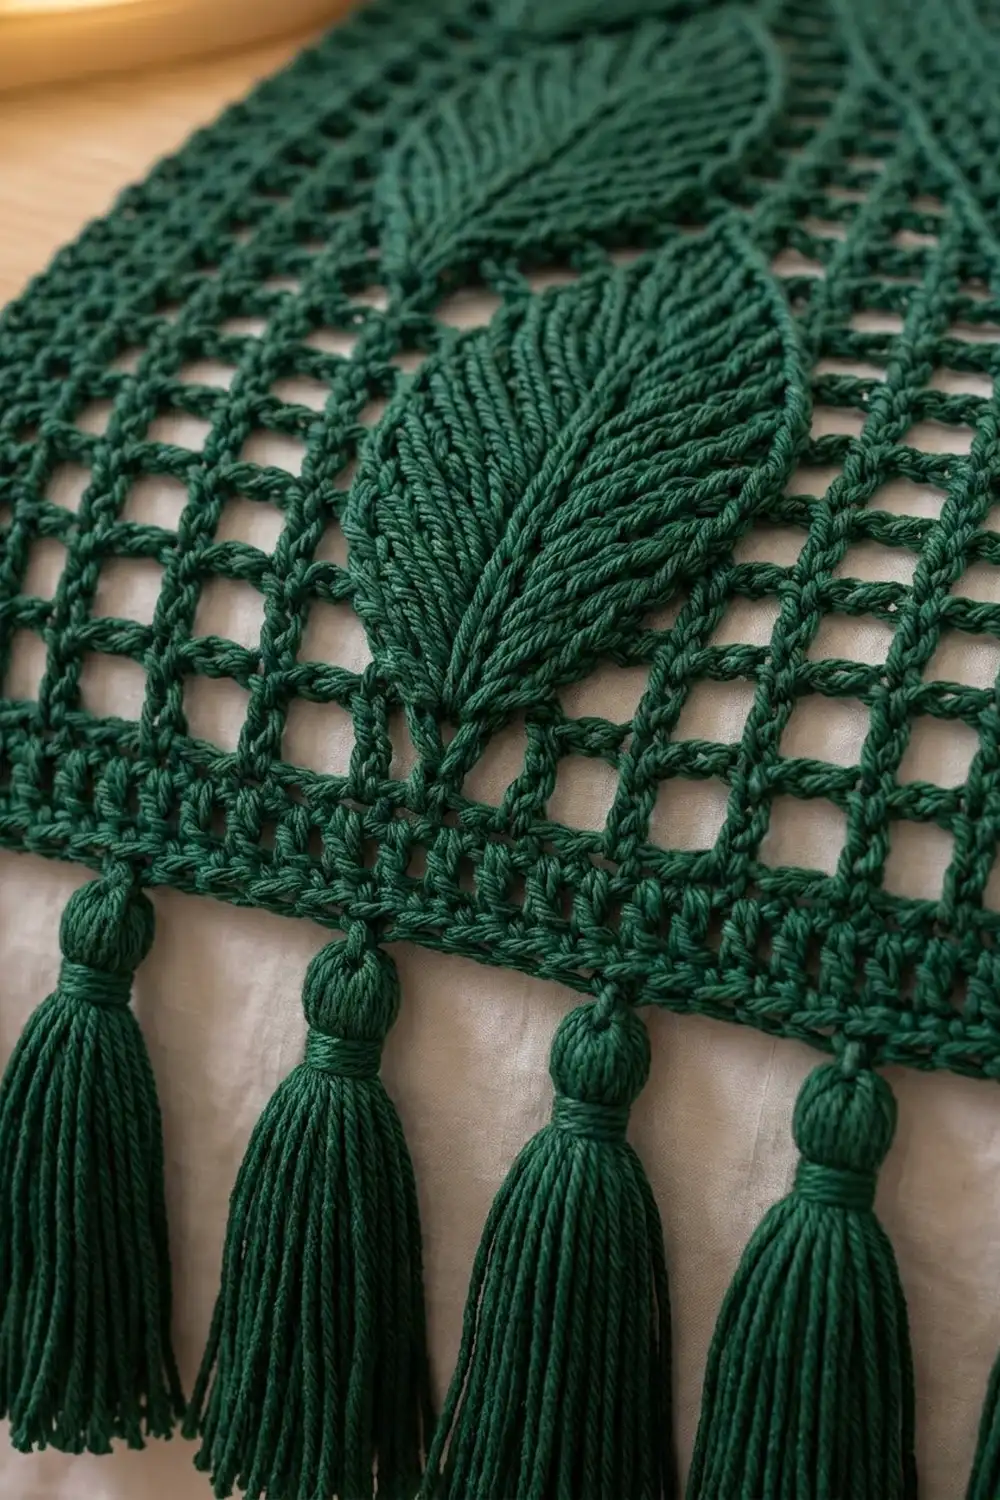
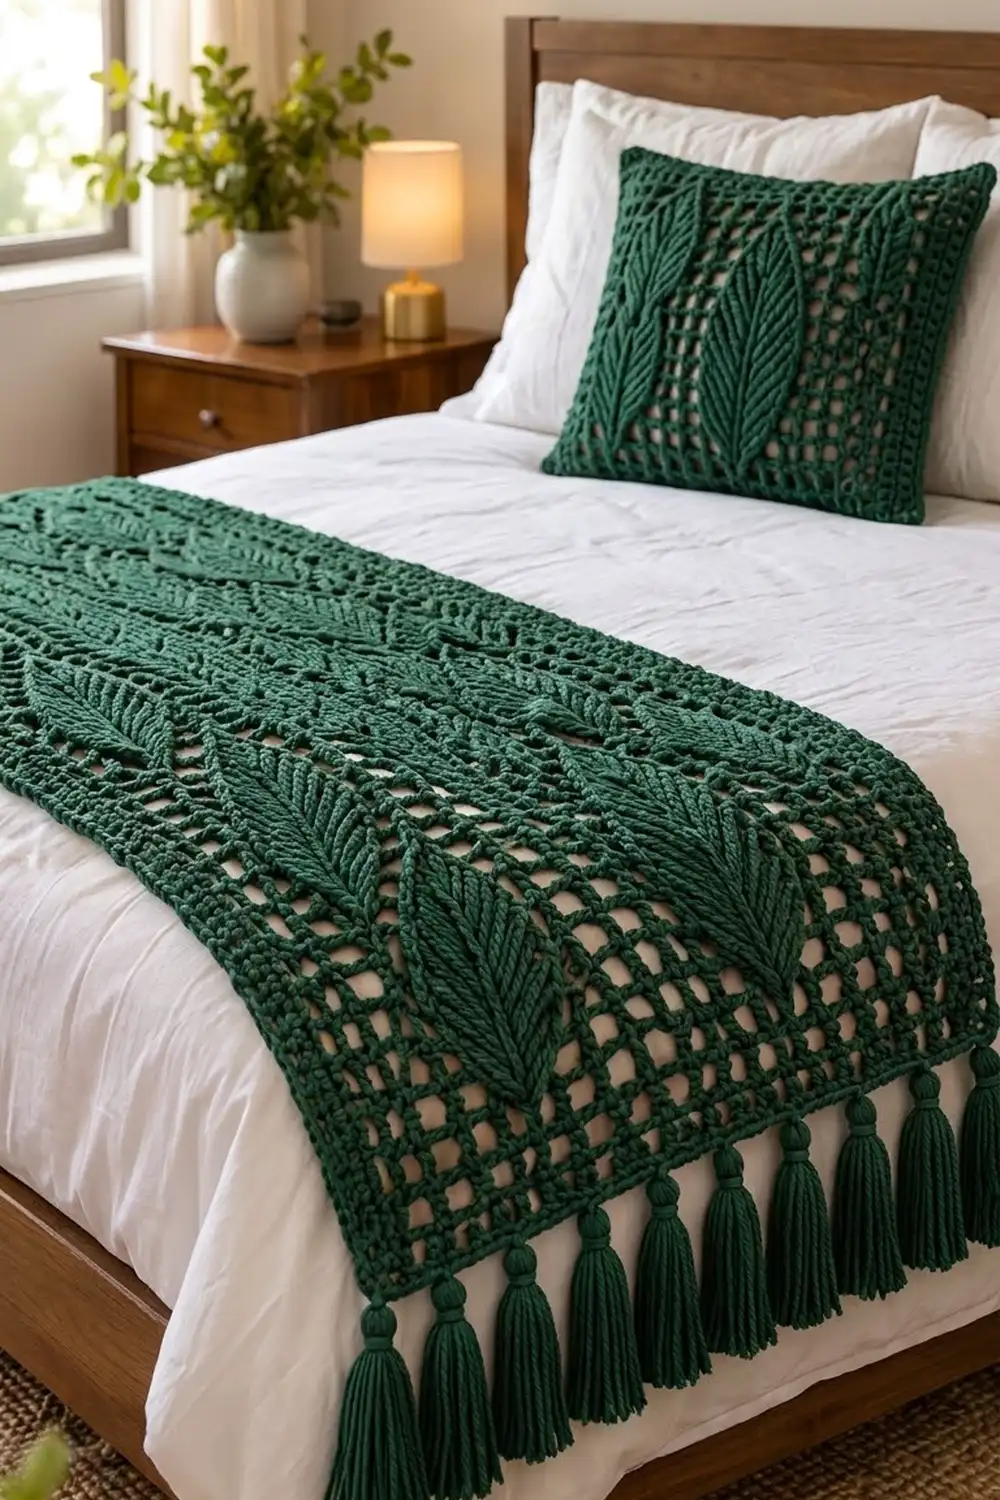
The Evergreen Leaf Bed Runner is a long, single-color runner for the foot of a bed. The background is an open filet mesh, and fifteen raised, ridged leaves sit on top of it. A solid border frames the panel, and a row of chunky tassels hangs from each short end.
The sample is all one deep forest green, so the texture does the work: open mesh squares against dense, herringbone-ridged leaves. It looks calm and botanical, and it suits white or cream bedding.
This pattern uses US crochet terms. The finished runner measures 18.5 x 74 in (47.0 x 188.0 cm) without tassels. The tassels add 4.5 in (11.4 cm) at each end, for a total hanging length of 83 in (210.8 cm).
Here is how it’s built. You work the mesh body in one piece, in rows across the width. Next you make 15 leaves separately and sew them onto the mesh in five bands of three. Then you work a three-round border and add 18 tassels.
Finished Size and Construction
- Finished size: 18.5 x 74 in (47.0 x 188.0 cm), plus tassels
- Skill level: Intermediate (easy repeats, long project)
- Terminology: US
- Yarn weight: Worsted (#4)
- Hook: 5.0 mm (H-8)
- Number of pieces: 1 runner body, plus 15 sewn-on leaf appliqués and 18 tassels
- Layout: 3 leaves across, 5 bands along the length
- Body size before border: 16.5 x 72 in (41.9 x 182.9 cm), 22 meshes x 96 rows
- Leaf size: about 6 x 2.5 in (15.2 x 6.4 cm)
- Border depth: 1 in (2.5 cm) on every side
Materials
Yarn: Use a smooth worsted-weight cotton or cotton blend with about 200 m (219 yd) per 100 g. Cotton gives crisp leaf ridges and a mesh that holds its shape. Fuzzy yarns blur the ridges.
- Forest green: 400 g, about 800 m (875 yd), which is 4 skeins
Estimated use is about 610 m (305 g): body 255 m, border 100 m, leaves 115 m, tassels 140 m. The 400 g total includes about a 30% margin for swatching, dye-lot safety, and trimming.
Tools:
- 5.0 mm (H-8) crochet hook
- Tapestry needle
- Rustproof pins
- Stitch markers (at least 6)
- Stiff card, 4.5 in (11.4 cm) tall, for tassels
- Scissors and tape measure
- Blocking mats or towels, and a spray bottle
Abbreviations (US Terms)
- ch: chain
- sl st: slip stitch
- sc: single crochet
- dc: double crochet
- sc blo: single crochet in back loop only
- sk: skip
- sp: space
- st(s): stitch(es)
- beg: beginning
- rep: repeat
Special stitch – filet mesh: one mesh is ch 2, sk 2, dc in next st. Each mesh is 3 sts wide. A row of 22 meshes plus the edge dc has 67 sts: 23 dc + 44 ch.
Gauge and Checkpoints
Mesh gauge: 4 meshes x 4 rows = 3 x 3 in (7.6 x 7.6 cm). That makes 1 mesh 0.75 in (1.9 cm) wide and 1 row 0.75 in (1.9 cm) tall.
Border gauge: 16 sc = 4 in (10.2 cm), or 4 sc per inch.
Test first: make a swatch and one leaf before starting the body.
- Swatch: ch 17 and work Rows 1–4 of the body pattern (4 meshes). It should measure 3 x 3 in (7.6 x 7.6 cm).
- Test leaf: it should measure about 6 x 2.5 in (15.2 x 6.4 cm).
If too big: use a 4.5 mm hook. If too small: use a 5.5 mm hook. Row height matters most, because the leaf bands are placed by row number.
Body checkpoints (length from the foundation edge):
- After Row 8: 6 in (15.2 cm)
- After Row 24: 18 in (45.7 cm)
- After Row 48: 36 in (91.4 cm)
- After Row 72: 54 in (137.2 cm)
- After Row 96: 72 in (182.9 cm)
The width should stay at 16.5 in (41.9 cm) the whole way.
Part 1: Runner Body
Ch 71. (3 x 22 meshes + 5 = 71.)
Row 1: Dc in 8th ch from hook, *ch 2, sk 2 ch, dc in next ch; rep from * across. Turn. (22 meshes; 67 sts: 23 dc + 44 ch)
The 7 skipped chains form the first mesh: the edge dc plus the ch-2 across its top.
Row 2: Ch 5 (counts as dc + ch 2), sk first ch-2 sp, dc in next dc, *ch 2, sk next ch-2 sp, dc in next dc; rep from * to last mesh, ch 2, sk last ch-2 sp, dc in 5th of the 7 skipped beg chains (counting up from the first dc of Row 1). Turn. (22 meshes; 67 sts)
Row 3: Ch 5 (counts as dc + ch 2), sk first ch-2 sp, dc in next dc, *ch 2, sk next ch-2 sp, dc in next dc; rep from * to last mesh, ch 2, sk last ch-2 sp, dc in 3rd ch of turning ch-5. Turn. (22 meshes; 67 sts)
Rows 4–96: Rep Row 3. (22 meshes; 67 sts in every row)
At the end of Row 96 the body measures 16.5 x 72 in (41.9 x 182.9 cm). Don’t fasten off. Put a marker in the working loop and set the body aside.
Part 2: Leaf Appliqués (Make 15)
You work each leaf around a foundation chain, turning at the tip on every row. The chain becomes the center vein. Working in back loops raises a V-shaped ridge on both sides, which creates the herringbone texture. Leaving 3 sts unworked at the base on every row tapers the stem end to a point.
Leave a 12 in (30.5 cm) starting tail.
Ch 24.
Row 1: Sc in 2nd ch from hook and in each of next 21 ch (22 sc), 3 sc in last ch (tip). Working along the other side of the foundation ch, sc in each of next 19 ch, leaving last 3 ch unworked. Turn. (44 sts: 22 + 3 + 19)
Row 2: Ch 1, sc blo in each of next 20 sts, 3 sc blo in center sc of tip, sc blo in each of next 20 sts, leaving last 3 sts unworked. Turn. (43 sts: 20 + 3 + 20)
Row 3: Ch 1, sc blo in each of next 21 sts, 3 sc blo in center sc of tip, sc blo in each of next 18 sts, leaving last 3 sts unworked. Turn. (42 sts: 21 + 3 + 18)
Row 4: Ch 1, sc blo in each of next 19 sts, 3 sc blo in center sc of tip, sc blo in each of next 19 sts, leaving last 3 sts unworked. Turn. (41 sts: 19 + 3 + 19)
Row 5: Ch 1, sc blo in each of next 20 sts, 3 sc blo in center sc of tip, sc blo in each of next 17 sts, leaving last 3 sts unworked. (40 sts: 20 + 3 + 17)
Fasten off and leave an 18 in (45.7 cm) tail for sewing.
On each row, the first side uses every stitch from the previous row’s last side, plus the last sc of the previous tip group.
Leaf checkpoints (width):
- After Row 1: about 0.5 in (1.3 cm)
- After Row 3: 1.5 in (3.8 cm)
- After Row 5: 2.5 in (6.4 cm)
The length stays at about 6 in (15.2 cm). If a leaf is more than 0.25 in (0.6 cm) off in either direction, remake it.
Part 3: Placing and Sewing the Leaves
Lay the body flat with Row 1 at the bottom. Number the dc columns 1 to 23 from right to left. The leaf veins sit over columns 5, 12, and 19.
- Column 12 is the exact center.
- The outer leaf veins are 4 meshes, or 3 in (7.6 cm), in from the body edges.
- The veins are 7 meshes, or 5.25 in (13.3 cm), apart, which leaves 2.75 in (7.0 cm) between leaf edges.
Each band is 8 rows, or 6 in (15.2 cm), tall. Each leaf base sits at the bottom of its band, with the tip pointing toward Row 96.
Rows 89–96   mesh only (6 in / 15.2 cm)
Rows 81–88   leaf  leaf  leaf   (band 5)
Rows 71–80   mesh only (7.5 in / 19.1 cm)
Rows 63–70   leaf  leaf  leaf   (band 4)
Rows 53–62   mesh only
Rows 45–52   leaf  leaf  leaf   (band 3)
Rows 35–44   mesh only
Rows 27–34   leaf  leaf  leaf   (band 2)
Rows 17–26   mesh only
Rows  9–16   leaf  leaf  leaf   (band 1)
Rows  1–8    mesh only (6 in / 15.2 cm)
Check: 8 + (5 x 8) + (4 x 10) + 8 = 96 rows.
Pin all 15 leaves before you sew any of them. Use the long tail to whipstitch each leaf’s outer edge to the mesh bars and dc posts underneath it. Then work small running stitches along the center vein so the leaf stays flat. Keep the stitches snug but not tight, or the mesh will pucker. Weave in the ends on the wrong side.
Part 4: Tassels (Make 18)
- Wrap the yarn 30 times around the 4.5 in (11.4 cm) card.
- Thread a 12 in (30.5 cm) strand under the wraps at the top and tie it tightly. Leave both ends long for attaching.
- Cut the bottom loops. This gives 30 strands, each 9 in (22.9 cm) long, folded in half.
- With an 18 in (45.7 cm) strand, wrap the neck 6 times, 0.75 in (1.9 cm) below the top. Knot it and bury the ends inside the tassel.
- Trim the tassel to 4 in (10.2 cm) long.
Border
Border gauge: 4 sc per inch. One mesh row is 0.75 in, which equals 3 sc.
Each corner is 3 sts worked into one stitch, and the middle of the three is the corner stitch. Every per-side count below includes both corner stitches. To get a round total, add the four sides and subtract 4, because each corner stitch is shared by two sides.
Rnd 1 (sc): Pick up the working loop at the end of Row 96. Turn, ch 1, 3 sc in first dc, sc in each of next 65 sts, 3 sc in last st. Rotate and work 3 sc around each of the 96 row-end posts (288 sc). Working in the free loops of the 67 base chains: 3 sc in first ch, sc in each of next 65 ch, 3 sc in last ch. Work 3 sc around each of the 96 row-end posts on the second long side (288 sc). Join with a sl st to the first sc.
- Short sides: 69 sts each (corner + 1 + 65 + 1 + corner)
- Long sides: 292 sts each (corner + 1 + 288 + 1 + corner)
- Total: (2 x 69) + (2 x 292) − 4 = 718 sts, which matches (4 x 3) + (2 x 65) + (2 x 288) = 718
Rnd 2 (dc): Sl st in next sc (corner stitch), ch 3 (counts as dc), 2 dc in same st, *dc in each st to next corner stitch, 3 dc in corner stitch; rep from * twice more, dc in each st to end. Join with a sl st to the top of ch-3.
- Short sides: 71 sts each
- Long sides: 294 sts each
- Total: 718 + 8 = 726 sts
Rnd 3 (sc): Sl st in next dc (corner stitch), ch 1, 3 sc in same st, *sc in each st to next corner stitch, 3 sc in corner stitch; rep from * twice more, sc in each st to end. Join with a sl st to the first sc. Fasten off.
- Short sides: 73 sts each
- Long sides: 296 sts each
- Total: 726 + 8 = 734 sts
Why the math works:
- Long sides: 96 rows x 0.75 in = 72 in, and 72 in x 4 sc = 288 sc, which is exactly 3 sc per row-end.
- Short sides: 65 sts plus the corner groups fits the 16.5 in (41.9 cm) width at border gauge.
- Corners: each round adds exactly 2 sts per side, one at each corner, so the border lies flat.
- Depth: two sc rounds (about 0.25 in each) and one dc round (about 0.5 in) add up to 1 in (2.5 cm).
Attaching the tassels: On each short side, number the 73 sts from corner stitch to corner stitch. Attach tassels at sts 1, 10, 19, 28, 37, 46, 55, 64, and 73. That gives 9 tassels with 8 even gaps of 9 sts, or 2.25 in (5.7 cm), and st 37 is the center. Pull the tie ends through the stitch and knot them on the wrong side so each tassel hangs 0.5 in (1.3 cm) below the edge.
Final Blocking
- Soak the runner in cool water for 15 minutes, then press the water out without wringing.
- Roll it in towels to remove the excess water.
- Lay it flat, right side up, on mats or towels.
- Pin the long edges at 74 in (188.0 cm) and the short edges at 18.5 in (47.0 cm), with a pin every few inches.
- Square the mesh so the rows run straight across.
- Smooth each leaf flat and line its tip up with its column.
- Let the tassels hang off the edge of the mat.
- Leave it until it is completely dry, usually 24–48 hours.
Final Quality-Control Checklist
- 22 meshes and 67 sts in every body row
- Body is 16.5 x 72 in (41.9 x 182.9 cm) before the border
- 15 leaves, each about 6 x 2.5 in (15.2 x 6.4 cm)
- Leaf veins on columns 5, 12, and 19
- Leaf bands at Rows 9–16, 27–34, 45–52, 63–70, and 81–88
- Border totals: 718, 726, and 734 sts
- Finished runner is 18.5 x 74 in (47.0 x 188.0 cm)
- 9 tassels per end, 2.25 in (5.7 cm) apart, each 4 in (10.2 cm) long
- All ends woven in
Troubleshooting
- Mesh slants or narrows: The final dc is going into the wrong chain. Count 23 dc in every row.
- Runner is too short: Your rows are too short. Pull each dc up a little taller or go up a hook size, then recheck at Row 24.
- Leaf curls: Your back-loop rows are too tight. Loosen your tension, or steam the leaf flat before sewing.
- Leaf is lopsided: Leave exactly 3 sts unworked at the base on every row.
- Border ruffles along the long sides: Work Rnd 1 with a 4.5 mm hook so 3 sc per row-end lies flat.
- Border cups: Use a hook 0.5 mm larger for the border rounds only.
- Mesh puckers around the leaves: Your sewing stitches are too tight. Unpick them and re-sew more loosely.
Care
Hand wash in cool water with mild soap, reshape, and dry flat. Smooth the tassels with your fingers while they’re damp.
Final Notes
One mesh is 0.75 in (1.9 cm). 22 meshes give a width of 16.5 in (41.9 cm), and 96 rows give a length of 72 in (182.9 cm). A 1 in (2.5 cm) border on every side brings it to 18.5 x 74 in (47.0 x 188.0 cm), and the tassels make the hanging length 83 in (210.8 cm). If your swatch matches gauge, every leaf band and tassel will land where it should.
Happy crocheting!