

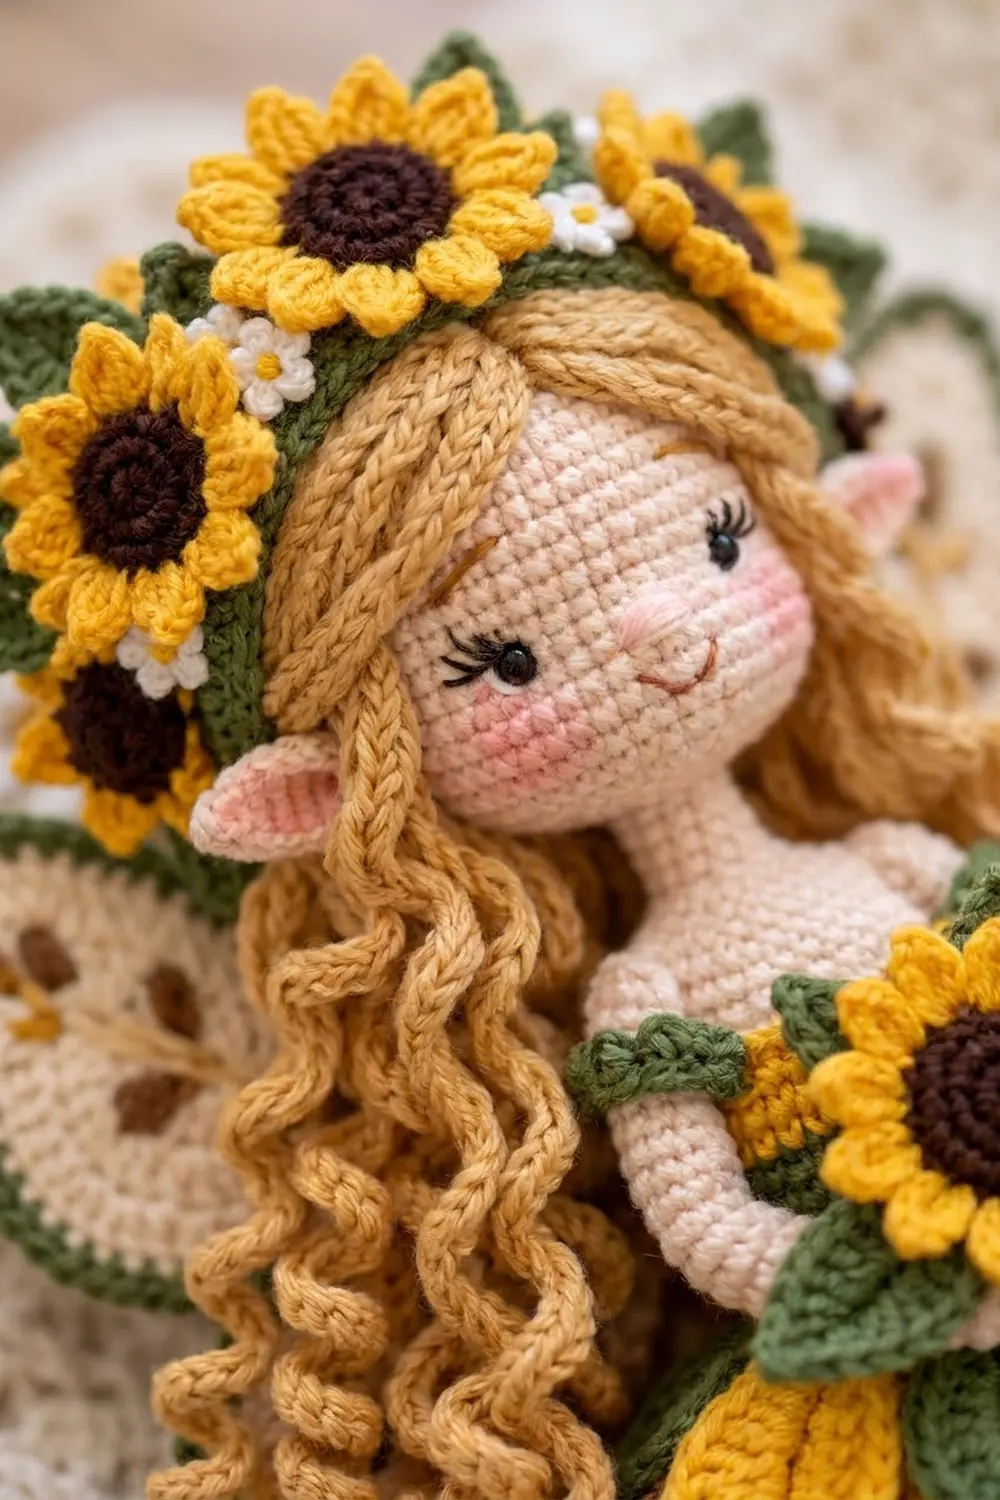
This sunflower fairy hides plastic grocery bags in the cheeriest way. A golden open-mesh body holds the bags. A small amigurumi fairy sits on top in a layered petal skirt, and the bags pull out through a leaf-trimmed opening at the bottom.
The colors are golden yellow, olive green, cream and chocolate brown, plus a light skin tone, honey-blonde curls, white daisies and pink blush. The style is cozy farmhouse.
All terms are US. The holder is about 20 in (50.8 cm) tall without the hanging loop. The mesh body is about 10 in (25.4 cm) wide laid flat.
You work the mesh body in the round from the bottom opening up. Then you make the fairy and the appliqués, assemble everything, and finish with a border around the bottom opening.
Finished Size and Construction
- Finished size: about 20 in (50.8 cm) tall, plus a 5 in (12.7 cm) hanging loop
- Skill level: Intermediate
- Terminology: US
- Yarn weight: worsted (#4)
- Hooks: 5.0 mm (H-8) for the mesh; 4.0 mm (G-6) for everything else
- Number of pieces: one finished holder (a mesh body plus a fairy and sewn-on appliqués)
- Layout: hangs vertically, with the fairy on top and the dispensing opening at the bottom
- Mesh body size: 10 in (25.4 cm) wide flat, 12 in (30.5 cm) tall
- Size before border: 12 in (30.5 cm) tall
- Border depth: about 1.2 in (3.0 cm), leaf points included
Materials
Choose a smooth worsted acrylic or cotton blend so the mesh stays crisp.
- Golden yellow: 150 g (285 m)
- Olive green: 60 g (114 m)
- Cream: 40 g (76 m)
- Chocolate brown: 35 g (67 m)
- Light skin tone: 35 g (67 m)
- Honey blonde: 70 g (133 m)
- White: 5 g (10 m)
- Pink and black yarn scraps
Tools: 5.0 mm and 4.0 mm hooks, 8 mm safety eyes (1 pair), about 40 g fiberfill, stitch markers, pins, a tapestry needle and scissors.
The quantities include a margin of about 15%.
Abbreviations (US Terms)
- ch – chain
- sl st – slip stitch
- sc – single crochet
- hdc – half double crochet
- dc – double crochet
- sc2tog – single crochet 2 together
- inc – 2 sc in same stitch
- MR – magic ring
- st(s) – stitch(es)
- loop – chain space
Leaf Point (special stitch): ch 6, sl st in 2nd ch from hook, sc in next ch, hdc in next ch, dc in next ch, hdc in last ch, sl st in last sc made.
Gauge and Checkpoints
Mesh (5.0 mm): 4 loops = 5 in (12.7 cm) wide; 4 rounds = 4 in (10.2 cm) tall, unstretched.
Solid (4.0 mm): 18 sc = 4 in (10.2 cm).
Make one large petal first as a test. It should measure about 2.4 in (6.1 cm) long and 1.2 in (3.0 cm) wide.
Checkpoints:
- After Rnd 4: about 20 in (50.8 cm) around.
- After Rnd 10: about 9 in (22.9 cm) tall.
- After Rnd 16: about 12 in (30.5 cm) tall, with the rim about 8 in (20.3 cm) around.
- Head: about 8 in (20.3 cm) around.
If your work is too big, go down a hook size. If it’s too small, go up one. The rim and torso stitch counts must match exactly.
Mesh Body
Use the 5.0 mm hook and golden yellow. Work in joined rounds without turning.
Foundation: Ch 24 and join with a sl st to form a ring about 6 in (15.2 cm) around.
Rnd 1: Ch 1, sc in each ch around; join. [24 sc]
Rnd 2: Ch 1, sc in next st, ch 5, skip 2 sts; repeat around; join to first sc. [8 loops]
Rnd 3 (growth): Sl st into first loop, (sc, ch 5) twice in next loop, (sc, ch 5) in next loop; repeat 3 more times; join. [12 loops]
Rnd 4 (growth): Sl st into first loop, (sc, ch 5) twice in next loop, (sc, ch 5) in each of next 2 loops; repeat 3 more times; join. [16 loops]
Rnds 5–10: Sl st into first loop, (sc, ch 5) in next loop; repeat around; join. [16 loops each round]
Rnds 11–12: Work as Rnd 5, but ch 4 instead of ch 5. [16 ch-4 loops each round]
Rnd 13: Work as Rnd 5, but ch 3. [16 ch-3 loops]
Change to the 4.0 mm hook.
Rnd 14 (conversion): Ch 1, sc in next sc, 2 sc in next ch-3 space; repeat around; join. [16 sc worked 1-per-existing-sc + 32 sc in spaces = 48 sc]
Rnd 15: Ch 1, sc in next 2 sts, sc2tog; repeat around; join. [36 sc]
Rnd 16: Ch 1, sc in each st; join. [36 sc] Fasten off.
The shorter chains in Rnds 11–13 taper the body into a rounded shoulder. The solid rim keeps the top firm.
Fairy
Use the 4.0 mm hook. Work in continuous spirals and mark the first stitch of each round.
Head (skin)
- Rnd 1: 6 sc in MR. [6]
- Rnd 2: Inc in each st. [12]
- Rnd 3: Sc 1, inc. [18]
- Rnd 4: Sc 2, inc. [24]
- Rnd 5: Sc 3, inc. [30]
- Rnd 6: Sc 4, inc. [36]
- Rnds 7–14: Sc around. [36]
- Rnd 15: Sc 4, sc2tog. [30]
- Rnd 16: Sc 3, sc2tog. [24]
- Rnd 17: Sc 2, sc2tog. [18] Insert the safety eyes between Rnds 9 and 10, 6 sts apart, and stuff firmly.
- Rnd 18: Sc 1, sc2tog. [12]
- Rnd 19: Sc2tog around. [6] Close the hole.
Embroider black lashes, a small pink smile and pink blush under the eyes.
Elf ears (make 2, skin): Ch 5, sl st in 2nd ch from hook, sc in next ch, hdc in next ch, 2 dc in last ch. Sew one ear to each side of the head at Rnd 10, with the points angled up.
Torso (skin, then green)
- Rnd 1: 6 sc in MR. [6]
- Rnd 2: Inc in each st. [12]
- Rnds 3–4: Sc around. [12]
- Rnd 5: Sc 1, inc. [18]
- Rnds 6–8: Sc around. [18]
- Rnd 9 (green): Sc 2, inc. [24]
- Rnds 10–13: Sc around. [24]
The torso is about 2.9 in (7.4 cm) tall. Stuff it firmly.
Base disk (green): 6 sc in MR; inc around [12]; sc 1, inc [18]; sc 2, inc [24]. Sew the disk to torso Rnd 13 stitch for stitch, 24 to 24, adding stuffing as you close.
Sew the head on top of the torso, using torso Rnd 1 as the neck.
Arms (make 2, skin): 6 sc in MR, then sc around for Rnds 2–12. [6] Stuff the hand end lightly, flatten the top and sew it to torso Rnd 4. Bring the hands together at the front.
Hair (honey blonde)
Wig cap: Work head Rnds 1–6 [36], then 4 rounds of sc around [36]. Sew the cap over the top and back of the head, leaving the face clear.
Curls (make 22): Ch 36, 3 sc in 2nd ch from hook and in each ch across. [105 sc] Each curl twists into a corkscrew about 6 in (15.2 cm) long. Sew 20 curls in two rows around the lower edge of the cap, and one at each temple.
Wings (cream, edged in green)
Upper wing (make 2): Ch 12.
- Rnd 1: Sc in 2nd ch from hook, sc in next 9 ch, 3 sc in last ch. Working along the opposite side, sc in next 9 ch, 2 sc in last ch; join. [24 sc]
- Rnd 2: Ch 3 (counts as dc), dc in same st, dc in next 9 sts, 2 dc in each of next 3 sts, dc in next 9 sts, 2 dc in each of last 2 sts; join. [24 worked 1-per-st + 6 extra = 30 dc]
- Rnd 3: Ch 1, sc in next st, 2 sc in next st; repeat around; join. [45 sc]
- Rnd 4 (green): Ch 1, sc in each st; join. [45 sc]
Each upper wing measures about 4.7 in (11.9 cm) long and 2.4 in (6.1 cm) wide.
Lower wing (make 2): Ch 8.
- Rnd 1: Sc in 2nd ch from hook, sc in next 5 ch, 3 sc in last ch. Working along the opposite side, sc in next 5 ch, 2 sc in last ch; join. [16 sc]
- Rnd 2: Ch 3, dc in same st, dc in next 5 sts, 2 dc in each of next 3 sts, dc in next 5 sts, 2 dc in each of last 2 sts; join. [16 worked 1-per-st + 6 extra = 22 dc]
- Rnd 3 (green): Ch 1, sc in next st, 2 sc in next st; repeat around; join. [33 sc]
Each lower wing measures about 3.3 in (8.4 cm) long and 2 in (5.1 cm) wide.
With brown, backstitch a fern vein on each wing: a center line with 3 or 4 angled side strokes. Tuck each lower wing 0.5 in (1.3 cm) under the base of an upper wing and sew them together. Sew both wing pairs to the back of the torso at Rnds 5–8.
Petals, Leaves and Sunflowers
Use the 4.0 mm hook.
Large Petal: Ch 11. Sc in 2nd ch from hook, hdc in next ch, dc in next 5 ch, hdc in next ch, sc in next ch, (sc, ch 2, sc) in last ch. Working along the opposite side, sc in next ch, hdc in next ch, dc in next 5 ch, hdc in next ch, sc in last ch; sl st to first sc. [20 sts + ch-2 tip] Make 6 cream, 6 brown and 10 golden yellow.
Small Leaf: Ch 8. Sc in 2nd ch from hook, hdc in next ch, dc in next 2 ch, hdc in next ch, sc in next ch, (sc, ch 2, sc) in last ch. Working along the opposite side, sc in next ch, hdc in next ch, dc in next 2 ch, hdc in next ch, sc in last ch; sl st. [14 sts + ch-2 tip] Each leaf is about 1.8 in (4.6 cm) long. Make 21 green and 4 brown, and sl st a center vein on each green leaf.
Large Sunflower (make 1): With brown, 8 sc in MR [8]; 2 sc in each st [16]. Change to golden yellow. Sl st in next st, ch 5, sl st in 2nd ch from hook, sc in next ch, hdc in next ch, dc in next ch, sl st in same st; repeat around. [16 petals] It measures about 2.4 in (6.1 cm) across.
Mini Sunflower (make 13): With brown, 8 sc in MR. [8] Change to golden yellow. Sl st in next st, ch 4, sl st in 2nd ch from hook, sc in next ch, hdc in next ch, sl st in same st; repeat around. [8 petals]
Daisy (make 6, white): In a MR, ch 2, sl st in ring 5 times; pull closed.
Assembly
- Skirt: Sew the petals by their bases only, so the tips hang free. Tier 1 goes at torso Rnd 13: 12 large petals, alternating cream and brown, one every 2 sts. Tier 2 goes at Rnds 11–12: the 10 golden petals, offset from Tier 1. Tier 3 goes at Rnd 10: 8 green leaves.
- Chest flower: Sew the large sunflower between the hands, with 2 green leaves beneath it.
- Attach the fairy: Set the torso at the back of the body rim. With doubled yarn, whipstitch the back 12 sts of the base disk to the back 12 sts of rim Rnd 16, stitch for stitch, going around twice. The front 24 rim sts stay open as the loading gap. Lift the front petals to push bags in.
- Crown: With green, ch 36, join and sl st in each ch around. Sew it to the head along with 5 mini sunflowers, 5 leaves and 6 daisies.
- Side vines (make 2): With green, ch 20, then sl st in 2nd ch from hook and in each ch back. Each vine is about 4 in (10.2 cm) long. Sew 2 mini sunflowers and 3 leaves to each vine, then attach one vine under the skirt at each side.
- Hanging loop: With green, ch 60 and sl st back along the chain. Sew both ends to the top of the head under the crown to make a 5 in (12.7 cm) loop.
Border
The border trims the bottom dispensing opening. Use the 4.0 mm hook. Border gauge is 18 sc = 4 in (10.2 cm).
Rnd 1 (golden yellow): Join the yarn in any remaining loop of the foundation chain. Ch 1, sc in each remaining loop; join. [24 sc]
Rnd 2 (green): Ch 1, sc in next 3 sts, Leaf Point; repeat around; join. [24 sc + 8 Leaf Points]
Fasten off. Sew the 4 brown leaves and 4 mini sunflowers in an alternating ring just above the border.
Why the math works: The foundation has 24 chains, so the border starts with exactly 24 sc. Since 24 ÷ 3 = 8, the Leaf Points space evenly with no partial repeat. On the smaller hook, 24 sc measure about 5.3 in (13.5 cm) around. That snugs the 6 in (15.2 cm) ring into an opening about 1.7 in (4.3 cm) wide, so bags feed out one at a time.
Final Blocking
- Lightly mist the wings, petals and leaves.
- Pin the wings flat to 4.7 in (11.9 cm) and 3.3 in (8.4 cm) long and let them dry.
- Shape the petal tips so they point downward.
- Fill the body with bags. Check for a 10 in (25.4 cm) flat width and a 12 in (30.5 cm) height.
- Steam the mesh lightly from 1 in (2.5 cm) away. Keep the steam away from the doll’s face and curls.
- Let everything dry fully before hanging.
Final Quality-Control Checklist
- 16 even loops in Rnds 4–13.
- Rim has 36 sc; torso base has 24 sc.
- Fairy is joined over the back 12 rim sts, with the front 24 sts open.
- Skirt tiers have 12 / 10 / 8 pieces.
- Border has 24 sc and 8 Leaf Points.
- Wings are symmetrical and secure.
- Hanging loop is sewn through the head and crown.
- Ends are woven in at least 1 in (2.5 cm).
Troubleshooting
- Bottom cups too deeply: Use ch 6 in Rnds 2–4.
- Body too short: Add one 16-loop round within Rnds 5–10. Each round adds about 1 in (2.5 cm).
- Rim ruffles: Redo Rnds 14–16 with a 3.75 mm hook.
- Fairy tips forward: Stuff the torso more firmly and sew across all 12 back sts.
- Bags drop out: Work border Rnd 1 with a smaller hook.
- Curls relax: Wet them, wrap them around a pencil and let them dry.
Care
Spot clean with mild soap and cool water, then lay flat to dry. Don’t machine wash it, because that can loosen the curls and safety eyes.

Final Notes
Here is the measurement chain in order:
- A 24-chain foundation of 6 in (15.2 cm) grows to 16 mesh loops and a 10 in (25.4 cm) flat width.
- The body tapers to a 36-sc rim.
- The fairy’s 24-st base sits over the back 12 rim stitches.
- The border closes the foundation into a 1.7 in (4.3 cm) opening.
Check each stage, and your fairy will hang straight and dispense bags neatly.
Happy crocheting!