

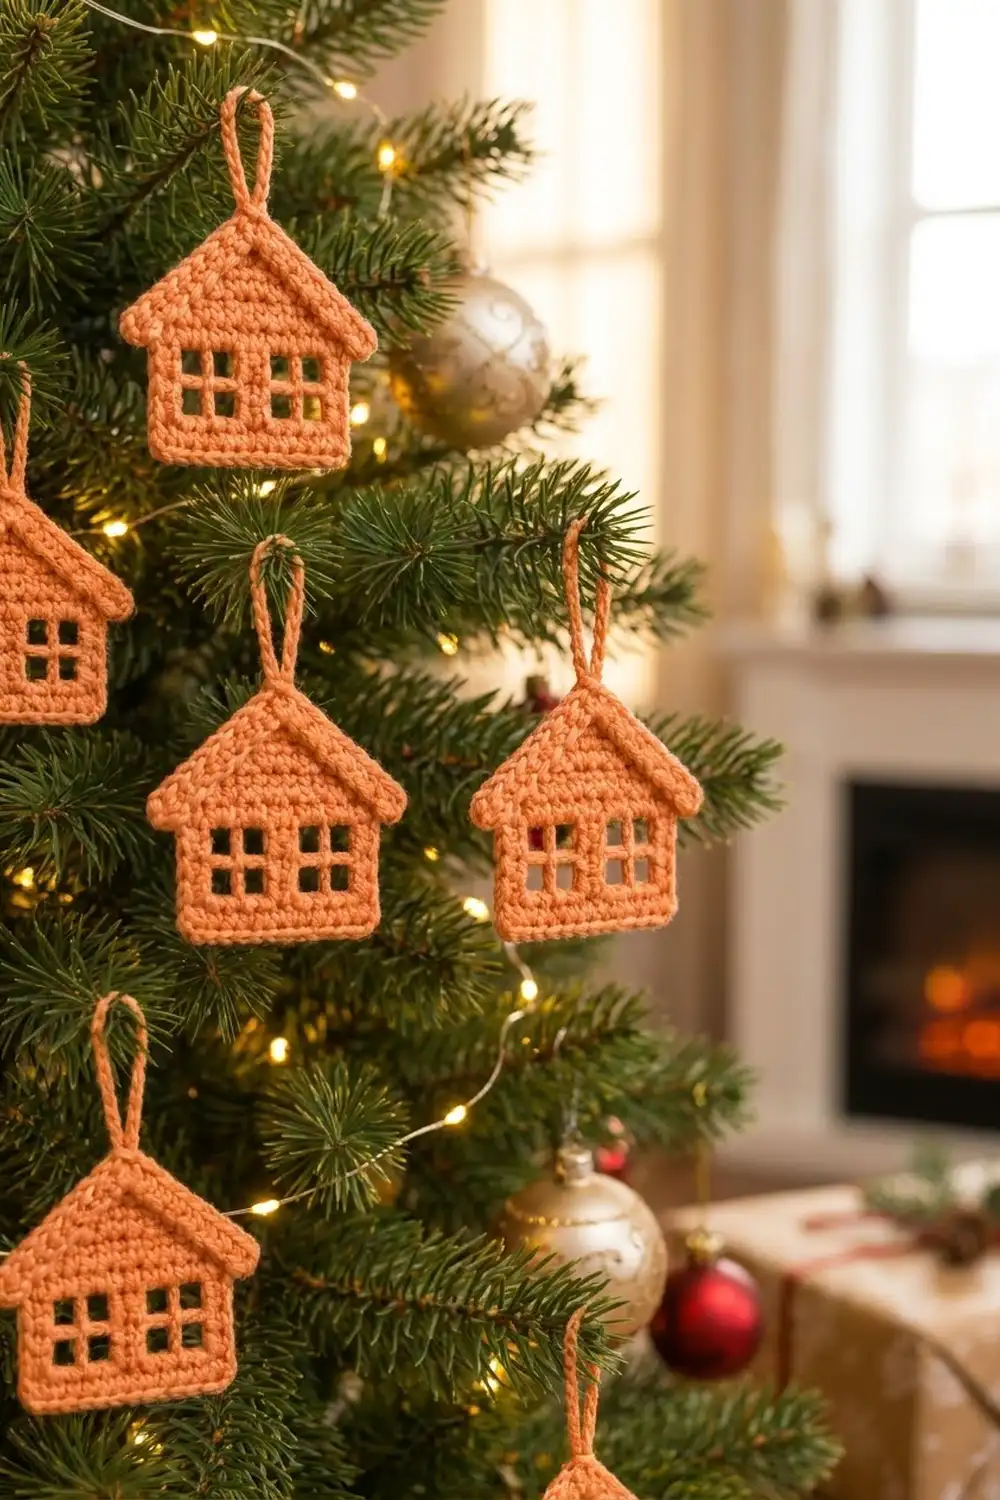
This small house ornament is quick to make. It is a flat, one-piece cottage in warm apricot yarn, with two four-pane windows, a roof with eaves that stick out at the sides, and a raised rope-like trim along the roof. A chained loop at the peak lets it hang straight from a branch.
The style is simple and tidy. Dense single crochet keeps the walls firm, and the windows are true openings, so tree lights shine through them. The finished ornament is about 3.7 in (9.4 cm) wide across the eaves and 3.4 in (8.6 cm) tall, not counting the loop. With the loop it is about 4.6 in (11.7 cm) tall.
This pattern uses US crochet terms throughout.
How it’s built: You start at the bottom and work the house body in rows. Two double crochet rows form the window panes. Next you add one wider row for the eaves and decrease the roof to a single stitch at the peak. Then you work one round of single crochet around the whole edge. Last comes a row of reverse single crochet (crab stitch) along the roof, with the hanging loop worked into it at the peak.
Finished Size and Construction
- Finished size: 3.7 in (9.4 cm) wide at the eaves x 3.4 in (8.6 cm) tall, plus a 1.2 in (3.0 cm) loop
- Skill level: Easy to intermediate
- Terminology: US
- Yarn weight: Sport (#2), cotton or cotton blend
- Hook: 3.25 mm (US D/3)
- Number of pieces: 1
- Layout: Single flat piece, no joining
- Piece size before border: body 2.8 in (7.1 cm) wide, eaves 3.2 in (8.1 cm) wide, 3.0 in (7.6 cm) tall
- Border depth: Round 1 adds about 0.2 in (0.5 cm) per edge. Round 2 adds about 0.1 in (0.3 cm) along the roof only.
Materials
Yarn: Use a smooth, mercerized or matte cotton in sport weight. Cotton gives crisp stitches, square window openings, and an ornament that stays flat on the tree. Acrylic works too, but it can make the edges look a little fuzzy.
- Apricot / peach orange: 10 g, about 30 m (33 yd)
This amount includes a margin. The ornament itself uses about 6 g.
Tools:
– 3.25 mm (US D/3) crochet hook
– Tapestry needle
– 2 stitch markers
– Scissors
– Blocking mat and rust-proof pins
– Optional: spray starch or a light fabric stiffener
Abbreviations (US Terms)
- ch: chain
- sc: single crochet
- dc: double crochet
- sl st: slip stitch
- sk: skip
- sp: space
- st(s): stitch(es)
- sc2tog: single crochet 2 together (1 decrease)
- sc3tog: single crochet 3 together (2 decreases)
- rev sc: reverse single crochet (crab stitch)
- fsc: foundation single crochet
- RS: right side
Special stitches
Foundation single crochet extension (fsc): Insert your hook into the base of the last sc made (the chain-like loop at its bottom). Yarn over, pull up a loop, yarn over and pull through 1 loop (this makes the base chain), then yarn over and pull through 2 loops. This adds 1 stitch to the end of a row without a separate chain.
Reverse single crochet (rev sc): Work from left to right (right to left if you are left-handed). Insert your hook into the next stitch to the right, yarn over, pull up a loop, yarn over and pull through both loops. Each stitch twists into a rolled, rope-like ridge.
sc3tog: Insert into the next st and pull up a loop, 3 times. Yarn over and pull through all 4 loops on the hook.
Gauge and Checkpoints
Gauge: 24 sc and 24 rows = 4 in (10.2 cm). That works out to 12 sc x 12 rows = 2 in (5.1 cm), or 6 stitches and 6 rows per inch.
One dc row stands about as tall as 2 sc rows: about 0.3 in (0.8 cm).
Test one piece first. Make one ornament before you start a batch, and measure it at each of these points:
- After Row 2: 2.8 in (7.1 cm) wide, 0.3 in (0.8 cm) tall
- After Row 5: 1.2 in (3.0 cm) tall, and each window pane looks about square
- After Row 8: 1.7 in (4.3 cm) tall
- After Row 9: 3.2 in (8.1 cm) wide at the eaves
- After Row 16: 3.0 in (7.6 cm) tall
- After the border: 3.7 in (9.4 cm) x 3.4 in (8.6 cm)
Too big? Go down 0.25 mm in hook size, or crochet a little tighter.
Too small? Go up 0.25 mm.
A difference of 0.1 in (0.3 cm) either way is fine for an ornament. A larger difference will change the shape of the window panes. If the panes come out tall and narrow, your dc rows are too tall. Pull the dc’s first loop up a little less, or swap the dc for a tall hdc.
The House Body
Row 1: Ch 18. Sc in 2nd ch from hook and in each ch across. Turn. (17 sc)
Row 2: Ch 1 (does not count as a st here or anywhere else). Sc in each st across. Turn. (17 sc)
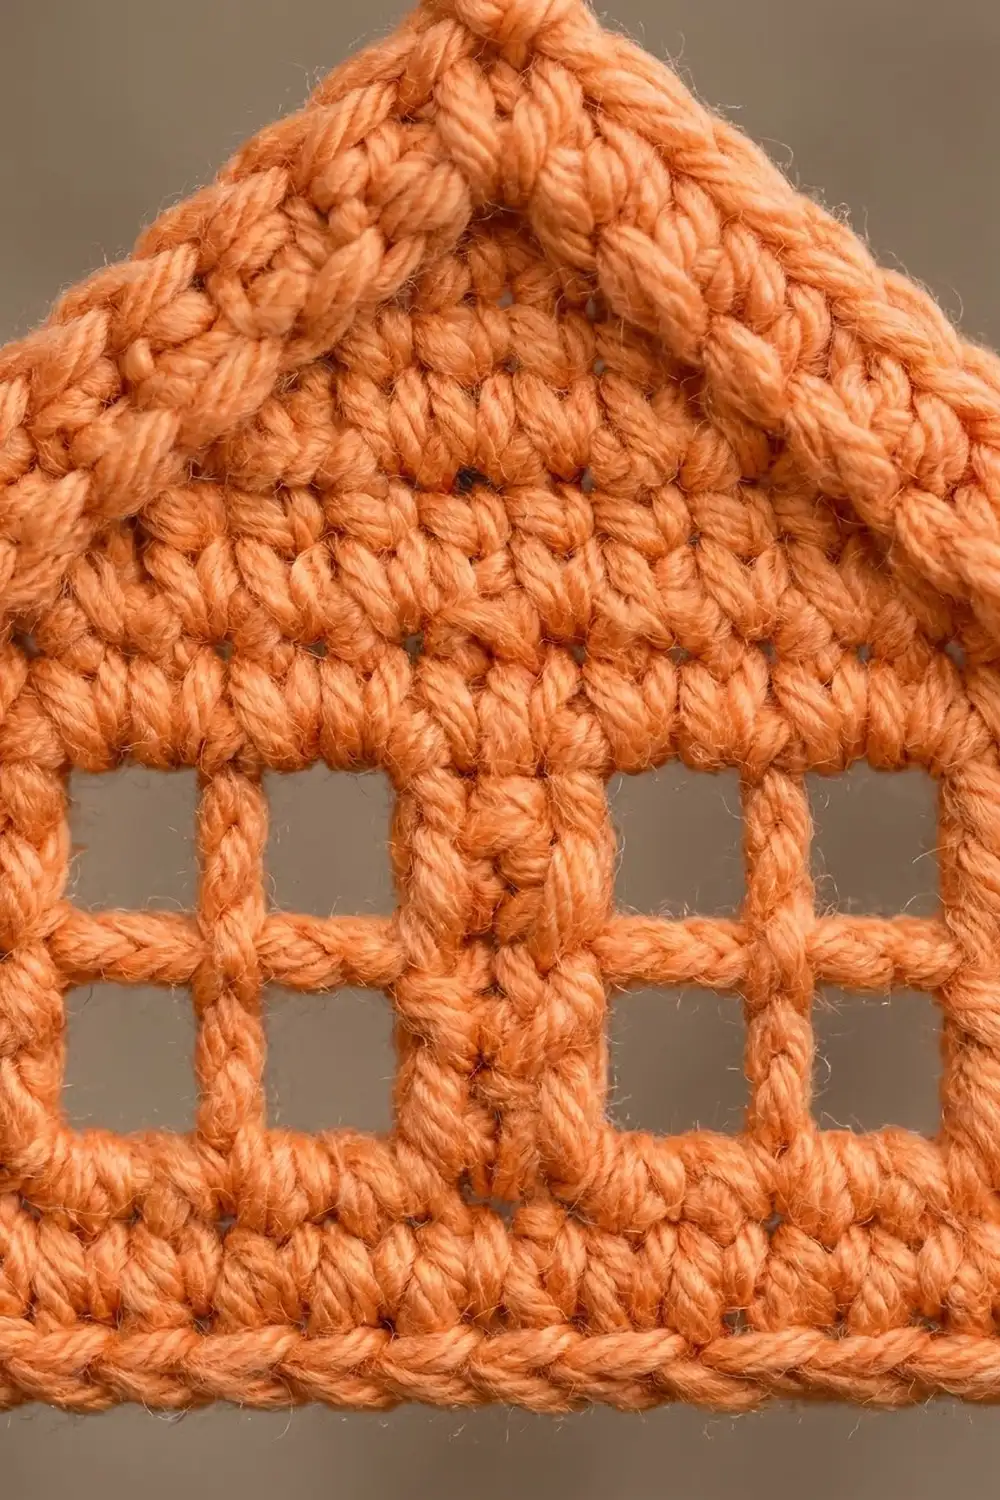
Row 3 (window panes, lower): Ch 3 (counts as first dc). Dc in next st, ch 2, sk 2, dc in next st, ch 2, sk 2, dc in each of next 3 sts, ch 2, sk 2, dc in next st, ch 2, sk 2, dc in each of last 2 sts. Turn. (9 dc and 4 ch-2 sps)
Check that the row uses up 17 stitches: 2 + 2 + 1 + 2 + 3 + 2 + 1 + 2 + 2 = 17. The single dc in each window is the vertical bar between panes. The 3-dc group is the wall between the two windows.
Row 4 (horizontal window bar): Ch 1. Sc in each dc, and work 2 sc in each ch-2 sp. Work the last sc into the top of the turning ch-3. Turn. (9 sc + 8 sc = 17 sc)
Row 5 (window panes, upper): Repeat Row 3. The dc posts should sit right on top of the Row 3 posts. (9 dc and 4 ch-2 sps)
Row 6: Repeat Row 4. (17 sc)
Rows 7–8: Ch 1. Sc in each st across. Turn. (17 sc)
At the end of Row 8, ch 2 and turn. Do not work a ch 1.
The windows are now finished. Each is 5 sts wide, about 0.8 in (2.0 cm) square. Each pane is 2 sts wide and one dc row tall, about 0.3 in (0.8 cm) square. The center wall is 0.5 in (1.3 cm) wide.
The Roof
Row 9 (eave row): Sc in 2nd ch from hook. This is the first eave overhang stitch. Sc in each of the 17 sts across. Work 1 fsc into the base of the last sc to make the second overhang stitch. Turn. (1 + 17 + 1 = 19 sc)
This row sticks out one stitch past each wall. That overhang is the eave.
Row 10: Ch 1, sc2tog, sc in next 15 sts, sc2tog. Turn. (17 sc)
Row 11: Ch 1, sc3tog, sc in next 11 sts, sc3tog. Turn. (13 sc)
Row 12: Ch 1, sc2tog, sc in next 9 sts, sc2tog. Turn. (11 sc)
Row 13: Ch 1, sc3tog, sc in next 5 sts, sc3tog. Turn. (7 sc)
Row 14: Ch 1, sc2tog, sc in next 3 sts, sc2tog. Turn. (5 sc)
Row 15: Ch 1, sc2tog, sc in next st, sc2tog. Turn. (3 sc)
Row 16: Ch 1, sc3tog. (1 sc) This stitch is the peak. Do not fasten off.
The roof alternates between losing 1 and 2 stitches at each end. That gives a slope of about 40 degrees, matching a classic cottage roof. If you only decreased 1 per side on every row, the roof would come out too tall and pointed.
Border
Border gauge: The border uses the same tension as the body, 6 sc per inch. Each sc you place along an edge should cover about 0.2 in (0.5 cm) of that edge.
When you work into row ends, insert the hook under 2 strands of the edge stitch so you don’t leave holes.
Round 1 (single crochet edging, all around)
With the peak in front of you, ch 1 and do not turn. Work in this order:
- Peak: 3 sc in the Row 16 st. (1 position + 2 extra = 3)
- First roof slope (going down): 1 sc in the end of Row 15, 2 sc in each end of Rows 14, 13, 12 and 11, 1 sc in the end of Row 10. (6 row ends + 4 extra = 10)
- Eave point: 3 sc in the end of Row 9. (1 + 2 extra = 3)
- Eave underside: 1 sc in the free loop under the overhang stitch. (1)
- First wall: 1 sc in the end of Row 8, 1 sc in Row 7, 1 sc in Row 6, 2 sc in Row 5, 1 sc in Row 4, 2 sc in Row 3, 1 sc in Row 2. (7 row ends + 2 extra = 9)
- Bottom edge: 3 sc in the first foundation-ch loop, 1 sc in each of the next 15 ch loops, 3 sc in the last ch loop. (17 positions + 4 extra corner sts = 21)
- Second wall: Work Rows 2 to 8 in the reverse of step 5. (9)
- Eave underside: 1 sc in the base of the fsc. (1)
- Eave point: 3 sc in the end of Row 9. (3)
- Second roof slope (going up): 1 sc in Row 10, 2 sc in each of Rows 11, 12, 13 and 14, 1 sc in Row 15. (10)
Sl st to the first sc. Fasten off. (3 + 10 + 3 + 1 + 9 + 21 + 9 + 1 + 3 + 10 = 70 sc)
Why the math works:
- Bottom: 17 stitches is 2.8 in (7.1 cm). Each corner adds 2 extra stitches so it can turn flat.
- Walls: Each wall is 1.7 in (4.3 cm) tall, or about 10 stitches long. That length is covered by the 9 sc on the wall plus the corner stitch below it.
- Roof slopes: Each slope rises 1.3 in (3.3 cm) over a run of about 1.6 in (4.1 cm). That makes the slope edge about 2.1 in (5.3 cm), or roughly 12 to 13 stitches long. You place 10 sc along it, plus 1 to 2 corner stitches at each end, so the edge stays flat. If you only worked 1 sc per row end (6 sc), the roof would cup inward.
- Rows that get 2 sc: These are the dc rows on the walls and the steeper stretches of the roof.
Checkpoint: body 3.2 in (8.1 cm) wide, eaves 3.5 in (8.9 cm), height 3.3 in (8.4 cm).
Round 2 (crab-stitch roof trim and hanging loop)
With the RS facing, choose the eave from which you can work toward the peak while moving left to right (right to left if you are left-handed). Join with a sl st in the center sc of that eave point’s 3-sc group. Then:
- Ch 1, rev sc in the same st. Rev sc in the next eave sc. (2)
- Rev sc in each of the 10 slope sc. (10)
- Rev sc in the first peak sc and in the center peak sc. Ch 14, then sl st into the same center peak sc to close the loop. Rev sc in the third peak sc. (3 rev sc + loop)
- Rev sc in each of the 10 sc on the other slope. (10)
- Rev sc in the first eave sc and the center eave sc. (2)
Fasten off. (2 + 10 + 3 + 10 + 2 = 27 rev sc)
The walls and the bottom edge stay plain sc, just like the photo. The 14-ch loop hangs about 1.2 in (3.0 cm) tall.
Final checkpoint: 3.7 in (9.4 cm) wide at the eaves, 3.4 in (8.6 cm) tall without the loop.
Final Blocking
- Weave in all ends inside the edging, not through the window bars, which would make them thicker.
- Lightly mist the ornament with water, or wet it and press out the excess in a towel.
- Pin it flat, RS up. Pin both bottom corners square, set the body width to 3.2 in (8.1 cm), and set the eaves to 3.7 in (9.4 cm).
- Pin the peak so the height is 3.4 in (8.6 cm) and the two roof slopes are straight and even.
- Put one pin through the center of each window and nudge each pane into a square.
- If you like, spray lightly with starch so the ornament hangs crisply.
- Let it dry completely, then unpin it. Smooth the hanging loop so it points straight up.
Final Quality-Control Checklist
- Row 4 and Row 6 each have 17 sc.
- Both windows have 4 open panes, and the bars line up.
- The center wall is 3 sts wide, and each outer wall is 2 sts wide.
- The eaves stick out evenly, 1 stitch on each side.
- The roof ends in a single centered peak stitch.
- Round 1 has 70 sc, and the corners lie flat.
- Round 2 has 27 rev sc on the roof only, and the loop is centered.
- The finished size is 3.7 x 3.4 in (9.4 x 8.6 cm), give or take 0.1 in (0.3 cm).
Troubleshooting
- The panes are slanted or uneven: Your dc posts have drifted. In Row 5, count from the edge so each dc sits right above a Row 3 dc.
- The roof leans to one side: You probably did a decrease on one end but missed it on the other. Count after each roof row.
- The roof edging ruffles: You placed too many stitches on the slopes. Work exactly 10 sc per slope.
- The roof edging pulls in: You placed too few. Make sure Rows 11 to 14 each got 2 sc.
- The crab stitch looks flat: Keep each loop loose. Rev sc twists better with a relaxed tension.
- There are holes where the eaves meet the walls: Work the underside sc through 2 strands, then close any gap with the tail when you weave in ends.
- The ornament curls: Block it flat and add a little starch.
Care
Hand wash in cool water with mild soap, press out the water in a towel, and dry flat pinned to shape. Store flat between seasons so the hanging loop and eaves keep their shape.
Final Notes
The measurement chain is simple:
- A gauge of 6 sts per inch gives a 17-stitch body 2.8 in (7.1 cm) wide.
- Two dc window rows with sc rows above and below them bring the body to 1.7 in (4.3 cm) tall.
- The 19-stitch eave row measures 3.2 in (8.1 cm).
- Eight roof rows finish the piece at 3.0 in (7.6 cm) tall.
- The 70-stitch border round and the 27-stitch crab trim bring it to 3.7 x 3.4 in (9.4 x 8.6 cm), with a 1.2 in (3.0 cm) loop.
If your first ornament hits these checkpoints, every one after it will match. You can make a whole neighborhood of little cottages for your tree.
Happy crocheting!