

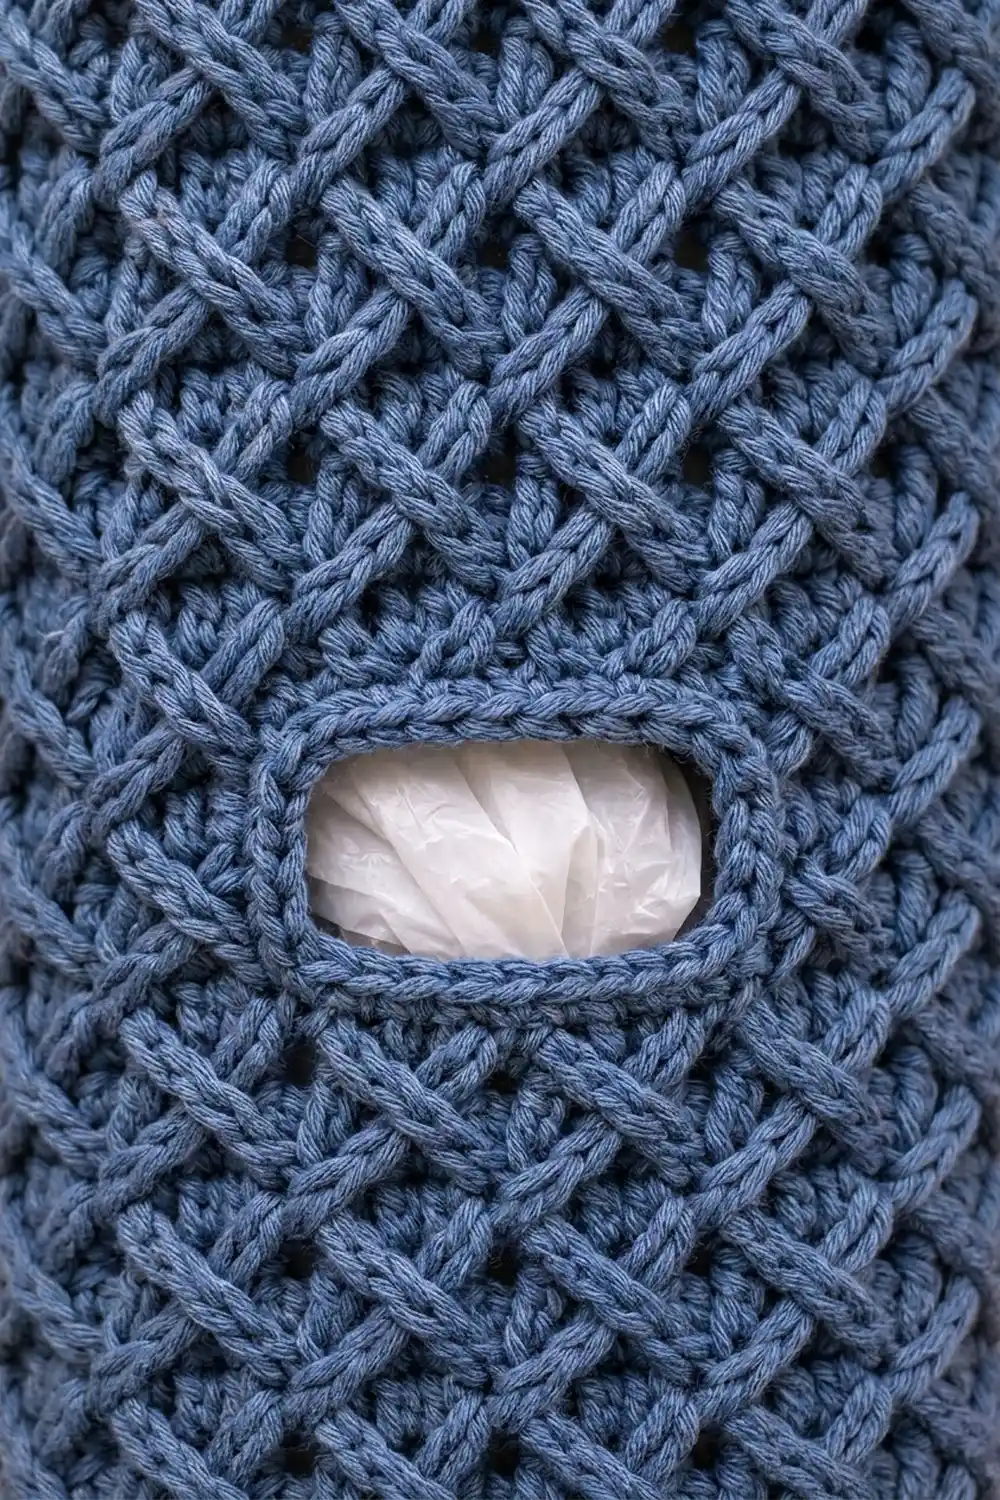
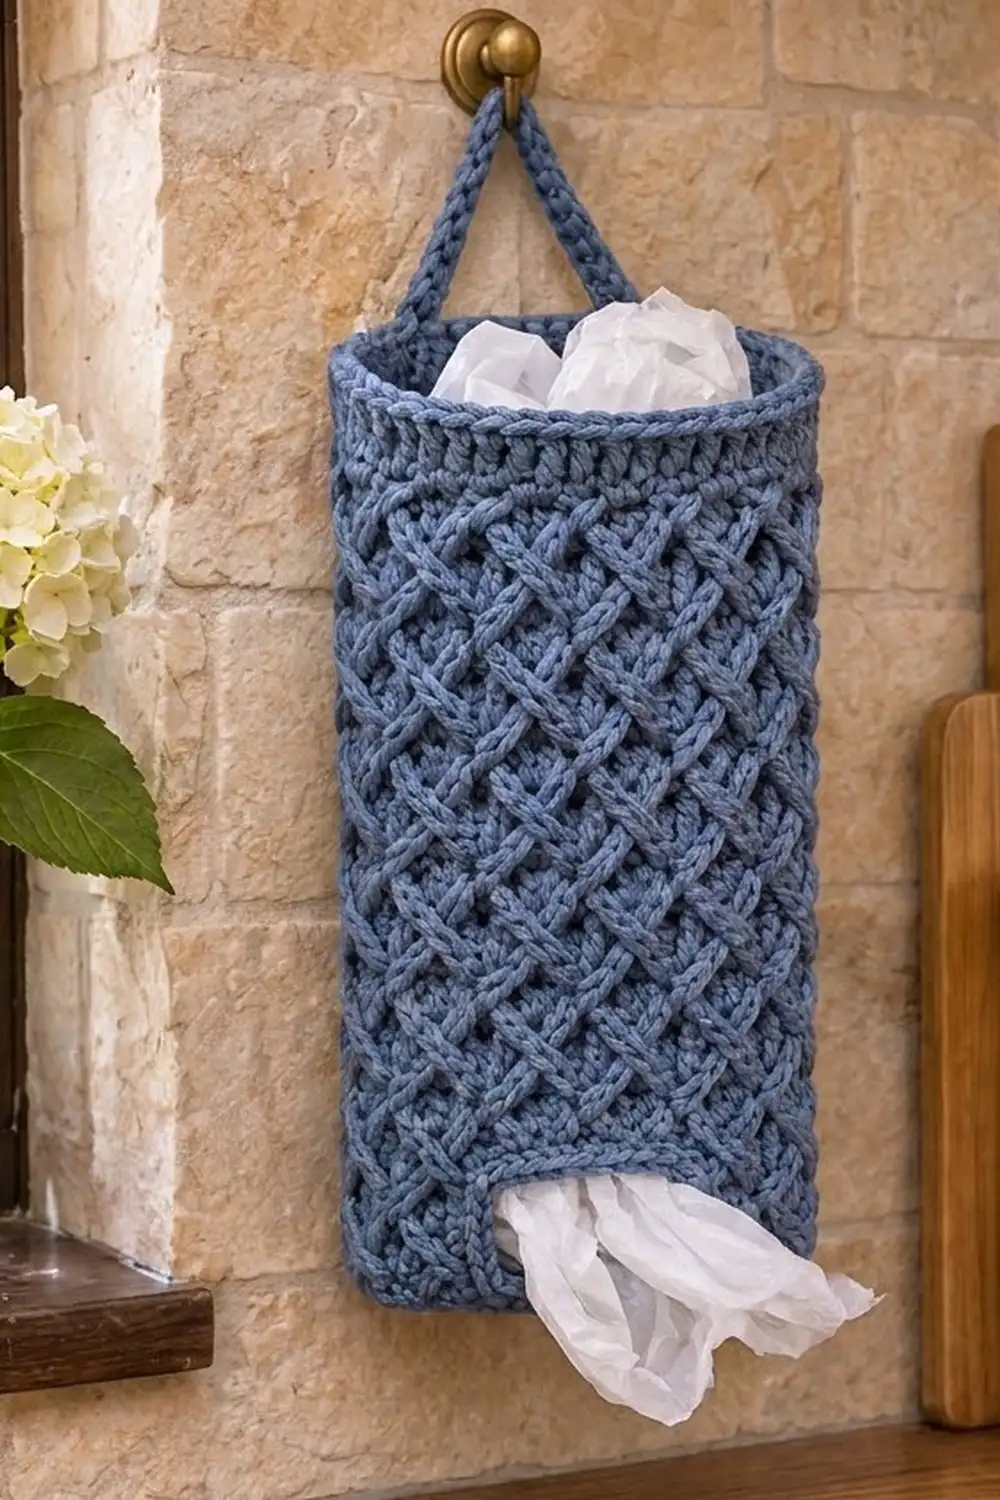
This plastic bag holder is a tall oval tube covered in a woven lattice texture. Diagonal bands of crossed front post stitches weave over and under each other, so the surface looks like a basket made of thick denim cord. A hanging strap rises from the back of the rim. An oval opening near the bottom lets you pull the bags out one at a time.
The sample is worked in one color, a soft denim blue, in worsted-weight cotton. It also looks good in gray, oatmeal, or any solid color that shows the stitch texture. Avoid variegated yarn, because the color changes hide the woven lattice.
The finished holder is about 6 in (15.2 cm) wide when flat and 12 in (30.5 cm) tall, not counting the strap. With the strap, it hangs about 15.5 in (39.4 cm) tall. All instructions use US crochet terms.
You make the whole holder in one piece from the bottom up. First comes an oval double crochet base. Next is a solid single crochet band with the dispensing slot built in, then 14 rounds of Celtic weave lattice and a solid single crochet rim. Last, you work a strap straight off the rim. The only sewing is weaving in yarn tails.
Finished Size and Construction
- Finished size: 6 in (15.2 cm) wide flat x 12 in (30.5 cm) tall; 15.5 in (39.4 cm) tall including the strap
- Skill level: Intermediate (front post treble crochet crosses)
- Terminology: US crochet terms
- Yarn weight: Medium / worsted (#4)
- Hook: 5.0 mm (H-8)
- Number of pieces: 1
- Layout: One oval tube worked bottom-up in joined rounds, with a strap worked directly off the rim
- Piece size: Base about 5 in x 2 in (12.7 cm x 5.1 cm); circumference 12 in (30.5 cm)
- Size before border: 6 in (15.2 cm) wide flat x 10.75 in (27.3 cm) tall after the last lattice round
- Border depth: Top rim 1.3 in (3.3 cm); opening edging about 0.25 in (0.6 cm)
Materials
Use a smooth worsted-weight cotton or cotton blend with good stitch definition. Cotton holds its shape when the holder is full, and a firm twist makes the crosses look round and cord-like. Soft acrylic also works, but the tube may stretch more.
- Denim Blue: 170 g / 290 m (317 yd)
For a gray version like the twin holder, use the same amount of gray. These amounts include a margin of about 15% for your gauge swatch and small differences in tension. Post stitches use much more yarn than flat stitches, so don’t cut it close.
Tools:
- 5.0 mm (H-8) crochet hook
- 4 locking stitch markers
- Tapestry needle
- Scissors
- Measuring tape
- Spray bottle and pins for blocking
- A rolled towel or a 4 in (10.2 cm) wide cardboard tube for shaping
Abbreviations (US Terms)
- ch: chain
- sl st: slip stitch
- sc: single crochet
- dc: double crochet
- BLO: back loop only
- FPtr: front post treble crochet
- sk: skip
- st(s): stitch(es)
- rnd(s): round(s)
- RS / WS: right side / wrong side
- rep: repeat
Special stitches
FPtr (front post treble crochet): Yarn over twice. Insert the hook from front to back to front around the post of the stitch. Yarn over and pull up a loop. Then (yarn over, pull through 2 loops) 3 times.
Front cross: Sk next 2 sts and FPtr around each of the next 2 sts. Then, working in front of the 2 sts you just made, FPtr around each of the 2 skipped sts. This uses 4 sts and makes 4 sts.
Back cross: Sk next 2 sts and FPtr around each of the next 2 sts. Then, working behind the 2 sts you just made, FPtr around each of the 2 skipped sts. This uses 4 sts and makes 4 sts.
Gauge and Checkpoints
- Single crochet: 16 sts x 18 rows = 4 in (10.2 cm)
- Celtic weave lattice: 16 sts (4 crosses) x 7 rnds = 4 in (10.2 cm)
Before you start, make a small sc swatch 20 sts wide and 20 rows tall. Then work the base and band (Rnds 1–13) and check them before going on. For this piece, they are the real test of your gauge.
Checkpoints:
- After Rnd 2, the base is about 5 in x 2 in (12.7 cm x 5.1 cm) and lies flat.
- After Rnd 13, the band is about 2.75 in (7.0 cm) tall, and the tube is 6 in (15.2 cm) wide when flattened.
- After Rnd 27, the piece is about 10.75 in (27.3 cm) tall and still 6 in (15.2 cm) wide.
- After Rnd 33, the body is about 12 in (30.5 cm) tall.
If your flat width is more than 1/4 in (0.6 cm) too big, go down one hook size. If it’s too small, go up one hook size. If the base cups, your dc are too tight; if it ruffles, they are too loose. Lattice rounds always pull in a little. That’s why the stitch count can stay at 48 all the way up.
Base
Ch 16.
Rnd 1: Dc in 3rd ch from hook and in next 12 ch (13 dc). Work 6 dc in last ch. Rotate and work along the other side of the chain: dc in next 12 ch, then 5 dc in last ch (the same ch that holds the first dc). Join with sl st to first dc. (36 sts)
You now have 12 sts along each long side and 6 sts at each end.
Rnd 2: Ch 2 (does not count as a st here or anywhere in the pattern). 2 dc in first st, dc in next 12 sts, 2 dc in each of next 6 sts, dc in next 12 sts, 2 dc in each of last 5 sts. Join to first dc. (48 sts)
Count check: 12 + 12 + 12 + 12 = 48. Each long side has 12 sts, and each end has 12 sts. From here on, sts 3–14 are Side 1, which becomes the front.
Lower Band and Dispensing Opening
Rnd 3: Ch 1, sc in BLO of each st around. Join to first sc. (48 sc)
This round makes the sharp edge where the base turns up into the wall.
Rnd 4: Ch 1, sc in each st around. Join. (48 sc)
To make the opening, you work rows over 38 sts and leave 10 sts of Side 1 unworked.
Row 5 (WS): Sl st in next 2 sts (the hook is now at st 3). Ch 1, turn. Sc in the same st, then sc in each of next 37 sts, working backward around the tube and ending in st 14. Turn. (38 sc)
The 10 unworked sts (sts 4–13) form the bottom edge of the opening.
Rows 6–10: Ch 1, sc in each sc across. Turn at the end of each row except Row 10. (38 sc each row)
Row 10 is a RS row, and it ends next to the gap.
Rnd 11 (closing round): Do not turn. Ch 10 loosely across the gap and join with sl st to the first sc of Row 10. Ch 1, sc in the same st and in each sc up to the chain (38 sc), then sc in each of the 10 ch (10 sc). Join. (48 sc)
Rnd 12: Ch 1, sc in each st around. Join. (48 sc)
Rnd 13: Ch 2, dc in each st around. Join to first dc. (48 dc)
The opening is now 10 sts wide and 6 rows tall, about 2.5 in x 1.3 in (6.4 cm x 3.3 cm), centered on the front.
Celtic Weave Lattice
Every round of the lattice has 12 crosses. Rounds alternate between front crosses and back crosses, and each round’s start moves over by 2 sts. As a result, each cross sits over the point where two crosses from the round below meet. That over-and-under shift makes the woven diamond look.
Rnd 14 (front cross round): Ch 2. Work a front cross 12 times around, working your post sts around the dc of Rnd 13. Join with sl st to the top of the first FPtr. (48 FPtr, 12 crosses)
Rnd 15 (back cross round, offset start): Sl st in next st. Ch 2. Work a back cross 11 times. For the last cross, sk the last 2 sts and FPtr around the first 2 sts of the previous round. Then, working behind them, FPtr around the 2 skipped sts. Join to first FPtr. (48 FPtr, 12 crosses)
The single sl st moves your starting point over by 2 sts. The last cross wraps across the join, so the pattern has no visible seam.
Rnd 16 (front cross round, offset start): Work as for Rnd 15, but use front crosses. The last cross also wraps across the join. (48 FPtr, 12 crosses)
Rnds 17–27: Repeat Rnds 15 and 16 in order. Rnd 27 is a back cross round, like Rnd 15. (48 FPtr each round)
Rnds 14–27 make 14 lattice rounds: 7 front cross rounds and 7 back cross rounds. Together they add about 8 in (20.3 cm) of height.
Always work around the posts of the round you just finished, not the round below it. Pull each FPtr up to the same height as its neighbors.
Top Rim and Strap
Rnd 28: Ch 1, sc in the top of each FPtr around. Join. (48 sc)
Rnds 29–33: Ch 1, sc in each st around. Join. (48 sc each round) Do not fasten off.
Mark the strap position: Flatten the holder so the opening is centered on the front. The folds are the sides, with 24 sts on the front and 24 on the back. Find the center of the back, which falls between two sts. Count 4 sts to the right of center and mark the next 4 sts (Strap Start). Then count 4 sts to the left of center and mark the next 4 sts (Strap End). That leaves 8 free sts, or 2 in (5.1 cm), between the two strap ends.
Strap: Sl st along the rim to the first Strap Start st.
Row 1: Ch 1, sc in the same st and in next 3 sts. Turn. (4 sc)
Rows 2–40: Ch 1, sc in each sc. Turn. (4 sc each row)
The strap is now about 8.9 in (22.6 cm) long. Bring the end over to the Strap End sts, checking that the strap isn’t twisted. Hold the last row on top of the rim and sl st through both layers 4 times. Fasten off.
Strap edging: Join yarn at the bottom of one long edge. Sl st loosely into each row end (40 sl st) to give the edge a corded look. Fasten off, then repeat on the other edge. The loop stands about 3.5 in (8.9 cm) above the rim.
Border
On this piece, the border is the top rim plus the edging around the opening. Both follow the sc gauge of 16 sts and 18 rows = 4 in (10.2 cm).
Top rim (Rnds 28–33): Each round has 48 sts, or 24 on the front and 24 on the back when flattened. At 16 sts per 4 in, 24 sts = 6 in (15.2 cm), which matches the lattice width. Six rounds at 18 rows per 4 in add 1.3 in (3.3 cm).
Opening edging, Rnd 1: With RS facing, join yarn at the bottom right corner of the opening. Work as follows, then join. (34 sc)
– Bottom (10): Sc in each of the 10 unworked sts of Rnd 4.
– Left side (7): Sc in 1 corner space and in 6 row ends.
– Top (10): Sc in the back bump of each of the 10 ch.
– Right side (7): Sc in 6 row ends and in 1 corner space.
Opening edging, Rnd 2: Sl st loosely in each sc around. Fasten off. (34 sl st)
Why the math works: The top and bottom of the opening each match the 10 skipped sts. Each side gets 1 st per row end for the 6 rows, plus 1 corner st so no hole forms. That makes 10 + 7 + 10 + 7 = 34, and the opening stays flat without flaring or puckering.
Final Blocking
- Weave in all ends on the inside, following the post stitches so they stay hidden.
- Slide a rolled towel or a 4 in (10.2 cm) wide tube inside the holder.
- Spray it evenly until it’s damp but not dripping.
- Pat it into an oval about 6 in (15.2 cm) wide flat and 12 in (30.5 cm) tall.
- Gently pinch each cross so the diagonal bands line up.
- Press the base flat and pin the opening into a neat oval.
- Lay the strap out straight and let it dry flat.
- Leave everything until completely dry, about 24 hours.
Final Quality-Control Checklist
- 48 sts in every round from Rnd 2 to Rnd 33
- Base lies flat, about 5 in x 2 in (12.7 cm x 5.1 cm)
- Opening centered on the front, with 34 sts in edging Rnd 1
- 14 lattice rounds with 12 crosses each and no broken diagonals
- No visible seam line in the lattice
- Width 6 in (15.2 cm) flat, height 12 in (30.5 cm)
- Strap untwisted, centered on the back, and edged on both sides
- All ends woven in securely
Troubleshooting
The lattice has a visible seam. You left out the offset sl st or the wrapping last cross. Rip back and start the round with exactly 1 sl st.
The diagonals change direction. You worked front crosses in two rounds in a row. Alternate front and back crosses every round.
The tube is narrower at the top. Your FPtr are too tight. Pull each loop up fully before you finish the stitch.
The opening gapes or bulges. Make sure the ch-10 is loose and each side of the edging has 7 sc.
The base cups. Your dc are too tight. Redo Rnd 2 with a 5.5 mm hook.
The strap stretches. Use cotton, or work the strap with a 4.5 mm hook.
Care
Hand wash in cool water and lay flat to dry, reshaping the oval while it’s damp. Don’t tumble dry, because heat can loosen the woven texture.
Final Notes
The measurement chain is short. Your gauge gives a 5 in x 2 in (12.7 cm x 5.1 cm) base with 48 sts, and the count stays at 48 all the way up. The band adds 2.75 in (7.0 cm), the lattice adds 8 in (20.3 cm), and the rim adds 1.3 in (3.3 cm). That gives a holder 12 in (30.5 cm) tall and 6 in (15.2 cm) wide. If you check your work at each checkpoint, your holder will hang straight and dispense bags neatly.
Happy crocheting!