

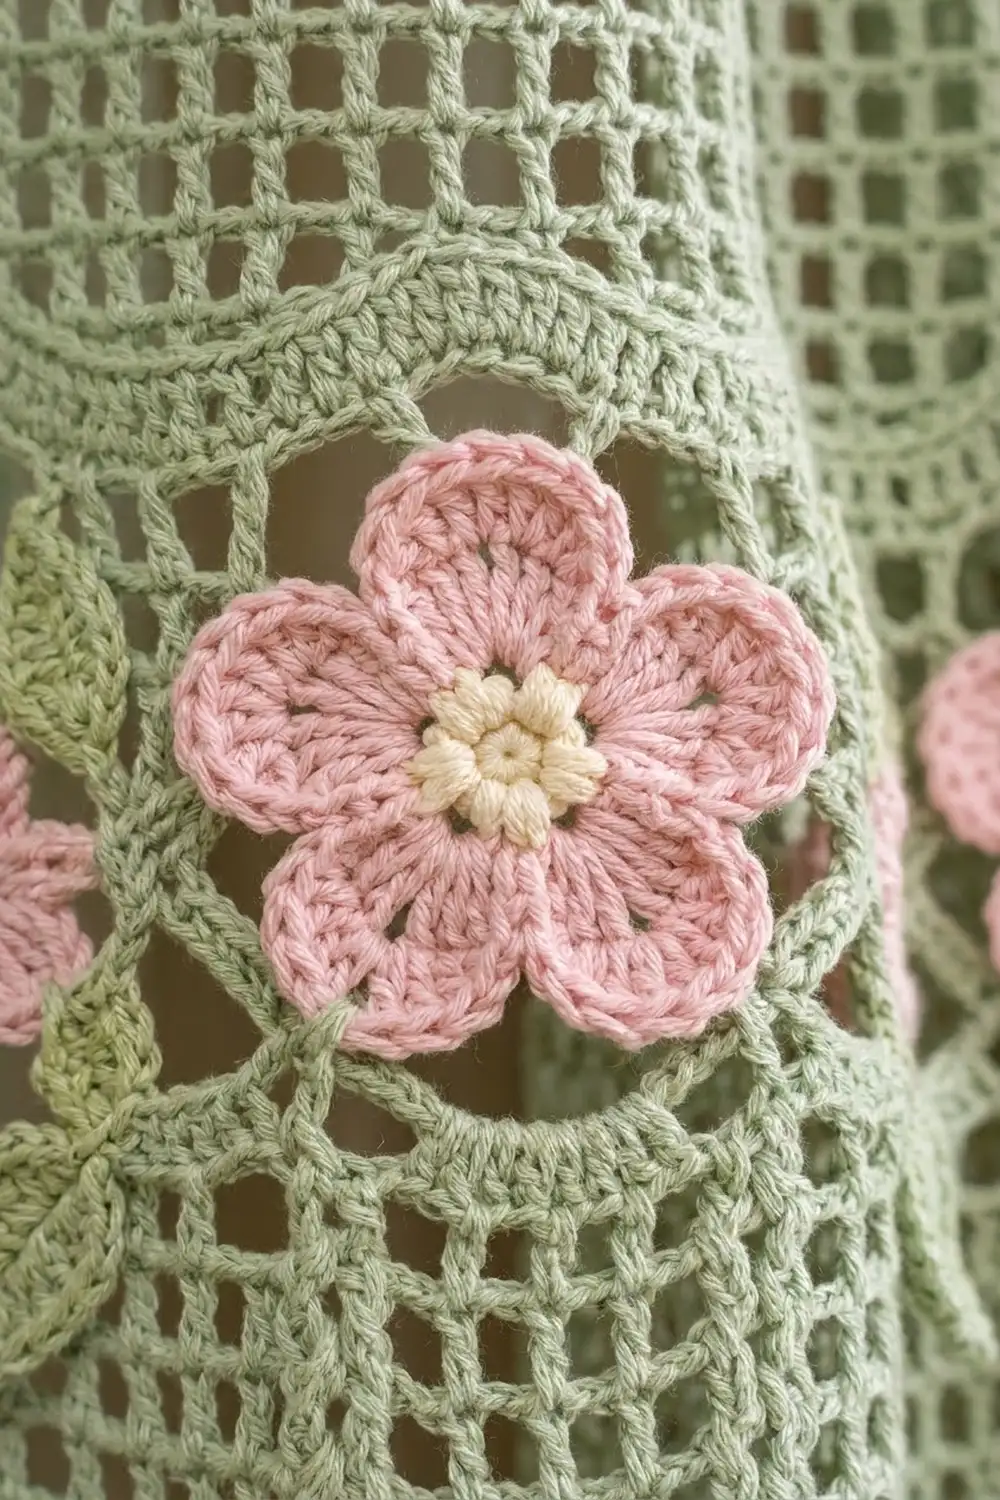
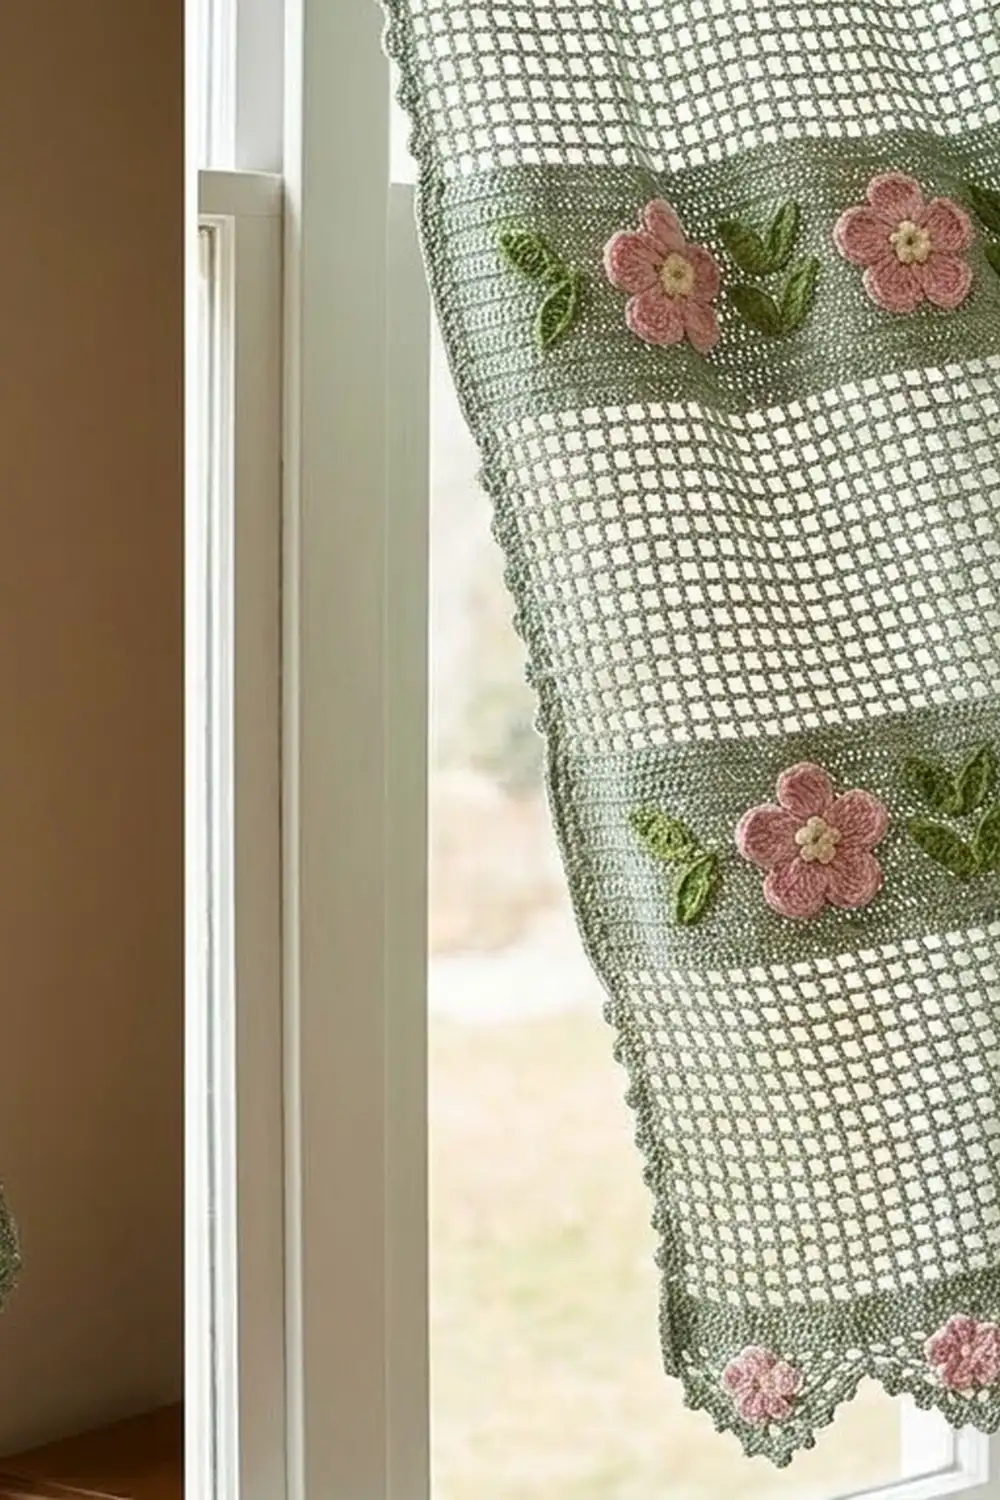
This curtain panel is light and airy. The body is an open filet mesh in sage green, crossed by three solid bands. Each band carries soft pink five-petal blossoms with cream knotted centers and small green leaves between them. Fan scallops finish the hem, and a tiny pink flower sits in each one.
The palette is four colors: sage, blush pink, cream, and leaf green. The look is cottage style, so the panel suits a kitchen, bedroom, or sunroom. All instructions use US crochet terms.
One finished panel measures 30.5 in (77.5 cm) wide by 70 in (177.8 cm) long, plus tab loops that rise 3 in (7.6 cm) above the top edge. Make two panels for a pair.
You work the body from the bottom up in rows of filet mesh, with three solid bands along the way. Next you add tab strips to the top edge, a scalloped edging along the foundation chain, and a single crochet edge down each side. Last, you make the flowers and leaves and sew them on.
Finished Size and Construction
- Finished size: 30.5 in × 70 in (77.5 cm × 177.8 cm) per panel, plus 3 in (7.6 cm) tab loops
- Skill level: Intermediate
- Terminology: US
- Yarn weight: DK (#3 light) cotton
- Hook: 4.0 mm (G-6)
- Number of pieces: 1 panel body (tabs and edgings are worked directly onto it), plus 99 sewn-on appliqués
- Layout: Mesh body with 3 solid bands, 9 tabs at the top, and 15 scallops at the hem
- Body size (before border): 30 in × 68 in (76.2 cm × 172.7 cm), 151 sts × 136 rows
- Border depth: 2 in (5.1 cm) scalloped hem, 0.25 in (0.6 cm) on each side
Materials
Choose a smooth mercerized or matte cotton in DK weight, about 106 m (116 yd) per 50 g. Cotton drapes well, holds its shape after blocking, and is washable. Avoid acrylic, because it tends to stretch out of shape on a long hanging panel.
Quantities for one panel:
- Sage green (main): 550 g, about 1,166 m
- Blush pink (flowers): 100 g, about 212 m
- Leaf green (leaves): 50 g, about 106 m
- Cream (flower centers): 25 g, about 53 m
All quantities include a margin of about 10%. Double them for a pair.
Tools:
- 4.0 mm (G-6) crochet hook
- Tapestry needle
- Stitch markers
- Measuring tape
- Rustproof pins and a large blocking surface
- Spray bottle
- Scissors
Abbreviations (US Terms)
- ch: chain
- sl st: slip stitch
- sc: single crochet
- hdc: half double crochet
- dc: double crochet
- sk: skip
- sp(s): space(s)
- st(s): stitch(es)
- RS / WS: right side / wrong side
Special stitches
- Mesh square: ch 1, sk 1 st, dc in next st.
- Picot: (sc, ch 3, sc) in the same space.
- French knot: with a tapestry needle, wrap the yarn around the needle 3 times, then insert the needle back next to its exit point.
Gauge and Checkpoints
Gauge: 10 mesh squares and 8 rows = 4 in (10.2 cm) after blocking. One square is 0.4 in (1.0 cm) wide and one row is 0.5 in (1.3 cm) tall, so 5 sts = 1 in (2.5 cm) and 2 rows = 1 in (2.5 cm).
Test first: Ch 27. Dc in the 4th ch from the hook and in each ch across (25 sts). Work 9 mesh rows as in Row 2 below, giving 12 squares. Block the swatch, then measure the center 10 squares and 8 rows.
- Too big: go down 0.5 mm in hook size.
- Too small: go up 0.5 mm in hook size.
Width matters most, because you can always add or remove mesh rows to change the length.
Checkpoints while working:
- After Row 1: 30 in (76.2 cm) wide
- After Row 8: 4 in (10.2 cm) tall
- After Row 72: 36 in (91.4 cm) tall
- After Row 120: 60 in (152.4 cm) tall
- After Row 136: 68 in (172.7 cm) tall
Panel Body
Use sage green throughout. Row 1 is the RS. A starting ch-3 counts as a dc. In mesh rows, ch 4 counts as dc + ch 1.
Foundation: Ch 153.
Row 1 (RS, solid): Dc in the 4th ch from the hook and in each ch across. Turn. (151 sts: 150 dc + turning ch)
Row 2 (mesh): Ch 4, sk the next st, dc in the next st. Ch 1, sk 1 st, dc in the next st. Repeat from * across, working the last dc into the top of the turning ch. Turn. (76 dc + 75 ch-1 sps = 151 sts, 75 squares)
Mesh rows: Ch 4. Dc in the next dc, ch 1. Repeat from * across, ending with a dc in the 3rd ch of the turning ch-4. Turn. (151 sts, 75 squares)
Solid band rows: Ch 3. Dc in the next ch-1 sp or st. Repeat from * across, working the last dc into the top of the turning ch. Turn. (151 sts) Because you work 1 dc into each stitch and each space, the count stays the same.
Row sequence:
- Rows 3–5: mesh rows (4 mesh rows in total, counting Row 2)
- Rows 6–8: solid band rows, which make the lower band
- Rows 9–69: mesh rows (61 rows)
- Rows 70–72: solid band rows, which make the middle band
- Rows 73–117: mesh rows (45 rows)
- Rows 118–120: solid band rows, which make the upper band
- Rows 121–133: mesh rows (13 rows)
- Rows 134–136: solid band rows, which make the header
Do not fasten off.
Total check: 1 + 4 + 3 + 61 + 3 + 45 + 3 + 13 + 3 = 136 rows. At 2 rows per inch, 136 rows = 68 in (172.7 cm).
Each band is 3 rows, or 1.5 in (3.8 cm) tall. The 2 in (5.1 cm) flowers cover the band and overlap the mesh by 0.25 in (0.6 cm) above and below.
Tabs
There are 9 tabs, each 7 sts wide, with 11-st gaps between them: 9 × 7 + 8 × 11 = 63 + 88 = 151 sts. The tabs start on sts 1, 19, 37, 55, 73, 91, 109, 127, and 145.
Tab Row 1: At the end of Row 136, ch 3 and turn. Dc in the next 6 sts. Turn. (7 sts)
Tab Rows 2–12: Ch 3, dc in the next 6 sts. Turn. (7 sts)
Fasten off, leaving a 12 in (30.5 cm) tail.
Remaining tabs: Sk 11 sts of Row 136 and join with a sl st in the next st. Repeat Tab Rows 1–12. Do this 8 times in total. The last tab ends exactly on st 151.
Each tab is 6 in (15.2 cm) long and 1.4 in (3.6 cm) wide. Fold each tab to the WS. Use the tail to whipstitch the last row along the base of Row 134. This forms a 3 in (7.6 cm) loop that fits rods up to 1.25 in (3.2 cm) in diameter.
Make the Appliqués
The panel itself is one piece. These small appliqués are made separately and sewn on.
Large flower (make 30: 10 per band)
- Rnd 1: With pink, make a magic ring, ch 1, and work 10 sc in the ring. Join. (10 sc)
- Rnd 2: Ch 1, sc in the first sc, ch 3, sk 1. Sc in the next sc, ch 3, sk 1. Repeat from * 3 more times. Join. (5 sc, 5 ch-3 sps)
- Rnd 3: Work (sc, hdc, 3 dc, hdc, sc) in each ch-3 sp. Join. (5 petals, 35 sts)
Fasten off. With cream, make a cluster of 6 French knots at the center. The finished flower is 2 in (5.1 cm) across.
Small flower (make 15)
- With pink, make a magic ring. Ch 2, 2 dc in the ring, ch 2, sl st in the ring. Repeat from * 4 more times. (5 petals)
Close the ring and fasten off. Add 1 cream French knot at the center. The finished flower is 1.25 in (3.2 cm) across.
Leaf (make 54: 18 per band)
- With leaf green, ch 7. Working into the back bumps from the 2nd ch from the hook, work sc, hdc, dc, dc, hdc, sc. Ch 2.
- Rotate and work along the other side of the chain: sc, hdc, dc, dc, hdc, sc. Sl st into the first ch. (12 sts + ch-2 tip)
Fasten off. Each leaf is 1.5 in (3.8 cm) long.
Border
Border gauge: Each scallop uses 10 sts and spans 2 in (5.1 cm). On the sides, you work 2 sc into each dc row-end, and each row-end is 0.5 in (1.3 cm) tall.
Hem Scallops
With the RS facing, join sage green at the bottom right corner. Work into the free loops of the foundation chain.
Edging Row 1 (RS): Ch 1, sc in each free loop across. Turn. (151 sc)
Edging Row 2: Ch 1, sc in the first sc. Sk 4 sc, 9 dc in the next sc, sk 4 sc, sc in the next sc. Repeat from * 15 times in total. Turn. (15 fans of 9 dc, 16 sc)
Edging Row 3: Ch 1, sc in the first sc. Ch 1, (dc in the next dc, ch 1) 9 times, sc in the next sc. Repeat from * 15 times in total. Turn. (Per scallop: 9 dc + 10 ch-1 sps. Row total: 135 dc, 150 ch-1 sps, 16 sc)
Edging Row 4: Ch 1, sl st in the first sc. Sk the next ch-1 sp, work a picot in each of the next 8 ch-1 sps, sk the next ch-1 sp, sl st in the next sc. Repeat from * 15 times in total. (120 picots)
Fasten off.
Why the math works: Each repeat uses 4 skipped + 1 + 4 skipped + 1 = 10 sts. With 15 repeats plus the first sc, that is 15 × 10 + 1 = 151 sts, matching the body exactly. The hem lies flat with no gathering or stretching. Only the 8 inner ch-1 sps of each scallop get picots, which keeps the dips between scallops crisp.
Side Edges
With the RS facing, join sage green at the end of Edging Row 1 on one long side. Work 2 sc into each row-end from Row 1 to Row 136. (272 sc) Fasten off. Repeat on the other long side. (272 sc)
Why the math works: Two sc fill the 0.5 in (1.3 cm) height of each dc row-end, so the sides hang straight without rippling.
Finished checkpoint: Width is 30 in + 2 × 0.25 in = 30.5 in (77.5 cm). Length is 68 in + 2 in = 70 in (177.8 cm).
Attaching the Appliqués
Block the appliqués flat before you sew them on.
- Large flowers: On each band, center the first flower 1.5 in (3.8 cm) in from the side edge. Place the next flowers every 3 in (7.6 cm). That gives 10 flowers, and the last one also sits 1.5 in (3.8 cm) from the far edge. Center each flower vertically on its band.
- Leaves: Between each pair of flowers, pin 2 leaves in a V, with the bases touching the petals. That is 9 gaps × 2 = 18 leaves per band.
- Small flowers: Center one small flower inside each scallop, over Edging Row 3.
- Sewing: Whipstitch around each piece through its back loops, using matching yarn and loose stitches. Weave in all ends on the WS.
Final Blocking
- Soak the panel in cool water for 15 minutes.
- Roll it in a towel to press out the water. Do not wring it.
- Lay the panel flat on a large clean surface, such as a bed covered with towels.
- Pin it to 30.5 in × 70 in (77.5 cm × 177.8 cm).
- Straighten the mesh columns against a long ruler.
- Pin each scallop into a round arch and open each picot.
- Shape the flower petals with your fingertips.
- Leave the panel until it is completely dry, which can take 24–48 hours.
Final Quality-Control Checklist
- [ ] Every mesh row has 75 squares (151 sts)
- [ ] 136 body rows, measuring 68 in (172.7 cm)
- [ ] 9 tabs, evenly spaced and securely sewn
- [ ] 15 scallops with 8 picots each
- [ ] 272 sc along each side
- [ ] 30 large flowers, 54 leaves, and 15 small flowers attached
- [ ] Bands are level and flowers are evenly spaced
- [ ] All ends woven in
Troubleshooting
- Panel narrows as you go up: You are probably missing the last dc into the turning ch. Count to 151 every 10 rows.
- Mesh squares lean: Your ch-1 is too tight. Loosen your chain tension.
- Bands pull in: Solid rows are denser than mesh. Work the band rows more loosely, or use a hook 0.5 mm larger for those rows only.
- Scallops ruffle: Work Edging Rows 2–3 with firmer tension.
- Panel too long after hanging: Cotton relaxes over time. Remove some mesh rows from Rows 9–69.
- Flowers pucker the mesh: Your sewing stitches are too tight. Resew them more loosely.
Care
Hand wash in cool water with a mild detergent, then dry flat. Rehang the panel only when it is fully dry, so the cotton does not stretch.
Final Notes
Here is the measurement chain:
- At 10 squares per 4 in (10.2 cm), 151 sts give 30 in (76.2 cm) of width.
- 136 rows give 68 in (172.7 cm) of body length.
- 15 scallops of 10 sts, plus 1 sc, match the 151 stitches along the bottom exactly.
- The 2 in (5.1 cm) hem and the 0.25 in (0.6 cm) side edges bring the panel to 30.5 in × 70 in (77.5 cm × 177.8 cm).
If each checkpoint matches, your panel will hang straight and even. Happy crocheting!