

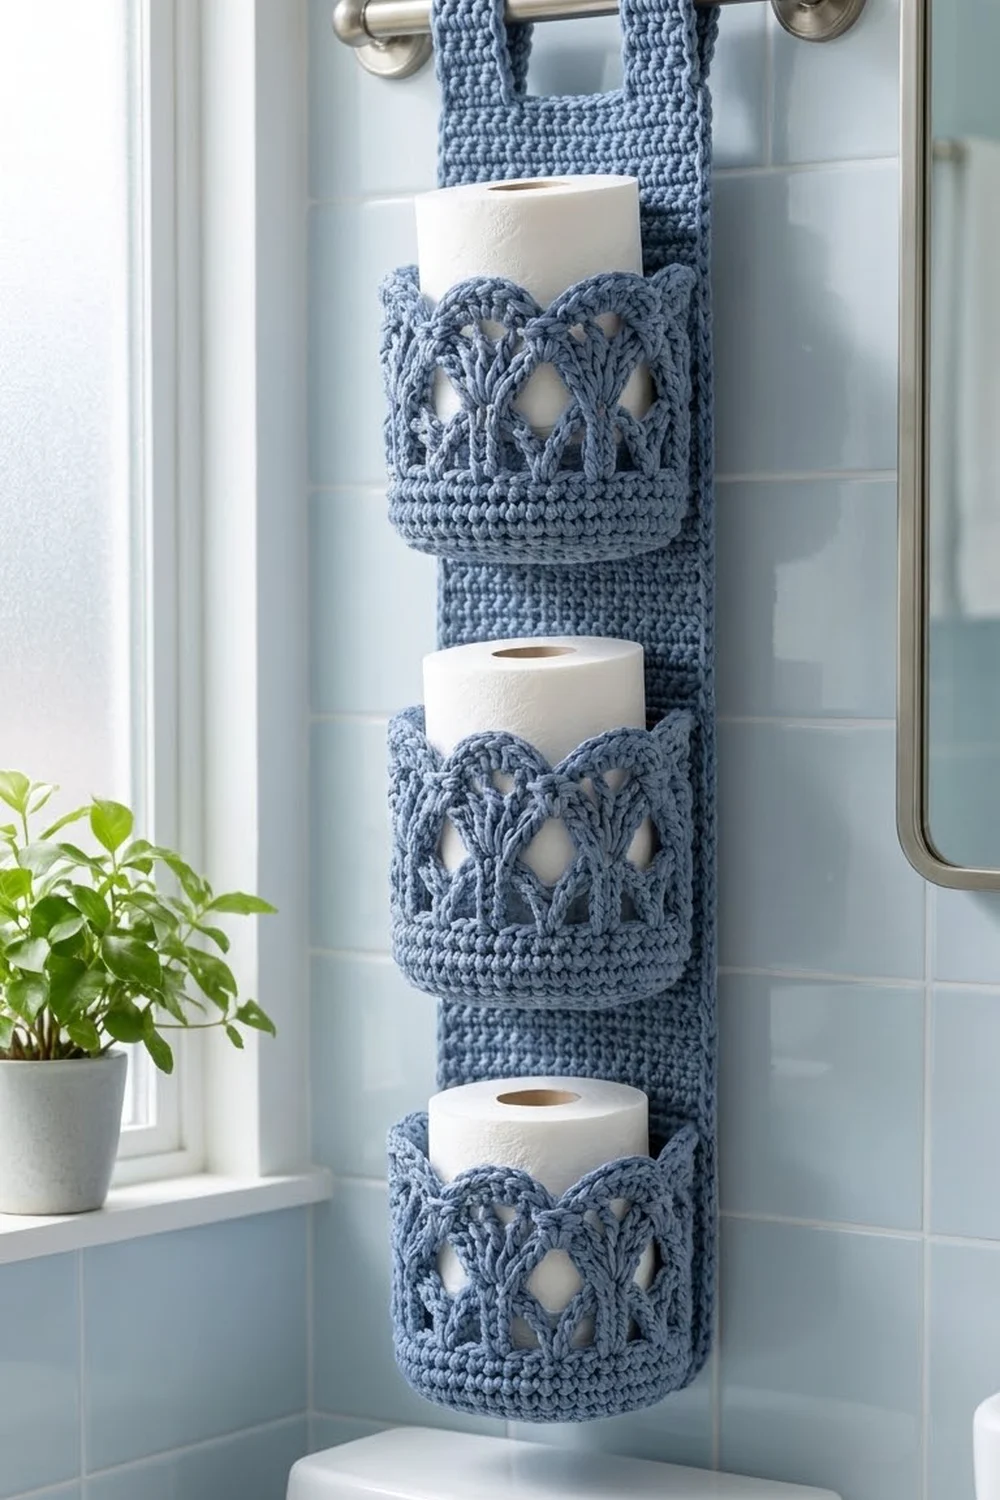
This hanging toilet paper holder is a long, solid backing panel with three small lace baskets sewn down its front. Two straps at the top loop over a towel bar, and each basket holds one standard roll, so your spares stay tidy and easy to reach.
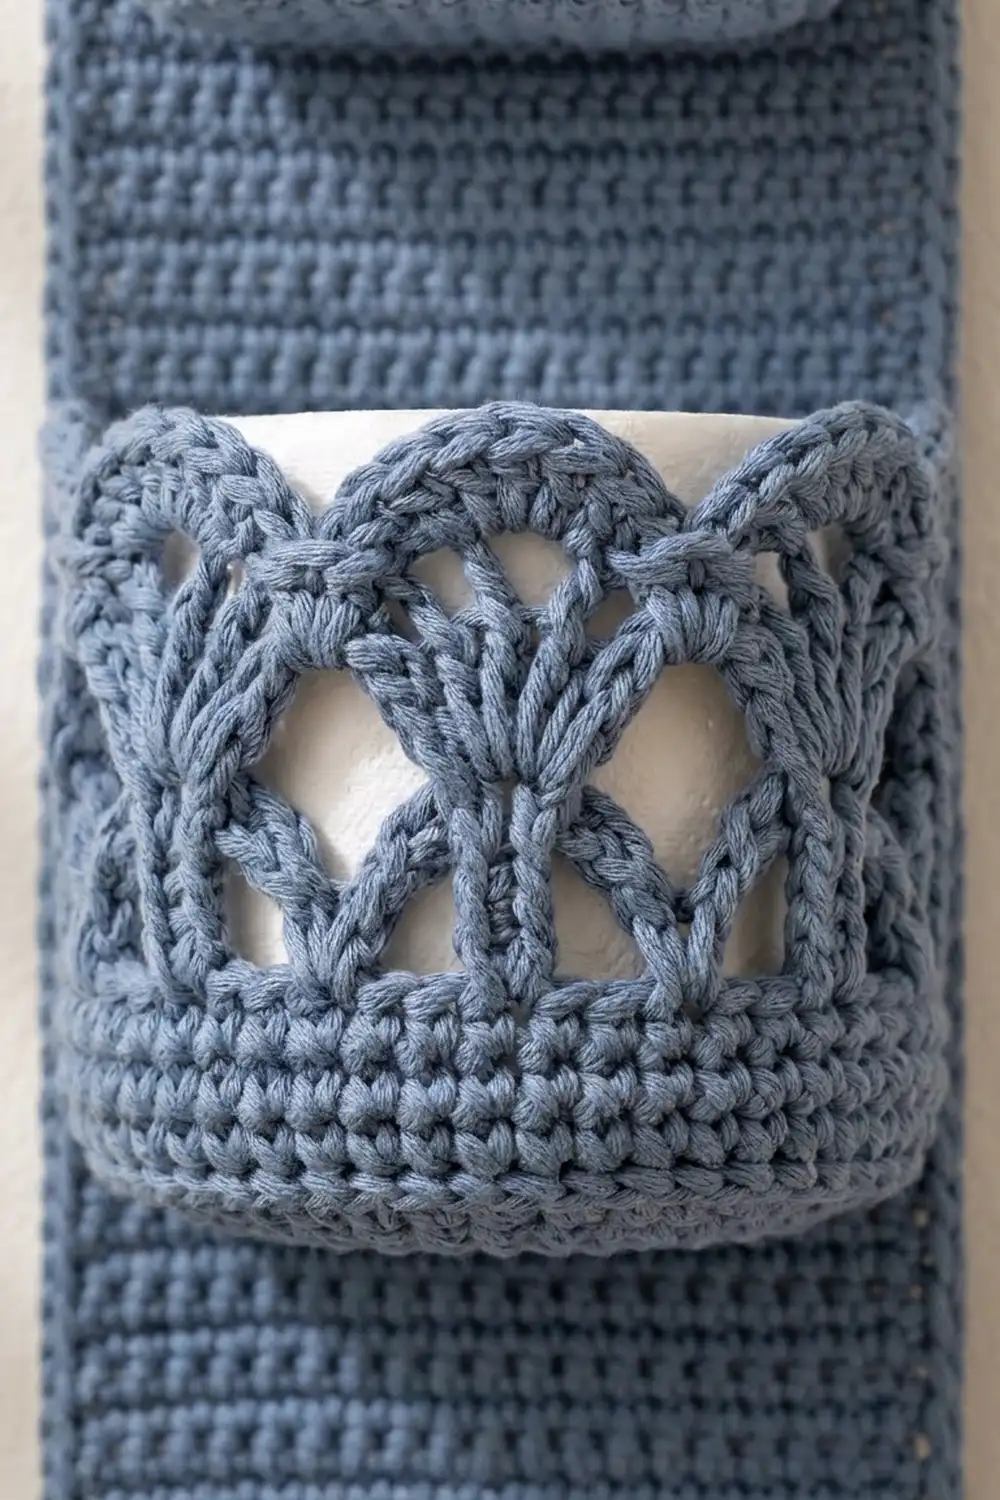
The sample uses one dusty denim blue cotton. Each basket has a dense single crochet base and lower wall, then an open lace band. In the lace, V-stitches and tall treble fans rise from pointed chain legs, and a scalloped edge with tiny picots finishes the rim. The plain panel lets the lace stand out.
The pattern uses US crochet terms. The finished panel measures 6.5 x 24.5 in (16.5 x 62.2 cm), and the loops add about 3.5 in (8.9 cm), so the whole holder hangs about 28 in (71.1 cm) long. Each basket is 4.75 in (12.1 cm) across the base and 3 in (7.6 cm) tall.
You crochet one panel in rows and three baskets in joined rounds. Then you sew the baskets on, work a border around the panel, and crochet two straps off the top edge.
Finished Size and Construction
- Finished panel size: 6.5 x 24.5 in (16.5 x 62.2 cm) after the border
- Total hanging length: about 28 in (71.1 cm) including the loops
- Skill level: Easy-intermediate
- Terminology: US crochet terms
- Yarn weight: #4 worsted cotton
- Hook: 5.0 mm (H-8)
- Number of pieces: 4 (1 backing panel, 3 identical baskets)
- Layout: 3 baskets stacked in one vertical column
- Panel size before border: 6 x 24 in (15.2 x 61.0 cm)
- Basket size: 4.75 in (12.1 cm) base diameter, 3 in (7.6 cm) tall, 15 in (38.1 cm) around
- Border depth: 0.25 in (0.6 cm), one round of single crochet
Materials
Choose a smooth, firm worsted-weight cotton or cotton blend. Cotton keeps the basket shape, blocks crisply, and handles bathroom humidity well. Avoid drapey or stretchy yarns, because the baskets will sag under the rolls.
Yarn
- Denim Blue: 250 g, about 400 m (437 yd)
This amount includes a margin of about 25 percent, which covers a test basket and small differences in tension.
Tools
- 5.0 mm (H-8) crochet hook
- Tapestry needle
- 6-8 stitch markers
- Rust-proof pins
- Scissors and tape measure
- Blocking mat and spray bottle
- One standard toilet roll, about 4.5 in (11.4 cm) wide, for fit tests
Abbreviations (US Terms)
- ch – chain
- sl st – slip stitch
- sc – single crochet
- hdc – half double crochet
- dc – double crochet
- tr – treble crochet
- st(s) – stitch(es)
- sp – space
- sk – skip
- BLO – back loop only
- rnd – round
- rep – repeat
- RS – right side
Special stitches
- V-stitch (V-st): (dc, ch 3, dc) in the same stitch.
- Fan: (tr, ch 1) 4 times, then tr, all in the same space. One fan has 5 tr and 4 ch-1 spaces.
- Picot: ch 3, sl st in the 3rd ch from hook.
Gauge and Checkpoints
Gauge: 16 sc and 16 rows = 4 in (10.2 cm), worked in rows with a 5.0 mm hook.
This square gauge matters because it lets the border take exactly 1 sc per row end without rippling or pulling in.
Make one basket before you start the panel. It uses less yarn and shows your gauge in both the solid and the lace stitches.
Checkpoints
- Basket after Rnd 10: a flat circle 4.75 in (12.1 cm) across.
- Basket after Rnd 15: a solid wall 1.25 in (3.2 cm) tall.
- Basket after Rnd 19: 3 in (7.6 cm) tall to the scallop peaks. The lace band is about 1.75 in (4.4 cm) of that.
- Roll test: a roll drops in easily and stands about 1.25 in (3.2 cm) above the rim.
- Panel after Row 20: 6 in (15.2 cm) wide and 5 in (12.7 cm) long.
- Panel after Row 96: 6 x 24 in (15.2 x 61.0 cm).
If your pieces are too big, go down to a 4.5 mm hook. If they are too small or the roll won’t fit, go up to 5.5 mm. Keep the stitch counts the same, because the basket placement and border math depend on them.
Basket (Make 3)
Work in joined rounds with the RS facing. The ch 1 at the start of a round does not count as a stitch.
Base
Rnd 1: Magic ring, ch 1, 6 sc in ring, sl st to first sc. (6)
Rnd 2: Ch 1, 2 sc in each st around, join. (12)
Rnd 3: Ch 1, *sc in next st, 2 sc in next st; rep from * 5 more times, join. (18)
Rnd 4: Ch 1, *sc in next 2 sts, 2 sc in next st; rep from * 5 more times, join. (24)
Rnd 5: Ch 1, *sc in next 3 sts, 2 sc in next st; rep from * 5 more times, join. (30)
Rnds 6-10: Keep going the same way, with 1 more sc between increases each round. The rounds have 36, 42, 48, 54 and 60 sts. On Rnd 10, work sc in next 8 sts, 2 sc in next st 6 times. (60)
The base should lie flat and measure 4.75 in (12.1 cm).
Solid wall
Rnd 11 (turning round): Ch 1, sc in BLO of each st around, join. (60 = 60 sts worked 1-per-stitch + 0 added)
The unworked front loops make a crisp ridge where the base turns up into the wall.
Rnds 12-15: Ch 1, sc in each st around, join. (60)
The wall now measures 1.25 in (3.2 cm).
Lace band
Rnd 16 (V round): Ch 1, sc in first st, *ch 3, sk 2 sts, V-st in next st, ch 3, sk 2 sts, sc in next st; rep from * 8 more times, ch 3, sk 2 sts, V-st in next st, ch 3, sk last 2 sts, sl st to first sc.
Each repeat uses 6 sts (1 sc + 2 skipped + 1 V-st + 2 skipped), so 60 sts make 10 repeats. Count: 10 sc, 10 V-sts and 20 ch-3 spaces.
Rnd 17 (fan round): Sl st in next 3 ch, in next dc, and into the ch-3 sp of the first V-st. Ch 4 (counts as first tr), then (ch 1, tr) 4 times in the same sp to finish the first fan. *Ch 2, sc in next sc, ch 2, fan in ch-3 sp of next V-st; rep from * 8 more times, ch 2, sc in next sc, ch 2, sl st to top of beginning ch-4.
Count: 10 fans (50 tr), 10 sc and 20 ch-2 spaces. The ch-2 legs slant up from each sc point to the fans, which makes the pointed “tree” arches.
Rnd 18 (fan top): Ch 1, *sc in first tr of fan, (sc in next ch-1 sp, sc in next tr) 4 times, ch 4, sk (ch-2 sp, sc, ch-2 sp); rep from * around, sl st to first sc.
Count: 90 sc (50 sts worked 1-per-tr + 40 added in ch-1 spaces) and 10 ch-4 loops. Each fan now has 9 sc.
Rnd 19 (scallop edge): Ch 1. *Across the 9 sc of the fan: sc in first st, hdc in next st, dc in next 2 sts, (dc, picot, dc) in center st, dc in next 2 sts, hdc in next st, sc in next st. Then work 4 sc in the ch-4 loop. Rep from * around, sl st to first sc. Fasten off, leaving a 30 in (76.2 cm) tail for sewing.
Count: 140 sts + 10 picots. That is 90 sts worked 1-per-stitch + 10 added (the second dc in each center st) + 40 sc in the loops. Each 14-st repeat makes a rounded scallop with a picot at its peak.
The basket should measure 3 in (7.6 cm) tall at the scallop peaks.
Backing Panel
Foundation: Ch 25.
Row 1 (RS): Sc in 2nd ch from hook and in each ch across, turn. (24)
Rows 2-96: Ch 1, sc in each st across, turn. (24)
The ch 1 does not count as a stitch. Keep the edge stitches neat, because the border is worked into these row ends. Fasten off.
The panel should measure 6 x 24 in (15.2 x 61.0 cm).
Make All Pieces
All pieces use Denim Blue.
- Backing panel: 1 piece, about 110 g including the border and straps
- Baskets: 3 pieces, about 30 g each (90 g total)
Layout grid (panel rows counted from the bottom):
[ Rows 81-96 ]  top margin, 16 rows = 4 in (10.2 cm)
[ Rows 69-80 ]  BASKET 3, 12 rows = 3 in (7.6 cm)
[ Rows 49-68 ]  gap, 20 rows = 5 in (12.7 cm)
[ Rows 37-48 ]  BASKET 2, 12 rows = 3 in (7.6 cm)
[ Rows 17-36 ]  gap, 20 rows = 5 in (12.7 cm)
[ Rows 5-16  ]  BASKET 1, 12 rows = 3 in (7.6 cm)
[ Rows 1-4   ]  bottom margin, 4 rows = 1 in (2.5 cm)
Check: 4 + 12 + 20 + 12 + 20 + 12 + 16 = 96 rows. Each 5 in (12.7 cm) gap leaves 3.75 in (9.5 cm) above the roll below it, which is enough room to lift the roll out.
Joining
Method: Whipstitch with the basket tail through both loops of the basket and one full sc of the panel.
Stitch-to-stitch logic: One third of each basket lies flat against the panel. One third of 60 sts is 20 sts, which is 5 in (12.7 cm) at 4 sts per inch. Center those 20 sts over panel sts 3-22, which leaves 2 panel sts free on each side (2 + 20 + 2 = 24).
- Mark panel Row 5 at sts 3 and 22. On the basket, mark the two ends of the 20 back sts at the base ridge.
- Bottom seam: With the base sticking out from the panel, sew the 20 back sts along the base ridge to sts 3-22 of Row 5, one basket st to one panel st.
- Side seams: Sew straight up each end of the flattened back. Basket Rnds 11-15 match panel Rows 5-9 (5 rounds to 5 rows). Then anchor the lace band edge up to Row 16 with small stitches.
- Rim tack: Tack the dips between the 2 back scallops to Row 16 so the rim can’t flop forward.
- Repeat for Basket 2 starting at Row 37 and Basket 3 starting at Row 69.
Tension: Pull each stitch snug but not tight. The panel should stay flat, with no puckers behind the seams. Test-fit a roll after you sew the first basket.
Size checkpoint: The panel should still measure 6 x 24 in (15.2 x 61.0 cm), and each basket’s flat back should be 5 in (12.7 cm) wide.
Border
Border gauge: Work 1 sc per st along the top and bottom and 1 sc per row end along the sides. Because the gauge is square (4 sts and 4 rows per inch), both edges get 4 sts per inch.
Rnd 1: With the RS facing, join yarn with a sl st in the first st of Row 96, at a top corner. Ch 1, 3 sc in same st, sc in next 22 sts, 3 sc in last st. Working down the side, sc in each row end (96). Working in the free loops of the foundation ch, 3 sc in first ch, sc in next 22 ch, 3 sc in last ch. Working up the second side, sc in each row end (96). Sl st to first sc and fasten off.
Counts per side (each count includes its 2 corner sts, the center sc of each 3-sc group):
- Top: 1 + 22 + 1 + 2 corners = 26 sts
- Bottom: 26 sts
- Each long side: 96 + 2 corners = 98 sts
- Total: 26 + 26 + 98 + 98 – 4 shared corners = 248 sts
Why the math works: Each edge gets one sc for every 0.25 in (0.6 cm), and the 3-sc corners turn flat. The border adds 0.25 in (0.6 cm) to every edge, so the panel grows from 6 x 24 in (15.2 x 61.0 cm) to 6.5 x 24.5 in (16.5 x 62.2 cm).
Straps
Number the 26 top-border sts from the corner where you started. Strap 1 uses sts 1-7, the next 12 sts (8-19) stay free, and Strap 2 uses sts 20-26. Check: 7 + 12 + 7 = 26.
Strap 1, Row 1: Join yarn in st 1 (the corner st). Ch 1, sc in same st and next 6 sts, turn. (7)
Rows 2-32: Ch 1, sc across, turn. (7) Fasten off, leaving an 18 in (45.7 cm) tail.
Strap 2: Join yarn in st 20. Ch 1, sc in same st and next 6 sts, ending in the corner st, turn. (7) Work Rows 2-32 as for Strap 1.
Each strap is 1.75 in (4.4 cm) wide and 8 in (20.3 cm) long, and the gap between them is 3 in (7.6 cm).
Attach: Fold each strap over the towel bar to the back of the panel. Lay its last 4 rows, 1 in (2.5 cm), on the back of the top rows and whipstitch around the overlap. That leaves a 7 in (17.8 cm) loop that rises about 3.5 in (8.9 cm) above the panel. If you can’t take the bar down, sew the straps with the bar in place.
Final Blocking
- Weave in all ends.
- Spray the whole piece until it is damp but not dripping.
- Lay the panel face up and pin it to 6.5 x 24.5 in (16.5 x 62.2 cm). Pin the corners first, then the middle of each side.
- Put a bagged roll or a 4.5 in (11.4 cm) jar in each basket so the walls dry round.
- Lift each scallop gently, open the fans with your fingers, and pin any picot that leans.
- Let everything dry completely, then take out the pins and hang the holder.
Final Quality-Control Checklist
- Each basket has 60 sts in Rnd 15 and 10 even scallops in Rnd 19.
- Each basket measures 4.75 in (12.1 cm) across and 3 in (7.6 cm) tall.
- The panel has 24 sts and 96 rows before the border.
- The border has 248 sts: 26 on the top and bottom and 98 on each side.
- The baskets start on Rows 5, 37 and 69 and are centered over sts 3-22.
- The straps are 7 sts wide with a 12-st gap between them.
- The panel hangs flat at 6.5 x 24.5 in (16.5 x 62.2 cm).
Troubleshooting
- Base cups or ruffles: Cupping means your tension is too tight, and ruffling means it is too loose. Change hook size and redo the base.
- Roll won’t fit: Go up a hook size. Don’t add stitches, or the flattened back will no longer be 20 sts.
- Fans lean: Make sure each fan goes into the V-st’s ch-3 space, not into a dc.
- Flat scallops: Block the basket over a roll and pull each picot up while it is damp.
- Border ripples or pulls in: Your row gauge doesn’t match your stitch gauge. Skip 1 row end, or add 1 sc, in every 12 rows.
- Basket tips forward: Add more anchoring stitches to the side seams and the rim tack.
Care
Hand wash in cool water with mild soap, press the water out in a towel, and dry flat with a roll in each basket. Don’t tumble dry.
Final Notes
Here is the measurement chain in short. Each basket has a 60-st base 4.75 in (12.1 cm) across, 5 solid rounds that make 1.25 in (3.2 cm), and a 1.75 in (4.4 cm) lace band, for 3 in (7.6 cm) total. The panel is 24 sts by 96 rows, or 6 x 24 in (15.2 x 61.0 cm). The 248-st border brings it to 6.5 x 24.5 in (16.5 x 62.2 cm), and the 8 in (20.3 cm) straps fold into loops, so the holder hangs about 28 in (71.1 cm) long.
Check each number as you go, and the baskets will line up, the rolls will fit, and the panel will hang straight.
Happy crocheting!