

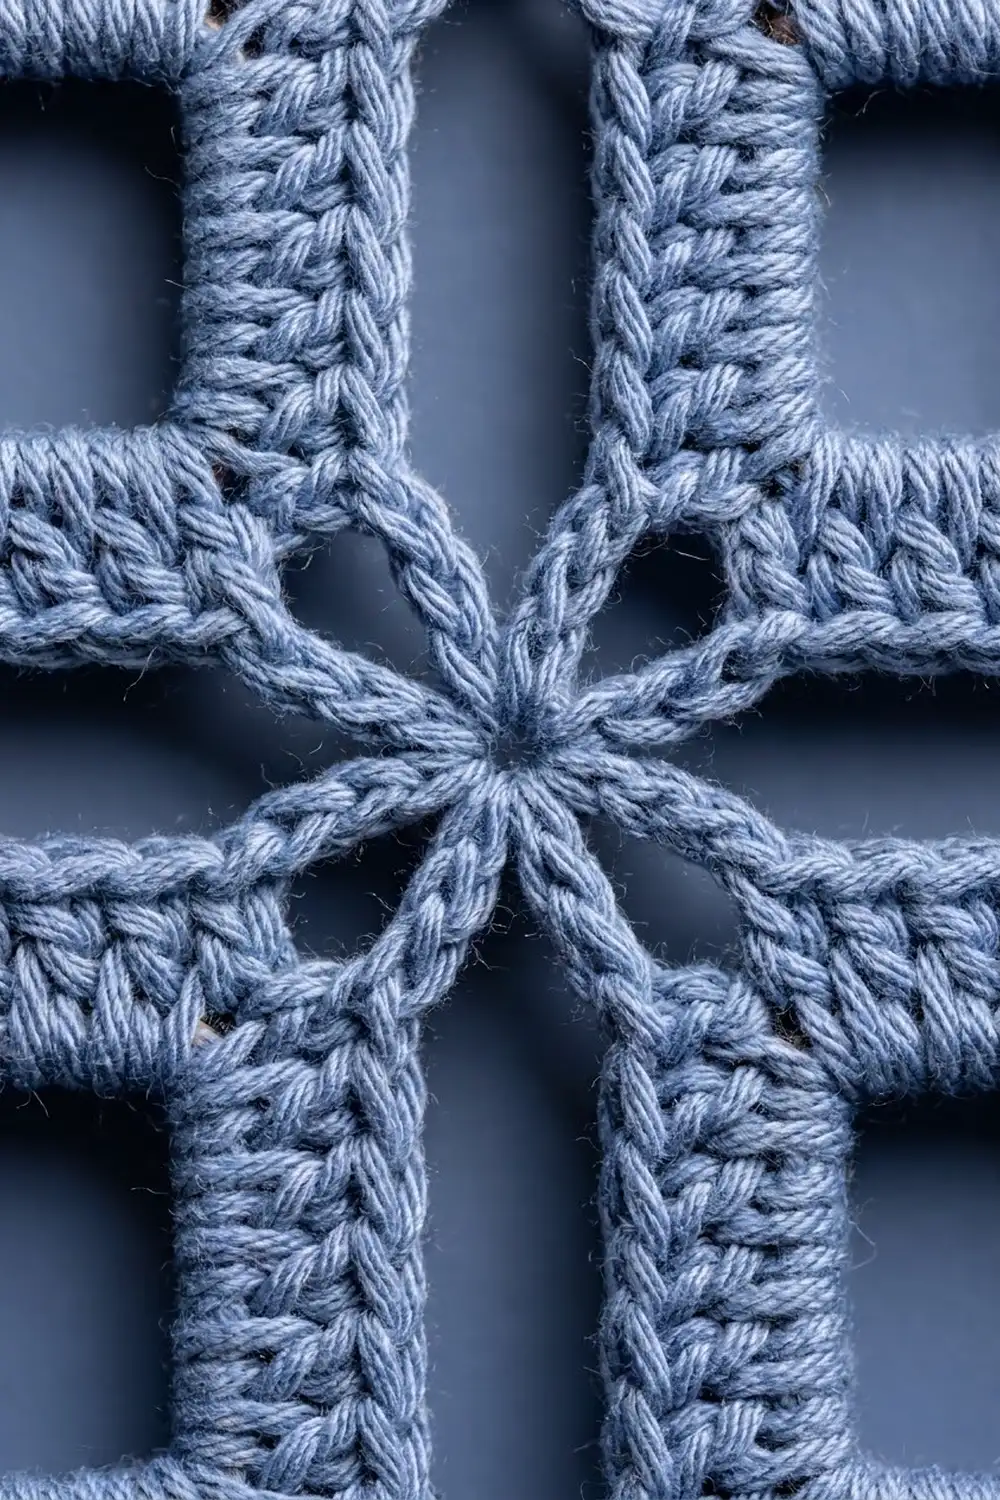
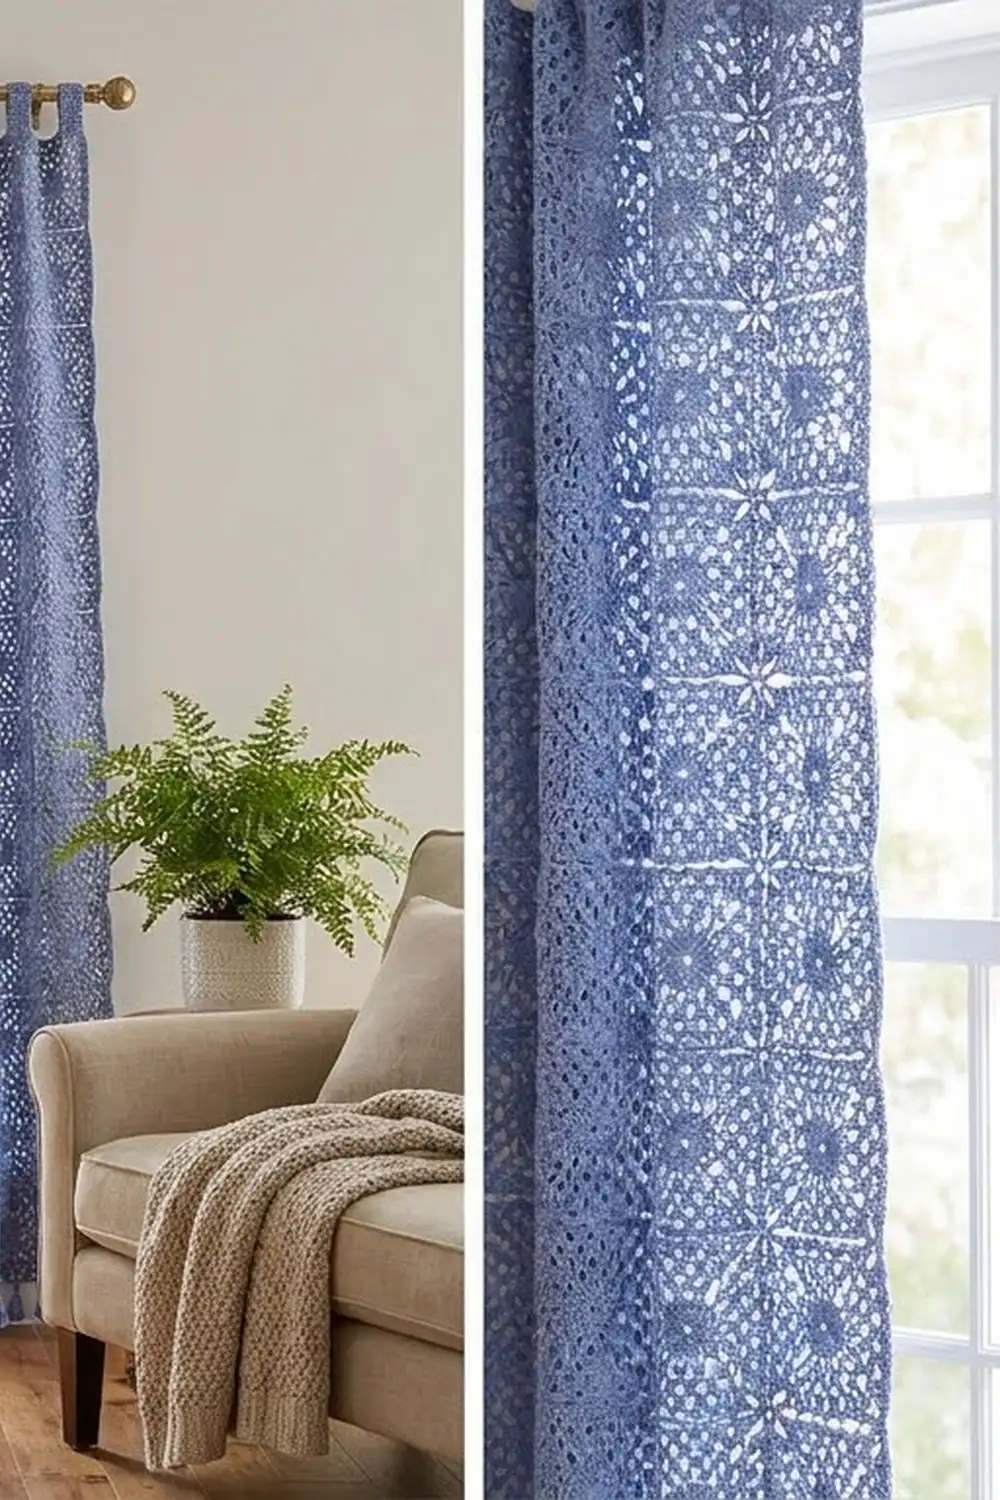
The Bluebell Lattice Curtain is a light, airy pair of panels built from open square frames. Each frame has a crisp square window at its center. Small chain-stitch stars fill the gaps where four motifs meet, so the finished fabric looks like a delicate trellis with little flowers at every crossing.
The whole curtain uses one color, a soft dusty periwinkle blue. It works in many rooms, from cottage kitchens to calm living rooms. Light coming through the open squares throws a gentle grid pattern on the floor.
This pattern uses US crochet terms. Each finished panel measures 28.5 in × 64.5 in (72.4 cm × 163.8 cm), not counting the hanging loops or the tassels.
Construction is simple and repeats a lot. You crochet 84 motifs per panel, seam them into a 6 × 14 grid, add a star at every inside intersection, then work a 3-round border with hanging loops on top and tassels on the bottom. Make two panels for the full pair.
Finished Size and Construction
- Finished panel size: 28.5 in × 64.5 in (72.4 cm × 163.8 cm), plus loops and tassels
- Skill level: Intermediate (easy stitches, but many pieces)
- Terminology: US crochet terms
- Yarn weight: DK (#3) cotton or cotton blend
- Hook: 3.5 mm (E-4)
- Number of pieces: 84 motifs per panel, 168 for the pair
- Layout: 6 motifs wide × 14 motifs tall per panel
- Motif size: 4.5 in (11.4 cm) square
- Size before border: 27 in × 63 in (68.6 cm × 160.0 cm)
- Border depth: 0.75 in (1.9 cm) on each side
Materials
Yarn: Choose a smooth, mercerized or combed DK cotton. Cotton keeps its shape when hanging and shows the open squares clearly. Avoid fuzzy yarns, because they blur the windows and the stars.
- Dusty Blue: 850 g / about 1,955 m (approximately 17 balls of 50 g / 115 m each)
These amounts include about a 15% margin for gauge differences, seaming, and tassels. If your yarn is a different weight per meter, buy by meters.
Tools:
– 3.5 mm (E-4) crochet hook
– Tapestry needle
– Stitch markers
– Scissors
– Measuring tape
– Blocking mats, rust-proof pins, and a spray bottle
– A piece of card 5.5 in (14.0 cm) tall for tassels
Abbreviations (US Terms)
- ch – chain
- sl st – slip stitch
- sc – single crochet
- dc – double crochet
- sp – space
- st(s) – stitch(es)
- rep – repeat
- RS / WS – right side / wrong side
Special technique, chain arm: Ch the given number, sl st into the given anchor point, then sl st back into each ch you just made, returning to the center of the star.
Gauge and Checkpoints
Crochet one complete motif and block it before you make the rest. Everything else in the pattern depends on this one square.
Motif gauge: 1 blocked motif = 4.5 in (11.4 cm) square. That gives 13 sc per side, corner to corner.
Checkpoints for the first motif:
– Foundation ring (laid flat as a square): about 2 in (5.1 cm) per side
– After Round 1: about 3 in (7.6 cm) square
– After Round 2: about 4 in (10.2 cm) square
– After Round 3, blocked: 4.5 in (11.4 cm) square
If your motif is too big, switch to a 3.25 mm hook. If it is too small, switch to a 3.75 mm or 4.0 mm hook. Don’t change the stitch counts, because the border math depends on them.
Motif (make 84 per panel)
Ch 32. Sl st to the first ch to form a ring, taking care not to twist the chain.
Round 1 (RS): Ch 3 (counts as dc), dc in next 6 ch, (dc, ch 2, dc) in next ch, dc in next 7 ch, (dc, ch 2, dc) in next ch; rep from * 2 more times, sl st to top of beginning ch-3.
Count: 36 dc (9 per side) and 4 ch-2 corner sps.*
Each side uses 8 foundation chains: 7 single dc plus 1 corner. Four sides × 8 = 32, so the whole ring is used exactly once.
Round 2: Ch 3 (counts as dc), dc in next 7 dc, (dc, ch 2, dc) in ch-2 sp, dc in next 9 dc, (dc, ch 2, dc) in next ch-2 sp; rep from * 2 more times, dc in last dc, sl st to top of beginning ch-3.
Count: 44 dc (11 per side) and 4 ch-2 corner sps.*
Round 3: Ch 1, sc in same st as join and in next 8 dc, (sc, ch 2, sc) in ch-2 sp, sc in next 11 dc, (sc, ch 2, sc) in next ch-2 sp; rep from * 2 more times, sc in last 2 dc, sl st to first sc.
Count: 52 sc (13 per side, including both corner sc) and 4 ch-2 corner sps.*
Fasten off, leaving a 6 in (15.2 cm) tail. Weave in the starting tail now. Keep the end tail if you plan to use it for seaming.
The two dc rounds make the solid frame. The sc round gives a neat, flat edge for seaming. The ch-2 corners stay free so the stars have something to anchor to.
Make All Pieces
Each panel needs 84 motifs in Dusty Blue. The full pair needs 168 motifs.
Block the motifs in batches of 10 to 20. Pin each one to 4.5 in (11.4 cm) square, mist, and let dry. Blocked squares are much easier to seam evenly.
Layout grid (one panel, M = one motif):
Row  1:  M M M M M M
Row  2:  M M M M M M
Row  3:  M M M M M M
Row  4:  M M M M M M
Row  5:  M M M M M M
Row  6:  M M M M M M
Row  7:  M M M M M M
Row  8:  M M M M M M
Row  9:  M M M M M M
Row 10:  M M M M M M
Row 11:  M M M M M M
Row 12:  M M M M M M
Row 13:  M M M M M M
Row 14:  M M M M M M
6 columns × 14 rows = 84 motifs.
Joining
Method: Slip-stitch seam on the WS, worked through the outer loops only.
Stitch logic: Place two motifs RS together. Join the yarn in the corner sc of both motifs. Sl st through both layers in each of the 13 sc along the side, matching corner sc to corner sc and stitch to stitch. Leave the ch-2 corner sps unworked. Each seam is exactly 13 sl sts.
Order:
1. Join the 6 motifs of each row into a strip (5 seams per strip).
2. Join the 14 strips together with long horizontal seams. At each crossing, carry the yarn straight across the junction and keep matching 13 to 13 for each motif.
Tension: Keep the sl sts relaxed, about the same width as an sc. Tight seams pucker and make the panel shorter. If the seams pull, go up one hook size for seaming only.
Size checkpoint: The joined panel should measure 27 in × 63 in (68.6 cm × 160.0 cm), which is 6 × 4.5 in by 14 × 4.5 in.
Chain Stars
Each panel has (6 − 1) × (14 − 1) = 65 inside intersections. Each one gets a star. Work with the RS facing.
At each intersection there are 4 free corner ch-2 sps (one per motif) and 4 seam ends, where the corner sc of two neighboring motifs meet. Label the motifs A (upper left), B (upper right), C (lower right), and D (lower left).
- Join with a sl st in the corner ch-2 sp of A. Ch 4. The top of this chain is the star’s center.
- Chain arm of 3 to the seam end between A and B.
- Chain arm of 4 to the corner sp of B.
- Chain arm of 3 to the seam end between B and C.
- Chain arm of 4 to the corner sp of C.
- Chain arm of 3 to the seam end between C and D.
- Chain arm of 4 to the corner sp of D.
- Chain arm of 3 to the seam end between D and A.
- Sl st in the top ch of the beginning ch-4. Fasten off.
The result is 8 arms: 4 long diagonal arms and 4 short straight arms. Together they make the flower-like star seen at every crossing. If the arms sag, use 1 fewer ch per arm. If they pull the corners inward, use 1 more.
Border
Border gauge: One sc per stitch along the motif edges, which works out to 13 sc per 4.5 in (11.4 cm). Three rounds of sc add about 0.75 in (1.9 cm) on each side.
At the outer edges, wherever two motifs meet, there is a small V-shaped notch made by two neighboring corner ch-2 sps. The border bridges each notch with a ch-1.
Round 1: With RS facing, join in the outer corner ch-2 sp of the top-right motif. Ch 1, (sc, ch 2, sc) in the same sp. Then, along each side: sc in each of the 13 sc of each motif, and at each notch between motifs ch 1, skipping both ch-2 sps. In each panel corner sp work (sc, ch 2, sc). Sl st to first sc.
– Top and bottom: 6 motifs × 13 = 78 sc, plus 2 corner sc = 80 sc and 5 ch-1 bridges
– Long sides: 14 motifs × 13 = 182 sc, plus 2 corner sc = 184 sc and 13 ch-1 bridges
Round 2: Ch 1, sc in each sc and in each ch-1 bridge, with (sc, ch 2, sc) in each corner sp. Sl st to first sc.
– Top and bottom: 80 + 5 + 2 = 87 sc per side
– Long sides: 184 + 13 + 2 = 199 sc per side
Round 3: Ch 1, sc in each sc, with (sc, ch 2, sc) in each corner sp. Sl st to first sc. Fasten off.
– Top and bottom: 87 + 2 = 89 sc per side
– Long sides: 199 + 2 = 201 sc per side
– Total: 580 sc and 4 corner ch-2 sps
Why the math works: The border starts from exactly 13 stitches per motif per side. Nothing is added at the seams except the 1-stitch bridge over each notch, which fills the gap without adding length. On the top and bottom edges of Round 3, the stitches over the panel corners and the 5 seam bridges land at stitches 3, 17, 31, 45, 59, 73, and 87. These positions are evenly spaced 14 stitches apart and centered on stitch 45. They are used for the loops and tassels below.
Hanging Loops (top edge)
With the top edge facing, join with a sl st in stitch 3 of the Round 3 top edge. Ch 18, sl st in the same stitch. Work 24 sc over the chain loop, then sl st in the same stitch. Fasten off.
Repeat at stitches 17, 31, 45, 59, 73, and 87, for 7 loops in all. Each loop hangs about 2 in (5.1 cm) and fits rods up to 1.25 in (3.2 cm) across. For curtain rings or clips, skip the loops and clip at the same 7 points.
Tassels (bottom edge)
Make 7 tassels per panel. For each one, wrap yarn 10 times around the 5.5 in (14.0 cm) card and cut along one edge, giving 10 strands of 11 in (27.9 cm). Fold the bundle in half and attach it with a lark’s head knot through stitches 3, 17, 31, 45, 59, 73, and 87 of the bottom edge. Wrap a separate strand tightly 0.5 in (1.3 cm) below the knot, tie it, and hide the ends inside. Trim to 5 in (12.7 cm).
Final Blocking
- Weave in all remaining ends along the seams and inside the dc rounds.
- Lay the panel flat on blocking mats or a clean carpet covered with a towel.
- Pin the four corners to 28.5 in × 64.5 in (72.4 cm × 163.8 cm).
- Pin along each edge every 4.5 in (11.4 cm), at each seam bridge.
- Pin each star’s center so the 8 arms lie straight and even.
- Spray until damp, not soaked.
- Let dry completely before unpinning, usually 12 to 24 hours.
- Steam the tassels lightly and comb the strands straight.
Final Quality-Control Checklist
- Every motif has 13 sc per side and 4 open ch-2 corners.
- Each panel has 84 motifs in a 6 × 14 grid.
- Each seam is 13 sl sts, corner to corner.
- All 65 inside intersections have an 8-arm star.
- Border Round 3 has 89 sc on the top and bottom and 201 sc on each long side.
- There are 7 evenly spaced loops and 7 tassels.
- The panel measures 28.5 in × 64.5 in (72.4 cm × 163.8 cm).
- Both panels match in size within 0.5 in (1.3 cm).
Troubleshooting
The square hole looks round: Your foundation chain is too tight. Use a hook one size larger for the 32 ch only.
The motifs curl or cup: The Round 3 corners are too tight. Make sure you work (sc, ch 2, sc) and not just 1 sc in the corner.
Motifs are different sizes: Your tension changed across sessions. Measure every 10th motif, and block them all to 4.5 in (11.4 cm).
Seams pucker: Loosen the sl sts or go up one hook size for seaming.
Stars sag or look lopsided: Adjust the arm lengths by 1 ch, and keep all 8 arms consistent within a panel.
Border ripples: Check that you have one ch-1 bridge per notch and not 2 or more sc.
The panel stretches when hung: This is normal for cotton. Re-block, and consider adding curtain clips at the 7 loop points so the weight is spread out.
Care
Hand wash in cool water with mild detergent. Press out the water in a towel and dry flat, reshaping to the blocked size. Do not tumble dry.
Final Notes
The whole curtain comes from one measurement chain. One motif is 13 sc per side, which blocks to 4.5 in (11.4 cm). Six across gives 27 in (68.6 cm), and fourteen down gives 63 in (160.0 cm). Three border rounds add 0.75 in (1.9 cm) on each side, for a finished panel of 28.5 in × 64.5 in (72.4 cm × 163.8 cm). Get the first motif right and every other number follows.
Happy crocheting!