

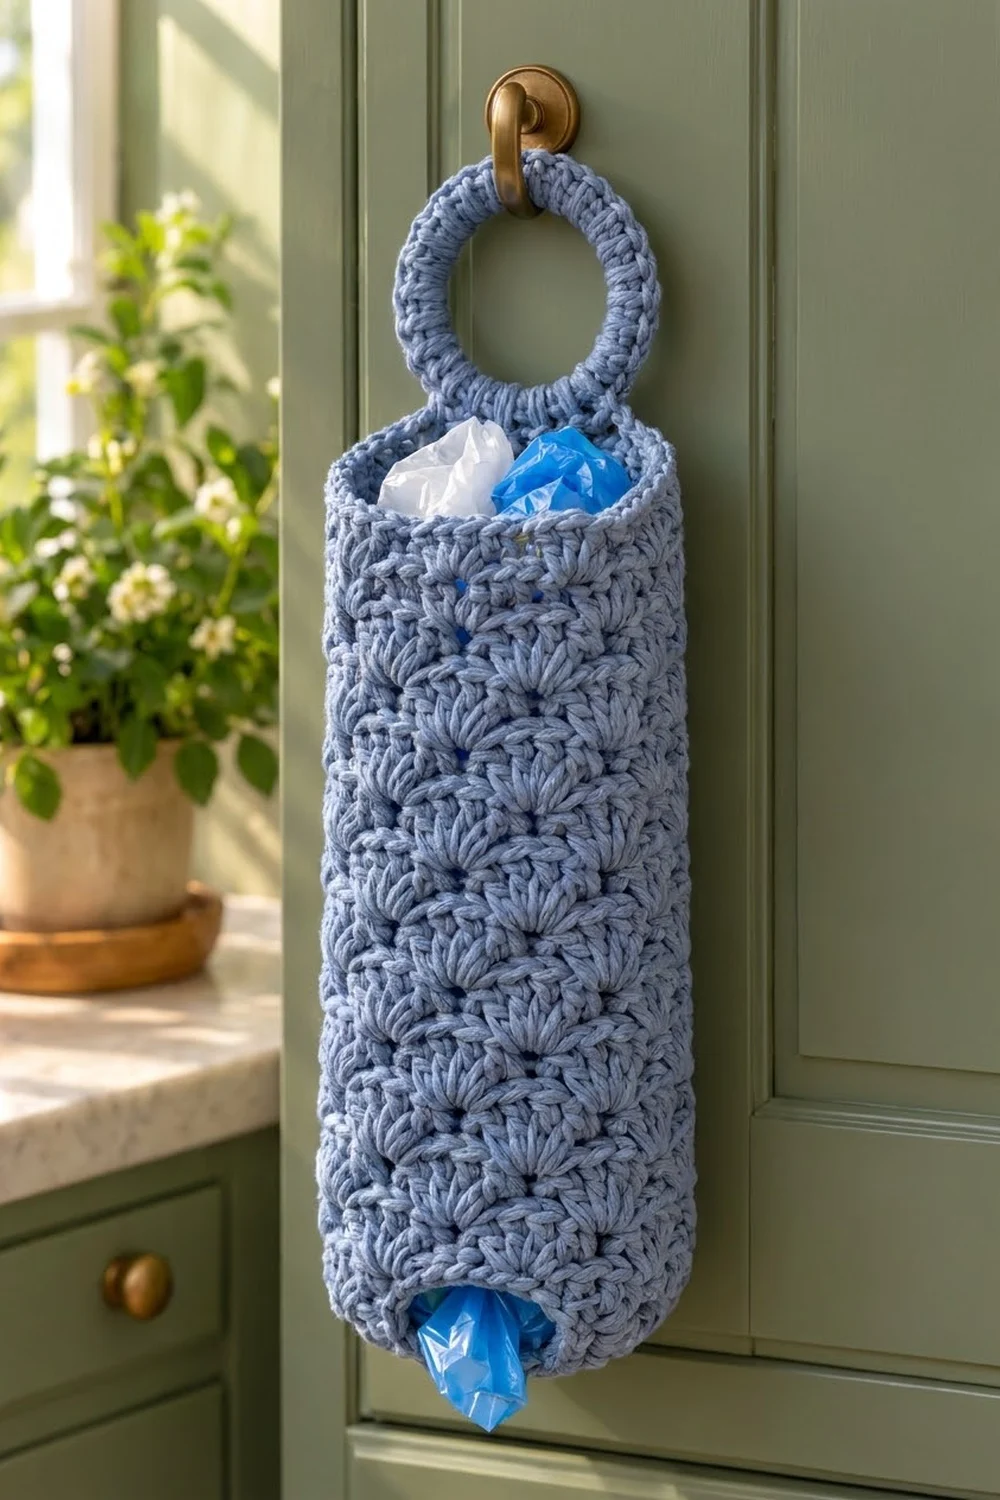
Plastic bags tend to pile up under the sink, in a drawer, or stuffed into another bag. The Bluebell Shell Plastic Bag Holder gives them one tidy place. You push bags in at the top and pull them out one at a time through the narrow opening at the bottom.
The holder is worked in a single dusty periwinkle blue cotton. Rows of plump 5-double-crochet shells cover the body, and each row is offset by half a shell so the fans nest into each other. Smooth single crochet bands finish the top and bottom, and a crochet-covered ring at the top slips over a cabinet knob or hook.
This pattern uses US crochet terms. The finished holder is 6 1/8 in (15.6 cm) wide when flat and 12 1/4 in (31.1 cm) around. The body is 17 3/4 in (45.1 cm) tall, and the full hanging length, ring included, is 22 in (55.9 cm).
Construction is simple. You crochet the body as a flat shell-stitch rectangle, then seam it into a tube. Next you work single crochet bands in rounds along the top and bottom edges. Last, you cover a ring with single crochet and attach it with a short tab at the center back.
Finished Size and Construction
- Finished size: 6 1/8 in (15.6 cm) wide flat × 22 in (55.9 cm) total hanging length
- Body height (bands included): 17 3/4 in (45.1 cm)
- Skill level: Easy / advanced beginner
- Terminology: US
- Yarn weight: Worsted (#4), cotton or cotton blend
- Hook: 5.0 mm (H-8)
- Number of pieces: 1 finished piece (body panel seamed into a tube, with a ring hanger worked onto it)
- Layout: Vertical tube with a ring at the top center back
- Flat panel size: 12 1/4 in (31.1 cm) wide × 15 in (38.1 cm) tall
- Size before bands: 15 in (38.1 cm) tube height
- Band depth: top 1 1/4 in (3.2 cm); bottom 1 1/2 in (3.8 cm)
- Ring: 3 in (7.6 cm) ring, 3 1/2 in (8.9 cm) across once covered
Materials
Yarn: Use a smooth worsted-weight cotton or cotton blend. Cotton holds the shells crisp, doesn’t stretch out under the weight of the bags, and can be washed. Avoid fuzzy or very stretchy acrylics, because they blur the shell texture and let the tube sag.
- Periwinkle blue (main color): 180 g, about 340 m (372 yd)
The quantity includes a margin of about 15 percent to cover your gauge swatch and small differences in tension.
Tools:
- 5.0 mm (H-8) crochet hook
- One 3 in (7.6 cm) ring, plastic or wooden (macramé or craft ring)
- Tapestry needle
- Scissors
- 4 stitch markers
- Measuring tape
- Blocking mat and pins
Abbreviations (US Terms)
- ch – chain
- sl st – slip stitch
- sc – single crochet
- dc – double crochet
- sc2tog – single crochet 2 together
- sk – skip
- st(s) – stitch(es)
- rep – repeat
- rnd – round
Special stitch – Shell: Work 5 dc in the same stitch.
Gauge and Checkpoints
Gauge in shell pattern: 16 sts and 8 rows = 4 in (10.2 cm)
Gauge in sc: 16 sts and 16 rnds = 4 in (10.2 cm)
Make a test swatch first. Ch 26, then work Rows 1–3 of the body pattern and repeat Rows 2–3 until you have 8 rows. The swatch has 25 sts (4 shell repeats plus 1) and should measure 6 1/4 in (15.9 cm) wide × 4 in (10.2 cm) tall.
Too big? Go down half a hook size, to 4.5 mm.
Too small? Go up half a hook size, to 5.5 mm.
Width matters most here. If the width is off by 1/4 in (0.6 cm) in the swatch, it will be off by nearly 1/2 in (1.3 cm) across the full panel.
Checkpoints:
- After Row 1: panel width 12 1/4 in (31.1 cm)
- After Row 10: 5 in (12.7 cm) tall
- After Row 20: 10 in (25.4 cm) tall
- After Row 30: 15 in (38.1 cm) tall
- After seaming: 6 1/8 in (15.6 cm) wide when flat
- After the bands: 17 3/4 in (45.1 cm) tall
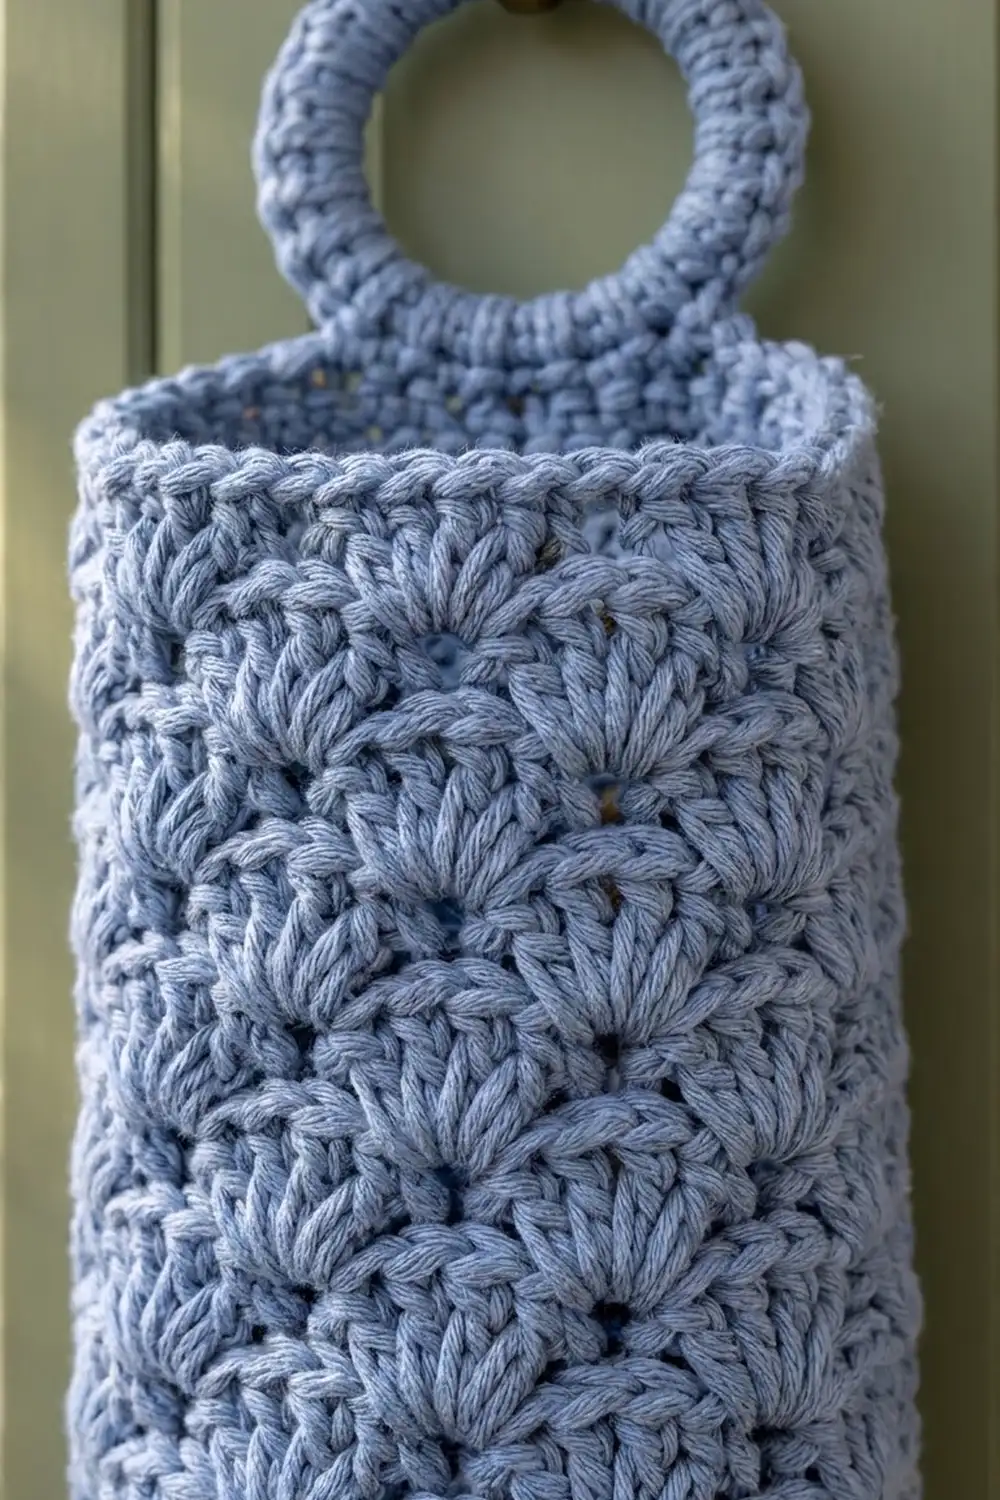
Body Panel (Worked Flat)
The shell pattern is a multiple of 6 sts plus 1. The panel has 8 shell repeats, which gives 49 sts.
Foundation: Ch 50.
Row 1 (Row A): Sc in 2nd ch from hook. Sk 2 ch, shell in next ch, sk 2 ch, sc in next ch. Rep from * to * across. Turn.
(1 sc + 8 × [shell + sc] = 49 sts: 8 shells, 9 sc)
Row 2 (Row B): Ch 3 (counts as dc), 2 dc in first sc. Sk 2 dc, sc in center dc of next shell, sk 2 dc, shell in next sc. Rep from * to * 6 more times. Then sk 2 dc, sc in center dc of last shell, sk 2 dc, 3 dc in last sc. Turn.
(3 dc + 7 × [sc + shell] + 1 sc + 3 dc = 49 sts: 7 full shells, 2 half shells, 8 sc)
Row 3 (Row A): Ch 1, sc in first dc. Sk 2 dc, shell in next sc, sk 2 dc, sc in center dc of next shell. Rep from * to * across. On the last repeat, work the final sc into the top of the turning ch. Turn.
(49 sts: 8 shells, 9 sc)
Rows 4–30: Rep Rows 2 and 3, ending with a Row 2 (Row B). That makes 30 rows in total.
(49 sts in every row)
Every row places its shells into the sc of the row below, so the fans sit offset in the brick-like pattern shown. Check the height at Rows 10, 20, and 30 against the checkpoints. Fasten off and leave a 24 in (61 cm) tail for seaming.
Seaming the Tube
Fold the panel in half with the right side facing in, bringing the two side edges (the row ends) together.
Thread the tail on a tapestry needle and whipstitch the row ends together from top to bottom. Pick up the edge stitch of each row on both sides. Work 2 whipstitches per shell row (Row B ends have a dc, Row A ends have a sc), which gives about 60 stitches along the seam.
Keep the tension snug but flat. The seam shouldn’t pucker or shorten the tube. Turn the tube right side out.
Checkpoint: The tube lies flat at 6 1/8 in (15.6 cm) wide and 15 in (38.1 cm) tall. The seam sits at the center back.
Bands (Top and Bottom Border)
The bands work as the border of this piece. The tube has two edges and no corners, so each band is worked in rounds.
Band gauge: 16 sc = 4 in (10.2 cm); 4 rnds = 1 in (2.5 cm)
Why the math works: Each edge of the panel has 49 sts. Once seamed, the first and last stitch of each row sit side by side at the seam, so you skip 1 of them. That leaves 48 sts, which is exactly 12 in (30.5 cm) at band gauge and matches the tube’s circumference. The number 48 also divides evenly by 8, so the bottom decreases come out evenly.
Top Band
Work into the top of Row 30 with the right side facing. Row 30 ends in dc stitches with shorter sc “valleys” between the shells, so Rnd 1 uses a dc in each valley to level the edge.
Rnd 1 (conversion round): Join yarn at the seam. Ch 1, then sc in each dc and dc in each sc valley around. Skip 1 of the 2 dc that meet at the seam. Join with a sl st to the first sc.
(40 sc worked 1 per existing dc + 8 dc worked into the valleys = 48 sts)
Rnds 2–5: Ch 1, sc in each st around, join. (48 sts)
That’s 5 rnds in total, 1 1/4 in (3.2 cm) deep. Fasten off and weave in the end.
Bottom Band
Turn the tube upside down and work into the free loops of the foundation chain with the right side facing.
Rnd 1: Join yarn at the seam. Ch 1, then sc in each foundation ch around, skipping 1 ch at the seam. Join.
(48 sts)
Rnd 2: Ch 1, [sc in next 4 sts, sc2tog] 8 times. Join. (40 sts)
Rnd 3: Ch 1, [sc in next 3 sts, sc2tog] 8 times. Join. (32 sts)
Rnd 4: Ch 1, [sc in next 2 sts, sc2tog] 8 times. Join. (24 sts)
Rnds 5–6: Ch 1, sc in each st around. Join. (24 sts)
That’s 6 rnds in total, 1 1/2 in (3.8 cm) deep. The opening is 6 in (15.2 cm) around, about 1.9 in (4.8 cm) across. This is snug enough to grip a bag but loose enough to pull one through. Fasten off and weave in the end.
Checkpoint: The body now measures 17 3/4 in (45.1 cm) tall: 15 in (38.1 cm) of shells, plus 1 1/4 in (3.2 cm) top band, plus 1 1/2 in (3.8 cm) bottom band.
Ring Hanger
Cover the Ring
Rnd 1: Make a slip knot on your hook. Hold the ring behind the working yarn and work sc stitches into the center of the ring and around it. Pack the stitches tightly so no ring shows through. You will fit about 56 sc around a 3 in (7.6 cm) ring. The exact count isn’t important; just keep going until the ring is fully covered. Join with a sl st to the first sc.
Rnd 2: Sl st loosely in the back loop of each sc around. Join.
This round gives the outer edge a raised, rounded rim. The covered ring now measures about 3 1/2 in (8.9 cm) across. Fasten off and weave in the end.
Tab
Place markers on the top band’s last round, 3 sts to the right of the seam and 3 sts to the left. This marks 6 sts centered over the seam at the center back.
Row 1: With the right side facing, join yarn in the first marked st. Ch 1, sc in the same st and in the next 5 sts. Turn. (6 sts)
Rows 2–8: Ch 1, sc in each st across. Turn. (6 sts)
The tab is 2 in (5.1 cm) long. Leave a 12 in (30.5 cm) tail.
Attach the ring: Pass the tab through the covered ring from front to back and fold it down inside the tube. Whipstitch Row 8 to the inside of the top band, just below Rnd 5. About 3/4 in (1.9 cm) of tab shows between the rim and the ring. Sew through both layers along the sides of the tab as well, so the ring can’t shift sideways.
Final Blocking
- Wet the holder in cool water. Press out the water gently; don’t wring it.
- Roll it in a towel to remove the extra moisture.
- Stuff the tube loosely with a rolled towel or a few plastic bags so it keeps its round shape.
- Lay it flat and pat it to 6 1/8 in (15.6 cm) wide × 17 3/4 in (45.1 cm) tall.
- Line up the shell columns so they run straight up the tube, and keep the seam centered at the back.
- Pat the bottom band into an even circle and fluff the shells with your fingertips.
- Lay the ring flat above the top band, then let everything dry completely.
Final Quality-Control Checklist
- 30 shell rows, with every row counting 49 sts
- Shells offset by half a repeat on each row
- Seam flat, with no puckering, and centered at the back
- Top band: 48 sts per round, 5 rounds, level edge
- Bottom band: 48 → 40 → 32 → 24 sts, opening about 1.9 in (4.8 cm) across
- Ring fully covered, with no plastic or wood visible
- Tab centered over the seam and sewn securely on three sides
- Body 17 3/4 in (45.1 cm); total hanging length 22 in (55.9 cm)
- All ends woven in on the inside
Troubleshooting
The panel slants or narrows. You missed the half shell at the end of a Row B, or the last sc of a Row A. Count 49 sts on every row.
Shells don’t line up in a brick pattern. Each shell must go into an sc, and each sc must go into a center dc. Check your skips: always skip 2 sts on each side.
The top edge looks wavy. Make sure Rnd 1 puts a dc into each sc valley. If it’s still wavy, work the band with a hook half a size smaller.
The bottom opening is too tight. Repeat Rnd 4 as [sc in next 3 sts, sc2tog] 6 times, which leaves 30 sts.
The bottom opening is too loose. Add one more decrease round: [sc in next st, sc2tog] 8 times, which leaves 16 sts.
Plastic shows through the ring. Undo the ring cover and add more sc, pushing them together firmly as you go.
The holder stretches when full. Your yarn is too stretchy, or your gauge is too loose. Go down a hook size and switch to 100 percent cotton.
Care
Hand wash or machine wash on a gentle cycle in cool water, then lay flat to dry, shaped around a rolled towel. Don’t tumble dry, and remove the ring hanger from any metal hook while the holder is wet.
Final Notes
The measurement chain goes like this:
- A swatch of 16 sts × 8 rows = 4 in (10.2 cm) gives a 49-st panel that is 12 1/4 in (31.1 cm) wide.
- 30 rows bring the panel to 15 in (38.1 cm) tall.
- Seaming leaves 48 working sts around a tube that is 6 1/8 in (15.6 cm) wide flat.
- The top band adds 1 1/4 in (3.2 cm), and the bottom band adds 1 1/2 in (3.8 cm) while decreasing to a 24-st opening.
- The body finishes at 17 3/4 in (45.1 cm).
- The covered ring at 3 1/2 in (8.9 cm) plus 3/4 in (1.9 cm) of tab brings the total hanging length to 22 in (55.9 cm).
If you check each of these numbers as you go, the holder will hang straight, hold a good stack of bags, and give you one bag at a time from the bottom.
Happy crocheting!