

The Emerald Monstera Bedspread fills a bed with deep green tropical leaves. Each motif is a heart-shaped monstera leaf with scalloped lobes, deep slits and lines of eyelet “veins.” An airy chain-mesh frame surrounds each leaf, so the bedding underneath shows through.
The whole bedspread uses one color, a rich forest green. Because there’s only one color, the shapes and the lace do the work. It suits a calm, botanical bedroom. Laid over white or cream sheets, the open mesh gives a strong contrast.
This pattern uses US crochet terms. The finished bedspread measures 85 x 101.5 in (215.9 x 257.8 cm), including a scalloped border. Each motif blocks to an 8.25 in (21.0 cm) square.
You work every leaf in the round from the center out, then shape it in one round. Next, you square it off with a chain frame and a final round of single crochet. Then you join 120 motifs in a 10 x 12 grid with a flat slip-stitch seam and finish with a three-round scalloped border.
Finished Size and Construction
- Finished size: 85 x 101.5 in (215.9 x 257.8 cm)
- Skill level: Intermediate
- Terminology: US
- Yarn weight: Worsted (#4)
- Hook: 4.5 mm (US 7) for motifs and border; 5.0 mm (US H-8) for joining
- Number of pieces: 120 identical motifs
- Layout: 10 motifs wide x 12 motifs long
- Motif size: 8.25 in (21.0 cm) square, 33 sc per side
- Size before border: 82.5 x 99 in (209.6 x 251.5 cm)
- Border depth: 1.25 in (3.2 cm) on each side
Materials
Yarn: Use a smooth, firmly plied worsted yarn so the lobes stay crisp and the eyelets stay clear. Cotton or a cotton blend gives the sharpest leaf texture. A soft acrylic is lighter and easier to wash. The quantities assume about 200 m (219 yd) per 100 g.
- Forest green: 2,900 g, about 5,800 m (6,343 yd)
- Motifs: about 20 g / 40 m (43.7 yd) each, 2,400 g in total
- Joining: about 140 g
- Border: about 105 g
The quantities include a margin of about 10% for gauge differences and swatching. Buy all the yarn from one dye lot.
Tools:
– 4.5 mm (US 7) and 5.0 mm (US H-8) crochet hooks
– 4 locking stitch markers
– Tapestry needle
– Scissors
– Blocking mats, rust-proof pins and a spray bottle
– Tape measure
Abbreviations (US Terms)
- ch – chain
- sl st – slip stitch
- sc – single crochet
- hdc – half double crochet
- dc – double crochet
- tr – treble crochet
- dtr – double treble: yarn over 3 times, insert hook, pull up a loop, (yarn over, pull through 2 loops) 4 times
- sk – skip
- sp – space
- st(s) – stitch(es)
- BLO – back loop only
- rep – repeat
Special stitch – surface slip stitch: With the yarn held behind the work, insert the hook from the front through the fabric, pull up a loop, and draw it through the loop on the hook. This makes a raised chain line on the surface.
Gauge and Checkpoints
Gauge: 16 sc = 4 in (10.2 cm) with the 4.5 mm hook.
Make one full motif and block it before you start production. Measure it at each checkpoint:
- After Round 3: 3 in (7.6 cm) across
- After Round 6: 5.75 in (14.6 cm) across
- After Round 7 (shaped leaf): 6.5 in (16.5 cm) from notch to tip
- After Round 10, blocked: 8.25 in (21.0 cm) square, within 0.25 in (0.6 cm)
If your motif is too big: go down one hook size. If it’s too small: go up one hook size. If the leaf is right but the square isn’t, fix your chain tension in Rounds 8–9 instead of changing the hook. Tight chains pull the corners in.
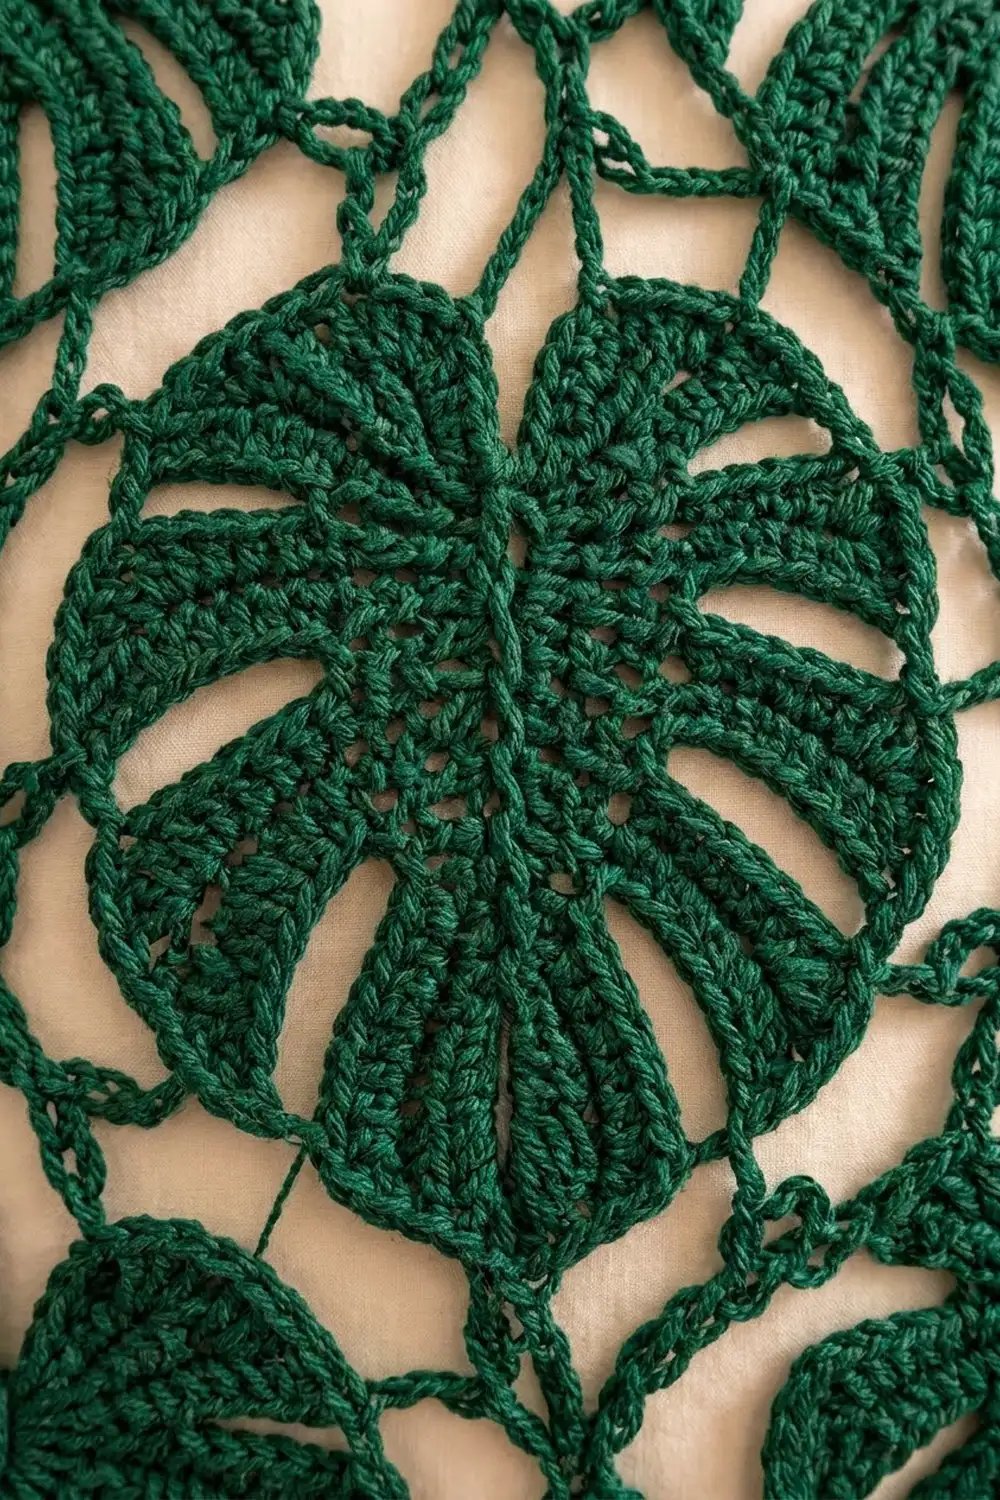
Motif (make 120)
Leaf
Round 1: Make a magic ring. Ch 3 (counts as dc), work 11 dc in the ring, then join with a sl st to the top of the ch-3. (12 dc)
Round 2: Ch 3 (counts as dc), dc in the same st, then work 2 dc in each st around. Join. (24 dc)
Round 3: This round sets up 12 sectors. Ch 3 (counts as dc), 2 dc in the next st, ch 1; dc in the next st, 2 dc in the next st, ch 1; rep from * 11 more times. Join. (36 dc, 12 ch-1 sps)
Round 4: Ch 3, dc in the same st, dc in the next 2 dc, ch 1, sk the ch-1 sp; 2 dc in the next dc, dc in the next 2 dc, ch 1, sk the ch-1 sp; rep from * 11 more times. Join. (48 dc, 12 ch-1 sps)
Round 5: Ch 3, dc in the same st, dc in the next 3 dc, ch 1, sk the sp; 2 dc in the next dc, dc in the next 3 dc, ch 1, sk the sp; rep from * 11 more times. Join. (60 dc, 12 ch-1 sps)
Round 6: Ch 3, dc in the same st, dc in the next 4 dc, ch 2, sk the sp; 2 dc in the next dc, dc in the next 4 dc, ch 2, sk the sp; rep from * 11 more times. Join. (72 dc, 12 ch-2 sps; 6 dc per sector)
The chain spaces sit directly above each other, so they form 12 straight lines of eyelets running out from the center. These are the leaf’s veins.
Round 7 (shaping): Number the sectors 1 to 12, starting from the join. Sector 1 is the notch and sector 7 is the tip.
- Sector 1 (notch): Sl st in the same st as the join and in the next 5 dc. (6 sl st)
- Slit anchor: Ch 1, sl st in the ch-2 sp, ch 1. Work one after every sector.
- Sectors 2–6: Sc, hdc, 2 dc in the next st, 2 dc in the next st, hdc, sc (8 sts each), then a slit anchor.
- Sector 7 (tip): Hdc, dc, 2 tr in the next st, ch 2, 2 tr in the next st, dc, hdc (8 sts plus a ch-2 point), then a slit anchor.
- Sectors 8–12: Same as sectors 2–6, each followed by a slit anchor.
Join to the first sl st. (94 sts: 80 in the regular lobes + 8 at the tip + 6 at the notch; 12 slit anchors) Fasten off.
The slip stitches pull sector 1 in to make the heart-shaped notch. The trebles push sector 7 out to a point. The chain-1 anchors pinch each slit closed at the edge, which makes the lobes look scalloped.
Midrib: Join yarn at the center ring. Work a surface slip stitch straight up to the notch, then fasten off. Join again at the center and work a surface slip stitch down through the middle of sector 7 to the tip point. Weave in the ends.
Mesh Frame
Round 8: Join yarn with a sc in the slit anchor between sectors 2 and 3. Ch 8, sc in the next slit anchor; rep from * 10 more times, ch 8, then join to the first sc. (12 sc, 12 ch-8 loops)
Place markers in the 1st, 4th, 7th and 10th sc. These are the corners, between sectors 2/3, 5/6, 8/9 and 11/12. Each side now has 3 loops, and the notch and tip sit at the centers of the top and bottom sides.
Round 9: Ch 5 (counts as dtr), ch 5, dtr in the same sc to make the first corner. Then ch 4, sc in the next loop, ch 9, sc in the next loop, ch 9, sc in the next loop, ch 4. Work (dtr, ch 5, dtr) in the next marked sc, ch 4, sc in the next loop, ch 9, sc in the next loop, ch 9, sc in the next loop, ch 4; rep from * 2 more times. Join to the top of the beginning ch-5. (8 dtr, 12 sc, 4 corner ch-5 sps, 8 ch-9 sps, 8 ch-4 sps)
Round 10: Sl st into the corner ch-5 sp, then ch 1 and work (sc, ch 2, sc) in the same sp. Along each side: sc in the dtr, 4 sc in the ch-4 sp, sc in the sc, 9 sc in the ch-9 sp, sc in the sc, 9 sc in the ch-9 sp, sc in the sc, 4 sc in the ch-4 sp, sc in the dtr. Work (sc, ch 2, sc) in each corner sp. Join and fasten off.
Count per side: 1 + 1 + 4 + 1 + 9 + 1 + 9 + 1 + 4 + 1 + 1 = 33 sc, including that side’s own corner sc at each end. Round total: 4 x 33 = 132 sc, plus 4 ch-2 corner sps.
Block each motif to 8.25 in (21.0 cm) square, with the notch at the top and the tip at the bottom. Pin out each lobe and the tip point.
Make All Pieces
Make 120 motifs in forest green. Count them in groups of ten as you go. Lay them out with every notch facing the head of the bed.
Text layout grid (M = motif, 10 across x 12 down):
Row 1:  M M M M M M M M M M
Row 2:  M M M M M M M M M M
Row 3:  M M M M M M M M M M
Row 4:  M M M M M M M M M M
Row 5:  M M M M M M M M M M
Row 6:  M M M M M M M M M M
Row 7:  M M M M M M M M M M
Row 8:  M M M M M M M M M M
Row 9:  M M M M M M M M M M
Row 10: M M M M M M M M M M
Row 11: M M M M M M M M M M
Row 12: M M M M M M M M M M
Joining
Method: This is a flat slip-stitch seam using the 5.0 mm hook. Hold two motifs with right sides together and the edges lined up.
Stitch-to-stitch logic: Sl st through both corner ch-2 sps. Then sl st through the BLO of each matching pair of sts, 33 pairs in all. Finish with a sl st through the next pair of corner sps. That’s 35 sl sts per motif seam. Each stitch matches one stitch, so the seam adds no stitches and no width.
Order: Join 10 motifs into each horizontal row (9 seams per row, 108 seams in all). Then join the 12 rows to each other with 11 long seams. Work each long seam straight across all 10 motifs without fastening off. Where four corners meet, work through all the corner spaces so there’s no hole.
Tension: Keep the slip stitches as loose as the sc in Round 10. Stretch the seam gently every 10 stitches. If it puckers, take it out and redo it with a bigger hook.
Size checkpoint: The joined body should measure 82.5 x 99 in (209.6 x 251.5 cm), within 1 in (2.5 cm).
Border
Border gauge: Use the same gauge as the motifs, 16 sc = 4 in (10.2 cm), with the 4.5 mm hook.
Round 1: Join yarn at any outer corner. Sc in each sc along every motif edge, which is 33 per motif. Skip the corner ch-2 sps at the seams, because the joins already use them. At each outer corner, ch 2 across the corner sp.
– Short sides: 10 x 33 = 330 sc
– Long sides: 12 x 33 = 396 sc
– Total: 2 x (330 + 396) = 1,452 sc, plus 4 ch-2 sps
Round 2: Sc in each sc, and work 1 sc in each corner ch-2 sp to make the corner st.
– 330 / 396 sc per side between corners, plus 4 corner sts
– Total: 1,452 + 4 = 1,456 sc
Round 3 (scallops): Work 7 dc in the corner st. Along the side: sk 2, 7 dc in the next st, sk 2, sc in the next st; rep from * across. The last sc lands in the final st before the next corner. Work 7 dc in each corner st, and rep around. Join and fasten off.
– Short sides: 330 ÷ 6 = 55 scallops
– Long sides: 396 ÷ 6 = 66 scallops
– Total: 2 x (55 + 66) + 4 corners = 246 scallops
Why the math works: A single motif’s 33 stitches don’t divide by 6. But 10 motifs give 330 and 12 motifs give 396, and both are multiples of 66, which divides evenly by 6. That means each side ends on a complete scallop and needs no fudged stitches. The border is 1.25 in (3.2 cm) deep, so the finished size is 85 x 101.5 in (215.9 x 257.8 cm).
Final Blocking
- Lay the bedspread flat on a clean sheet or on blocking mats placed over a large floor area.
- Spray it evenly until it’s damp all over. Don’t soak it, because a heavy, wet bedspread stretches.
- Pat the grid square. Check that every row of motifs is straight and that every seam lies flat.
- Pin the outer edge to 85 x 101.5 in (215.9 x 257.8 cm), with a pin at the center of each scallop.
- Open the eyelet veins and slits with your fingers, then pin the tip point of the outer leaves.
- Leave it until it’s completely dry, which can take up to 48 hours.
Final Quality-Control Checklist
- All 120 motifs measure 8.25 in (21.0 cm), within 0.25 in (0.6 cm)
- Every notch faces the head of the bed
- Each motif has 12 straight lines of eyelets and 12 clear slits
- Every seam has 35 sl sts with no puckering
- Four-corner meeting points are closed
- Border Round 1 has 330 / 396 sc per side
- There are 55 / 66 scallops per side plus 4 corner scallops
- All ends are woven in at least 2 in (5.1 cm) and trimmed
Troubleshooting
- The leaf ruffles: Your dc tension is loose. Go down a hook size for Rounds 1–6.
- The leaf cups: It’s tight. Go up a hook size, or check the increase counts in Rounds 4–6.
- The eyelets spiral: You worked the chain in the wrong place. Each ch-sp must sit directly over the one below it.
- The notch is flat: Make sure sector 1 is all slip stitches, with no sc.
- The corners are rounded: Your Round 9 dtrs are short. Pull each loop up to full height.
- The sides bow inward: The Round 9 chains are tight. Chain more loosely, or use a bigger hook for the chains only.
- A seam ripples: You skipped or doubled a stitch. Recount to 33 pairs.
- The border ruffles: Recount Round 1. Don’t add stitches at the seams.
Care
Hand wash or machine wash on a gentle cycle in cool water, inside a large mesh laundry bag. Dry flat and reshape the leaf points while the bedspread is damp.
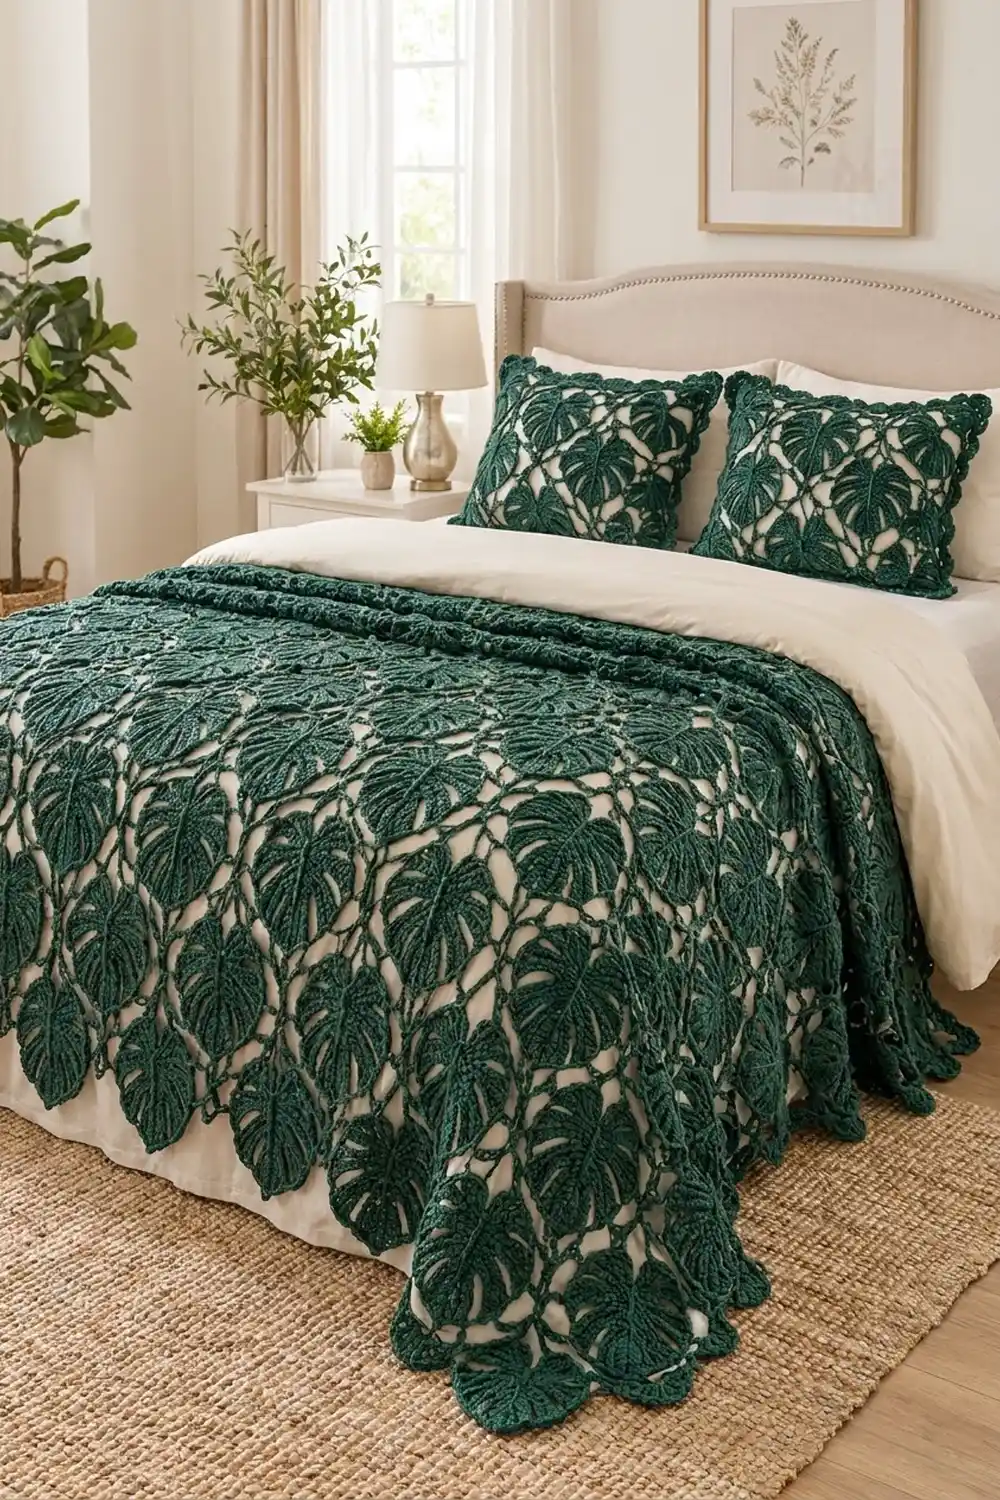
Final Notes
The measurements build on each other. A gauge of 16 sc = 4 in (10.2 cm) gives a 5.75 in (14.6 cm) leaf after Round 6, a 6.5 in (16.5 cm) leaf after shaping, and an 8.25 in (21.0 cm) motif with 33 sc per side. Ten by twelve motifs make 82.5 x 99 in (209.6 x 251.5 cm). The 1.25 in (3.2 cm) border brings it to 85 x 101.5 in (215.9 x 257.8 cm). If each stage matches its checkpoint, the next stage will fit.
Happy crocheting!