

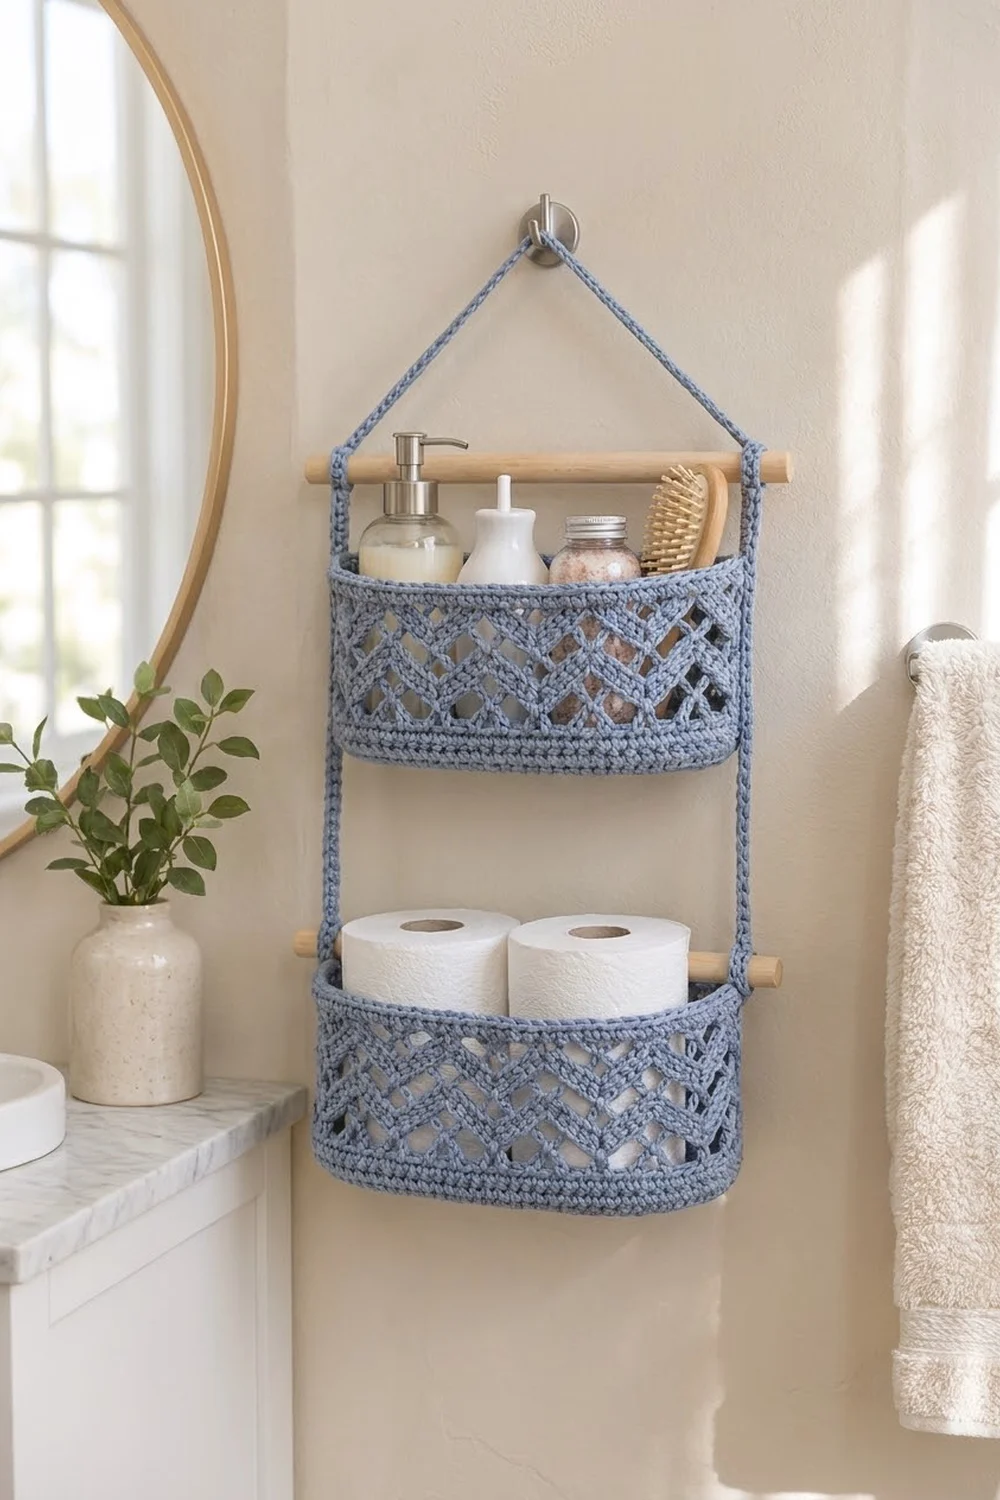
This organizer has two tiers. Each tier is an oval crochet basket that hangs from its own wooden dowel. Slim crochet cords join the two dowels and form a hanging triangle above the top one. Toiletries go in the upper basket and spare toilet rolls in the lower one, and the whole thing stays off your counter.
Both baskets use one soft dusty blue cotton. Each basket has:
- a firm single crochet base
- a short solid band at the bottom of the wall
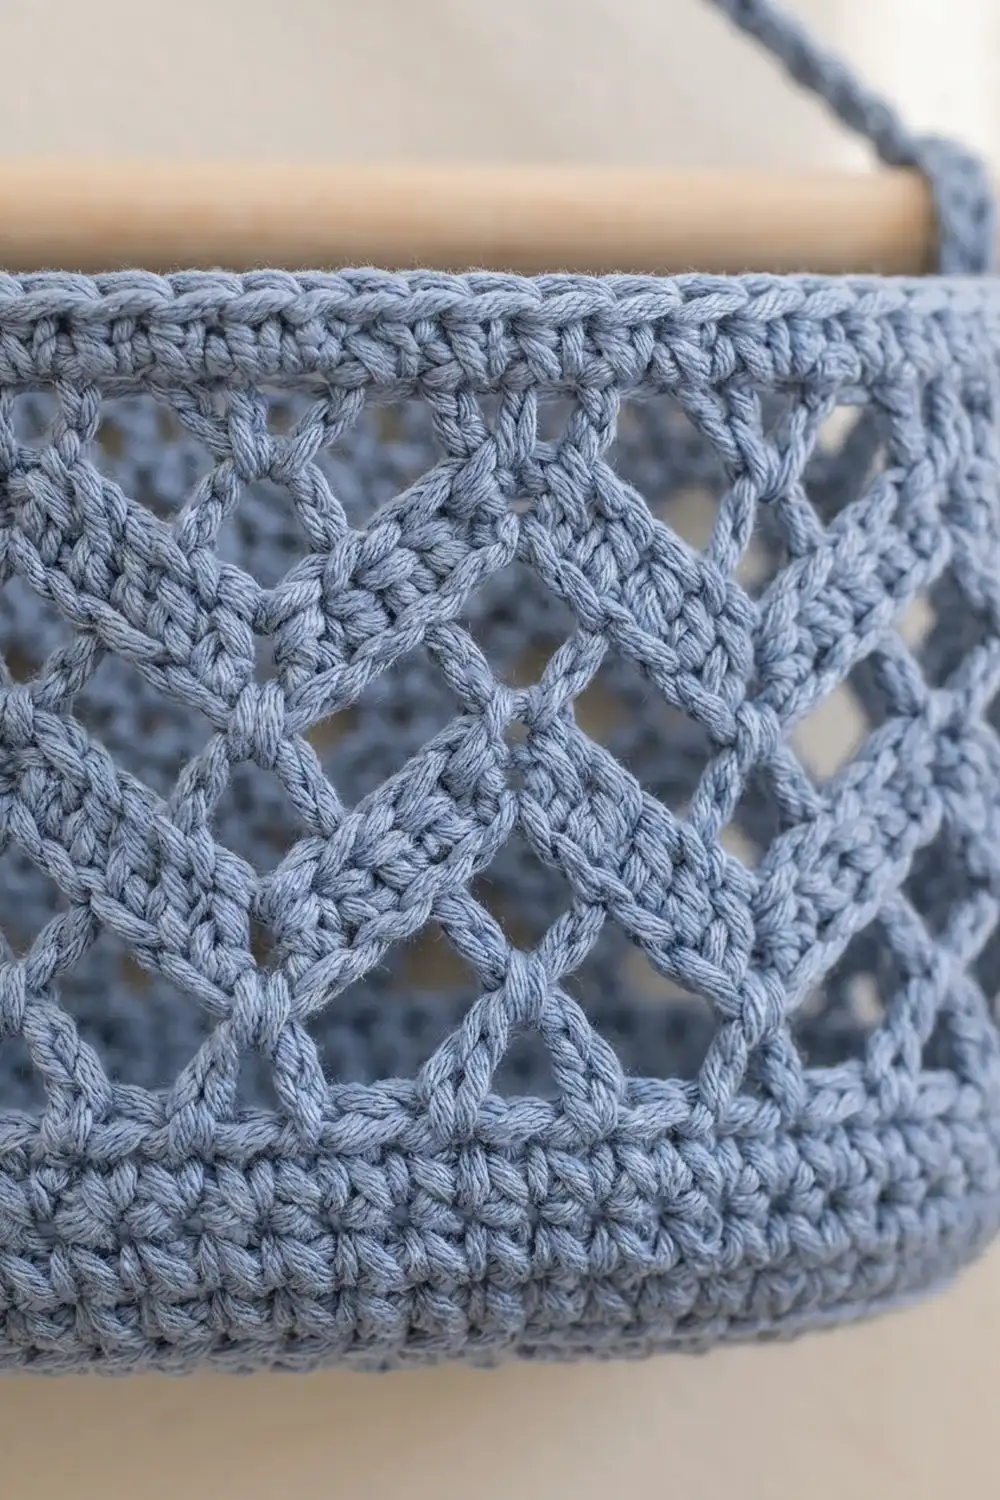
- an open trellis of offset V-stitches, which makes zigzag chevrons and diamond-shaped holes
- a solid single crochet rim at the top
The style is calm and coastal-cottage, and it looks good with wood, white ceramics and plants.
The pattern uses US crochet terms. Each finished basket is about 10.3 in (26.2 cm) long, 4 in (10.2 cm) deep and 4.5 in (11.4 cm) tall. When hung, the organizer is about 13 in (33.0 cm) wide at the dowels. It measures about 23 in (58.4 cm) from the wall hook to the bottom of the lower basket.
How it’s made: start each basket with an oval base worked in joined rounds. Turn up the wall through the back loops, then work the solid band, the trellis and the rim. Add a folded tab at each short end to hold the dowel. Finally, three slip-stitch cords join the dowels and hang the organizer.
Finished Size and Construction
- Finished basket size: 10.3 x 4 x 4.5 in (26.2 x 10.2 x 11.4 cm)
- Assembled organizer: about 13 in (33.0 cm) wide x 23 in (58.4 cm) tall
- Skill level: Intermediate
- Terminology: US crochet terms
- Yarn weight: Worsted (#4) cotton
- Hook: 5 mm (H-8)
- Number of pieces: 5 crocheted pieces (2 baskets, 2 side cords, 1 hanging cord) plus 2 wooden dowels
- Layout: 1 column x 2 tiers, one basket above the other
- Basket base size: 10.3 x 4 in (26.2 x 10.2 cm)
- Wall height before rim: 3.5 in (8.9 cm)
- Rim (border) depth: 1 in (2.5 cm)
Materials
Yarn: Choose a smooth worsted-weight cotton or cotton blend. Cotton keeps its shape when the baskets are full, and it handles bathroom humidity well. Acrylic will give you a softer, floppier basket.
- Dusty blue: 170 g, about 340 m (372 yd)
This amount includes a margin of about 30% for your gauge test, the cords and the sewing tails.
Tools:
- 5 mm (H-8) crochet hook
- 4 locking stitch markers
- Tapestry needle
- Scissors
- Tape measure
- 2 wooden dowels, 5/8 in (1.6 cm) diameter, cut to 13 in (33.0 cm) long
- 1 wall hook or knob for hanging
Abbreviations (US Terms)
- ch: chain
- sl st: slip stitch
- sc: single crochet
- dc: double crochet
- BLO: back loop only
- st(s): stitch(es)
- sp: space
- rep: repeat
- RS: right side
Special stitch – V-stitch (V-st): (dc, ch 2, dc) all in the same stitch or space.
Slip-stitch cord: Chain the required number. Sl st into the back bump of the 2nd ch from the hook, then into the back bump of each ch across. The result is a firm cord that doesn’t stretch.
Gauge and Checkpoints
Gauge: 14 sc and 16 rounds = 4 in (10.2 cm), worked in sc in the round.
Trellis gauge: One trellis repeat (a V-st plus a ch-1 sp) is about 1.14 in (2.9 cm) wide. One trellis round is about 0.5 in (1.3 cm) tall.
Cord gauge: 4 sl-st cord stitches = 1 in (2.5 cm).
Finish one whole basket before you start the second. That first basket is your real gauge swatch. Check it at each stage:
- After Rnd 4: The base measures about 8.3 x 2 in (21.1 x 5.1 cm).
- After Rnd 8: The base measures 10.3 x 4 in (26.2 x 10.2 cm) and lies flat.
- After Rnd 12: The solid wall is 1 in (2.5 cm) tall and stands upright.
- After Rnd 17: The wall is 3.5 in (8.9 cm) tall.
- After Rnd 21: The wall is 4.5 in (11.4 cm) tall, and the top edge measures about 26.3 in (66.8 cm) around.
Base too big? Go down half a hook size. Base too small? Go up half a hook size.
If the base ruffles, you’re working the end curves too loosely. If it cups, your tension is too tight. Fix the base before you start the wall.
Basket (Make 2)
Oval Base
Ch 25.
Rnd 1:
– Work 3 sc in the 2nd ch from the hook.
– Sc in each of the next 22 ch.
– Work 3 sc in the last ch.
– Rotate the work. Sc in each of the 22 unused loops on the other side of the chain.
– Join with a sl st to the first sc.
(50 sts: 2 ends of 3, 2 long sides of 22)
Place a marker in the center sc of each 3-sc end group. Move the markers up every round so they always mark the end curves.
Rnd 2: Ch 1. Work 2 sc in each of the next 3 sts (the end), then sc in the next 22 sts (the side). Rep once more, then join. (56 sts: ends 6, sides 22)
Rnd 3: Ch 1. Work [sc in the next st, 2 sc in the next st] 3 times across the end, then sc in the next 22 sts. Rep once more, then join. (62 sts: ends 9, sides 22)
Rnd 4: Ch 1. Work [sc in the next 2 sts, 2 sc in the next st] 3 times, then sc in the next 22 sts. Rep once more, then join. (68 sts: ends 12, sides 22)
Rnd 5: Work as Rnd 4, but with 3 sc before each increase. (74 sts: ends 15, sides 22)
Rnd 6: Work as Rnd 4, but with 4 sc before each increase. (80 sts: ends 18, sides 22)
Rnd 7: Work as Rnd 4, but with 5 sc before each increase. (86 sts: ends 21, sides 22)
Rnd 8: Work as Rnd 4, but with 6 sc before each increase. (92 sts: ends 24, sides 22)
Each round adds exactly 3 sts to each end, which is the standard half-circle increase. The long sides stay at 22 sts, so the straight part is 6.3 in (16.0 cm) long. The rounds build up to 4 in (10.2 cm) across, so the total length is 10.3 in (26.2 cm).
Solid Lower Wall
Rnd 9 (turning round): Ch 1, sc in the BLO of each st around, then join. (92 sts) The unused front loops make a crisp ridge where the wall turns upward.
Rnds 10–12: Ch 1, sc in each st around, then join. (92 sts each round)
The solid band is now 1 in (2.5 cm) tall.
Trellis Section
Rnd 13:
– Ch 5 (counts as dc + ch 2), then dc in the same st. This is the first V-st.
– *Ch 1, skip 3 sts, V-st in the next st; rep from * 21 more times.
– Ch 1, skip 3 sts, then join with a sl st to the 3rd ch of the beginning ch-5.
(23 V-sts, 23 ch-1 sps)
Check: 1 st + (22 x 4 sts) + 3 skipped sts = 92 sts used.
Rnd 14:
– Sl st into the ch-2 sp, sl st in the next dc, then sl st in the next ch-1 sp.
– Ch 5 (counts as dc + ch 2), then dc in the same ch-1 sp.
– *Ch 1, V-st in the next ch-1 sp; rep from * 21 more times.
– Ch 1, then join to the 3rd ch of the beginning ch-5.
(23 V-sts, 23 ch-1 sps)
Rnds 15–17: Rep Rnd 14. (23 V-sts, 23 ch-1 sps each round)
In each round, the V-sts go into the gaps between the V-sts below. This shifts them by half a repeat and creates the zigzag chevrons and diamond holes. The wall is now 3.5 in (8.9 cm) tall.
Keep the ch-1s relaxed. The trellis should be the same distance around as the solid band, without pulling in.
Make All Pieces
- Baskets: 2, in dusty blue, about 62 g each
- Side cords: 2, in dusty blue. Ch 49, then work a slip-stitch cord across (48 sl sts). Each cord is 12 in (30.5 cm) long.
- Hanging cord: 1, in dusty blue. Ch 101, then work a slip-stitch cord across (100 sl sts). The cord is 25 in (63.5 cm) long.
Leave a 10 in (25.4 cm) tail at both ends of every cord.
Layout (front view):
              [ wall hook ]
               /         \
        hanging cord   hanging cord
             /             \
  [====== top dowel, 13 in ======]
  |    [  Basket A  ]            |
  side                        side
  cord                        cord
  |                              |
  [===== lower dowel, 13 in =====]
       [  Basket B  ]
Joining
Dowels: Slide one dowel through both tabs of Basket A and the other through both tabs of Basket B. Center each basket so its dowel sticks out 1.35 in (3.4 cm) past each tab.
Side cords:
1. Measure 0.5 in (1.3 cm) in from one tip of the top dowel. Wrap 1.5 in (3.8 cm) of one cord end around the dowel there.
2. Fold the cord end back on itself. Whipstitch through both layers of cord, matching stitch to stitch, over 6 cord sts.
3. Attach the other end of the same cord to the lower dowel in the same way.
4. Attach the second side cord the same way at the other end of both dowels.
This leaves a free drop of 12 − (2 x 1.5) = 9 in (22.9 cm) between the dowels.
Hanging cord: Wrap and sew each end around the top dowel the same way, just outside the side cords. The free length is 25 − (2 x 1.5) = 22 in (55.9 cm). It forms a triangle about 9 in (22.9 cm) tall.
Tension: Pull the whipstitches snug enough that the wraps can’t slide along the dowel. Don’t pull so hard that the cord twists.
Size checkpoint: Hang the organizer. Both dowels should be level, with 9 in (22.9 cm) between them, and the total height should be about 23 in (58.4 cm). If one side hangs lower, re-sew that wrap 1–2 cord sts shorter.
Border: Rim and Dowel Tabs
Border gauge: Same as the base, 14 sc and 16 rnds = 4 in (10.2 cm).
Rnd 18 (conversion round): Ch 1. Sc in the dc, sc in the ch-2 sp, sc in the next dc, sc in the ch-1 sp; rep from * around, then join. (92 sc = 92 worked 1-per-element + 0 extra)*
Why this works: each repeat has 4 elements (dc, ch-2 sp, dc, ch-1 sp). There are 23 repeats, so 23 x 4 = 92 sc. That’s the same count as Rnd 8, so the rim sits straight above the base without flaring or pulling in.
Before Rnd 19: Flatten the basket so the end markers sit at the folds. Count 22 sts on each long side and 24 sts on each end, then re-mark the center of each end.
Rnds 19–21: Ch 1, sc in each st around, then join. (92 sts each round: long sides 22 + 22, ends 24 + 24) Fasten off and weave in the ends.
The rim is 1 in (2.5 cm) deep, and the basket is 4.5 in (11.4 cm) tall.
Dowel tabs (make 2 per basket): Find the 10th st of a 24-st end group. With the RS facing, join yarn in that st.
Row 1: Ch 1, sc in the same st and in the next 5 sts. (6 sc)
Rows 2–10: Ch 1, turn, sc in each st across. (6 sc each row)
The finished tab is 1.7 in (4.3 cm) wide and 2.5 in (6.4 cm) tall. Fasten off, leaving a 10 in (25.4 cm) tail.
To make the loop:
1. Fold the tab toward the inside of the basket.
2. Whipstitch Row 10 to the inside of Rnd 21, matching the 6 tab sts to the 6 rim sts.
The loop is 2.5 in (6.4 cm) around, so it fits a 5/8 in (1.6 cm) dowel with room to spare. Repeat at the other end.
Final Blocking
- Soak the baskets, then press the water out with a towel. Don’t wring them.
- Fill each basket with a folded towel or a box that fits, so the walls stand at 4.5 in (11.4 cm).
- Flatten the base to 10.3 x 4 in (26.2 x 10.2 cm).
- Open up the trellis diamonds evenly with your fingers.
- Lay the cords out straight.
- Let everything dry completely, about 24 hours, before you put the organizer together.
Final Quality-Control Checklist
- The base measures 10.3 x 4 in (26.2 x 10.2 cm) and lies flat.
- Rnd 8 and every rim round have 92 sts.
- Every trellis round has 23 V-sts.
- The walls stand 4.5 in (11.4 cm) tall without slumping.
- The tabs are centered, with 9 sts on either side of each one.
- The dowels hang level, 9 in (22.9 cm) apart.
- All yarn ends are woven in securely.
Troubleshooting
- The base curls up: You’re missing end increases. Each end needs 3 more sts every round.
- The base ruffles: Your tension is too loose. Go down one hook size for the base only.
- The trellis pulls in: Your ch-1s are too tight. Loosen them, or work ch 2 instead.
- The trellis flares: Tighten your dc, or go down half a hook size.
- The rim waves: You have more than 92 sts. Recount Rnd 18.
- The basket tilts: A tab is off-center. Unpick it and count again from the marker.
- The organizer hangs crooked: Shorten the cord wrap on the lower side so the drops match.
Care
Take out the dowels first. Hand wash in cool water with a mild soap, reshape the baskets and dry them flat.
Final Notes
Each measurement depends on the one before it:
- At 14 sc = 4 in (10.2 cm), the 92-st base measures 10.3 x 4 in (26.2 x 10.2 cm).
- Those 92 sts divide into 23 trellis repeats, and the conversion round brings the count back to exactly 92.
- The walls reach 3.5 in (8.9 cm), then 4.5 in (11.4 cm) with the rim.
- The tabs hold 13 in (33.0 cm) dowels.
- The cords set the tiers 9 in (22.9 cm) apart, for an organizer about 23 in (58.4 cm) tall.
Check each step as you go, and the finished piece will hang straight and keep its shape.
Happy crocheting!