

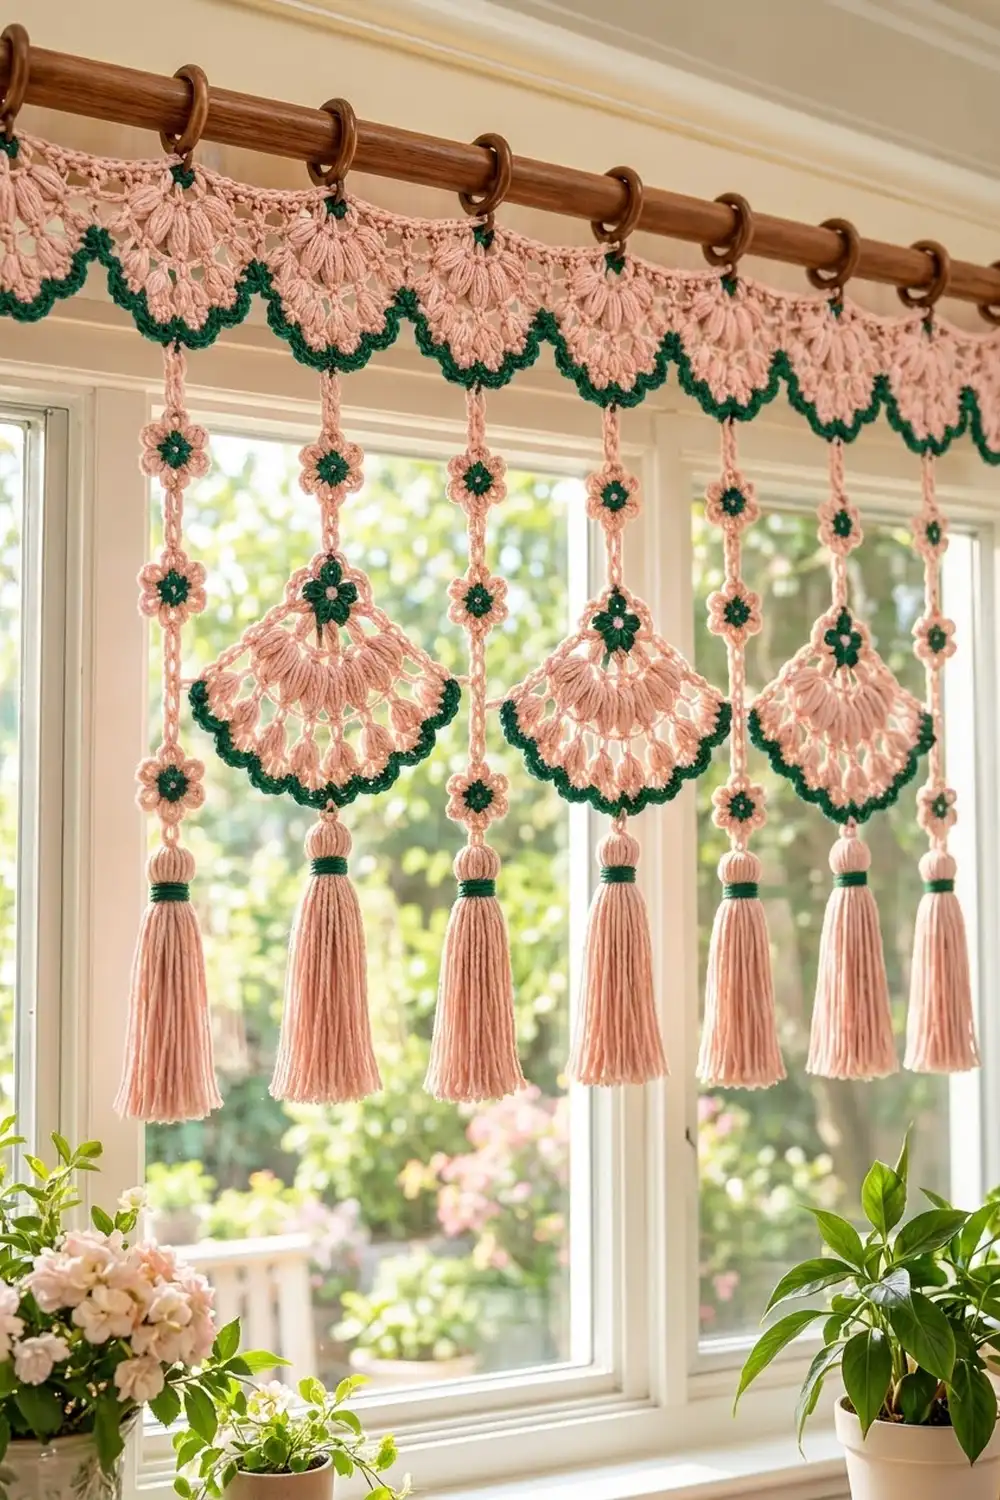
This valance has blush-pink fan scallops with forest-green edges along the top, and below them hang flower chains, smaller fan pendants and full tassels. Sunlight shows through the open puff stitches, so the piece looks lacy without being fragile.
The palette is two colors only: soft blush pink and deep green. The pink does most of the work, and the green is used for the rope-like edges, the flower centers and the tassel wraps. The style is cottage-romantic, and the structure is simple and repeatable.
The pattern uses US crochet terms. The finished valance is 39 in (99.1 cm) wide and 23 in (58.4 cm) long, including the tassels.
You make six half-circle fans and join them at their corners. A three-row top border then turns them into one straight band. Next you make chain cords, add small flowers and three fan pendants, tie on six tassels and attach curtain rings.
Finished Size and Construction
- Finished size: 39 in (99.1 cm) wide x 23 in (58.4 cm) long
- Skill level: Intermediate
- Terminology: US crochet terms
- Yarn weight: DK (light worsted, #3) cotton
- Hook: 4.0 mm (G-6)
- Number of pieces: 6 header fans, 3 pendant fans, 18 small flowers, 3 apex flowers, 9 cords, 6 tassels
- Layout: 6 header fans in one row; 6 strands below them, alternating plain and pendant
- Header fan size: 6.5 in (16.5 cm) wide x 3.25 in (8.3 cm) deep
- Header size before border: 39 in (99.1 cm) x 3.25 in (8.3 cm)
- Border depth: 0.75 in (1.9 cm), worked along the top edge only
- Drop below header: cords 14 in (35.6 cm) + tassels 5 in (12.7 cm)
Materials
Use a smooth mercerized or soft combed DK cotton. Cotton keeps the puffs crisp and the tassels hang straight. Acrylic tassels tend to frizz.
- Blush pink: 150 g, about 330 m (361 yd)
- Forest green: 50 g, about 110 m (120 yd)
Tools:
- 4.0 mm (G-6) crochet hook
- Tapestry needle
- Scissors
- Stitch markers
- 5 in (12.7 cm) piece of cardboard for the tassels
- 7 wooden curtain rings, 1.5 in (3.8 cm) across
- Blocking mat and rust-proof pins
- Spray bottle
The yarn quantities include a margin of about 15% for gauge differences and for the tails.
Abbreviations (US Terms)
- ch: chain
- sl st: slip stitch
- sc: single crochet
- hdc: half double crochet
- dc: double crochet
- sk: skip
- sp: space
- st(s): stitch(es)
- tch: turning chain
- rev sc: reverse single crochet (crab stitch)
Puff: (Yarn over, insert hook in the indicated st or sp, pull up a loop to 0.5 in (1.3 cm)) 3 times. Yarn over and pull through all 7 loops, then ch 1 to lock. The locking ch does not count as a stitch.
Big puff: Work like a puff, but pull up 5 loops (11 loops on the hook) before closing. Ch 1 to lock; it does not count.
Rev sc: Work single crochet from left to right (right-handed). Insert the hook into the next stitch to the right, pull up a loop, yarn over and pull through both loops.
Gauge and Checkpoints
Make one header fan before anything else and measure it.
- Main gauge: a finished header fan (Rows 1–7) is 6.5 in (16.5 cm) wide and 3.25 in (8.3 cm) deep.
- Border gauge: 4 sc = 1 in (2.5 cm) along the straight top edge.
- Cord gauge: 4 sl sts = 1 in (2.5 cm) along a cord.
Checkpoints for the header fan, measured across the straight edge:
- After Row 2: 2 in (5.1 cm)
- After Row 4: 4.5 in (11.4 cm)
- After Row 5: 5.5 in (14.0 cm)
- After Row 7: 6.5 in (16.5 cm)
If your fan is too big, go down 0.5 mm in hook size, or keep the puff loops shorter. If it is too small, go up 0.5 mm. Puff height has the most effect on size, so lift every loop to the same height.
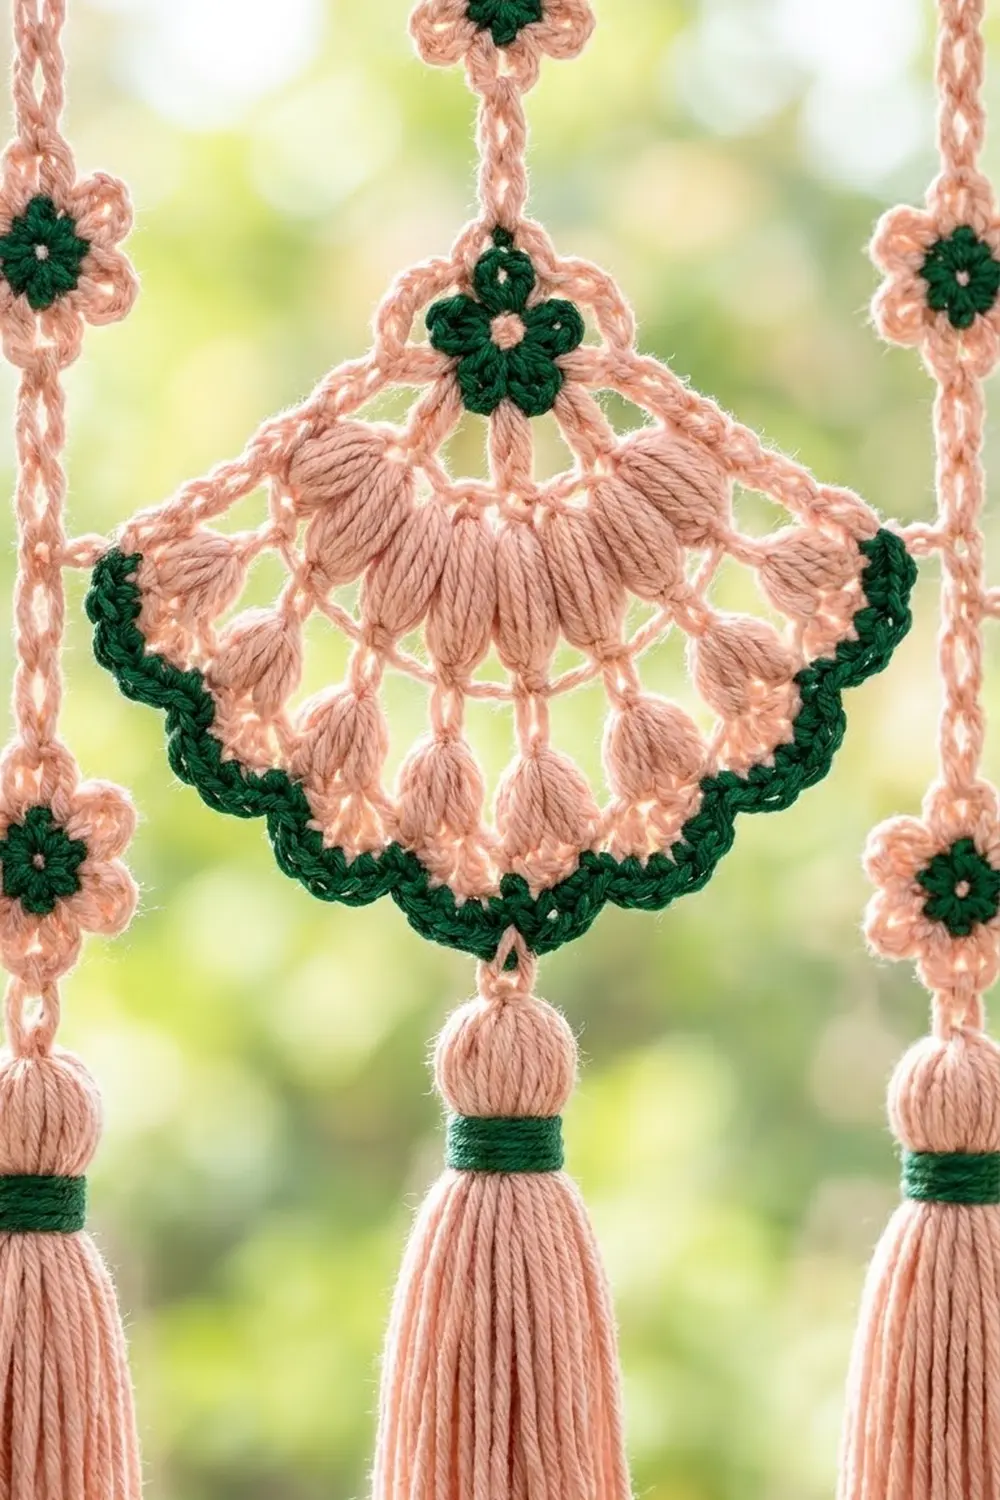
Header Fan (Make 6)
Each fan starts at the center of its straight edge and grows outward as a half circle. Turn at the end of every row.
Row 1 (pink): Make a magic ring. Ch 3 (counts as dc), then work 8 dc in the ring. Pull the ring snug but do not join. (9 dc)
Row 2: Ch 3 (counts as dc). Dc in the same st, then 2 dc in each st across. (18 dc)
Row 3: Ch 3 (counts as dc). Ch 1, sk 1 st, puff in the next st. Repeat from * 8 times in total, which uses sts 2–17. Ch 1, dc in the top of the tch. (8 puffs, 9 ch-1 sps, 2 dc)
Row 4: Ch 3 (counts as dc). Ch 1, big puff in the next ch-1 sp. Repeat from * 9 times in total. Ch 1, dc in the top of the tch. (9 big puffs, 10 ch-1 sps, 2 dc)
Row 5: Ch 4 (counts as dc + ch 1). Puff in the next ch-1 sp, ch 2. Repeat from * 9 times in total. Puff in the last ch-1 sp, ch 1, dc in the 3rd ch of the tch. (10 puffs, 9 ch-2 sps, 2 ch-1 sps, 2 dc)
Fasten off the pink.
Row 6 (green, conversion row): Join green in the last dc of Row 5 and ch 1. Work: sc in the dc, 2 sc in the ch-1 sp, sc in the puff. 3 sc in the ch-2 sp, sc in the next puff. Repeat from * 9 times in total. Finish with 2 sc in the ch-1 sp and sc in the last dc.
The count works like this: the dc and puffs get 1 sc each (2 + 10 = 12), plus the extra sc packed into the spaces (2 + 2 + 9 x 3 = 31). That gives 12 + 31 = 43 sc.
Row 7 (green): Ch 1, but do not turn. Rev sc in each sc across. (43 rev sc)
This row gives the dense green rope edge along the curve. Fasten off and weave in the ends. Stitch 22 of Row 7 is the center bottom point; mark it.
Check the fan against the gauge before you make the other five.
Pendant Fan (Make 3)
The pendant is built like the header fan but starts with fewer stitches. That gives a 120° wedge with a sharp tip at the top and a rounded green bottom.
Row 1 (pink): Make a magic ring. Ch 3 (counts as dc), then work 5 dc in the ring. Do not join. (6 dc)
Row 2: Ch 3 (counts as dc). Dc in the same st, then 2 dc in each st across. (12 dc)
Row 3: Ch 3 (counts as dc). Ch 1, sk 1 st, puff in the next st. Repeat from * 5 times in total, which uses sts 2–11. Ch 1, dc in the top of the tch. (5 puffs, 6 ch-1 sps, 2 dc)
Row 4: Ch 3 (counts as dc). Ch 1, big puff in the next ch-1 sp. Repeat from * 6 times in total. Ch 1, dc in the top of the tch. (6 big puffs, 7 ch-1 sps, 2 dc)
Row 5: Ch 4 (counts as dc + ch 1). Puff in the next ch-1 sp, ch 2. Repeat from * 6 times in total. Puff in the last ch-1 sp, ch 1, dc in the 3rd ch of the tch. (7 puffs, 6 ch-2 sps, 2 ch-1 sps, 2 dc)
Fasten off the pink.
Row 6 (green, conversion row): Join green in the last dc and ch 1. Work: sc in the dc, 2 sc in the ch-1 sp, sc in the puff. 3 sc in the ch-2 sp, sc in the next puff. Repeat from * 6 times in total. Finish with 2 sc in the ch-1 sp and sc in the last dc.
Count: 9 sc worked 1-per-stitch (2 dc + 7 puffs) plus 22 extra sc in the spaces (2 + 2 + 6 x 3) gives 31 sc.
Row 7 (green): Ch 1, do not turn. Rev sc in each sc across. (31 rev sc)
Mark st 16 as the center bottom.
Pendant checkpoint: 5.75 in (14.6 cm) across the widest part of the curve, and 3.25 in (8.3 cm) from the tip to the center bottom. The straight sides stay pink, and only the curve is green.
Flowers
Small flower (make 18):
- Rnd 1 (green): Make a magic ring. Ch 1, work 5 sc in the ring, then sl st in the first sc. Fasten off. (5 sc)
- Rnd 2 (pink): Join pink in any sc. In that same sc, work (ch 2, 2 dc, ch 2, sl st) to make one petal. Then in each of the remaining 4 sc, work (sl st, ch 2, 2 dc, ch 2, sl st). Fasten off. (5 petals)
Apex flower (make 3): Work it the same way, but use pink for Rnd 1 and green for Rnd 2. That gives a green flower with a pink center.
Each flower measures 1.25 in (3.2 cm) across.
Cords and Tassels
Every cord is a chain with a row of sl sts worked back along it, which makes a firm, rounded cord.
- Plain cord (make 3): Ch 57. Sl st in the 2nd ch from the hook and in each ch across. (56 sl sts = 14 in / 35.6 cm)
- Pendant top cord (make 3): Ch 33. Sl st back along the chain as for the plain cord. (32 sl sts = 8 in / 20.3 cm)
- Pendant bottom cord (make 3): Join pink with a sl st in the marked st 16 of a pendant’s Row 7. Ch 12. Sl st in the 2nd ch from the hook and in each ch back. (11 sl sts = 2.75 in / 7.0 cm)
Tassel (make 6):
- Wrap pink 30 times around the 5 in (12.7 cm) card.
- Tie the loops together at the top with a 12 in (30.5 cm) pink tie, and cut the bottom loops.
- Make the rounded head: 0.75 in (1.9 cm) below the top, wrap green 8 times tightly and secure the end inside the head.
- Trim the tassel to 5 in (12.7 cm).
Make All Pieces
Check this list before you assemble:
- Pink: 6 header fans (Rows 1–5), 3 pendant fans (Rows 1–5), 18 small flower petal rounds, 3 apex flower centers, 9 cords, 6 tassels
- Green: Rows 6–7 on all 9 fans, 18 small flower centers, 3 apex flower petal rounds, 6 tassel wraps
Layout, seen from the front (H = header fan, P = plain strand, F = pendant strand):
| H1 | H2 | H3 | H4 | H5 | H6 |
| P  | F  | P  | F  | P  | F  |
Each strand hangs from the center bottom of the header fan above it.
Joining
Lay the six header fans in a row, wrong side up, with the straight edges in one line. Neighboring fans meet only at their corners, where the ends of their green Rows 6–7 touch.
To join the fans, thread green on a needle and whipstitch the two green row ends of one fan to the two green row ends of the next with 3 stitches. Stitch only through the row-end stitches so the seam lies flat and stays hidden. Do this at all 5 joins.
The straight edges are not sewn. The border joins them, so the seam adds no stitches.
Keep the tension snug but not tight. A tight seam pulls the corners up and stops the scallops from sitting level.
Size checkpoint: The joined row measures 39 in (99.1 cm), which is 6 x 6.5 in (16.5 cm).
Border
The border is worked across the straight top edge only, in pink, using the border gauge of 4 sc = 1 in (2.5 cm).
Stitches per fan along the top edge: Rows 1–5 are dc-height, so each of their row ends gets 2 sc, which is 10 sc per side. Rows 6–7 get 1 sc each, which is 2 sc per side. Add 2 sc worked over the magic-ring center. Each fan therefore gives 12 + 2 + 12 = 26 sc.
Row 1: With the right side facing, join pink at the top right corner and ch 1. Work 26 sc across each fan, going straight from one fan to the next at the joins. (6 x 26 = 156 sc) Turn.
Row 2: Ch 2 (does not count). Hdc in each st across. (156 hdc) Turn.
Row 3: Ch 1. Sc in each st across. (156 sc) Fasten off.
Why the math works: 156 sc at 4 sc per inch is exactly 39 in (99.1 cm), which matches the joined fans. The band will not ruffle or pull in.
Rings: Sew a ring with green yarn at each end of the band and over each of the 5 joins, between sc 26/27, 52/53, 78/79, 104/105 and 130/131. That is 7 rings in total, 6.5 in (16.5 cm) apart.
Assembly of Strands
- Plain strands (under H1, H3, H5): Sew the top of a plain cord to the marked st 22 of the header fan. Sew small flowers centered on the cord at sl sts 8, 22, 36 and 50, counted from the top. That is 2 in (5.1 cm), 5.5 in (14.0 cm), 9 in (22.9 cm) and 12.5 in (31.8 cm) down. Tie a tassel to the bottom end.
- Pendant strands (under H2, H4, H6): Sew the top cord to st 22 of the header fan, and sew its lower end to the back of the pendant’s magic ring. Sew small flowers on the cord at sl sts 8 and 22. Sew an apex flower over the pendant’s tip so it covers the ring. Tie a tassel to the end of the bottom cord.
Length check: 8 in (20.3 cm) + 3.25 in (8.3 cm) + 2.75 in (7.0 cm) = 14 in (35.6 cm). All six tassels start at the same height.
Final Blocking
- Spray the whole valance lightly until it is damp but not soaked.
- Pin the top border straight to 39 in (99.1 cm).
- Pin each header fan’s curve into a smooth half circle 3.25 in (8.3 cm) deep, putting a pin in every second green rev sc.
- Pin each pendant flat to 5.75 in (14.6 cm) x 3.25 in (8.3 cm), and lift each big puff so it stands up round.
- Pin the flowers flat with one pin in each petal.
- Lay the cords straight and comb the tassels.
- Let everything dry completely, then unpin and hang the valance.
Final Quality-Control Checklist
- The band measures 39 in (99.1 cm) and the top edge is straight.
- Each header fan shows 8 small puffs, 9 big puffs and 10 outer puffs.
- Each pendant shows 5 small puffs, 6 big puffs and 7 outer puffs.
- All green edges have 43 rev sc (header fans) or 31 rev sc (pendants).
- The joins are hidden and the scallops hang level.
- The cords alternate plain, pendant, plain, pendant, plain, pendant.
- The flowers line up across the strands at 2 in (5.1 cm) and 5.5 in (14.0 cm).
- All tassels are 5 in (12.7 cm) long and hang 14 in (35.6 cm) below the header.
- All 7 rings are firmly attached.
Troubleshooting
- Fan cups: The puffs are too short or the hook is too small. Lift the loops higher, or go up 0.5 mm.
- Fan ruffles: The loops are too long, or there are extra chains. Recount the ch-1 and ch-2 sps.
- Green edge flares: Work Row 7 with a smaller hook, or make Row 6 tighter.
- Border waves: Check that each fan has exactly 26 sc. Too many sc in the row ends is the usual cause.
- Strands twist: Block the cords damp under light weight, such as a ruler.
- Tassels look thin: Add 6 more wraps when you make the next one.
Care
Hand wash in cool water with mild soap, roll the valance in a towel and dry it flat, then re-pin the scallops if needed. Do not tumble dry.
Final Notes
Each stage depends on the measurement before it. One header fan of 6.5 in (16.5 cm) times six gives the 39 in (99.1 cm) band. The 26 sc per fan matches that width in the 156-stitch border. Cords of 14 in (35.6 cm) and 5 in (12.7 cm) tassels give the 23 in (58.4 cm) drop with the 4 in (10.2 cm) header. Check the first fan carefully and the rest will fit.
Happy crocheting!