

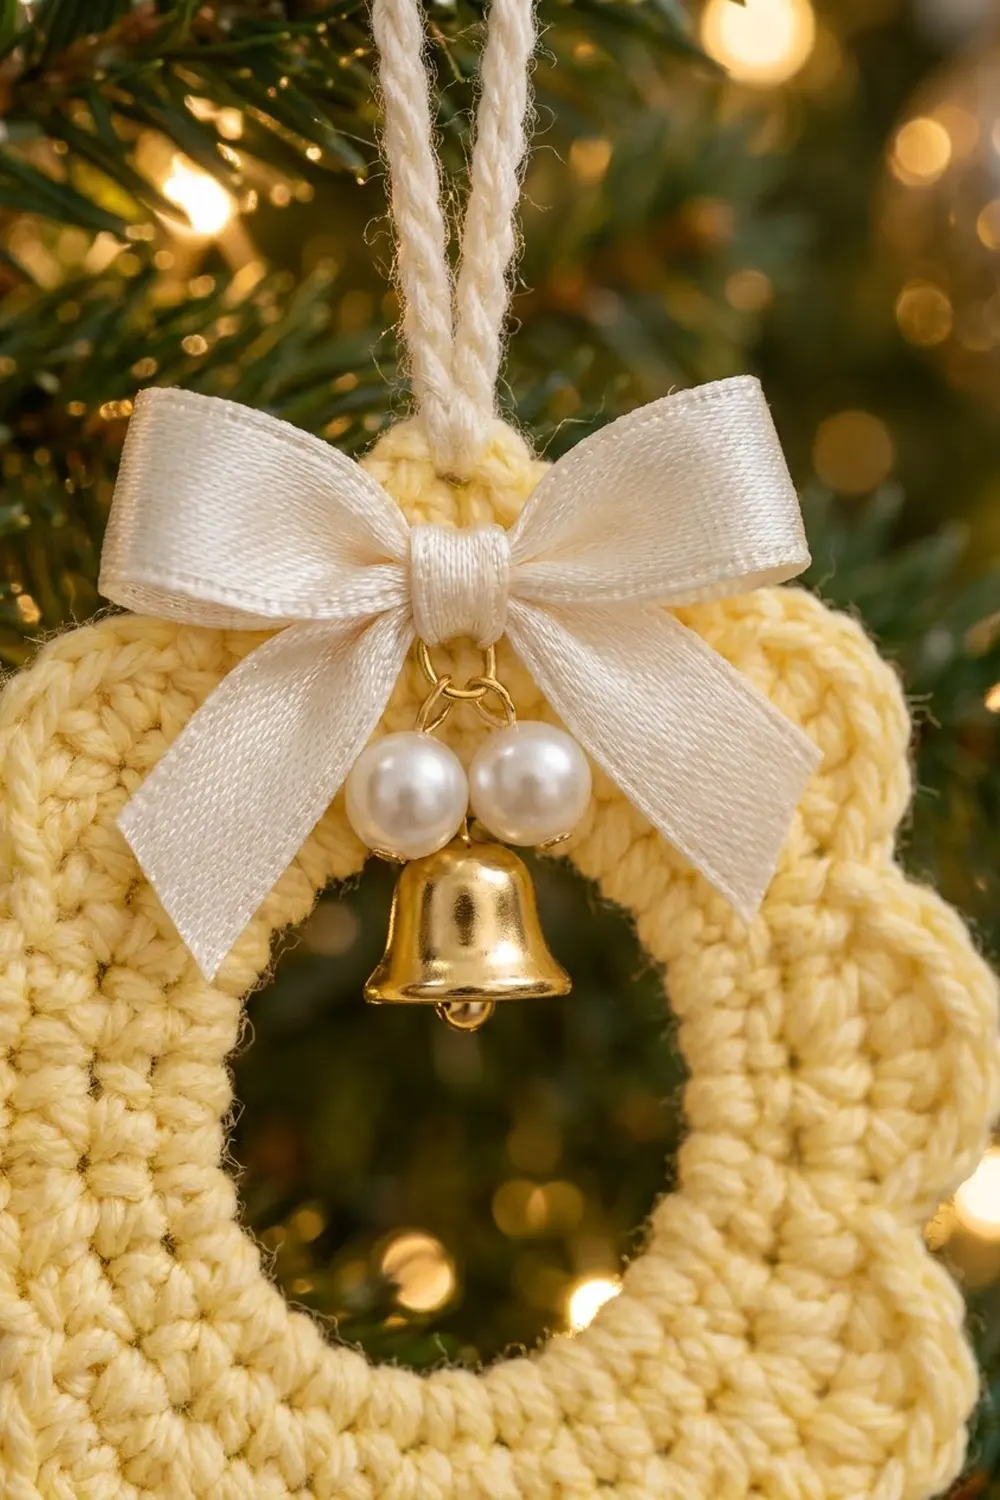
This little wreath ornament is soft, bright and quick to make. It is a flat yellow ring with a scalloped outer edge. At the top it has an ivory satin bow, two faux pearls and a small gold jingle bell that hangs into the center opening. A cream chain loop lets it hang from any branch.
The color is a pale buttercream yellow, which looks warm under tree lights and goes well with gold and ivory decorations. The style is classic and a little vintage. It works well on a tree, a gift package or a door handle.
This pattern uses US crochet terms. The finished ornament measures about 3.3 in (8.4 cm) across, with a center hole of about 1.25 in (3.2 cm).
The ring is one piece worked in four joined rounds. You start with a chain ring, add one round of single crochet and two rounds of half double crochet, then finish with a round of ten scallops. The hanging loop is a separate chain, and the bow, pearls and bell are sewn on at the end.
Finished Size and Construction
- Finished size: about 3.3 in (8.4 cm) in diameter
- Center hole: about 1.25 in (3.2 cm) in diameter
- Skill level: Easy
- Terminology: US crochet terms
- Yarn weight: DK (light worsted / weight 3)
- Hook: 3.5 mm (E-4)
- Number of pieces: 1 crocheted ring, plus 1 chain hanging loop
- Layout: single motif; no joining
- Ring size before scallop edge (end of Rnd 3): about 2.6 in (6.6 cm)
- Scallop edge depth: about 0.35 in (0.9 cm) on each side
Materials
Choose a smooth DK yarn so the stitches look crisp and the scallops stay well defined. Cotton or a cotton blend gives a firm, flat ornament that keeps its shape. Soft acrylic also works, but it may need firmer blocking.
Yarn:
– Pale butter yellow (main color): 6 g, about 18 m
– Cream (hanging loop): 2 g, about 3 m
These quantities include a margin for the swatch and the tails. One ring uses less than this.
Tools and notions:
– 3.5 mm (E-4) crochet hook
– Tapestry needle
– Ivory satin ribbon, 5/8 in (1.6 cm) wide, 10 in (25.4 cm) long
– 2 white faux pearl beads, 8 mm, with hanging loops or holes
– 1 gold jingle bell, 12 mm
– Ivory sewing thread and a fine hand-sewing needle
– Scissors
– Rustproof pins, a blocking mat or foam board, and a spray bottle
– Ruler or measuring tape
Abbreviations (US Terms)
- ch – chain
- sl st – slip stitch
- sc – single crochet
- hdc – half double crochet
- dc – double crochet
- st(s) – stitch(es)
- sk – skip
- rep – repeat
- Rnd – round
- 2 hdc in next st – increase: work 2 hdc into the same stitch
Special stitch – Scallop: sk next st, 5 dc in next st, sk next st, sl st in next st. One scallop uses 4 stitches of the previous round.
Gauge and Checkpoints
Gauge: 20 sc and 22 rows = 4 in (10.2 cm). For a smaller test, 10 sc and 11 rows = 2 in (5.1 cm).
For a piece this small, the ring itself is the best gauge test. Make one ring through Rnd 3 and measure it before you add the edge.
Measurement checkpoints (laid flat, lightly pressed):
- Chain ring: 20 ch, about 4 in (10.2 cm) around
- After Rnd 1: about 1.6 in (4.1 cm) across
- After Rnd 2: about 2.1 in (5.3 cm) across
- After Rnd 3: about 2.6 in (6.6 cm) across
- After Rnd 4 (scallops): about 3.3 in (8.4 cm) across
- Center hole: about 1.25 in (3.2 cm) across at every stage
If your ring is too big: go down to a 3.25 mm (D-3) or 3 mm hook. If the size is right but the ring ruffles, your tension may be loose on the increase rounds. Tighten slightly.
If your ring is too small or cups into a bowl: go up to a 3.75 mm (F-5) hook. Also check that you worked every increase. Rnd 2 needs 10 increases and Rnd 3 needs 10.
A difference of 0.1 in (0.3 cm) after Rnd 3 is fine. Anything over 0.2 in (0.5 cm) is worth fixing before you go on.
Wreath Ring
Work with the pale butter yellow. Do not turn at the end of a round; the right side always faces you.
Foundation: Ch 20 and sl st in the first ch to form a ring. Make sure the chain isn’t twisted.
The chain ring should be about 4 in (10.2 cm) around, which gives the 1.25 in (3.2 cm) center hole.
Rnd 1: Ch 1 (does not count as a st). Sc in each ch around. Sl st in the first sc to join. (20 sc)
Work into the chains themselves, not around the ring. This keeps the inner edge neat and the hole round.
Rnd 2: Ch 2 (does not count as a st). Hdc in next st, 2 hdc in next st; rep from * 9 more times. Sl st in the first hdc to join. (30 hdc)*
That is 10 repeats of 3 hdc each, for 30 stitches in this round.
Rnd 3: Ch 2 (does not count as a st). Hdc in each of the next 2 sts, 2 hdc in next st; rep from * 9 more times. Sl st in the first hdc to join. (40 hdc)*
That is 10 repeats of 4 hdc each, for 40 stitches in this round.
Checkpoint: The ring should lie flat and measure about 2.6 in (6.6 cm) across, with the hole still about 1.25 in (3.2 cm). Fix any size problems now.
Do not fasten off. The scallop edge starts from the join.
Border: Scallop Edge (Rnd 4)
On this ornament the scallop round works as the border. It adds the soft, flower-like outline.
Border gauge: each 5-dc scallop is about 0.35 in (0.9 cm) deep and about 1 in (2.6 cm) wide at its widest point, measured along the outer curve.
Rnd 4: Do not ch. *Sk next st, 5 dc in next st, sk next st, sl st in next st; rep from * 9 more times. Make the last sl st into the same st as the Rnd 3 join. Fasten off, leaving a 6 in (15.2 cm) tail.
Count for Rnd 4: 10 scallops. Each scallop is 5 dc + 1 sl st, so the round has 50 dc + 10 sl st = 60 stitches worked into the 40 stitches of Rnd 3.
Count per scallop section: 4 base stitches each (1 skipped, 1 holding the 5 dc, 1 skipped, 1 holding the sl st). 10 sections x 4 stitches = 40, which matches Rnd 3 exactly.
Why the math works: Rnd 3 has 40 stitches, which divides evenly into 10 sections of 4. The last repeat ends in the join stitch, where the round started, so no stitch is used twice and none are left over. Rnd 3 measures about 8.2 in (20.8 cm) around its outer edge. Each scallop rests on about 0.8 in (2.0 cm) of it and fans out to about 1 in (2.6 cm) at the tip. That small flare makes rounded scallops that still lie flat instead of ruffling.
Checkpoint: The ornament should measure about 3.3 in (8.4 cm) across. That is the 2.6 in (6.6 cm) ring plus 0.35 in (0.9 cm) of scallop on each side.
Weave in the ends on the back, following the stitch path. Trim close.
Hanging Loop
Work with the cream yarn.
Loop: Leaving a 6 in (15.2 cm) tail, ch 24. Fasten off, leaving another 6 in (15.2 cm) tail.
The chain should be about 4 in (10.2 cm) long. Folded in half, it makes a loop about 2 in (5.1 cm) tall.
Attach: Pick one scallop as the top. Fold the chain in half. Thread one tail onto the tapestry needle and pass it from front to back through Rnd 3, just below the 3rd (center) dc of that scallop. Pass the second tail through the stitch beside it. Knot the two tails firmly together on the back. Then weave each tail into a different stitch on the back and trim.
The loop should stand straight up from the center of the top scallop.
Bow, Pearls and Bell
Bow: Tie the 10 in (25.4 cm) ribbon into a bow about 2.2 in (5.6 cm) wide. Trim the ends at an angle so they sit level with the middle of the ring, about 1.25 in (3.2 cm) long. To stop fraying, seal the cut ends lightly with clear nail polish or fray stop.
Attach the bow: Center the knot over the base of the hanging loop, on Rnd 3 at the top. With ivory thread, sew through the back of the knot and into the crochet 3 or 4 times, so the stitches don’t show on the front. Tack each bow loop once at its outer edge so it lies flat.
Pearls: Sew both pearls to the bottom of the bow knot with ivory thread, so they hang side by side, about 0.2 in (0.5 cm) apart.
Bell: Thread the bell onto ivory thread and sew it just below the pearls. It should hang over the inner edge of Rnd 1 at the top of the center hole. Leave about 1/8 in (0.3 cm) of thread so the bell can swing and ring. Knot securely on the back and weave the thread into the stitches.
Final Blocking
Block the ring after weaving in its ends but before sewing on the bow, pearls and bell. If you have already attached them, keep them dry.
- Lay the ring right side up on a blocking mat.
- Mist it evenly with water until damp, not soaked.
- Draw a 3.3 in (8.4 cm) circle on paper under the mat cover, or measure with a ruler.
- Pin the center hole into a round 1.25 in (3.2 cm) opening, using 4 to 6 pins around the inner edge.
- Pin the tip of each of the 10 scallops on the 3.3 in (8.4 cm) circle, spacing them evenly.
- Press any curling scallops flat with your fingers.
- Let it dry completely, usually 2 to 4 hours.
- Remove the pins and check that the ornament measures 3.3 in (8.4 cm) across.
Final Quality-Control Checklist
- Rnd 1 has 20 sc, Rnd 2 has 30 hdc, and Rnd 3 has 40 hdc.
- Rnd 4 has 10 even scallops of 5 dc each, divided by 10 sl sts.
- The ring lies flat, with no cupping or ruffling.
- The ornament is about 3.3 in (8.4 cm) across.
- The center hole is round and about 1.25 in (3.2 cm) across.
- The hanging loop is centered over the top scallop, about 2 in (5.1 cm) tall.
- The bow is centered, firmly sewn, and has neat sealed tails.
- Both pearls hang evenly below the bow knot.
- The bell hangs freely and rings.
- All ends are woven in on the back, and none show from the front.
Troubleshooting
The ring cups like a bowl. You probably missed increases, or your hdc is tight. Count Rnds 2 and 3, or go up a hook size.
The ring ruffles. There are too many stitches, or your tension is loose. Recount Rnds 2 and 3 (30 and 40) and go down a hook size if needed.
There’s a gap at the end of Rnd 4. The last scallop should end with a sl st in the Rnd 3 join stitch. If you have stitches left over, you skipped incorrectly. Recount 4 stitches per scallop.
The scallops are uneven. Make sure every 5-dc group goes into one stitch and every sl st sits in the stitch after a skip. Blocking fixes small differences.
The center hole is too small. Your foundation chain was tight. Start again with a hook one size larger for the chain only.
The bow flops forward. Add a tack stitch through each bow loop and through the back of the knot.
The bell doesn’t ring. The thread is too short or too tight. Restitch with a little more slack.
Care
Store the ornament flat or hanging, away from moisture and direct sunlight. If needed, spot clean the crochet gently with a damp cloth, keeping water off the ribbon and metal bell.

Final Notes
The measurement chain is simple. Each step builds on the one before, and you can check each one with a ruler:
- The 20-chain ring is about 4 in (10.2 cm) around, which gives a 1.25 in (3.2 cm) hole.
- Rnd 1 has 20 sc and measures about 1.6 in (4.1 cm) across.
- Rnd 2 has 30 hdc and measures about 2.1 in (5.3 cm) across.
- Rnd 3 has 40 hdc and measures about 2.6 in (6.6 cm) across.
- The 10 scallops add about 0.35 in (0.9 cm) on each side, for a finished size of about 3.3 in (8.4 cm).
Check your size at Rnd 3 and the rest will follow. Make one, or make a set for the tree. Each ornament takes very little yarn and less than an hour.
Happy crocheting!