

Buttercream Pines is a lacy curtain panel built from small crochet Christmas trees. Every tree hangs from the one above it on a short chain, and loose chain swags connect the trees side to side. With light behind it, the whole panel looks like a soft, golden forest.
It uses one color only: a pale butter yellow cotton that glows in winter sun. Each tree is a stepped triangle of double crochet tiers. Rows of small open eyelets sit between the tiers, and a short solid trunk finishes the bottom. The style is airy, vintage-lace, and festive without being loud.
This pattern uses US crochet terms. One finished panel measures 33.8 in (85.9 cm) wide and 72.0 in (182.9 cm) long from the header band to the bottom trunks. The header band and the scalloped bottom edge add to that length. The photo shows a pair of panels, so make two for a matching window.
Construction is simple. First you crochet 60 identical trees per panel, worked top-down in rows from the tip. Then you crochet a header band, sew the trees into columns, add chain swags between neighbors, and finish with a picot swag edge along the bottom.
Finished Size and Construction
- Finished panel size: 33.8 in (85.9 cm) wide x 72.0 in (182.9 cm) long, header to trunk tips
- Skill level: Easy intermediate (simple stitches, lots of repetition, careful assembly)
- Terminology: US crochet terms
- Yarn weight: DK (light, #3) cotton
- Hook: 3.5 mm (US E-4)
- Number of pieces: 60 tree motifs per panel (120 for the pair shown)
- Layout: 5 columns x 12 tiers
- Piece size: 5.8 in (14.7 cm) wide x 4.8 in (12.2 cm) tall, plus a 1.2 in (3.0 cm) tip chain
- Size before border: 33.8 in (85.9 cm) wide x 72.0 in (182.9 cm) long
- Border depth: header band 0.5 in (1.3 cm) plus rod loops; bottom picot swags drop about 1.5 in (3.8 cm)
Materials
Choose a smooth mercerized or combed cotton in DK weight. Cotton holds the tree shape, shows stitch definition, and blocks crisply. Avoid fuzzy yarns, which blur the eyelets.
- Butter yellow DK cotton: 250 g / 575 m (629 yd) per panel; 500 g / 1150 m (1258 yd) for the pair
- 3.5 mm (US E-4) crochet hook
- Tapestry needle
- Stitch markers (5)
- Scissors
- Rust-proof pins and a blocking mat or folded towels
- Measuring tape
- Curtain rod up to 1 in (2.5 cm) diameter
Quantities include a margin of roughly 15% for gauge differences and the many ends you will weave in.
Abbreviations (US Terms)
- ch – chain
- sl st – slip stitch
- sc – single crochet
- dc – double crochet
- sk – skip
- st(s) – stitch(es)
- sp – space
- rep – repeat
- RS / WS – right side / wrong side
Special stitch – Tier flare: Work 3 dc into one stitch. When it is the first stitch of a row, the beginning ch 3 counts as the first of the three. A tier flare at each end of an eyelet row adds 2 stitches per side and creates the stepped outline.
Turning ch 3 counts as 1 dc throughout. Every ch-1 space counts as 1 stitch in the stitch totals.
Gauge and Checkpoints
Gauge: 20 dc and 10 rows = 4 in (10.2 cm). That is 5 dc = 1 in (2.5 cm), and 1 dc row = 0.4 in (1.0 cm).
Chain gauge: 5 ch = 1 in (2.5 cm), worked at your normal, relaxed tension.
Test one tree first. You don’t need a separate swatch because the first tree works as your swatch. Check it at these points:
- After Row 3 (9 sts): 1.8 in (4.6 cm) wide
- After Row 5 (15 sts): 3.0 in (7.6 cm) wide, 2.0 in (5.1 cm) tall
- After Row 7 (21 sts): 4.2 in (10.7 cm) wide
- After Row 10 (29 sts): 5.8 in (14.7 cm) wide, 4.0 in (10.2 cm) tall
- Finished tree: 4.8 in (12.2 cm) tall without the tip chain
If your tree is too big, go down a hook size. If it is too small, go up a hook size. A difference of just 0.2 in (0.5 cm) per tree grows to 1.0 in (2.5 cm) across the panel width and 2.4 in (6.1 cm) down its length, so get this right before you continue.
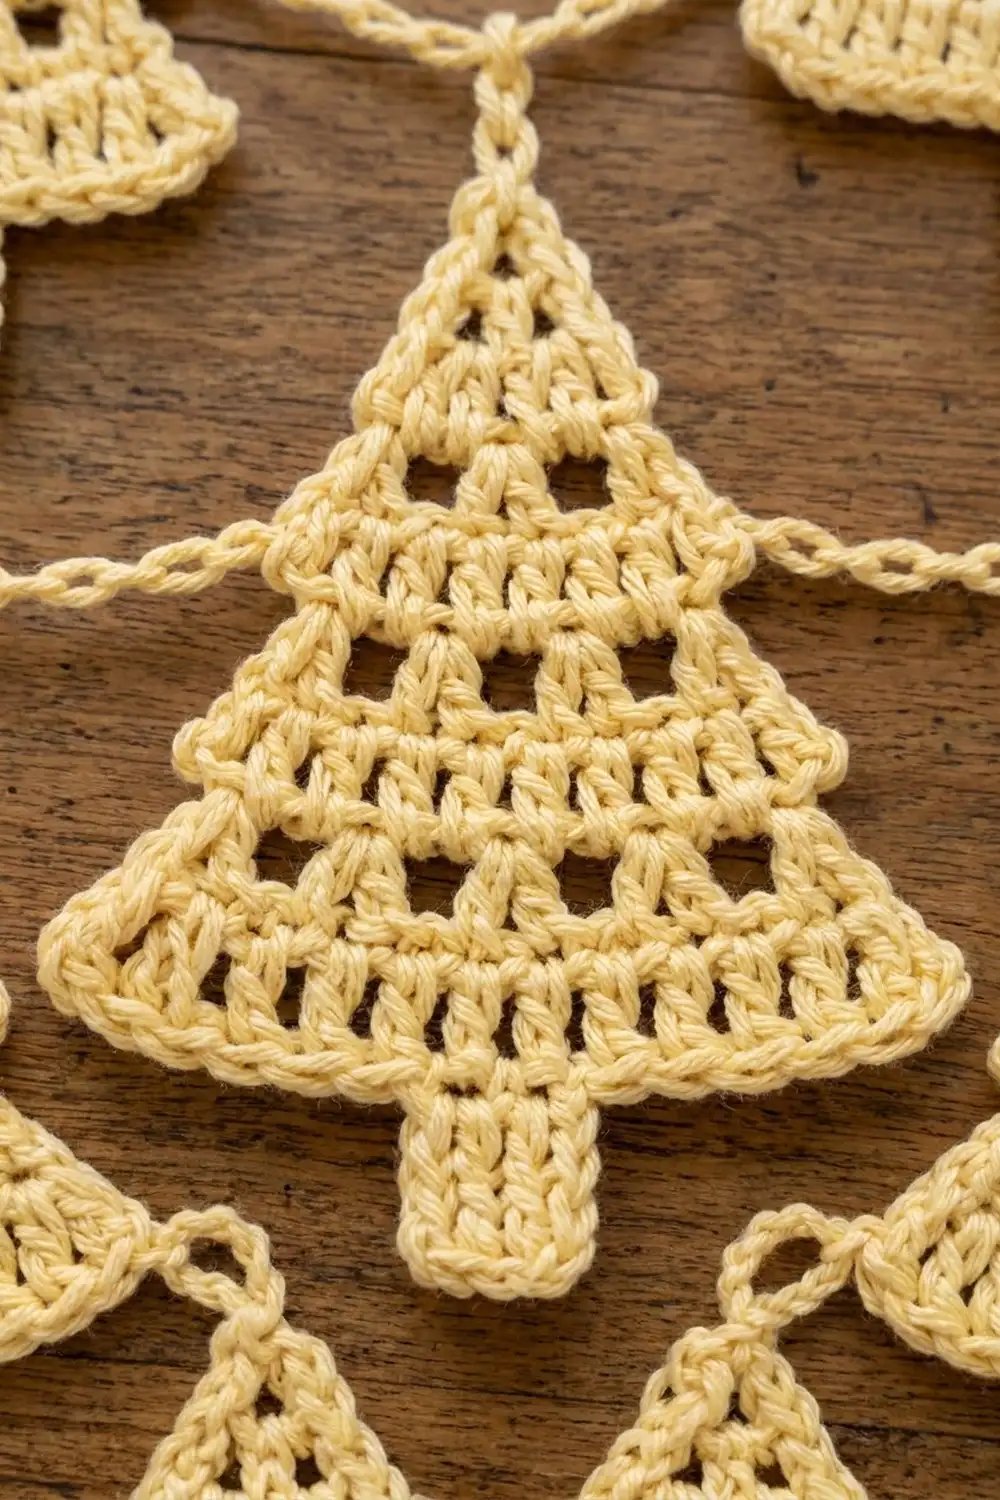
Tree Motif
Work top-down in rows. Row 1 is the RS. Leave an 8 in (20.3 cm) starting tail, which you will use for joining.
Foundation: Ch 10.
Row 1 (RS): 2 dc in 4th ch from hook (the 3 skipped ch count as the first dc). Leave the other 6 ch unworked to form the tip chain. Turn. (3 sts)
Row 2: Ch 3, dc in same st, dc in next st, 2 dc in last st. Turn. (5 sts)
Row 3 (eyelet row): Ch 3, 2 dc in same st (tier flare made), ch 1, sk next st, dc in next st, ch 1, sk next st, 3 dc in last st. Turn. (9 sts: 3 + 3 middle + 3)
Row 4: Ch 3, dc in same st, dc in each st and ch-1 sp across to last st, 2 dc in last st. Turn. (11 sts)
Row 5 (eyelet row): Ch 3, 2 dc in same st, ch 1, sk next st, dc in next st, ch 1, sk next st; rep from * 3 more times, 3 dc in last st. Turn. (15 sts: 3 + 9 middle + 3)*
Row 6: Rep Row 4. (17 sts)
Row 7 (eyelet row): Ch 3, 2 dc in same st, ch 1, sk next st, dc in next st, ch 1, sk next st; rep from * 6 more times, 3 dc in last st. Turn. (21 sts: 3 + 15 middle + 3)*
Row 8: Rep Row 4. (23 sts)
Row 9 (eyelet row): Ch 3, 2 dc in same st, ch 1, sk next st, dc in next st, ch 1, sk next st; rep from * 9 more times, 3 dc in last st. Turn. (27 sts: 3 + 21 middle + 3)*
Row 10: Rep Row 4. Fasten off. (29 sts)
The canopy now has four tiers. Each eyelet row adds 4 stitches (2 per side), and each solid row adds 2 stitches (1 per side). Because the rows grow unevenly, each tier flares slightly at its lower edge, which gives the stepped pine silhouette.
Trunk
Count 12 sts in from either end of Row 10. The center 5 sts (sts 13–17) form the trunk base, since 12 + 5 + 12 = 29.
Row 11 (RS): With RS facing, join yarn with sl st in st 13, ch 3, dc in next 4 sts. Turn. (5 sts)
Row 12: Ch 3, dc in next 4 sts. Fasten off. (5 sts)
The trunk is 1.0 in (2.5 cm) wide and 0.8 in (2.0 cm) tall. Weave in the trunk ends only, and keep the starting tail at the tip.
Make All Pieces
Make 60 trees per panel, all in butter yellow. For the pair shown, make 120 trees.
Layout for one panel (T = tree, | = vertical tip chain, ~ = side swag):
        HEADER BAND (169 sts)
   |       |       |       |       |
   T ~~~~ T ~~~~ T ~~~~ T ~~~~ T     Tier 1
   |       |       |       |       |
   T ~~~~ T ~~~~ T ~~~~ T ~~~~ T     Tier 2
   ...  (repeat to Tier 12)  ...
   T ~~~~ T ~~~~ T ~~~~ T ~~~~ T     Tier 12
    \____/ \____/ \____/ \____/      Picot swags
Before joining, check each tree against the 5.8 in (14.7 cm) by 4.8 in (12.2 cm) target. Lightly block any tree that is off by more than 0.1 in (0.3 cm). Trees that all match will give you straight columns.
Joining
Join in three steps: the header first, then the columns, then the side swags.
Step 1 – Header band (Rows 1–2). Ch 170.
Header Row 1: Sc in 2nd ch from hook and in each ch across. Turn. (169 sc)
Header Row 2: Ch 1, sc in each st across. Turn. (169 sc) Don’t fasten off; the rod loops are worked in the Border section.
Place markers in sc 15, 50, 85, 120, and 155 of Row 1. These are the five column centers, spaced 35 sts (7.0 in / 17.8 cm) apart. Both outer markers sit 15 sts from their ends, so the layout is symmetrical.
Step 2 – Columns. Take one Tier 1 tree. Using its starting tail, sew the end ch of its tip chain to marked sc 15 along the foundation edge of the header. Repeat at the other four markers.
Sew each Tier 2 tree’s tip chain to the 3rd (center) st of Row 12 on the trunk of the tree above. Continue down each column until it holds 12 trees. Each join attaches one chain end to one stitch and adds no stitches.
Stitch logic: each tree is 29 sts wide and the gap between trees is 6 sts, so the panel is (5 x 29) + (4 x 6) = 169 sts wide. That matches the header exactly, with nothing added at the seams.
Step 3 – Side swags. On each tier, join yarn with sl st in the bottom right corner st of Row 10 on the left tree. Ch 10, then sl st in the bottom left corner st of Row 10 on the next tree. Fasten off. That makes 4 swags per tier and 48 per panel.
The trees sit 1.2 in (3.0 cm) apart. The 10-ch swag is 2.0 in (5.1 cm) long, so it drapes in a soft curve.
Tension advice: Make every tip chain and swag at the same relaxed tension. Tight chains pull the columns shorter and make the swags hang flat. Loose chains stretch under the weight of the panel.
Size checkpoint: Lay the panel flat. It should measure 33.8 in (85.9 cm) at the header and 72.0 in (182.9 cm) from header to trunk tips: 1.2 in tip chain + (12 x 4.8 in trees) + (11 x 1.2 in chains) = 1.2 + 57.6 + 13.2 = 72.0 in.
Border
The panel has two bordered edges: rod loops on the header and picot swags along the bottom. The side edges stay unbordered so the stepped tree outlines show.
Border gauge: Both sc and chain work at 5 sts = 1 in (2.5 cm). One sc row is about 0.25 in (0.6 cm).
Top edge – Header Row 3 (rod loops): Ch 1, sc in first st, ch 12, sk next 11 sts, sc in next st; rep from * 13 more times. Fasten off. (15 sc, 14 ch-12 loops)*
Math check: 1 + (14 x 12) = 169 sts used, which is every stitch in Row 2. Each loop is a 12-ch arc over an 11-st base, about 4.6 in (11.7 cm) around, which fits a rod up to 1 in (2.5 cm) thick.
Bottom edge – Swag Row 1: Join yarn with sl st in the center st of Row 12 on the Tier 12 tree in Column 1. Ch 39, sl st in the center trunk st of the next tree; rep from * 3 more times. Turn. (4 chains of 39 ch each, 156 ch total)*
Swag Row 2: Sc in 1st ch, (ch 3, sk next ch, sc in next ch) 19 times, sl st in the trunk st; rep from * 3 more times. Fasten off. (Per swag: 20 sc and 19 ch-3 picots. Total: 80 sc and 76 picots.)*
Math check: each swag uses 1 + (19 x 2) = 39 ch, so every chain is worked exactly once. The trunks sit 7.0 in (17.8 cm) apart and each chain is 7.8 in (19.8 cm) long, so each swag dips about 1.5 in (3.8 cm) into a gentle scallop.
Final Blocking
- Weave in all remaining ends, including the starting tails, along the chains or inside the dc stitches.
- Soak the panel in cool water for 15 minutes. Press out the water gently; don’t wring it.
- Roll it in towels to remove extra moisture.
- Lay it flat on mats or a clean sheet. Pin the header straight to 33.8 in (85.9 cm).
- Pin each tree to 5.8 in (14.7 cm) wide at Row 10. Pin the tier corners outward so the steps show.
- Check that the columns are straight and 7.0 in (17.8 cm) apart, center to center.
- Let the swags curve naturally. Don’t stretch them flat.
- Let the panel dry completely, then unpin.
Final Quality-Control Checklist
- Every tree has 29 sts in Row 10 and a 5-st trunk centered on sts 13–17
- Every eyelet row has open ch-1 spaces and a tier flare at each end
- All tip chains have 6 ch and sit centered on the trunk above
- Every tier has 4 side swags of 10 ch
- The header has 169 sc and 14 rod loops
- The bottom has 4 picot swags, each with 19 picots
- The panel measures 33.8 in (85.9 cm) by 72.0 in (182.9 cm)
- All ends are woven in securely
Troubleshooting
Tree leans to one side: You probably skipped the turning ch 3 or missed the last st. Count each row against the totals.
Tiers don’t step out: Make sure the eyelet rows use 3 dc at both ends, not 2.
Eyelets close up: Your ch 1 is too tight. Relax your tension, or block the tree with pins in the eyelets.
Columns are different lengths: Your chain tension varies. Remake any tip chain that is more than 0.1 in (0.3 cm) off.
Panel too narrow: The swags or trees are tight. Block to size, or redo the swags slightly looser.
Rod loops too small: Add 2 ch to every loop and rework Header Row 3.
Care
Hand wash in cool water with mild soap and dry flat, re-pinning if needed. If the trees curl, press on low heat through a cloth.
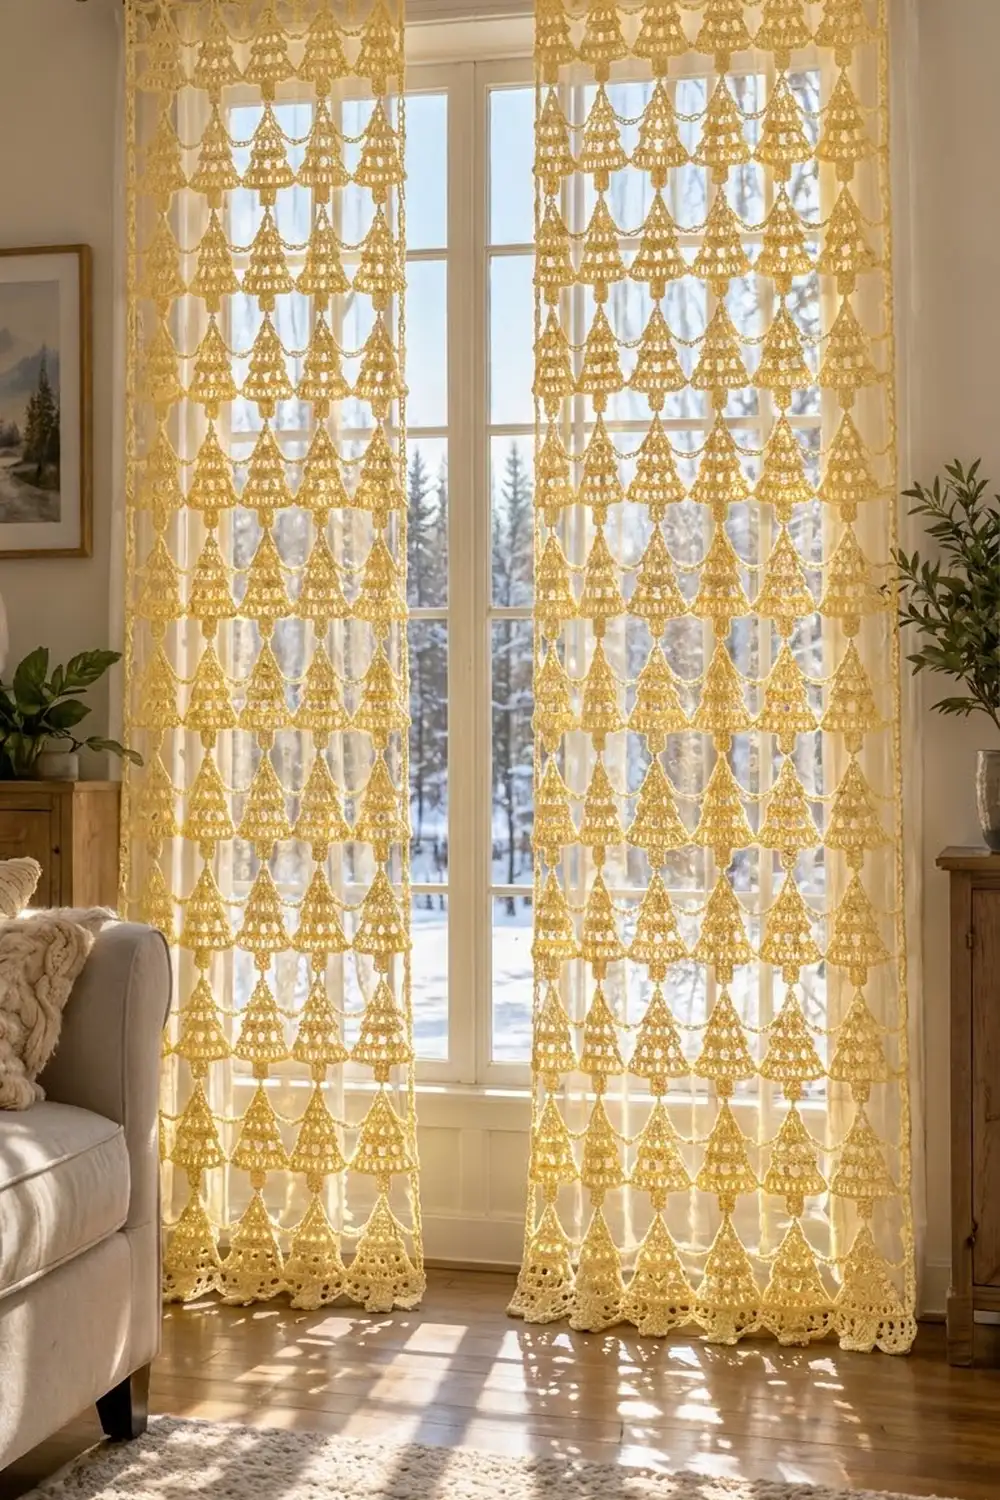
Final Notes
Everything depends on one measurement chain. Start with 5 dc = 1 in (2.5 cm). That gives a 29-st tree 5.8 in (14.7 cm) wide, and 12 rows make it 4.8 in (12.2 cm) tall. Add 6-st gaps and you get a 169-st header 33.8 in (85.9 cm) wide. Add 1.2 in (3.0 cm) chains above and between the twelve tiers and the panel reaches 72.0 in (182.9 cm). Check the first tree carefully and the rest of the curtain will follow.
Happy crocheting!