

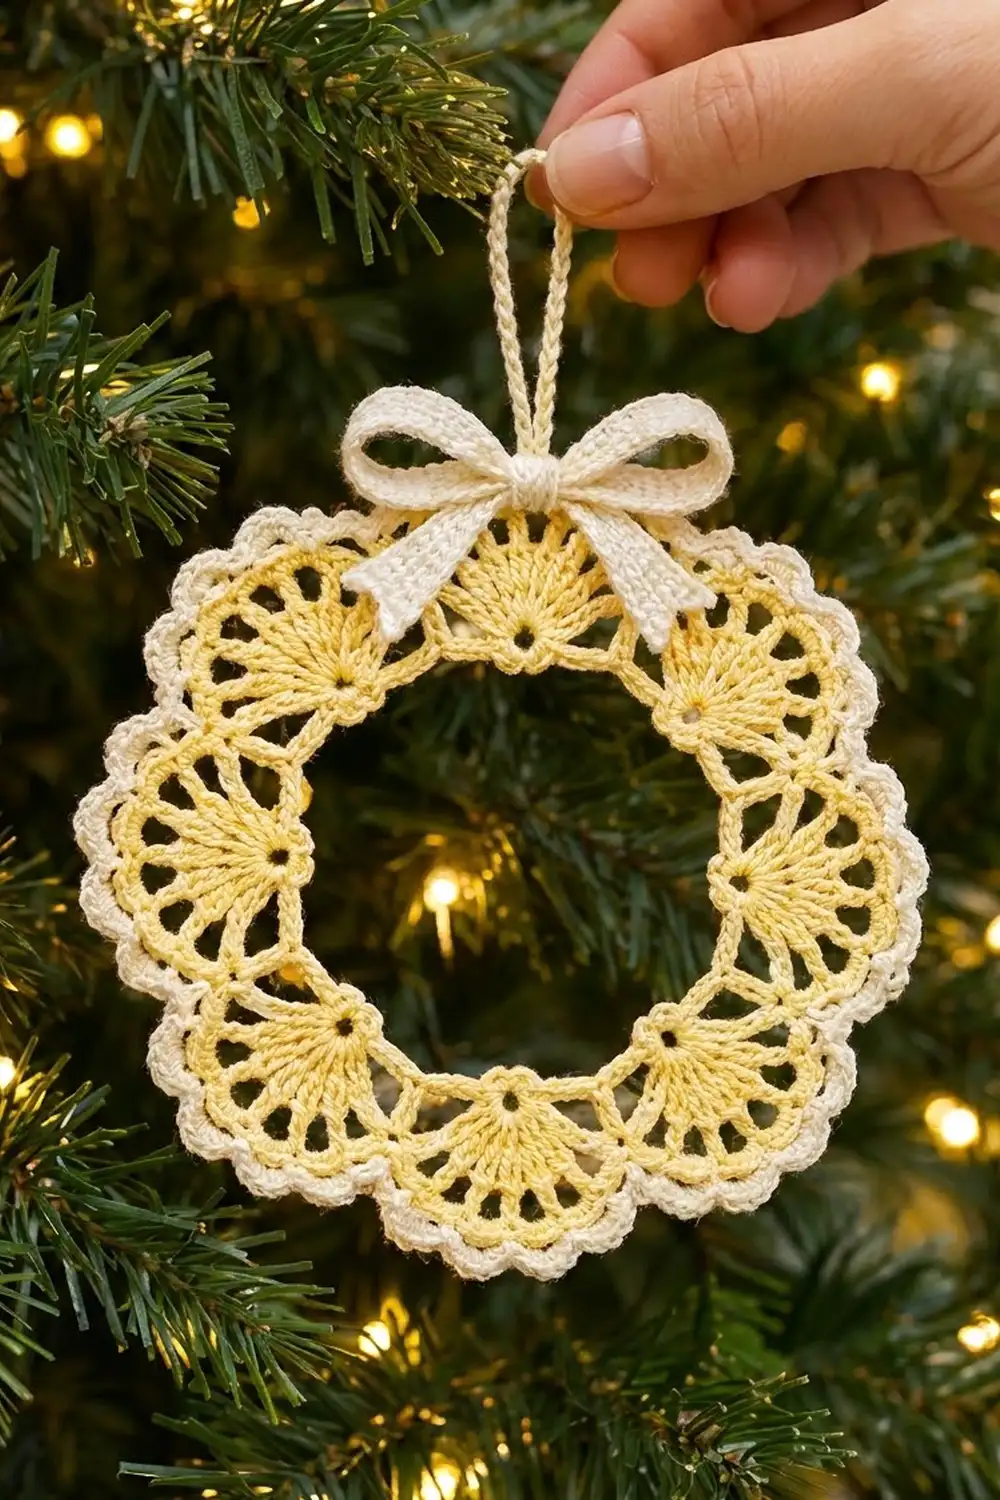
This little wreath ornament is a ring of eight lacy fans in soft butter yellow. A fine cream picot edge goes around the outside, and a cream bow and hanging loop finish the top. It looks like vintage doily lace but takes only one evening to make, and it looks lovely against tree lights.
The palette is just two shades. Pale yellow is used for the fans and cream for the edging, bow and loop. Worked in size 10 cotton thread, the ornament is crisp, light and easy to block into a perfect circle.
This pattern uses US crochet terms. The finished ornament measures about 5 in (12.7 cm) across, with a center opening of about 2.25 in (5.7 cm). The hanging loop adds about 2 in (5.1 cm) above the top edge.
The wreath is one continuous piece. You crochet the fans one after another in a strip, joining each fan to the one before it as you go. Then you close the strip into a ring, firm up the inner edge, add a two-round cream picot border, and sew on the bow and loop.
Finished Size and Construction
- Finished size: 5 in (12.7 cm) diameter, not counting the loop
- Center opening: about 2.25 in (5.7 cm)
- Skill level: Intermediate (thread crochet, join-as-you-go)
- Terminology: US
- Yarn weight: Size 10 cotton crochet thread (Lace, weight 0)
- Hook: 1.75 mm (US steel 6)
- Number of pieces: 1 wreath ring, plus 1 bow (3 small parts) and 1 hanging loop
- Layout: 8 fans in a circle
- Single fan size: 1.25 in wide x 0.75 in tall (3.2 x 1.9 cm)
- Size before border: 4.5 in (11.4 cm) diameter
- Border depth: 0.25 in (0.6 cm)
Materials
Use a mercerized cotton thread. It gives clean stitch definition and holds its shape well after blocking. Matte cotton or a blend will work too, but the fans will look softer.
- Pale yellow (fans): 8 g, about 64 m (70 yd)
- Cream (border, bow, loop): 5 g, about 40 m (44 yd)
The quantities above include a comfortable margin for your gauge swatch and for weaving in ends.
Tools:
– 1.75 mm (US steel 6) crochet hook
– Fine tapestry needle
– Small sharp scissors
– Blocking board or foam mat, rust-proof pins
– Spray starch or a 1:1 mix of school glue and water (optional, for stiffening)
– Ruler or tape measure
Abbreviations (US Terms)
- ch – chain
- sl st – slip stitch
- sc – single crochet
- dc – double crochet
- sp – space
- st(s) – stitch(es)
- RS – right side
Special stitch – Picot: Ch 3, sl st in the 3rd ch from hook (into the front loop and the left leg of that chain).
Gauge and Checkpoints
Make one complete fan first (Fan 1, Rows 1–3) and measure it before you go on.
- After Row 1: the half-circle measures 0.75 in (1.9 cm) across its straight edge.
- After Row 3: the fan measures 1.25 in (3.2 cm) wide x 0.75 in (1.9 cm) tall.
- Strip of 4 fans: lies in a gentle quarter-to-half circle curve.
- Closed ring before border: 4.5 in (11.4 cm) across.
- After border: 5 in (12.7 cm) across.
If your fan is too big: go down to a 1.5 mm (US steel 7) hook, or work the dc rows a little tighter.
If your fan is too small: go up to a 2.0 mm (US steel 4) hook.
Small differences are fine for an ornament. Just keep the same tension through all 8 fans so the ring closes evenly.
Fan Strip (Pale Yellow)
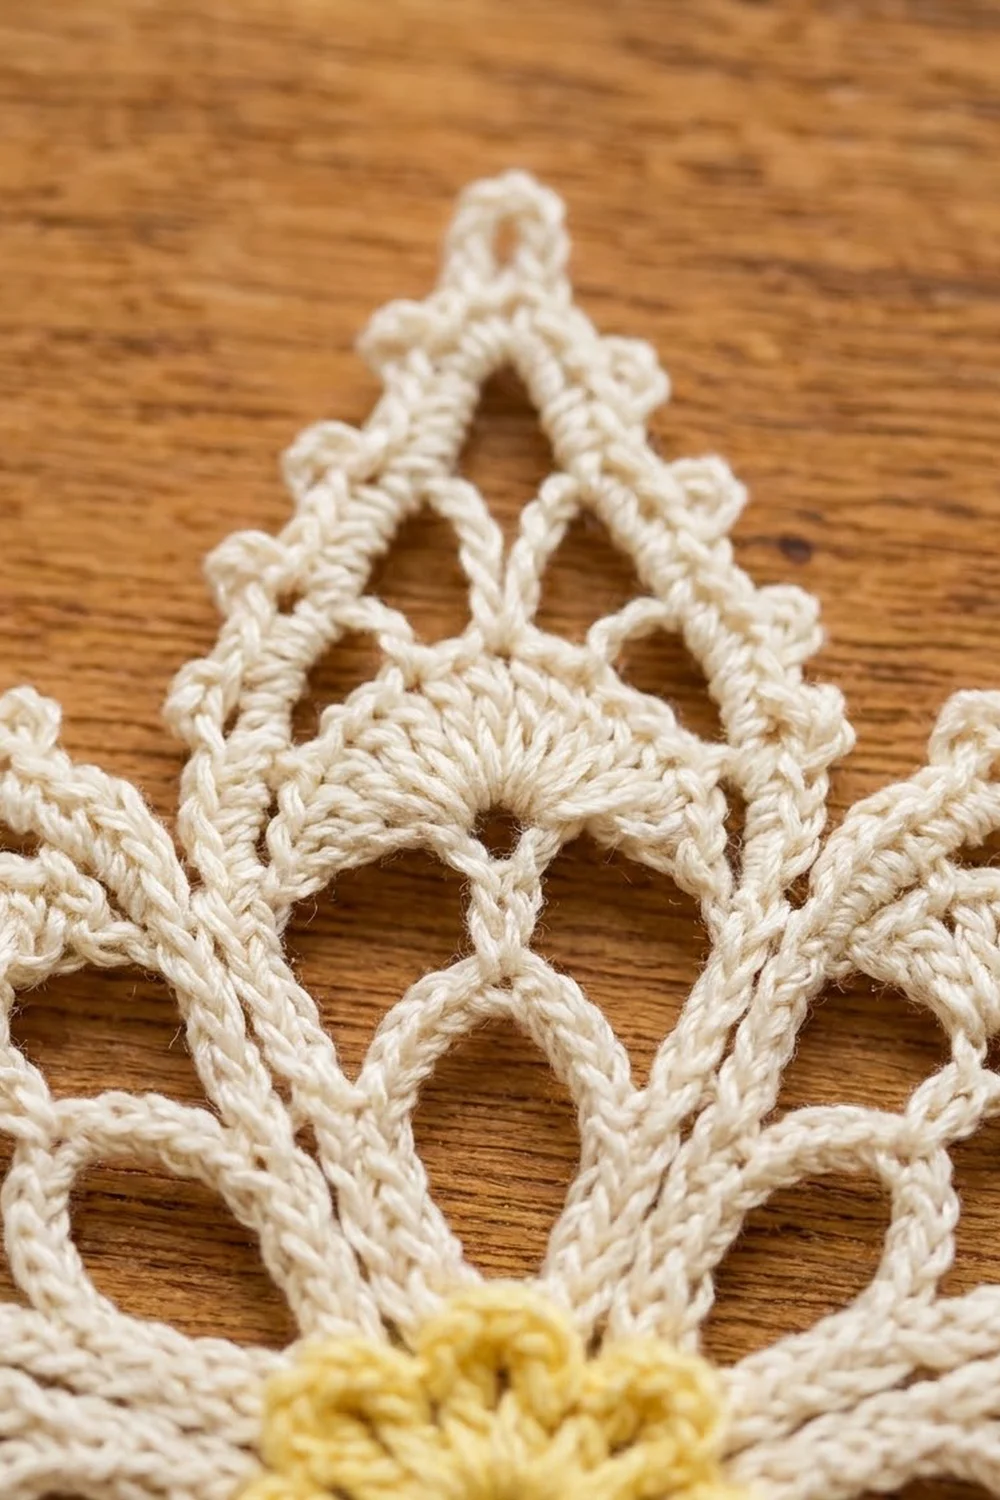
Every fan has three rows. Row 1 is the solid half-circle around the eyelet. Row 2 is the open rays. Row 3 is the small chain arches on the outer edge. You turn after every row.
Fan 1
Foundation: Ch 6, sl st in the first ch to form a ring. This ring becomes the eyelet at the base of the fan.
Row 1: Ch 3 (counts as dc). Work 10 dc into the ring, using only about half of the ring so the stitches fan out in a half-circle. Turn. (11 dc)
Row 2: Ch 4 (counts as dc + ch 1), dc in the next dc. Ch 1, dc in the next dc; repeat from * across, ending with the last dc in the top of the turning ch. Turn. (11 dc, 10 ch-1 sps)*
Row 3: Ch 1, sc in the first dc. Ch 3, sc in the next dc; repeat from * across, ending with the last sc in the 3rd ch of the turning ch. (11 sc, 10 ch-3 loops)*
Do not fasten off. You are now at the outer tip of Fan 1, on the side where Fan 2 will go.
Checkpoint: 1.25 in x 0.75 in (3.2 x 1.9 cm).
Fans 2 to 7 (joined as you go)
Bridge and ring: Ch 3 for the bridge. Then ch 6 and sl st in the 6th ch from the hook to form the new eyelet ring.
Row 1: Ch 3 (counts as dc). Work 10 dc into the half of the new ring that faces away from the inner edge, working away from the previous fan. Turn. (11 dc)
Row 2: Work as Fan 1, Row 2. This row ends on the side next to the previous fan. After the last dc, sl st into the last ch-3 loop of the previous fan to join. Turn. (11 dc, 10 ch-1 sps, plus 1 joining sl st)
Row 3: Work as Fan 1, Row 3, working away from the previous fan. (11 sc, 10 ch-3 loops)
Repeat until you have 7 fans.
Checkpoint: After 4 fans, the strip should curve naturally, with the eyelets on the inside of the curve. If it lies straight, your bridges are too loose. If it curls hard, your Row 2 is too tight.
Fan 8 (closing the ring)
Work the bridge, ring, Row 1 and Row 2 as for Fans 2–7, joining Row 2 to Fan 7 as usual.
Row 3: Ch 1, sc in the first dc. Ch 3, sc in the next dc; repeat from * 8 more times (9 loops made). For the 10th loop: ch 1, sl st in the first ch-3 loop of Fan 1, ch 1, sc in the top of the turning ch. (11 sc, 10 loops, with the last loop joined to Fan 1)*
Closing bridge: Ch 3, sl st in the base of Fan 1’s foundation ring. Make sure the strip is not twisted before you make this sl st.
Inner Round
This round tightens the inner edge and turns the eyelets into a neat circle.
Inner Rnd: Working along the inside of the ring with the RS facing, work 4 sc into the next ch-3 bridge, then 3 sc over the unworked lower half of the next eyelet ring; repeat from * around 8 times. Sl st to the first sc. (56 sc: 7 per fan x 8 fans)* Fasten off and weave in the ends.
Checkpoint: Pin the ring flat. It should measure 4.5 in (11.4 cm) across, with a 2.25 in (5.7 cm) opening.
Border (Cream)
Border gauge: 3 sc fill one ch-3 loop snugly without cupping. Around the whole ring, this adds 0.25 in (0.6 cm) on each side.
Starting count: Each fan has 10 outer ch-3 loops, so the ring has 8 x 10 = 80 loops. The joined loop where Fan 8 meets Fan 1 counts as one loop.
Rnd 1: With the RS facing, join cream with a sl st in the first ch-3 loop of any fan. Ch 1. Work 3 sc in each ch-3 loop around. The sc at the fan tips are skipped, so you work into the loops only. Sl st to the first sc. (30 sc per fan; 240 sc total)
Rnd 2: Ch 1. Sc in each of the next 2 sc, picot, sc in the next sc; repeat from * around. Sl st to the first sc. (240 sc and 80 picots: 30 sc and 10 picots per fan)* Fasten off.
Why the math works: Each fan contributes 10 loops x 3 sc = 30 sc. Because 30 divides evenly by the 3-stitch picot repeat, every fan gets exactly 10 picots, one centered over each loop. No stitches are added or skipped at the fan joins, so the scallops stay identical all the way around.
Checkpoint: 5 in (12.7 cm) across.
Bow (Cream)
Bow loops: Ch 41.
– Row 1: Sc in the 2nd ch from hook and in each ch across. Turn. (40 sc)
– Rows 2–3: Ch 1, sc in each sc across. Turn. (40 sc)
Fasten off, leaving a 6 in (15.2 cm) tail. The strip measures 4 in x 0.3 in (10.2 x 0.8 cm).
Tails: Ch 21.
– Row 1: Sc in the 2nd ch from hook and in each ch across. Turn. (20 sc)
– Row 2: Ch 1, sc in each sc across. (20 sc)
Fasten off. The strip is 2 in (5.1 cm) long.
Center wrap: Ch 9.
– Row 1: Sc in the 2nd ch from hook and in each ch across. Turn. (8 sc)
– Row 2: Ch 1, sc across. (8 sc)
Fasten off, leaving a 6 in (15.2 cm) tail.
Assembly:
1. Fold both ends of the loop strip to the center and overlap them by 0.25 in (0.6 cm). Stitch them down.
2. Fold the tail strip into an inverted V and place it behind the center of the loops.
3. Pinch all the layers together and wrap the center piece tightly around them. Sew it closed at the back.
The bow measures about 2 in wide x 1.25 in tall (5.1 x 3.2 cm), and each tail hangs about 1 in (2.5 cm).
Hanging Loop (Cream)
Ch 46. Sl st in the back bump of the 2nd ch from hook and in each back bump across. (45 sl st) This makes a firm, rope-like cord about 4.6 in (11.7 cm) long. Fasten off.
Fold the cord in half. Sew both ends to the wrong side of the top fan, at the Row 1 level, letting the loop stand up about 2 in (5.1 cm). Sew the bow on the RS over the base of the loop, so the loops of the bow sit over the top fan and the tails spread over the neighboring fans.
Final Blocking
- Wet the wreath (without the bow) in cool water and gently press out the excess in a towel.
- Pin the center opening into a 2.25 in (5.7 cm) circle first, with one pin in each eyelet.
- Pin the outer edge to a 5 in (12.7 cm) circle, with one pin in the middle picot of each fan, so 8 pins in total.
- Open the rays of each fan evenly with the tip of a pin.
- Pin out the remaining picots for crisp scallops.
- Spray with starch or brush on the glue mix if you want a stiff ornament.
- Let it dry completely, then unpin it and sew on the bow and loop. Steam the bow lightly if you need to.
Final Quality-Control Checklist
- 8 fans, each with 11 dc rays and 10 outer loops
- Every eyelet sits on the inner edge, not twisted
- Inner round has 56 sc
- Border Rnd 1 has 240 sc, and Rnd 2 has 80 picots
- Diameter is 5 in (12.7 cm), opening is 2.25 in (5.7 cm)
- Bow is centered over the top fan and the loop stands straight
- All ends are woven in on the wrong side
Troubleshooting
- The ring ruffles: your fans are bigger than the inner round allows. Rework the Inner Rnd with 3 sc in each bridge (48 sc total).
- The ring cups or dishes: your inner round is too tight. Use a hook 0.25 mm larger for that round only.
- The fans overlap at the tips: your joins in Row 2 are too tight. Keep the joining sl st loose.
- The border flares: you may have worked 4 sc in some loops. Count 30 sc per fan.
- Picots disappear: make sure each picot is a full ch 3 with the sl st into the 3rd ch from hook.
- The bow droops: starch the bow, or add a hidden stitch from each bow loop to the wreath.
Care
Hand wash in cool water, press it flat in a towel, and reblock if needed. Store it flat or hanging, away from crushing weight.
Final Notes
The measurement chain is simple: one fan at 1.25 x 0.75 in (3.2 x 1.9 cm), eight joined fans closed into a 4.5 in (11.4 cm) ring with a 56-stitch inner round, then a 240-stitch cream border bringing it to 5 in (12.7 cm). If each checkpoint matches, the bow and loop will sit just right. Make one for every branch, or tie one onto a gift.
Happy crocheting!