
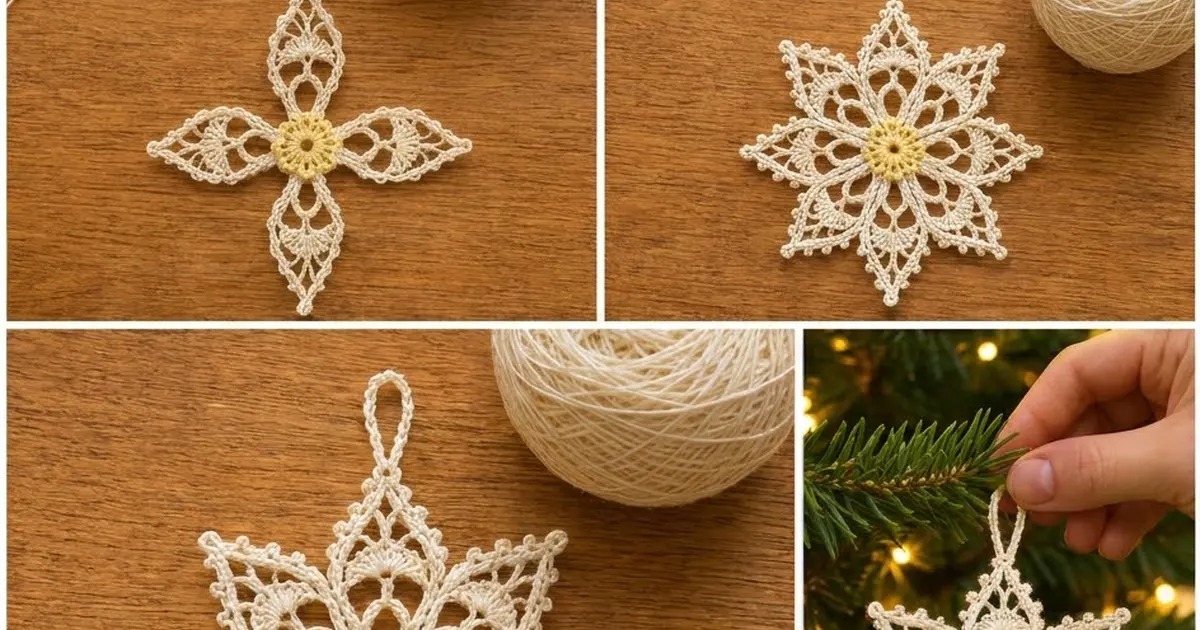
The Golden Heart Lace Star is a delicate thread ornament with eight long pointed petals around a small yellow flower center. The petals are open and airy, with arched windows, a fan in the middle of each one and a fine picot edge around the whole outline. It looks like a cross between a snowflake and a poinsettia, and it shows up well on a tree, in a window or tied to a gift.
The palette is simple: soft butter yellow for the center and warm cream for the petals and border. The pattern uses US crochet terms throughout.
The finished star measures 5 in (12.7 cm) from point to point, and the hanging loop adds about 1 in (2.5 cm) at the top. That makes the total height 6 in (15.2 cm).
Construction is in four stages. First, crochet a 2-round flower center. Next, work 8 lace petals in rows, each one straight off a center scallop. Then work one continuous picot border around the whole star, making the hanging loop at the same time. Finish by blocking the star flat. The result is one single piece with no sewing.
Finished Size and Construction
- Finished size: 5 in (12.7 cm) point to point; 6 in (15.2 cm) tall including the loop
- Skill level: Intermediate (working in rows on a small scale, using thread)
- Terminology: US terms
- Yarn weight: Lace (0), size 10 crochet cotton thread
- Hook: 1.75 mm (US steel 6)
- Number of pieces: 1 (the center and petals are worked as one piece)
- Layout: 8 petals radiating from a central flower
- Center size: 0.9 in (2.3 cm) across after Round 2
- Petal size: 1.85 in (4.7 cm) long, 0.9 in (2.3 cm) wide at the widest row
- Size before border: 4.6 in (11.7 cm) point to point
- Border depth: about 0.2 in (0.5 cm) at each tip, including the picot
Materials
Use a mercerized cotton thread in size 10. It holds its shape after blocking, the stitch definition stays crisp, and it can be lightly starched. Avoid fuzzy or very soft threads, because they blur the openwork.
- Yellow (center): 1 g, about 8 m (9 yd)
- Cream (petals and border): 6 g, about 50 m (55 yd)
Both quantities include a margin for a gauge test and for weaving in ends.
Tools:
– 1.75 mm (US steel 6) crochet hook
– Fine tapestry needle
– Small sharp scissors
– Rustproof pins and a foam blocking board
– Spray starch or a diluted fabric stiffener (optional)
– Ruler or tape measure
Abbreviations (US Terms)
- ch – chain
- sl st – slip stitch
- sc – single crochet
- hdc – half double crochet
- dc – double crochet
- sp(s) – space(s)
- sk – skip
- tch – turning chain
- st(s) – stitch(es)
- sc2tog – single crochet 2 together: (insert hook in next indicated place, yo, pull up a loop) twice, yo, draw through all 3 loops.
- dc2tog – double crochet 2 together: (yo, insert hook in next indicated place, yo, pull up a loop, yo, draw through 2 loops) twice, yo, draw through all 3 loops.
Special stitch:
– Picot – ch 3, sl st in the 3rd ch from the hook.
– Large picot – ch 4, sl st in the 4th ch from the hook.
Turning chains: In the petal rows, ch 3 counts as 1 dc. In Row 8 and Row 9, ch 2 counts as the first leg of a dc2tog.
Gauge and Checkpoints
For thread work, gauge is checked against the piece itself rather than a flat swatch. Make the center first and measure it before you go on.
- After Round 1 of the center: 0.6 in (1.5 cm) across.
- After Round 2 of the center: 0.9 in (2.3 cm) across, measured from scallop tip to opposite scallop tip.
- First petal, after Row 3: 0.6 in (1.5 cm) long, measured from the scallop tip.
- First petal, after Row 5: 1.1 in (2.8 cm) long and 0.9 in (2.3 cm) wide.
- First petal, after Row 9: 1.85 in (4.7 cm) long.
- After all 8 petals: 4.6 in (11.7 cm) point to point, unblocked but gently flattened.
- After the border and blocking: 5 in (12.7 cm) point to point.
If your center is too big (over 1 in / 2.5 cm after Round 2), change to a 1.5 mm hook. If it is too small (under 0.8 in / 2 cm), change to a 2 mm hook. Recheck the first petal against the checkpoints before you make the other seven. A difference of one hook size changes the finished star by roughly 0.5 in (1.3 cm).
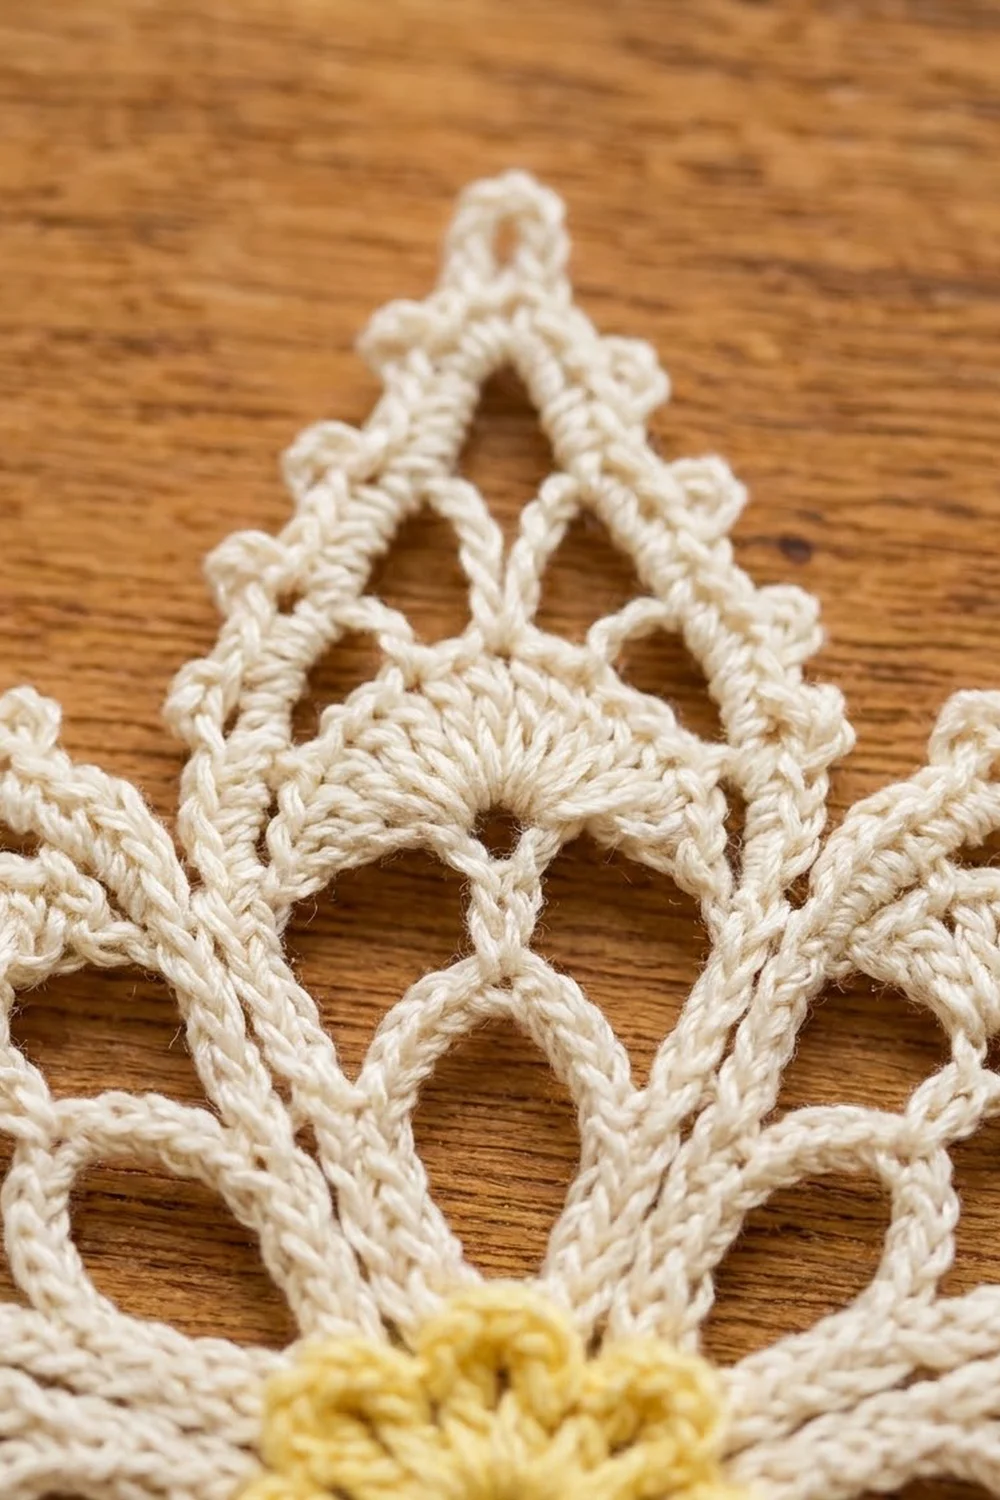
Center Flower (Yellow)
With yellow, ch 6 and sl st to the first ch to form a ring.
Round 1: Ch 3 (counts as dc), work 15 dc in the ring. Join with a sl st to the top of the beginning ch-3. (16 dc)
Round 2: Ch 1, sc in the next dc, (hdc, dc, hdc) in the next dc. Repeat from * 8 times in total. Join with a sl st to the first sc. (8 scallops; 32 sts: 8 sc, 16 hdc, 8 dc)
Fasten off and weave in the tail.
The center dc of each scallop is the anchor point for one petal. Number the scallops 1 to 8 in your head, going around.
Lace Petals (Cream)
Each petal is worked back and forth in rows, starting from the center dc of one scallop. Fasten off after each petal.
Working order: Work petals on scallops 1, 3, 5 and 7 first, so you get an even cross. Then fill in scallops 2, 4, 6 and 8. This keeps the spacing balanced and stops the star from pulling to one side.
Row 1: Join cream with a sl st in the center dc of a scallop. Ch 3 (counts as dc), then work (dc, ch 3, 2 dc) in the same st. Turn. (4 dc, 1 ch-3 sp)
Row 2: Ch 3, dc in the next dc, ch 5, sc in the ch-3 sp, ch 5, dc in the next dc, dc in the top of the tch. Turn. (4 dc, 1 sc, 2 ch-5 sps)
Row 3: Ch 3, dc in the next dc, ch 4, sc in the first ch-5 sp, ch 3, sc in the next ch-5 sp, ch 4, dc in the next dc, dc in the top of the tch. Turn. (4 dc, 2 sc, 3 sps: ch-4, ch-3, ch-4)
The two ch-4 spaces form the small arched windows at the base of the petal.
Row 4 (fan base): Ch 3, dc in the next dc, ch 3, sk the ch-4 sp, work 7 dc in the center ch-3 sp, ch 3, sk the ch-4 sp, dc in the next dc, dc in the top of the tch. Turn. (11 dc: 2 + 7 + 2; 2 ch-3 sps)
Row 5 (fan opens): Ch 3, dc in the next dc, ch 3, dc in the first fan dc, (ch 1, dc in the next fan dc) 6 times, ch 3, dc in the next dc, dc in the top of the tch. Turn. (11 dc: 2 + 7 + 2; 6 ch-1 sps, 2 ch-3 sps)
This is the widest row of the petal: 0.9 in (2.3 cm).
Row 6: Ch 3, dc in the next dc, ch 6, sk the first 3 fan dc, sc in the 4th (center) fan dc, ch 6, sk the remaining fan sts, dc in the next dc, dc in the top of the tch. Turn. (4 dc, 1 sc, 2 ch-6 sps)
The two ch-6 arches form the larger windows above the fan.
Row 7: Ch 3, dc in the next dc, ch 4, sc in the sc, ch 4, dc in the next dc, dc in the top of the tch. Turn. (4 dc, 1 sc, 2 ch-4 sps)
Row 8 (taper): Ch 2, dc in the next dc (the ch-2 and this dc count as the first dc2tog), ch 3, sc in the sc, ch 3, dc2tog over the next dc and the top of the tch. Turn. (2 dc2tog, 1 sc, 2 ch-3 sps)
Row 9 (point): Ch 2, then work dc2tog with the first leg in the sc and the second leg in the top of the last dc2tog. (1 point cluster)
Fasten off, leaving a 4 in (10.2 cm) tail.
Repeat Rows 1–9 on each remaining scallop in the working order given above, for 8 petals in total. Weave each tail back through the dc frame of its own petal so that it is hidden along the solid edge.
Checkpoint: The star should measure 4.6 in (11.7 cm) from one point to the opposite point. The petals should sit edge to edge near the center without overlapping.
Border (Cream)
The border is one continuous round of single crochet and picots that outlines every petal. It also creates the hanging loop.
Border gauge: Each dc row end takes 2 sc. A dc row is roughly twice as tall as an sc is wide, so 2 sc per row end lets the edge lie flat without ruffling or cupping.
Where the stitches go: Each petal side has 8 row ends (Rows 1–8), and Row 9 forms the tip. Row ends 2–8 give 7 row ends per side. At 2 sc each, that makes 14 sc per side. The Row 1 row ends of two neighboring petals are worked together as one sc2tog at the valley between them.
Setup: With the star right side up, join cream with a standing sc2tog at the valley between any two petals. Work the first leg in the Row 1 row end of the left petal and the second leg in the Row 1 row end of the right petal. The petal to your right is Petal A, and the first petal you edge.
Border Round:
Up the side of the petal: Work 2 sc in each of row ends 2–8 (14 sc in total), and work a picot after the 3rd, 6th, 9th and 12th sc. (14 sc, 4 picots)
Tip: Work (sc, large picot, sc) in the point cluster. (2 sc, 1 large picot)
Down the side: Work 2 sc in each of row ends 8–2 (14 sc in total), and work a picot after the 2nd, 5th, 8th and 11th sc. (14 sc, 4 picots)
Valley: Work sc2tog over the Row 1 row end of this petal and the Row 1 row end of the next petal. (1 sc2tog)
Repeat this sequence around all 8 petals. On the last petal, leave out the final valley sc2tog, because the joining sc2tog already sits there. Sl st to the top of the first sc2tog to close.
Hanging loop: On the tip of the petal you want at the top, replace the large picot with ch 20. The tip of that petal becomes (sc, ch 20, sc). Work this as you come to it in the round.
Counts per petal: 14 + 2 + 14 + 1 = 31 sts and 9 picots (8 small, 1 large or the loop).
Round total: 8 × 31 = 248 sts, plus 64 small picots and 7 large picots + 1 hanging loop.
Why the math works: The picots on the up side sit after sc 3, 6, 9 and 12, which leaves 2 sc before the tip. The picots on the down side sit after sc 2, 5, 8 and 11, which leaves 2 sc after the tip and 3 sc before the valley. This makes the picot spacing mirror-symmetric about each point. Each valley takes exactly one sc2tog, and there are 8 valleys, so no stitches are added or lost between petals. The border adds about 0.2 in (0.5 cm) at each tip, bringing the star from 4.6 in (11.7 cm) to 5 in (12.7 cm).
Fasten off and weave in the tail along the border sc.
Final Blocking
- Soak the star in cool water for 5 minutes, then press it gently in a towel. Do not wring it.
- Lay it right side up on the blocking board.
- Pin the center first so the yellow hole is round and the scallops are even.
- Pin each petal tip outward, one pin through each large picot, so that opposite tips are 5 in (12.7 cm) apart.
- Check that the eight tips are evenly spaced. Each gap between neighboring tips should match the others.
- Pin open the windows and the fan in each petal with a pin through the arches, if needed.
- Pin out the small picots along the edges so they stand out as neat bumps.
- Mist with starch or brush on a diluted stiffener, if you want a firmer ornament.
- Pin the hanging loop into a neat teardrop 1 in (2.5 cm) tall.
- Leave to dry completely, usually 12–24 hours, before you unpin.
Final Quality-Control Checklist
- The center has 16 dc in Round 1 and 8 even scallops in Round 2.
- There are 8 petals, one on each scallop.
- Each petal has 2 small base windows, a 7-dc fan, 2 upper windows and a single point.
- The border has 31 sts and 9 picots per petal, 248 sts in total.
- The picots are mirror-symmetric on each petal.
- The star measures 5 in (12.7 cm) point to point after blocking.
- The hanging loop is 1 in (2.5 cm) tall and sits on the top tip.
- All tails are woven into solid stitches and none show from the front.
Troubleshooting
Petals overlap near the center: Your tension in Rows 1–2 is too loose. Rework those rows with a firmer pull, or use a hook 0.25 mm smaller for the petals only.
Gaps between petals at the base: The center is too large for the petals. Rework the center with a smaller hook, or tighten the valley sc2tog in the border.
The fan bunches up: Check that Row 4 has exactly 7 dc in the center space and that Row 5 has 6 ch-1 spaces.
The petal point is blunt: Make sure Row 9 is a single dc2tog and not two separate dc. Block the tip with a pin through the large picot.
The border ruffles: You have too many sc. Count 14 per side. If it still ruffles, work the border with a smaller hook.
The border cups or pulls: You have too few sc, or your tension is tight. Check the count of 2 sc per row end, and relax your tension.
The star won’t lie flat after blocking: Re-wet it, pin it more tightly at the center and the tips, and add starch.
Care
Hand wash in cool water with a mild soap, press it in a towel and re-block it flat to dry. Store it flat or hanging, away from direct sunlight, so the cream thread doesn’t yellow.
Final Notes
The measurements build step by step. The yellow center measures 0.9 in (2.3 cm) across. Each petal adds 1.85 in (4.7 cm), which brings the star to 4.6 in (11.7 cm) before the border. The picot border adds 0.2 in (0.5 cm) at each tip, for a finished 5 in (12.7 cm) star, and the loop brings the total height to 6 in (15.2 cm). Check the center and the first petal against these numbers before you make the rest, and the remaining petals will match.
Happy crocheting!