

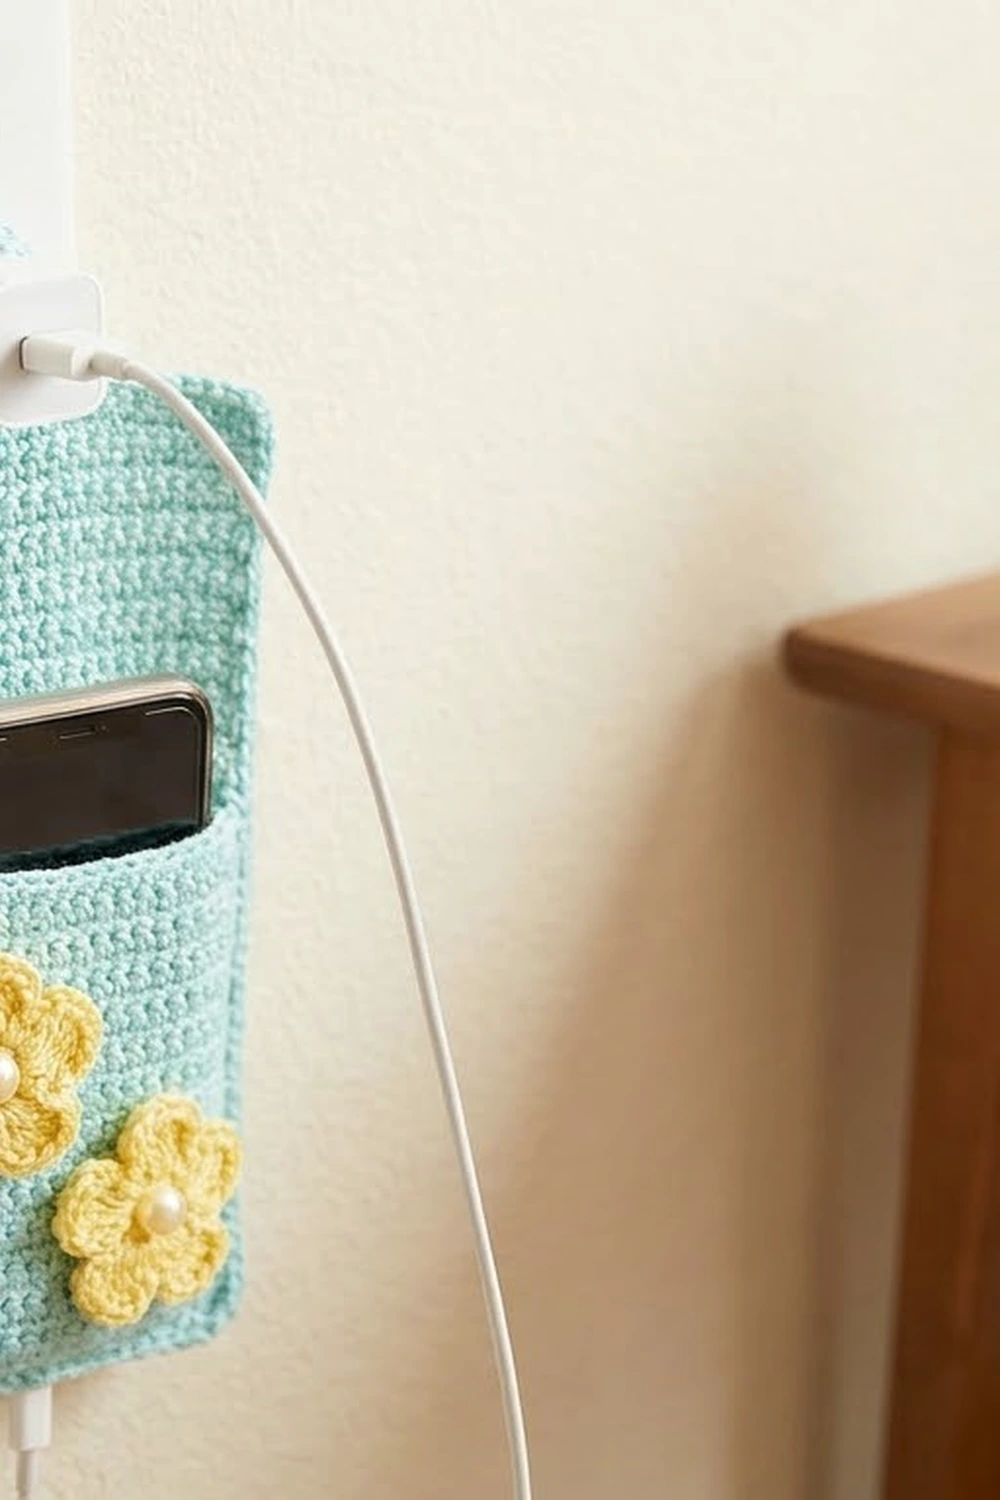
This little holder hangs right on your wall charger and keeps your phone off the floor while it charges. The back panel has a rounded top with a round opening that slips over the charger plug, and a flat pocket on the front holds the phone upright with the cable running down into it.
The main fabric is a soft light aqua, worked in dense single crochet for a smooth, even texture. Two sunny yellow five-petal flowers sit on the lower left of the pocket, each finished with a white pearl bead in the center. The style is clean and simple, with a sweet touch.
This pattern uses US crochet terms. The finished holder measures about 5.4 in (13.7 cm) wide and 9.4 in (23.9 cm) tall, with an opening about 1.7 in (4.3 cm) across.
Construction is simple. You crochet the back panel’s top in joined rounds around a chain ring, shape the bottom half into straight sides and square corners, then work rows downward for the lower back. The pocket is a separate rectangle in rows. You sew the flowers onto the pocket, then one border round joins the pocket to the back and edges the whole outline.
Finished Size and Construction
- Finished size: 5.4 in (13.7 cm) wide x 9.4 in (23.9 cm) tall
- Skill level: Advanced beginner
- Terminology: US crochet terms
- Yarn weight: Worsted (#4)
- Hook: 4.0 mm (G-6)
- Number of pieces: 4 (1 back panel, 1 pocket, 2 flowers), joined into one holder
- Layout: Pocket over the lower back panel, bottom and side edges aligned; flowers on the lower left of the pocket
- Piece sizes: Back panel 4.9 in (12.4 cm) x 8.9 in (22.6 cm); pocket 4.9 in (12.4 cm) x 5.6 in (14.2 cm); flowers 1.5 in (3.8 cm) across
- Size before border: 4.9 in (12.4 cm) x 8.9 in (22.6 cm)
- Border depth: 0.25 in (0.6 cm) on each edge
Materials
Choose a smooth worsted-weight yarn with good stitch definition. Cotton or a cotton blend gives a firm holder that keeps its shape under the weight of a phone. Soft acrylic also works, but it stretches more, so keep your tension snug.
- Light aqua (main color): 60 g, about 120 m (131 yd)
- Sunny yellow (flowers): 6 g, about 12 m (13 yd)
Quantities include a margin for a gauge swatch and small adjustments.
Tools:
- 4.0 mm (G-6) crochet hook
- 2 white pearl beads, 8 mm, with a sewing hole
- Yarn needle
- Sewing needle and white or yellow thread for the beads
- 4 locking stitch markers
- Scissors
- Measuring tape
- Pins and a blocking surface
- Spray bottle with water
Abbreviations (US Terms)
- ch – chain
- sl st – slip stitch
- sc – single crochet
- hdc – half double crochet
- dc – double crochet
- st(s) – stitch(es)
- RS – right side
- rnd – round
- standing sc – start with a slip knot on the hook, insert hook in the stitch, yarn over, pull up a loop, yarn over and pull through both loops
- corner – 3 sc in the same stitch; the middle of these 3 sc is the corner center for the next round
Special stitch – petal: (hdc, 2 dc, hdc) all in the same stitch.
Gauge and Checkpoints
Gauge: 18 sc and 20 rows (or rounds) = 4 in (10.2 cm). One sc is about 0.22 in (0.6 cm) wide and one row is 0.2 in (0.5 cm) tall.
Test one piece first. Work Rounds 1–7 of the back panel and measure before you go on. This section shows both your stitch gauge and your round gauge, and it shows whether the opening fits your charger.
Checkpoints:
- After Rnd 1: opening about 1.7 in (4.3 cm) across
- After Rnd 3: circle about 2.9 in (7.4 cm) across
- After Rnd 7: about 4.9 in (12.4 cm) wide and 4.5 in (11.4 cm) tall
- After back Row 22: 4.9 in (12.4 cm) x 8.9 in (22.6 cm)
- Pocket: 4.9 in (12.4 cm) x 5.6 in (14.2 cm)
- After border: 5.4 in (13.7 cm) x 9.4 in (23.9 cm)
If your piece is too big, go down 0.5 mm in hook size. If it is too small, go up 0.5 mm. Change the hook, not the stitch counts, because the counts in each section depend on each other.
If the opening doesn’t fit your charger, change the starting chain by 6 and add or remove 1 stitch between the increases in every round. For a simpler fix, choose a bigger or smaller hook for the first round only.

Back Panel
The rounds are joined, and the turning ch 1 never counts as a stitch. Do not turn between rounds. The RS faces you the whole time.
Foundation: Ch 24. Sl st into the first ch to form a ring, without twisting.
Rnd 1: Ch 1, work 24 sc into the ring, working over the chain rather than into it. Sl st to the first sc to join. (24 sts)
Rnd 2: Ch 1, sc in next 3 sts, 2 sc in next st, repeat from * 5 more times, join. (30 sts)
Rnd 3: Ch 1, sc in next 4 sts, 2 sc in next st, repeat from * 5 more times, join. (36 sts)
Lay the ring flat with the join at the left side, at 9 o’clock. The first 18 sts of the next round run down the left side and across the bottom to 3 o’clock. This is the bottom half. The last 18 sts arch over the top back to the join. This is the top half.
Rnd 4 (conversion round): Ch 1.
- Bottom half: sc in next 4 sts, 2 sc in next st, corner in next st, 2 sc in each of next 6 sts, corner in next st, 2 sc in next st, sc in next 4 sts.
- Top half: sc in next 5 sts, 2 sc in next st, repeat from * 2 more times. Join.
Count: 36 sts worked 1-per-stitch + 15 extra (12 in the bottom half, 3 in the top half) = 51 sts. Place a marker in each corner center.
The sections are now: left side 6, corner 3, bottom 12, corner 3, right side 6, top 21.
Rnd 5: Ch 1, sc in next 7 sts, corner in marked st, sc in next 14 sts, corner in marked st, sc in next 7 sts, sc in next 6 sts, 2 sc in next st 3 times, join. Move the markers up to the new corner centers. (58 sts: bottom half 34, top half 24)
Rnd 6: Ch 1, sc in next 8 sts, corner, sc in next 16 sts, corner, sc in next 8 sts, sc in next 7 sts, 2 sc in next st 3 times, join. Move the markers. (65 sts: bottom half 38, top half 27)
Rnd 7: Ch 1, sc in next 9 sts, corner, sc in next 18 sts, corner, sc in next 9 sts, sc in next 8 sts, 2 sc in next st 3 times, join. Move the markers. Fasten off. (72 sts: bottom half 42, top half 30)
The corners push outward with each round, so the bottom half becomes two straight sides and a flat bottom edge. Meanwhile, the top keeps growing by 3 sts per round, which is the right rate for a flat half circle. Check this section against the Rnd 7 checkpoint now.
Lower back (rows): Turn the piece so the flat bottom edge is at the top.
Row 1: With RS facing, join with a standing sc in the marked center st of the right-hand corner. Sc in each st across to and including the marked center st of the other corner. (22 sts: corner center + 1 + 18 + 1 + corner center)
Rows 2–22: Ch 1, turn, sc in each st across. (22 sts)
Fasten off. The back panel measures 4.9 in (12.4 cm) x 8.9 in (22.6 cm). Above each corner center there are 10 unused Rnd 7 sts on each side, and 30 sts around the arch.
Foundation: With light aqua, ch 23.
Row 1: Sc in 2nd ch from hook and in each ch across. (22 sts)
Rows 2–28: Ch 1, turn, sc in each st across. (22 sts)
Fasten off. The pocket measures 4.9 in (12.4 cm) x 5.6 in (14.2 cm). Row 28 is the top opening, and the foundation chain is the bottom.
Flowers (make 2)
Foundation: With yellow, make a magic ring.
Rnd 1: Ch 1, work 10 sc into the ring, pull the ring tight, and sl st to the first sc. (10 sts)
Rnd 2: Sl st in next st, petal in next st, repeat from * 4 more times. Sl st to the first sl st to join. (5 petals; 25 sts: 20 petal sts + 5 sl sts)
Fasten off, leaving a 10 in (25.4 cm) tail. Each flower measures about 1.5 in (3.8 cm) across.
Finish the flowers: With a sewing needle and thread, sew one pearl bead firmly over the center ring of each flower.
Make All Pieces
Before assembly, you should have:
- Light aqua: 1 back panel, 1 pocket
- Yellow: 2 flowers, each with a pearl center
Text layout (front view):
      .-----------.
     /   .-----.   \      back panel arch
    |   ( hole  )   |     (rounds 1-7)
    |    '-----'    |
    |---------------|     pocket top (Row 28)
    |               |
    |    POCKET     |     22 sts x 28 rows
    |       [F2]    |
    |  [F1]         |
    |_______________|     bottom: back Row 22 + pocket foundation
Placing the flowers: Lay the pocket RS up with Row 28 at the top. Pin Flower 1 so its center sits 1.25 in (3.2 cm) from the left edge and 1.25 in (3.2 cm) from the bottom edge. Pin Flower 2 up and to the right, with its center 1.25 in (3.2 cm) above and 1 in (2.5 cm) to the right of Flower 1’s center. One petal of each flower should just touch the other.
With the yellow tails, sew around the center ring and tack down the tip of each petal. Sew through the pocket only, not the back panel, or the pocket won’t open.
Joining
The pocket is joined to the back in the first border round by working single crochet through both layers. Only the bottom edge and the two sides are joined, and the top of the pocket stays open.
Alignment: Place the back panel RS up with the arch at the top. Lay the pocket on top of it, RS up and flowers visible, with the foundation edge on the back’s Row 22. Line up the side edges and pin them.
Stitch-to-stitch logic:
- Bottom: The pocket’s 22 foundation stitches match the back’s 22 Row 22 stitches, one to one.
- Sides: The pocket has 28 row-ends per side. On the back, these match the 22 row-ends of the lower back plus the lowest 6 of the 10 Rnd 7 side stitches. The pocket top sits about 0.2 in (0.5 cm) below the opening.
Tension: Work the joining stitches at your normal gauge tension. If you pull them tight, the edges pucker and the pocket narrows. If you work them loose, the edge flares. Insert your hook under both loops of the front layer and through the matching stitch or row-end of the back layer.
Size checkpoint: Before you start the border, pin the layers flat and measure. The stack should measure 4.9 in (12.4 cm) wide, with the pocket covering the lower 5.6 in (14.2 cm) of the back.
Border
Border gauge: The same as the body, 18 sc = 4 in (10.2 cm). Each border round adds about 0.2 in (0.5 cm) for the sc round and 0.05 in (0.1 cm) for the slip stitch round, so 0.25 in (0.6 cm) per edge.
Rnd 1 (join and edge): With light aqua and RS facing, join with a standing sc in the bottom right corner through both layers. Work around as follows:
- Bottom: 1 sc in each of the 22 stitch pairs through both layers. Work 3 sc in the first and last of these stitches. Count: 22 worked 1-per-stitch + 4 extra = 26 sts.
- Left side: 1 sc in each of the 22 row-ends of the lower back and then 1 sc in each of the 10 Rnd 7 side sts. The first 28 of these go through both layers, and the last 4 go through the back only. Count: 32 sts.
- Arch: sc in next 9 sts, 2 sc in next st 3 times. Count: 30 worked 1-per-stitch + 3 extra = 33 sts.
- Right side: 1 sc in each of the 10 Rnd 7 side sts and then 1 sc in each of the 22 row-ends. The last 28 of these go through both layers. Count: 32 sts.
Join to the first sc. Total: 116 sts worked 1-per-stitch + 7 extra = 123 sts.
Rnd 2 (finishing edge): Ch 1, sl st loosely in each st around, join. (123 sts) Fasten off.
Optional opening edge: Join light aqua to the opening and sl st loosely into each of the 24 sts of Rnd 1. This gives the opening a firmer edge.
Why the math works: The bottom has 22 stitches on each layer, so the two layers match exactly, and the 4 corner extras let it turn the corners without curling. Each side is 22 row-ends + 10 side sts = 32, and the pocket’s 28 rows match the lowest 28 of them. No stitches are added or skipped on the sides, so they stay straight. The arch gets 3 increases, the same rate as Rnds 4–7, so it stays flat. The width grows from 4.9 in (12.4 cm) to 5.4 in (13.7 cm), and the height grows from 8.9 in (22.6 cm) to 9.4 in (23.9 cm).
Final Blocking
- Weave in all ends on the back of the panel, going through the back layer only.
- Lay the holder RS up on a blocking mat.
- Pin it to 5.4 in (13.7 cm) x 9.4 in (23.9 cm), with the pins along the straight sides first.
- Shape the arch into an even half circle and push the opening into a round shape about 1.7 in (4.3 cm) across.
- Smooth the flower petals out flat, keeping away from the pearl beads.
- Mist with water until damp, but not soaked.
- Let it dry completely, then remove the pins.
Final Quality-Control Checklist
- The holder measures 5.4 in (13.7 cm) x 9.4 in (23.9 cm).
- The opening slides over your charger with a little room.
- The pocket opens freely along its top edge.
- The side edges are straight, with no puckering where the layers are joined.
- The arch lies flat with no ruffling or cupping.
- Both flowers are sewn through the pocket only, and the pearls are secure.
- All ends are woven in and hidden.
- Your phone sits in the pocket and its top shows above the pocket edge.
Troubleshooting
- The arch ruffles: Your round tension is looser than your row tension. Redo Rnds 5–7 with a hook 0.5 mm smaller.
- The arch cups: Your tension is too tight. Loosen up or redo the rounds with a hook 0.5 mm larger.
- The bottom corners are rounded: Make sure each corner has 3 sc in the marked center stitch. Blocking sharpens the corners.
- The opening is too tight: Add 6 ch to the foundation and 1 stitch between the increases in each round, or skip the optional slip stitch opening edge.
- The pocket is shorter than the guide: Your row gauge is short. Add 1 row to the pocket, and work 1 more of the Rnd 7 side sts through both layers.
- The sides wave: You worked more than 1 sc per row-end. Rip out the border and work exactly 32 sts per side.
Care
Hand wash in cool water, press out the water in a towel, and dry flat. Do not tumble dry, because the heat can damage the pearl beads.
Final Notes
The measurement chain is simple. The 24-stitch ring makes a 1.7 in (4.3 cm) opening. Seven rounds bring the top to 4.9 in (12.4 cm) wide and 4.5 in (11.4 cm) tall. Twenty-two rows bring the back to 8.9 in (22.6 cm). The 22 x 28 pocket covers the lower 5.6 in (14.2 cm), and the 0.25 in (0.6 cm) border finishes the holder at 5.4 in (13.7 cm) x 9.4 in (23.9 cm). Check your measurements at each stage, and the holder will fit together without trouble.
Happy crocheting!