

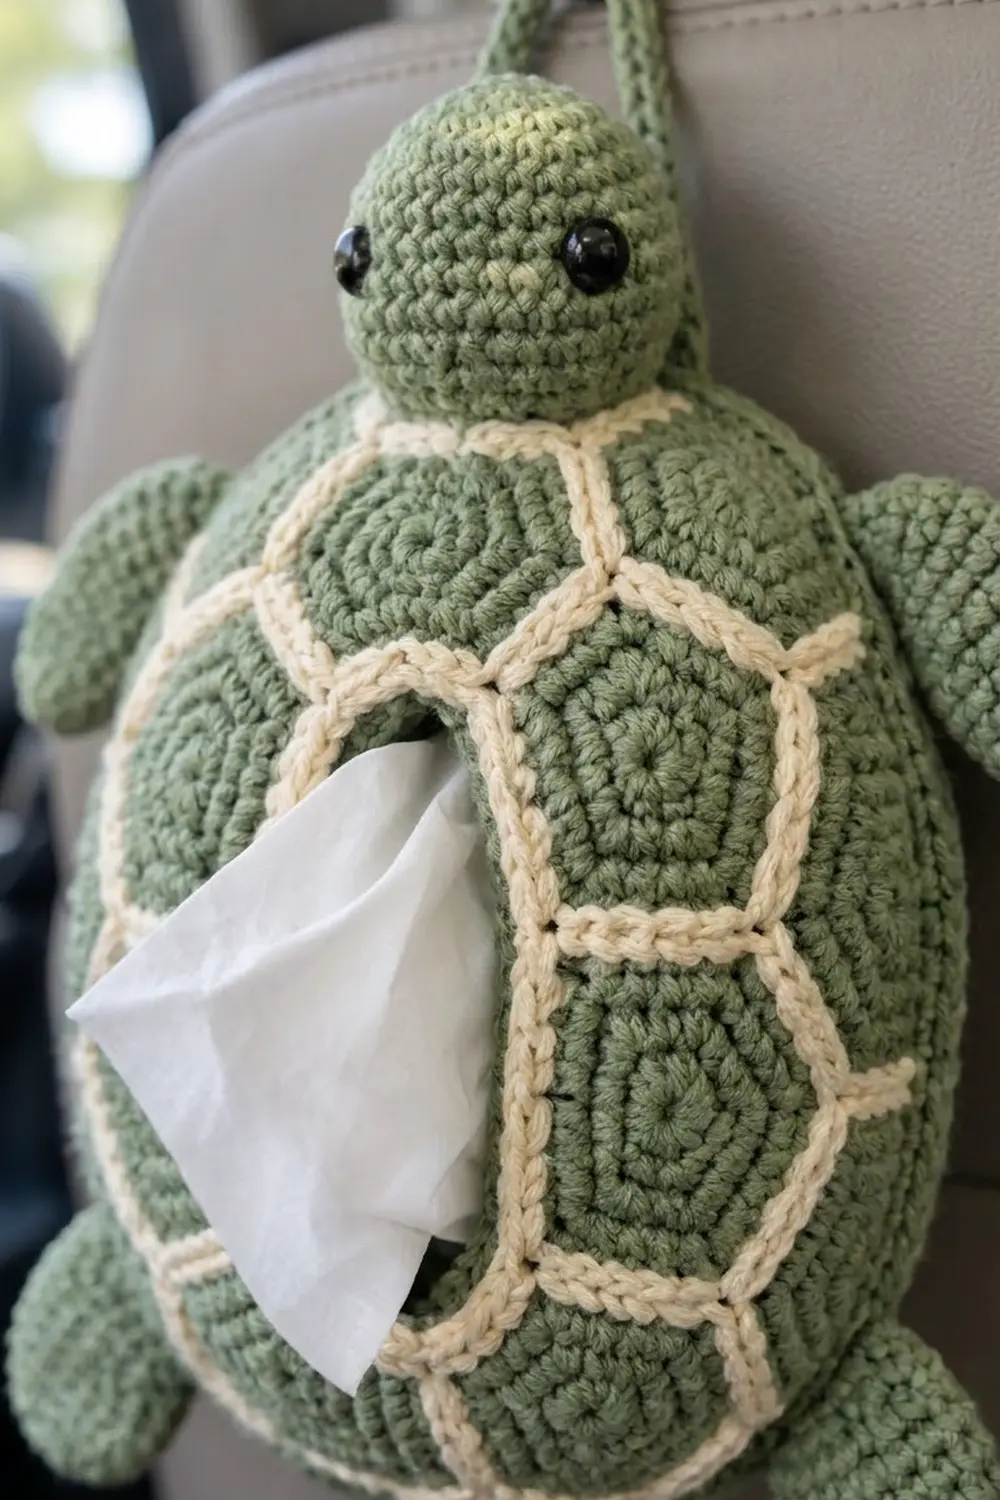
This sea turtle tissue holder hangs from a car headrest and hands out tissues through a slot in its shell. The shell is a honeycomb of sage green hexagons outlined in cream, so the turtle looks clean and graphic but still cute.
There are only three colors: sage green for the body and the hexagon centers, cream for the shell lines, and black safety eyes. The single crochet is worked tight in the amigurumi style, so the dome keeps its shape even when the holder is empty.
This pattern uses US crochet terms. The finished body is about 7 in (17.8 cm) wide, 10 in (25.4 cm) long and 3 in (7.6 cm) deep. The turtle is about 13 in (33.0 cm) from head to tail and 11 in (27.9 cm) across the front flippers.
Here is how it’s built. You make 12 hexagons and join them into a flat panel, leaving out two cells in the center to form the tissue slot. A border then gathers the panel into a dome, and you join it to an oval base. Last, you sew on the head, flippers, tail and strap.
Finished Size and Construction
- Finished size: body 7 x 10 x 3 in (17.8 x 25.4 x 7.6 cm); 13 in (33.0 cm) from head to tail
- Skill level: Intermediate
- Terminology: US crochet terms
- Yarn weight: worsted (#4), cotton or cotton blend
- Hook: 4.0 mm (G-6)
- Number of pieces: 12 hexagons, 1 base, 1 head, 4 flippers, 1 tail, 1 strap
- Layout: 5 columns of flat-top hexagons (2-3-2-3-2), with two center cells left open for the slot
- Piece size: each hexagon is 2.3 in (5.8 cm) flat to flat and 2.7 in (6.9 cm) point to point
- Size before border: the joined panel is about 10.7 x 9.2 in (27.2 x 23.4 cm) laid flat
- Border depth: 6 rounds, about 1.2 in (3.0 cm)
Materials
Choose a smooth worsted cotton or cotton blend. Cotton shows the stitches clearly, holds the dome well, and stands up to sun in the car. Avoid fuzzy yarns, because they blur the cream lines.
- Sage green (Color A): 150 g, about 276 m
- Cream (Color B): 40 g, about 74 m
These quantities include a margin of about 15 percent.
Tools and notions:
- 4.0 mm (G-6) crochet hook
- 9 mm black safety eyes, 1 pair
- About 40 g polyester fiberfill
- Tapestry needle and 8 stitch markers
- Measuring tape, scissors, rustproof pins, spray bottle
Abbreviations (US Terms)
- ch – chain
- sc – single crochet
- sc2tog – single crochet 2 together
- inc – 2 sc in the same stitch
- sl st – slip stitch
- BLO – back loop only
- MR – magic ring
- st(s) – stitch(es)
- Rnd – round
- RS / WS – right side / wrong side
Special stitch: corner (sc, ch 2, sc). Work 1 sc, ch 2, and 1 sc into the same stitch. The ch-2 space is the hexagon’s corner point. It is not counted as a stitch.
Gauge and Checkpoints
Gauge: 18 sc and 20 rounds = 4 in (10.2 cm) with a 4.0 mm hook.
Make one complete hexagon first and measure it before you go on.
- Checkpoint 1, hexagon: 2.3 in (5.8 cm) flat to flat, with 6 sc on each side between the corner spaces.
- Checkpoint 2, joined panel: about 10.7 x 9.2 in (27.2 x 23.4 cm) laid flat.
- Checkpoint 3, border Rnd 1: 182 sc, about 40 in (101.6 cm) around.
- Checkpoint 4, band: 122 sc, about 27 in (68.6 cm) around.
- Checkpoint 5, base: 122 sc, about 6.4 x 9.3 in (16.3 x 23.6 cm).
If your hexagon is larger than 2.4 in (6.1 cm), go down half a hook size. If it’s smaller than 2.2 in (5.6 cm), go up half a size. Change your hook, not your stitch counts, so every join still lines up.
Hexagon (Make 12)
Work in continuous rounds with the RS facing you. Mark the first stitch of each round. Stack each round’s increases directly above the last round’s so the six straight sides form.
Rnd 1 (A): 6 sc in MR. (6 sts)
Rnd 2: Inc in each st around. (12 sts)
Rnd 3: (Sc in next st, inc) 6 times. (18 sts)
Rnd 4 (BLO): (Sc in next 2 sts, inc) 6 times. (24 sts) The unworked front loops make the faint inner ridge.
Rnd 5: (Sc in next 3 sts, inc) 6 times. (30 sts) Sl st in the next st. Fasten off A.
Rnd 6 (B, conversion round): Join B in the first sc after any increase. (Sc in next 4 sts, corner in next st) 6 times. Join with a sl st.
Count: 30 sts are worked 1 per existing stitch, and the corners add 6 extra sc, for a total of 36 sc and 6 ch-2 corner spaces. Each side has 6 sc between its corner spaces: 4 sc plus 1 sc from each corner. On 6 of the hexagons, leave a 12 in (30.5 cm) tail for joining.
Make All Pieces
Hexagons: 12 total. Work Rnds 1-5 in A and Rnd 6 in B.
Layout: Turn each hexagon so it is flat on top and bottom, with a point at each side. Each column sits half a cell higher or lower than the one next to it. “X” is a hexagon and “o” is an empty slot cell.
        Col1  Col2  Col3  Col4  Col5
Row a              X
Row b         X          X
Row c   X          o          X
Row d         X          X
Row e   X          o          X
Row f         X          X
Row g              X
Total: 2 + 3 + 2 (center) + 3 + 2 = 12 hexagons.
Other pieces, all in A: base, head, 2 front flippers, 2 back flippers, tail, strap.
Joining
Method: With the RS facing up, whipstitch with B through the back loops of the Rnd 6 sc on both hexagons. The front loops stay on top and form a single raised cream line.
Stitch-to-stitch logic: Line up the two edges so their corner spaces meet. Sew corner to corner, then each of the 6 sc to its partner, then corner to corner again. Where three hexagons meet, take the needle through all three corner spaces once so no hole is left.
Order: Join the hexagons within each column first, then join the columns to each other. When you finish there should be 18 shared edges. Leave the 10 sides that face the two empty cells unjoined.
Tension: Pull each stitch only until the edges touch. If you pull harder, the seams pucker.
Size checkpoint: The panel should measure about 10.7 in (27.2 cm) across and 9.2 in (23.4 cm) down the center column.
Border
The border completes the cream outline, gathers the panel into a dome, and forms a side wall that matches the base. It uses the main gauge of 18 sc = 4 in (10.2 cm).
Slot Edging
Rnd 1 (B): Join B at an inner corner of the opening. Work 6 sc along each of the 10 open sides and 1 sc in each of the 10 corner points. Count: (10 x 6 = 60) + 10 = 70 sc. Join with a sl st.
Rnd 2 (A): (Sc in next 5 sts, sc2tog) 10 times. (60 sts)
Rnd 3 (A): Sc in each st around. (60 sts) Join and fasten off.
These three rounds take about 0.6 in (1.5 cm) off each side of the opening, which leaves a slot about 3.5 x 1.5 in (8.9 x 3.8 cm).
Outer Border and Side Band
The panel’s outer edge has 26 sides and 26 corner points. Here is the check: 12 hexagons x 6 sides = 72 sides. The 18 seams use 36 of them, which leaves 36 open sides. The slot takes 10 of those, so 26 face outward.
Rnd 1 (B, conversion round): Join B at the center top. Work 6 sc along each outer side and 1 sc in each corner point. Count: (26 x 6 = 156) + 26 = 182 sc. Join. It should measure about 40 in (101.6 cm) around.
Rnd 2 (A): (Sc in next 4 sts, sc2tog) 30 times, sc in last 2 sts. Count: 30 x 5 + 2 = 152 sts.
Rnd 3 (A): (Sc in next 3 sts, sc2tog) 30 times, sc in last 2 sts. Count: 30 x 4 + 2 = 122 sts.
Rnds 4-6 (A): Sc in each st around. (122 sts) Don’t fasten off. Put a marker in the live loop.
Why the math works: Rnds 2 and 3 remove 60 stitches. That pulls the 182-stitch edge in to 122, and the hexagons curve up into a dome. Rnds 4-6 add a straight wall about 0.6 in (1.5 cm) tall. Because the band ends at 122 stitches, the same as the base, the two pieces join one stitch to one stitch with no easing.
Base
Work in A, in continuous rounds.
Foundation: Ch 16.
Rnd 1: Sc in 2nd ch from hook and in next 13 ch, then 3 sc in last ch. Working along the other side of the chain, sc in next 13 ch, then 2 sc in the first ch. Count: 1 + 13 + 3 + 13 + 2 = 32 sts.
Rnd 2: Sc in next 13 sts, (inc) 3 times, sc in next 13 sts, (inc) 3 times. (38 sts)
Rnds 3-16: For round number n, sc in next 13 sts, (sc in next n − 2 sts, inc) 3 times, sc in next 13 sts, (sc in next n − 2 sts, inc) 3 times.
Counts: Rnd 3: 44, Rnd 4: 50, Rnd 5: 56, Rnd 6: 62, Rnd 7: 68, Rnd 8: 74, Rnd 9: 80, Rnd 10: 86, Rnd 11: 92, Rnd 12: 98, Rnd 13: 104, Rnd 14: 110, Rnd 15: 116, Rnd 16: 122.
Check: 32 + (15 x 6) = 122. The base should measure about 6.4 x 9.3 in (16.3 x 23.6 cm). Fasten off.
Join base to band: Hold the base and band with WS together and the long axes lined up. Using the band’s live loop, sc through both layers, 1 to 1, all the way around (122 sts). Fasten off.
Head, Flippers, Tail and Strap
Head (A): Rnd 1: 6 sc in MR (6). Rnd 2: inc around (12). Rnd 3: (sc, inc) x 6 (18). Rnd 4: (sc 2, inc) x 6 (24). Rnd 5: (sc 3, inc) x 6 (30). Rnd 6: (sc 4, inc) x 6 (36). Rnds 7-12: sc around (36). Rnd 13: (sc 4, sc2tog) x 6 (30). Rnd 14: (sc 3, sc2tog) x 6 (24). Set the eyes between Rnds 9 and 10, 7 sts apart. Stuff firmly and leave the head open. It measures about 2.6 in (6.6 cm) across.
Front flipper (make 2): Rnds 1-3 as for the head (18). Rnds 4-14: sc around (18). Rnd 15: (sc, sc2tog) x 6 (12). Stuff lightly, flatten, and sc 6 across through both layers. Each flipper is about 3 in (7.6 cm) long.
Back flipper (make 2): Rnds 1-3 as for the head (18). Rnds 4-8: sc around (18). Rnd 9: (sc, sc2tog) x 6 (12). Flatten and sc 6 across. Each is about 1.8 in (4.6 cm) long.
Tail: Rnd 1: 4 sc in MR (4). Rnd 2: (inc, sc) x 2 (6). Rnd 3: (inc, sc 2) x 2 (8). Rnd 4: sc around (8). Flatten and sc 4 across. It is about 0.8 in (2.0 cm) long.
Strap: Ch 51. Row 1: sc in 2nd ch from hook and in each ch across (50). Ch 1, turn. Row 2: sc across (50). The strip is 11 in (27.9 cm) long and 0.4 in (1.0 cm) wide. Fold it in half to make a 5.5 in (14.0 cm) loop.
Assembly: Sew the head to the center top so it overlaps the top hexagon by 0.5 in (1.3 cm). Sew both strap ends to the base behind the head. Sew the front flippers to the band level with the top of the slot, angled upward. Sew the back flippers level with the bottom of the slot, and the tail at the bottom center.
Final Blocking
- Before you start the border, mist the panel, pin it to the Checkpoint 2 size, and let it dry.
- After assembly, stuff a small towel into the shell to fill out the dome.
- Mist the shell lightly. Smooth the cream lines and square up each hexagon with your fingers.
- Pinch the slot into a neat oval.
- Let it dry for 24 hours, then remove the towel.
Final Quality-Control Checklist
- Every hexagon has 36 sc and 6 corner spaces
- No gaps where three hexagons meet
- The slot edging has 60 sts and the slot is centered
- Border Rnd 1 has 182 sc and the band has 122
- The base has 122 sts and is joined 1 to 1
- The eyes are level and all limbs are secure
- The strap holds the turtle’s weight without stretching
- All ends are woven in
Troubleshooting
- Hexagons look round: your increases drifted. Keep them stacked.
- Panel ripples: your seam tension is uneven. Resew the worst seams.
- Dome is too flat: work border Rnds 2-3 one hook size smaller.
- Band and base counts don’t match: recount the 26 sides and 26 corner points in border Rnd 1.
- Slot is too loose: add one round of (sc 4, sc2tog) x 10 for 50 sts.
- Refilling: take a folded stack of tissues about 7 x 4 x 2 in (17.8 x 10.2 x 5.1 cm) out of its wrapper and ease it in through the slot.
Care
Spot clean with mild soap and cool water, then air dry in the domed shape. Take the tissues out first.

Final Notes
The measurements build on each other. A 2.3 in (5.8 cm) hexagon gives a 10.7 x 9.2 in (27.2 x 23.4 cm) panel. That panel’s 26 outer sides give 182 border stitches, which gather to 122 to match the 122-stitch base. If you check each stage before moving on, the turtle will finish at about 7 x 10 in (17.8 x 25.4 cm), ready to hang.
Happy crocheting!