

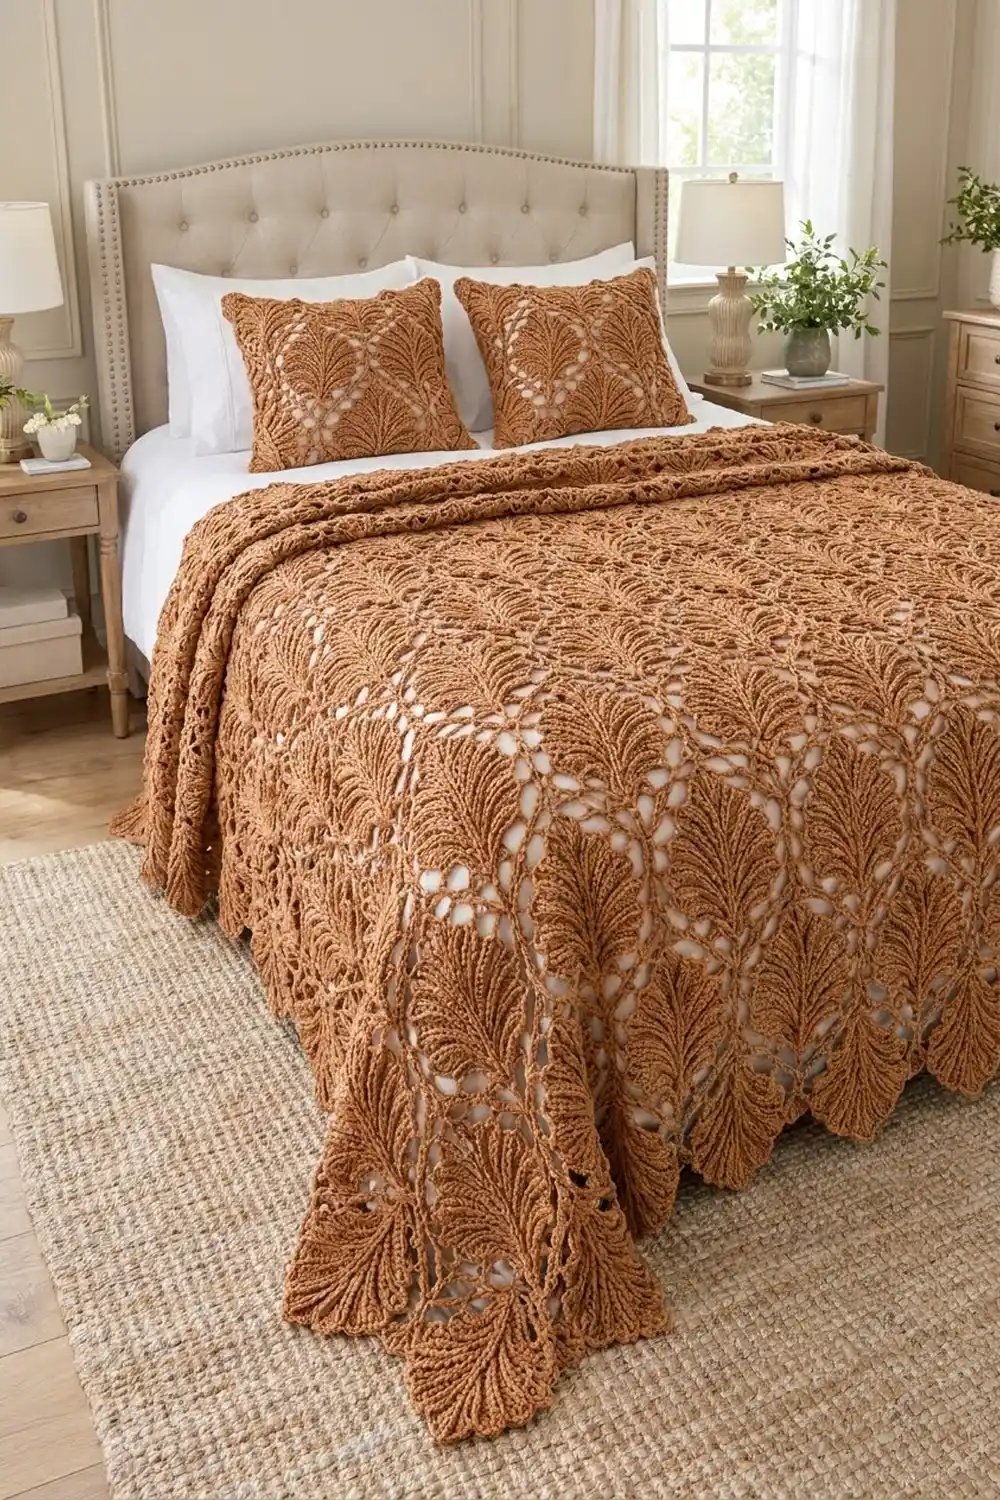
This bedspread pairs solid, textured leaf fans with airy chain lace. Each leaf has raised ribs that spread out from a narrow stem point and end in a row of rounded lobes. Chain loops around each leaf turn it into a square, and the bedding shows through the open lace.
The sample uses one warm cinnamon-caramel color. A single color keeps the look calm and lets the ribbed texture stand out. All instructions use US crochet terms.
The finished bedspread measures 87 x 111 in (221.0 x 281.9 cm) after blocking, including the border. That fits a queen bed with a generous drop.
Here is how it’s built. First you work a ribbed leaf in rows. Four lace rounds then turn it into a 12 in (30.5 cm) square. You join 63 squares, turning every other row upside down so the leaves alternate up and down. A three-round scalloped border finishes the edge.
Finished Size and Construction
- Finished size: 87 x 111 in (221.0 x 281.9 cm)
- Skill level: Intermediate
- Terminology: US crochet terms
- Yarn weight: Worsted (#4)
- Hook: 4.5 mm (US 7)
- Number of pieces: 63 identical squares
- Layout: 7 squares across x 9 squares long
- Square size: 12 x 12 in (30.5 x 30.5 cm), 45 dc per side
- Size before border: 84 x 108 in (213.4 x 274.3 cm)
- Border depth: 1.5 in (3.8 cm) on every side
Materials
Yarn: Use a smooth worsted-weight yarn with good stitch definition, such as a cotton-acrylic or cotton-wool blend. Fuzzy yarns hide the ribs. The sample uses 100 g skeins of about 200 m (219 yd) each.
- Cinnamon / caramel brown: 2,400 g (about 4,800 m / 5,249 yd), which is 24 skeins
These quantities include a margin of about 15%. One square uses about 28 g (56 m). The seams and border use about 300 g (600 m) together.
Tools:
- 4.5 mm (US 7) crochet hook
- Tapestry needle
- 4 stitch markers
- Tape measure
- Blocking mats, rust-proof pins and a spray bottle
Abbreviations (US Terms)
- ch – chain
- sl st – slip stitch
- sc – single crochet
- hdc – half double crochet
- dc – double crochet
- dtr – double treble crochet (yarn over 3 times, then work off the loops in pairs)
- sk – skip
- sp – space
- st(s) – stitch(es)
- RS / WS – right side / wrong side
Special stitches:
- FPdc (front post double crochet): Yarn over, insert the hook from front to back to front around the stitch’s post, then complete a dc.
- BPdc (back post double crochet): Yarn over, insert the hook from back to front to back around the post, then complete a dc. When you work it on a WS row, the rib shows raised on the RS.
Gauge and Checkpoints
Gauge: 15 dc and 8 rows = 4 in (10.2 cm) in plain dc rows, blocked.
Make one complete square first, then block it and measure it. That square is your real gauge swatch.
- After Row 9 (leaf): about 6.5 in (16.5 cm) wide and 4.25 in (10.8 cm) tall.
- After Round 2: about 11 in (27.9 cm) across. The shape will be uneven at this stage.
- After Round 4: 12 in (30.5 cm) square after blocking.
If the square measures 12.5 in (31.8 cm) or more, go down 0.5 mm. If it measures 11.5 in (29.2 cm) or less, go up 0.5 mm. Never change the stitch counts, because the border math depends on exactly 45 dc per side.
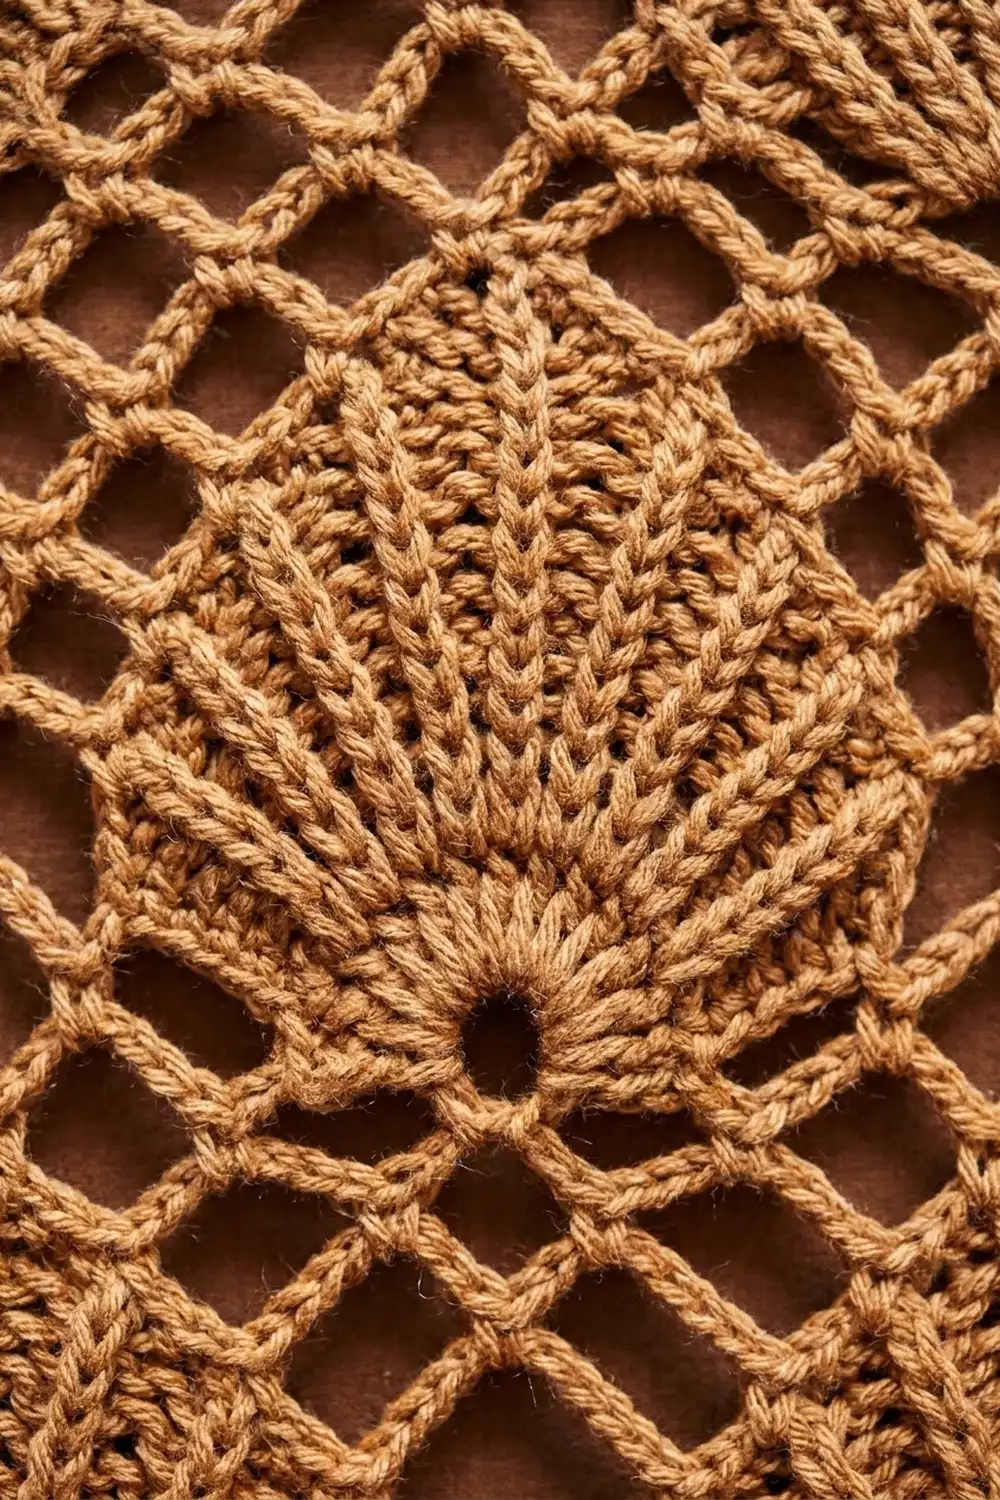
Leaf Square (Make 63)
Leaf
You work the leaf flat in rows, starting from the stem point. The ch-3 at the start of each row counts as a dc.
Row 1 (RS): Make a magic ring. Ch 3, then work 10 dc into the ring. Pull the ring tight and turn. (11 sts)
Row 2 (WS): Ch 3, dc in the first st, BPdc around the next st, 2 dc in the next st; repeat from * 4 more times. Turn. (17 sts: 6 panels of 2 dc, 5 ribs)
Row 3 (RS): Ch 3, dc in the next st, FPdc around the next post st, dc in each of the next 2 sts; repeat from * 4 more times. Turn. (17 sts)
Row 4 (WS): Ch 3, 2 dc in the next st, BPdc around the next post st, dc in the next st, 2 dc in the next st; repeat from * 4 more times. Turn. (23 sts: 6 panels of 3 dc, 5 ribs)
Row 5 (RS): Ch 3, dc in each of the next 2 sts, FPdc around the next post st, dc in each of the next 3 sts; repeat from * 4 more times. Turn. (23 sts)
Row 6 (WS): Ch 3, dc in the next st, 2 dc in the next st, BPdc around the next post st, dc in each of the next 2 sts, 2 dc in the next st; repeat from * 4 more times. Turn. (29 sts: 6 panels of 4 dc, 5 ribs)
Row 7 (RS): Ch 3, dc in each of the next 3 sts, FPdc around the next post st, dc in each of the next 4 sts; repeat from * 4 more times. Turn. (29 sts)
Row 8 (WS): Ch 3, dc in each of the next 2 sts, 2 dc in the next st, BPdc around the next post st, dc in each of the next 3 sts, 2 dc in the next st; repeat from * 4 more times. Turn. (35 sts: 6 panels of 5 dc, 5 ribs)
Row 9 (RS, lobes): Ch 1 (does not count). Sc in the next st, hdc in the next st, 3 dc in the next st, hdc in the next st, sc in the next st, sl st in the next post st; repeat from * 4 more times. Then work sc, hdc, 3 dc, hdc and sc over the last panel. (47 sts: 6 lobes of 7 sts, 5 sl sts) Fasten off.
The leaf now has 5 raised ribs and 6 rounded lobes.
Lace Frame
Hold the leaf RS facing you with the lobes at the top.
Round 1: Join the yarn in the center dc of the right-hand lobe. Ch 1 and sc in the same st. Ch 5, sc in the center dc of the next lobe; repeat from * 4 more times.
Then work down the left edge, around the stem and up the right edge: ch 7, sc in the row end of Row 6, ch 5, sc in the row end of Row 3, ch 7, sc in the magic ring. Ch 7, sc in the row end of Row 3 on the right edge, ch 5, sc in the row end of Row 6, ch 7, and sl st in the first sc. (11 sc, 7 ch-5 loops, 4 ch-7 corner loops)
The ch-5 loops arch over the valleys between the lobes. The rib sl sts are skipped.
Round 2: Sl st into the top-right ch-7 loop, then ch 1.
- Top edge: Work (sc, ch 7, sc) in the top-right loop. Ch 5, sc in the next ch-5 loop; repeat from * 4 more times, then ch 5.
- Left side: Work (sc, ch 7, sc) in the top-left loop. Ch 15, sc in the side ch-5 loop, ch 15.
- Bottom edge: Work (dtr, ch 7, dtr) in the bottom-left loop. Ch 15, sc in the stem sc, ch 15.
- Right side: Work (dtr, ch 7, dtr) in the bottom-right loop. Ch 15, sc in the side ch-5 loop, ch 15. Sl st in the first sc.
The top edge now has 6 ch-5 loops and 5 sc. Each other side has 2 ch-15 loops and 1 sc. The dtr stitches push the lower corners out past the narrow stem.
Round 3: Sl st into the corner loop, then ch 1. In each ch-7 corner loop, work (3 sc, ch 2, 3 sc). Skip the sc or dtr on either side of each corner.
- Top edge: 5 sc in each ch-5 loop and 1 sc in each sc between loops. That gives (6 x 5) + 5 = 35 sts.
- Each other side: 17 sc in each ch-15 loop and 1 sc in the middle sc. That gives (2 x 17) + 1 = 35 sts.
Join with a sl st. (41 sc per side between corner ch-2 sps: 3 + 35 + 3; 164 sc in total)
Round 4: Ch 3 (counts as dc). Dc in each sc. In each corner ch-2 sp, work (2 dc, ch 2, 2 dc). Join with a sl st and fasten off. (45 dc per side between corner ch-2 sps: 2 + 41 + 2; 180 dc in total)
The 45 dc on each side already include the corner dc on both ends. The ch-2 corner spaces are counted separately. Weave in the ends.
Make All Pieces
Make 63 squares in cinnamon, about 28 g (56 m) each. Lightly block each one to 12 in (30.5 cm).
Lay them out in 7 columns and 9 rows. U means the leaf points up (lobes at the top). D means the square is turned 180°.
Row 1: U U U U U U U
Row 2: D D D D D D D
Row 3: U U U U U U U
Row 4: D D D D D D D
Row 5: U U U U U U U
Row 6: D D D D D D D
Row 7: U U U U U U U
Row 8: D D D D D D D
Row 9: U U U U U U U
With the rows alternating, the leaves form the up-and-down rhythm you see in the photo.
Joining
Method: Slip stitch join through the outer loops.
- Hold two squares RS together. Insert the hook through the outer loop of each edge stitch.
- Sl st through both corner ch-2 spaces. Then work 1 sl st in each matching pair of dc (45 in total), and end with a sl st through the next pair of corner spaces.
- Join stitch to stitch: dc 1 goes to dc 1 and dc 45 goes to dc 45. Nothing is added or skipped.
- Join all the horizontal seams first, then the vertical seams. Carry the yarn straight across each four-corner meeting point.
Tension: Keep the sl sts loose, about as wide as a dc. If a seam is shorter than an unjoined edge, go up 0.5 mm for joining.
Checkpoint: The joined panel should measure 84 x 108 in (213.4 x 274.3 cm).
Border
Border gauge: Same as the squares, 15 dc = 4 in (10.2 cm). One scallop repeat covers 6 sts, about 1.6 in (4.1 cm).
Round 1: Join the yarn in any outer corner ch-2 sp. Ch 3 (counts as dc), then work (ch 2, dc) in the same sp. Dc in each dc along each side. At each seam, go straight from the last dc of one square to the first dc of the next. Work nothing into the joined corner spaces. In each outer corner, work (dc, ch 2, dc). Join with a sl st.
- Short sides: (7 x 45) + 2 = 317 dc between corner ch-2 sps
- Long sides: (9 x 45) + 2 = 407 dc between corner ch-2 sps
Round 2 (scallops): Sl st into the corner sp. Ch 3, then work (3 dc, ch 2, 4 dc) in the same sp. That is the corner shell.
Along each side: sk 2 sts, sc in the next st, sk 2 sts, 7 dc in the next st, sk 2 sts, sc in the next st. Repeat from * 52 times on the short sides and 67 times on the long sides. Then sk 2 sts and work (4 dc, ch 2, 4 dc) in the next corner sp. Join with a sl st.
- Short sides: 2 + 1 + (52 x 6) + 2 = 317 sts used, giving 52 shells
- Long sides: 2 + 1 + (67 x 6) + 2 = 407 sts used, giving 67 shells
Round 3 (picot rim): Ch 1.
- Each 7-dc shell: Sc in each of the first 3 dc, (sc, ch 3, sc) in the center dc, then sc in each of the last 3 dc.
- Between shells: Sl st in each sc.
- Each corner shell: Sc in each of the 4 dc, (sc, ch 3, sc) in the ch-2 sp, then sc in each of the 4 dc.
Join with a sl st and fasten off.
Why the math works: Each square has 45 sts per side, and both side lengths use an odd number of squares (7 and 9). So 315 and 405 each leave a remainder of 3 when divided by 6. The 2 corner dc from Round 1 bring the totals to 317 and 407. Both equal 6 x a whole number + 5, which is exactly what the scallop sequence needs: 2 skipped + 1 sc + full repeats + 2 skipped. Every side ends cleanly at its corner shell. The border adds 1.5 in (3.8 cm) per side, so the finished size is 87 x 111 in (221.0 x 281.9 cm).
Final Blocking
- Lay the bedspread flat on mats or on a carpet covered with towels.
- Mist it evenly until it is damp but not dripping.
- Pin the edges straight to 87 x 111 in (221.0 x 281.9 cm). Check that both diagonals match.
- Pin each scallop out at its picot.
- Open the chain lace with your fingers so no loops are twisted.
- Push the leaf ribs up gently.
- Let it dry completely, usually 24–48 hours, before you unpin.
Final Quality-Control Checklist
- [ ] Every leaf has 5 raised ribs and 6 lobes.
- [ ] Every square has 45 dc per side and measures 12 in (30.5 cm).
- [ ] The leaf rows alternate up and down.
- [ ] All seams are stitch to stitch and lie flat.
- [ ] Border Round 1 has 317 / 407 dc per side.
- [ ] There are 52 / 67 shells per side.
- [ ] The finished size is 87 x 111 in (221.0 x 281.9 cm).
- [ ] All ends are woven into solid stitches.
Troubleshooting
- The ribs sink: Use BPdc on WS rows and FPdc on RS rows.
- The leaf cups: Loosen your tension in Rows 6–8.
- The lower corners pull in: Check that you worked dtr, not tr, at the bottom corners, and pin them firmly when you block.
- Round 3 ruffles: Chain more loosely in Round 2.
- The border ripples or cups: Go down or up 0.5 mm for Round 2 only.
- Seams form ridges: Join with the RS together, through the outer loops only.
Care
Hand wash, or machine wash cold on a gentle cycle inside a large mesh bag. Dry it flat and reshape it while damp. Never hang it wet.
Final Notes
The size depends on each stage matching the one before it. If the gauge is 15 dc = 4 in (10.2 cm), each leaf blocks to 6.5 in (16.5 cm). Each square then blocks to 12 in (30.5 cm) with 45 dc per side. The 63 squares join into 84 x 108 in (213.4 x 274.3 cm). The 1.5 in (3.8 cm) border brings the bedspread to 87 x 111 in (221.0 x 281.9 cm).
Happy crocheting!